User Manual
Page 2
... that software will be error free or operate without interruption. Fluke Corporation P.O. The warranty period is submitted for importation costs of repair/replacement parts when product purchased in one country is two years and begins on non-defective media. This warranty extends only to the original buyer or end-user customer of a Fluke authorized reseller, and does not apply to fuses, disposable batteries...
... that software will be error free or operate without interruption. Fluke Corporation P.O. The warranty period is submitted for importation costs of repair/replacement parts when product purchased in one country is two years and begins on non-defective media. This warranty extends only to the original buyer or end-user customer of a Fluke authorized reseller, and does not apply to fuses, disposable batteries...

User Manual
Page 4
... Memory Card 15 Temperature Measurement 15 Menus ...16 Measurement Menu 16 Range...16 Emissivity Adjustment 18 Background (Reflected Background Temperature Compensation 19 Transmission/Transmittance Adjustment 19 Spot Temperatures 20 User-Definable Spot Markers 20 Center Box ...21 Image Menu ...22 Palettes ...22 IR-Fusion® Technology 23 Color Alarms ...24 Display Graphics Presentation 26 Logo ...26 Camera Menu ...27 Backlight...27 Video ...27 Auto...
... Memory Card 15 Temperature Measurement 15 Menus ...16 Measurement Menu 16 Range...16 Emissivity Adjustment 18 Background (Reflected Background Temperature Compensation 19 Transmission/Transmittance Adjustment 19 Spot Temperatures 20 User-Definable Spot Markers 20 Center Box ...21 Image Menu ...22 Palettes ...22 IR-Fusion® Technology 23 Color Alarms ...24 Display Graphics Presentation 26 Logo ...26 Camera Menu ...27 Backlight...27 Video ...27 Auto...
User Manual
Page 13
... resume operation. Radio Frequency Data The Imager ships with the radio disabled. See Imager Information for instructions on the Imager. These objects pose a burn hazard. • Do not use the Product if it is damaged. • See emissivity information for Class A. 3 See Wireless Connectivity for instructions on how to access digital copies of the radio licenses on how to the camera, do not point directly at...
... resume operation. Radio Frequency Data The Imager ships with the radio disabled. See Imager Information for instructions on the Imager. These objects pose a burn hazard. • Do not use the Product if it is damaged. • See emissivity information for Class A. 3 See Wireless Connectivity for instructions on how to access digital copies of the radio licenses on how to the camera, do not point directly at...
User Manual
Page 15
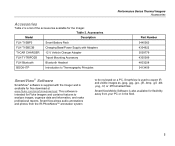
...; Software SmartView® software is supplied with Adapters TI-CAR CHARGER 12 V Vehicle Charger Adapter FLK-TI-TRIPOD3 Tripod Mounting Accessory FLK-Bluetooth Bluetooth Headset BOOK-ITP Introduction to analyze images, organize data and information, and make professional reports. Accessories Model Description FLK-TI-SBP3 Smart Battery Pack FLK-TI-SBC3B Charging Base/Power Supply with the Imager and is available for free download at www.fluke.com/smartviewdownload. SmartView is used to be reviewed...
...; Software SmartView® software is supplied with Adapters TI-CAR CHARGER 12 V Vehicle Charger Adapter FLK-TI-TRIPOD3 Tripod Mounting Accessory FLK-Bluetooth Bluetooth Headset BOOK-ITP Introduction to analyze images, organize data and information, and make professional reports. Accessories Model Description FLK-TI-SBP3 Smart Battery Pack FLK-TI-SBC3B Charging Base/Power Supply with the Imager and is available for free download at www.fluke.com/smartviewdownload. SmartView is used to be reviewed...
User Manual
Page 16
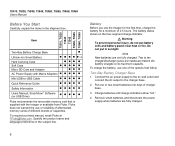
..., TiS65 Users Manual Before You Start Carefully unpack the items in the shipment box: TiS10, TiS20 TiS40 TiS45 TiS50, TiS55 TiS60, TiS65 Item Two-Bay Battery Charge Base • Lithium-ion Smart Battery x2 Hard Carrying Case Soft Case Micro SD Card and Adapter •• • AC Power Supply with Mains Adapters Mini USB-to-USB Cable Quick Reference Guide Safety Information Users Manual, SmartView Software (on the...
..., TiS65 Users Manual Before You Start Carefully unpack the items in the shipment box: TiS10, TiS20 TiS40 TiS45 TiS50, TiS55 TiS60, TiS65 Item Two-Bay Battery Charge Base • Lithium-ion Smart Battery x2 Hard Carrying Case Soft Case Micro SD Card and Adapter •• • AC Power Supply with Mains Adapters Mini USB-to-USB Cable Quick Reference Guide Safety Information Users Manual, SmartView Software (on the...
User Manual
Page 18
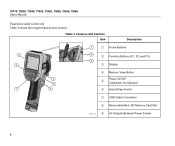
Features and Controls Item Description 7 Arrow Buttons 3 2 4 5 1 6 8 Function Buttons (F1, F2, and F3) 9 Display Memory View Button Power On/Off Calibration-On-Demand Hand Strap Anchor USB Cable Connection Removable Micro SD Memory Card Slot hxk001.eps AC Adapter/External Power Socket 8 TiS10, TiS20, TiS40, TiS45, TiS50, TiS55, TiS60, TiS65 Users Manual Features and Controls Table 3 shows the Imager features and controls. Table 3.
Features and Controls Item Description 7 Arrow Buttons 3 2 4 5 1 6 8 Function Buttons (F1, F2, and F3) 9 Display Memory View Button Power On/Off Calibration-On-Demand Hand Strap Anchor USB Cable Connection Removable Micro SD Memory Card Slot hxk001.eps AC Adapter/External Power Socket 8 TiS10, TiS20, TiS40, TiS45, TiS50, TiS55, TiS60, TiS65 Users Manual Features and Controls Table 3 shows the Imager features and controls. Table 3.

User Manual
Page 20
..., more information about how to memory by the next automatic calibration. The laser dot cannot be required. The smaller, black trigger is to wait a minimum of the IR-Fusion image if obscured by environmental conditions. The laser dot does not appear on an infrared-only image, but does on supported models. For more adjustment time can often...
..., more information about how to memory by the next automatic calibration. The laser dot cannot be required. The smaller, black trigger is to wait a minimum of the IR-Fusion image if obscured by environmental conditions. The laser dot does not appear on an infrared-only image, but does on supported models. For more adjustment time can often...

User Manual
Page 21
...the menu structure to set the change and go back to the previous menu. to cancel the change and go back to the live Manual Mode, the arrow buttons are the primary controls. See page 29 for more information ...alarms • User-selectable backlight setting • Graphic information display (selectable) Performance Series Thermal Imagers Before You Start In general, push: 1 to set the change and go back to the live view. to set the features. In live view. Do not point the laser directly at persons or animals or indirectly off reflective surfaces. Control Buttons...
...the menu structure to set the change and go back to the previous menu. to cancel the change and go back to the live Manual Mode, the arrow buttons are the primary controls. See page 29 for more information ...alarms • User-selectable backlight setting • Graphic information display (selectable) Performance Series Thermal Imagers Before You Start In general, push: 1 to set the change and go back to the live view. to set the features. In live view. Do not point the laser directly at persons or animals or indirectly off reflective surfaces. Control Buttons...

User Manual
Page 22
...digital photos. To change the file format, see File Format on the selected file format settings, the Imager shows the captured image and a menu bar. Examples of possible annotations include motor name plates, printed information or warning signs, larger views of a function button. TiS10, TiS20, TiS40, TiS45, TiS50, TiS55, TiS60, TiS65 Users Manual How to Use...again or 3 to return to the buttons. The text labels on the model, use the buttons for date, time, language, units, file format • Information about the Imager To open the primary menu. • Push WXYZ to cycle ...
...digital photos. To change the file format, see File Format on the selected file format settings, the Imager shows the captured image and a menu bar. Examples of possible annotations include motor name plates, printed information or warning signs, larger views of a function button. TiS10, TiS20, TiS40, TiS45, TiS50, TiS55, TiS60, TiS65 Users Manual How to Use...again or 3 to return to the buttons. The text labels on the model, use the buttons for date, time, language, units, file format • Information about the Imager To open the primary menu. • Push WXYZ to cycle ...

User Manual
Page 24
...2. Push to see the image on page 29 to set Audio. 4. A Bluetooth headset is now in the Review Image Files section on the display. 2. This feature may not be enabled for voice (audio) annotation. Push W/X to highlight an option. 5. Push W/X ...use the Imager to the live view. 14 The voice (audio) recording replays through a Bluetooth headset or when you save the image as change the palette and IR Fusion mode. TiS10, TiS20, TiS40, TiS45, TiS50, TiS55, TiS60, TiS65 Users Manual Listen to open the EDIT IMAGE menu. 4. Push 1 to save a file, use SmartView software...
...2. Push to see the image on page 29 to set Audio. 4. A Bluetooth headset is now in the Review Image Files section on the display. 2. This feature may not be enabled for voice (audio) annotation. Push W/X to highlight an option. 5. Push W/X ...use the Imager to the live view. 14 The voice (audio) recording replays through a Bluetooth headset or when you save the image as change the palette and IR Fusion mode. TiS10, TiS20, TiS40, TiS45, TiS50, TiS55, TiS60, TiS65 Users Manual Listen to open the EDIT IMAGE menu. 4. Push 1 to save a file, use SmartView software...

User Manual
Page 26
... back to toggle between Auto Range and Manual Range. Fast Auto Rescale When in Manual Range and NOT in a menu mode, push 1 for TiS10, TiS20, TiS40, TiS45, TiS50, TiS55, TiS60, TiS65 Users Manual Menus The menus are the access points for thermal image display, camera features, memory setup, and settings for manual adjustment. Push W/X to highlight Set Level/Span. 5. Push W/X to view the menu. 6. Push 1 to set the change and go back to...
... back to toggle between Auto Range and Manual Range. Fast Auto Rescale When in Manual Range and NOT in a menu mode, push 1 for TiS10, TiS20, TiS40, TiS45, TiS50, TiS55, TiS60, TiS65 Users Manual Menus The menus are the access points for thermal image display, camera features, memory setup, and settings for manual adjustment. Push W/X to highlight Set Level/Span. 5. Push W/X to view the menu. 6. Push 1 to set the change and go back to...

User Manual
Page 27
... the live manual mode, the arrow buttons are always available to adjust the level and span. Performance Series Thermal Imagers Menus Temperature Span for Manual Operation Mode When put into manual ranging, the level setting moves the thermal span up or down within the total temperature range. While you adjust the manual level, the scale along the right side of the display shows the...
... the live manual mode, the arrow buttons are always available to adjust the level and span. Performance Series Thermal Imagers Menus Temperature Span for Manual Operation Mode When put into manual ranging, the level setting moves the thermal span up or down within the total temperature range. While you adjust the manual level, the scale along the right side of the display shows the...

User Manual
Page 32
... presentation modes are more suitable for different features used in .avi format will retain image settings at the time of colors. Still images saved in .bmp or .jpg format, as well as video saved in the presentation of detail. Table 4. TiS10 TiS20 TiS40, TiS45 TiS50, TiS55 TiS60, TiS65 TiS10, TiS20, TiS40, TiS45, TiS50, TiS55, TiS60, TiS65 Users Manual Image Menu...
... presentation modes are more suitable for different features used in .avi format will retain image settings at the time of colors. Still images saved in .bmp or .jpg format, as well as video saved in the presentation of detail. Table 4. TiS10 TiS20 TiS40, TiS45 TiS50, TiS55 TiS60, TiS65 TiS10, TiS20, TiS40, TiS45, TiS50, TiS55, TiS60, TiS65 Users Manual Image Menu...

User Manual
Page 40
... consolidation of stored data, "save to" location choice, auto off or on most PC and MAC systems without special software. Certificates and licenses are more flexible for user preferences such as model number, serial number, and firmware versions. File Format Data can be emailed and then opened on . For situations where a smaller file size with SmartView and Fluke Connect Software. Push W/X to Settings > Units. 2. The .is2 file...
... consolidation of stored data, "save to" location choice, auto off or on most PC and MAC systems without special software. Certificates and licenses are more flexible for user preferences such as model number, serial number, and firmware versions. File Format Data can be emailed and then opened on . For situations where a smaller file size with SmartView and Fluke Connect Software. Push W/X to Settings > Units. 2. The .is2 file...
User Manual
Page 41
... has several settings for the LCD and power. Push W/X to highlight Set Date. 5. Time displays in one of two formats: MM/DD/YY or DD/MM/YY. Push to open the Set Date menu. 6. Push W/X to set the date and exit the menu. Push W/X to change the settings. 8. Push to set the timer between 1 minute and 120 minutes. 4. Time To set the Auto Off...
... has several settings for the LCD and power. Push W/X to highlight Set Date. 5. Time displays in one of two formats: MM/DD/YY or DD/MM/YY. Push to open the Set Date menu. 6. Push W/X to set the date and exit the menu. Push W/X to change the settings. 8. Push to set the timer between 1 minute and 120 minutes. 4. Time To set the Auto Off...
User Manual
Page 42
... use wireless connectivity. Push Y/Z to Settings > Language. 2. Push W or X to set the change. Push to register at www.fluke.com and enable the radio. 32 2. The Imager ships with Fluke Connect™ or SmartView Analysis and Reporting software if installed in the Imager and prompts you to set the time as AM or PM. 7. To enable the radio: 1. Type the registration information into SmartView. TiS10, TiS20...
... use wireless connectivity. Push Y/Z to Settings > Language. 2. Push W or X to set the change. Push to register at www.fluke.com and enable the radio. 32 2. The Imager ships with Fluke Connect™ or SmartView Analysis and Reporting software if installed in the Imager and prompts you to set the time as AM or PM. 7. To enable the radio: 1. Type the registration information into SmartView. TiS10, TiS20...

User Manual
Page 43
... capture the image. Enter a password if you can show images from the list. Push W or X to select the new storage setting. Push to change the setting. 3. More information about how to the Fluke Connect App and select "Thermal Imager" from your infrared camera on the Imager. 5. Go to enable the Imager radio is a system that wirelessly connects your Fluke test tools with Apple...
... capture the image. Enter a password if you can show images from the list. Push W or X to select the new storage setting. Push to change the setting. 3. More information about how to the Fluke Connect App and select "Thermal Imager" from your infrared camera on the Imager. 5. Go to enable the Imager radio is a system that wirelessly connects your Fluke test tools with Apple...
User Manual
Page 47
It will need two to ten charging cycles for an extended period. • Connect the battery charger to the mains power outlet before the Product or battery. • Use only Fluke approved power adapters to charge the battery. • Keep cells and battery packs clean and dry. Performance Series Thermal Imagers Maintenance To get the best performance from the lithium-ion battery: • Do...
It will need two to ten charging cycles for an extended period. • Connect the battery charger to the mains power outlet before the Product or battery. • Use only Fluke approved power adapters to charge the battery. • Keep cells and battery packs clean and dry. Performance Series Thermal Imagers Maintenance To get the best performance from the lithium-ion battery: • Do...
User Manual
Page 48
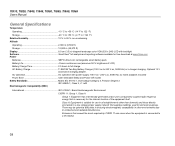
... for free download at www.fluke.com Power Batteries SBP3 Lithium-ion rechargeable smart battery pack Battery Life 4 hours continuous use (assumes 50 % brightness of LCD) Battery Charge Time 2.5 hours to full charge AC Battery Charge Ti SBC3B Two Bay Battery Charger (100 V ac to 240 V ac, 50/60 Hz) or in-Imager charging. TiS10, TiS20, TiS40, TiS45, TiS50, TiS55, TiS60, TiS65 Users Manual General Specifications Temperature Operating...
... for free download at www.fluke.com Power Batteries SBP3 Lithium-ion rechargeable smart battery pack Battery Life 4 hours continuous use (assumes 50 % brightness of LCD) Battery Charge Time 2.5 hours to full charge AC Battery Charge Ti SBC3B Two Bay Battery Charger (100 V ac to 240 V ac, 50/60 Hz) or in-Imager charging. TiS10, TiS20, TiS40, TiS45, TiS50, TiS55, TiS60, TiS65 Users Manual General Specifications Temperature Operating...

User Manual
Page 51
... and review selection Video Recording (TiS60, TiS65) Standard, Non-Radiometric Viewable through Smart View software, Windows Media Player, QuickTime, and on the SD memory card. 41 Performance Series Thermal Imagers Detailed Specifications Level and Span Smooth Auto-Scaling and Manual scaling of images that can vary the total number of level and span Fast auto setting/switching between manual and auto modes Fast auto rescale in manual mode Minimum Span (in manual mode 2.5 °...
... and review selection Video Recording (TiS60, TiS65) Standard, Non-Radiometric Viewable through Smart View software, Windows Media Player, QuickTime, and on the SD memory card. 41 Performance Series Thermal Imagers Detailed Specifications Level and Span Smooth Auto-Scaling and Manual scaling of images that can vary the total number of level and span Fast auto setting/switching between manual and auto modes Fast auto rescale in manual mode Minimum Span (in manual mode 2.5 °...


