User Manual
Page 2
... non-defective media. To obtain warranty service, contact your product online, visit register.fluke.com P.O. Fluke Corporation P.O. Parts, product repairs, and services are warranted for damage in Fluke's opinion, has been misused, altered, neglected, contaminated, or damaged by a court or other provision. Warranty support is available only if product is submitted for 90 days and that software will be error free or operate without...
... non-defective media. To obtain warranty service, contact your product online, visit register.fluke.com P.O. Fluke Corporation P.O. Parts, product repairs, and services are warranted for damage in Fluke's opinion, has been misused, altered, neglected, contaminated, or damaged by a court or other provision. Warranty support is available only if product is submitted for 90 days and that software will be error free or operate without...

User Manual
Page 3
... Contacting Fluke 1-2 Safety Information 1-2 Standard Accessories 1-4 Charge and Insert Battery 1-6 Power Camera On 1-7 Insert Memory Card 1-8 Focus...1-8 Set Temperature Level and Span 1-9 Set IR-Fusion® Blend Level 1-9 Capturing an Image 1-10 SmartView Software for Your PC 1-11 2 Camera Overview 2-1 Introduction 2-1 Camera Parts 2-2 Camera Display Screen 2-6 Programming Function Buttons 2-10 Using Display Screen Menus 2-12 Inserting and Removing Memory Card 2-13 3 Basic Operation 3-1 Acquiring and Reviewing Images 3-1 Scan Target 3-1 Pause/Save Image 3-1 View Saved...
... Contacting Fluke 1-2 Safety Information 1-2 Standard Accessories 1-4 Charge and Insert Battery 1-6 Power Camera On 1-7 Insert Memory Card 1-8 Focus...1-8 Set Temperature Level and Span 1-9 Set IR-Fusion® Blend Level 1-9 Capturing an Image 1-10 SmartView Software for Your PC 1-11 2 Camera Overview 2-1 Introduction 2-1 Camera Parts 2-2 Camera Display Screen 2-6 Programming Function Buttons 2-10 Using Display Screen Menus 2-12 Inserting and Removing Memory Card 2-13 3 Basic Operation 3-1 Acquiring and Reviewing Images 3-1 Scan Target 3-1 Pause/Save Image 3-1 View Saved...
User Manual
Page 4
... Using Menu to Adjust Color Alarm Ranges 5-8 Using Palette Bar to Adjust Color Alarm Ranges 5-9 6 Camera Setup 6-1 Adjusting Display Screen Brightness 6-1 Hiding Display Screen Task Bar 6-2 Hiding Display Screen Color Palette 6-2 Setting Temperature Units 6-3 Setting Temperature Calibration Range 6-3 Changing Lens Selection 6-3 Setting Date and Time 6-4 Changing the Language 6-6 Saving and Reloading Camera Settings 6-6 Naming Image Files 6-7 Changing Image File Name Prefix 6-8 Resetting Image File Name Sequence Number 6-9 Selecting Video Output Options 6-9 7 Advanced Operation...
... Using Menu to Adjust Color Alarm Ranges 5-8 Using Palette Bar to Adjust Color Alarm Ranges 5-9 6 Camera Setup 6-1 Adjusting Display Screen Brightness 6-1 Hiding Display Screen Task Bar 6-2 Hiding Display Screen Color Palette 6-2 Setting Temperature Units 6-3 Setting Temperature Calibration Range 6-3 Changing Lens Selection 6-3 Setting Date and Time 6-4 Changing the Language 6-6 Saving and Reloading Camera Settings 6-6 Naming Image Files 6-7 Changing Image File Name Prefix 6-8 Resetting Image File Name Sequence Number 6-9 Selecting Video Output Options 6-9 7 Advanced Operation...

User Manual
Page 9
Standard Accessories 1-5 1-2. Camera Bottom View 2-3 2-4. Camera Display Screen--Example 1 2-6 2-5. Camera Display Screen--Example 2 2-7 2-6. Camera Display Screen--Example 3 2-7 2-7. Inserting and Removing a Memory Card 2-13 5-1. Inserting a Memory Card 1-8 1-5. Capturing an Image 1-11 2-1. Inserting the Battery 1-7 1-3. Setting the Level and Span 1-9 1-7. Setting the IR-Fusion® Blend Level 1-10 1-8. Focusing the Camera 1-8 1-6. Turning the Power On and Off 1-7 1-4. Aligning the 20-mm Lens 5-2 vii Camera Back View 2-3 2-2. List of Figures ...
Standard Accessories 1-5 1-2. Camera Bottom View 2-3 2-4. Camera Display Screen--Example 1 2-6 2-5. Camera Display Screen--Example 2 2-7 2-6. Camera Display Screen--Example 3 2-7 2-7. Inserting and Removing a Memory Card 2-13 5-1. Inserting a Memory Card 1-8 1-5. Capturing an Image 1-11 2-1. Inserting the Battery 1-7 1-3. Setting the Level and Span 1-9 1-7. Setting the IR-Fusion® Blend Level 1-10 1-8. Focusing the Camera 1-8 1-6. Turning the Power On and Off 1-7 1-4. Aligning the 20-mm Lens 5-2 vii Camera Back View 2-3 2-2. List of Figures ...

User Manual
Page 16
... use . Standard Accessories Number Description A Portable Infrared Camera with Lens Cap B Camera Carrying Case C LCD Cleaning Cloth D AC adapters (2) or equivalent E Auxiliary AC Power Supply (TiR2, TiR4, Ti45 and Ti55 only) or equivalent F AC Patch Cord or equivalent G Neck Strap H Video Cable I AC Power Supply J Battery Charger K Compact Flash Memory Card L Two Rechargeable Batteries M Multifunction Memory Card Reader with USB Adapter N Getting Started Guide O SmartView® Software CD (includes SmartView Users Manual) P FlexCam Documentation CD (Users...
... use . Standard Accessories Number Description A Portable Infrared Camera with Lens Cap B Camera Carrying Case C LCD Cleaning Cloth D AC adapters (2) or equivalent E Auxiliary AC Power Supply (TiR2, TiR4, Ti45 and Ti55 only) or equivalent F AC Patch Cord or equivalent G Neck Strap H Video Cable I AC Power Supply J Battery Charger K Compact Flash Memory Card L Two Rechargeable Batteries M Multifunction Memory Card Reader with USB Adapter N Getting Started Guide O SmartView® Software CD (includes SmartView Users Manual) P FlexCam Documentation CD (Users...

User Manual
Page 27
... are aiming the camera towards. R Video port - U Neck strap mount - V Tripod mount - Fluke 7-volt lithium-ion battery for mounting camera on tripod. P Laser - S CompactFlash memory card slot - Standard 1/4-20 threaded hole for primary power. 2-5 Adjustable strap for CompactFlash memory card. The torch and flash can be enabled at the same time. Also Q used to connect camera to scan target mode. Used to pause and/or save an image frame. Ejection button and slot...
... are aiming the camera towards. R Video port - U Neck strap mount - V Tripod mount - Fluke 7-volt lithium-ion battery for mounting camera on tripod. P Laser - S CompactFlash memory card slot - Standard 1/4-20 threaded hole for primary power. 2-5 Adjustable strap for CompactFlash memory card. The torch and flash can be enabled at the same time. Also Q used to connect camera to scan target mode. Used to pause and/or save an image frame. Ejection button and slot...

User Manual
Page 30
.... K Time - click to change time. Used to change button function. Palette used in displayed image; click number to display camera temperature units; J Date - Image name created from current battery charge. 2-8 M Power source - Level and Span - Click to scroll to change the emissivity value. Display Screen - Click icon to the next or the previous image. F Browse image arrows - Current 24-hour time; TiR2,TiR3,TiR4,Ti40,Ti45,Ti50,Ti55 Users Manual...
.... K Time - click to change time. Used to change button function. Palette used in displayed image; click number to display camera temperature units; J Date - Image name created from current battery charge. 2-8 M Power source - Level and Span - Click to scroll to change the emissivity value. Display Screen - Click icon to the next or the previous image. F Browse image arrows - Current 24-hour time; TiR2,TiR3,TiR4,Ti40,Ti45,Ti50,Ti55 Users Manual...
User Manual
Page 32
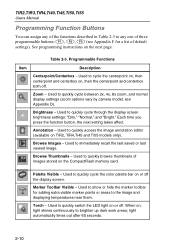
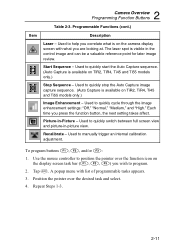
... display screen brightness settings: "Dim," "Normal," and "Bright." Browse Thumbnails - Torch - Table 2-3. Each time you press the function button, the next setting takes affect. Zoom - Marker Toolbar Visible - Used to quickly access the image annotation editor (available on the CompactFlash memory card. Used to show or hide the marker toolbar for a list of default settings). TiR2,TiR3,TiR4,Ti40,Ti45,Ti50,Ti55 Users Manual Programming Function Buttons...
... display screen brightness settings: "Dim," "Normal," and "Bright." Browse Thumbnails - Torch - Table 2-3. Each time you press the function button, the next setting takes affect. Zoom - Marker Toolbar Visible - Used to quickly access the image annotation editor (available on the CompactFlash memory card. Used to show or hide the marker toolbar for a list of default settings). TiR2,TiR3,TiR4,Ti40,Ti45,Ti50,Ti55 Users Manual Programming Function Buttons...
User Manual
Page 33
... Ti55 models only.) Image Enhancement - The laser spot is on the display screen task bar (A, B, C) you press the function button, the next setting takes affect. Use the mouse controller to help you correlate what you are looking at. 2 Camera Overview Programming Function Buttons Table 2-3. Used to position the pointer over the desired task and select. 4. Tap E. Start Sequence - Used to manually trigger an internal calibration adjustment. Recalibrate...
... Ti55 models only.) Image Enhancement - The laser spot is on the display screen task bar (A, B, C) you press the function button, the next setting takes affect. Use the mouse controller to help you correlate what you are looking at. 2 Camera Overview Programming Function Buttons Table 2-3. Used to position the pointer over the desired task and select. 4. Tap E. Start Sequence - Used to manually trigger an internal calibration adjustment. Recalibrate...
User Manual
Page 34
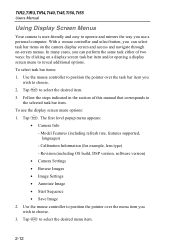
... Revision (including OS build, DSP version, software version) • Camera Settings • Browse Images • Image Settings • Annotate Image • Start Sequence • Save Image 2. To use a personal computer. TiR2,TiR3,TiR4,Ti40,Ti45,Ti50,Ti55 Users Manual Using Display Screen Menus Your camera is user-friendly and easy to operate and mirrors the way you use the display screen menu options: 1. To select task bar items...
... Revision (including OS build, DSP version, software version) • Camera Settings • Browse Images • Image Settings • Annotate Image • Start Sequence • Save Image 2. To use a personal computer. TiR2,TiR3,TiR4,Ti40,Ti45,Ti50,Ti55 Users Manual Using Display Screen Menus Your camera is user-friendly and easy to operate and mirrors the way you use the display screen menu options: 1. To select task bar items...

User Manual
Page 38
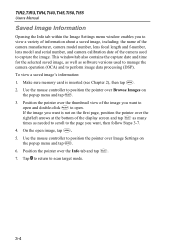
... to scan target mode. Make sure memory card is not on the popup menu and tap E. 3. Tap to close the thumbnail screen and return to delete is inserted (see Chapter 2), then tap F. 2. Use the mouse controller to position the pointer over Browse Images on the first page, position the pointer over the Delete button at a time: 1. Tap to accept setting change...
... to scan target mode. Make sure memory card is not on the popup menu and tap E. 3. Tap to close the thumbnail screen and return to delete is inserted (see Chapter 2), then tap F. 2. Use the mouse controller to position the pointer over Browse Images on the first page, position the pointer over the Delete button at a time: 1. Tap to accept setting change...
User Manual
Page 40
...,Ti40,Ti45,Ti50,Ti55 Users Manual Saved Image Information Opening the Info tab within the Image Settings menu window enables you to view a variety of information about a saved image, including: the name of the camera manufacturer, camera model number, lens focal length and f-number, lens model and serial number, and camera calibration date of the display screen and tap E as many times as software versions used to perform image data processing (DSP). Position the...
...,Ti40,Ti45,Ti50,Ti55 Users Manual Saved Image Information Opening the Info tab within the Image Settings menu window enables you to view a variety of information about a saved image, including: the name of the camera manufacturer, camera model number, lens focal length and f-number, lens model and serial number, and camera calibration date of the display screen and tap E as many times as software versions used to perform image data processing (DSP). Position the...

User Manual
Page 57
... flash operates at approximately 50% power continuously; When the flash is enabled, it operates with one burst of light when an image is captured (the moment the image is , the torch remains on the popup menu and tap E. 3. tap E to scan target mode. Then, to the VLCM tab. 4. 5 Visible Light Camera Module (VLCM) Using Torch Control 1. Limit torch use to a programmable button (see Chapter 2). Tap F. 2. Use...
... flash operates at approximately 50% power continuously; When the flash is enabled, it operates with one burst of light when an image is captured (the moment the image is , the torch remains on the popup menu and tap E. 3. tap E to scan target mode. Then, to the VLCM tab. 4. 5 Visible Light Camera Module (VLCM) Using Torch Control 1. Limit torch use to a programmable button (see Chapter 2). Tap F. 2. Use...

User Manual
Page 59
... accept setting change the image file; Use the laser function to help you point out the object you are rendered according to show a colleague where a problem is enabled. 5. For example, use the laser to the blend level setting for each image file. 5-7 release when finished. Use the radio buttons on the thumbnail browser window to scan target mode. fused images are aiming the camera towards...
... accept setting change the image file; Use the laser function to help you point out the object you are rendered according to show a colleague where a problem is enabled. 5. For example, use the laser to the blend level setting for each image file. 5-7 release when finished. Use the radio buttons on the thumbnail browser window to scan target mode. fused images are aiming the camera towards...

User Manual
Page 68
... setting change the language setting: 1. Saving and Reloading Camera Settings You can save current camera settings to the camera's internal memory or to select. 5. Visible light camera module (VLCM) settings are saved and loaded just as the color palette, temperature units, programmed function buttons, etc., that you power on the popup menu. 3. Tap F. 2. Tap E to scan target mode. Tap E. 4. To save your current camera settings to a Compact Flash card (recommended if using a memory card...
... setting change the language setting: 1. Saving and Reloading Camera Settings You can save current camera settings to the camera's internal memory or to select. 5. Visible light camera module (VLCM) settings are saved and loaded just as the color palette, temperature units, programmed function buttons, etc., that you power on the popup menu. 3. Tap F. 2. Tap E to scan target mode. Tap E. 4. To save your current camera settings to a Compact Flash card (recommended if using a memory card...

User Manual
Page 82
....fluke.com. To view the Info tab information: 1. When you change lenses, you must change the lens selection setting accordingly as IR refresh rate, IR image size (in pixels), zoom capabilities, IRFusion® capabilities, camera serial number, software versions, lens descriptions of each lens used (if more than one), calibration range, number of image files on the memory card, and the used and free space on the popup menu...
....fluke.com. To view the Info tab information: 1. When you change lenses, you must change the lens selection setting accordingly as IR refresh rate, IR image size (in pixels), zoom capabilities, IRFusion® capabilities, camera serial number, software versions, lens descriptions of each lens used (if more than one), calibration range, number of image files on the memory card, and the used and free space on the popup menu...
User Manual
Page 102
... Digital Image Enhancement Digital Display On-screen Indicators Automatic Full-time Enhanced Display and Image Storage 5 in reports Programmable Image Capture 20mm f/0.8 Germanium Automatically capture n/a thermal images (program) Standard Optics Field of battery, target emissivity, background temp., temp. unit (C/F/K), date, and time Palettes Storage Medium 8 unique color palettes available Compact Flash Card (stores hundreds of images) File Formats Supported Image Controls 14 bit measurement data...
... Digital Image Enhancement Digital Display On-screen Indicators Automatic Full-time Enhanced Display and Image Storage 5 in reports Programmable Image Capture 20mm f/0.8 Germanium Automatically capture n/a thermal images (program) Standard Optics Field of battery, target emissivity, background temp., temp. unit (C/F/K), date, and time Palettes Storage Medium 8 unique color palettes available Compact Flash Card (stores hundreds of images) File Formats Supported Image Controls 14 bit measurement data...

User Manual
Page 104
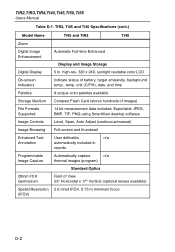
... Ti40 Specifications (cont.) Model Name Ti45 and TiR2 Ti40 Battery 2-3 hours continuous operation for each battery, typical Operating Time Battery Charging 2-bay intelligent charger powered via AC outlet or optional 12 V from car AC Operation Power Saving Video Output Weight AC adapter 110/220 V ac, Option 50/60 Hz Automatic shutdown and standby modes (user specified) Interfaces RS170 EIA/NTSC or CCIR/PAL composite video Physical Characteristics 4.4 lbs including battery Size...
... Ti40 Specifications (cont.) Model Name Ti45 and TiR2 Ti40 Battery 2-3 hours continuous operation for each battery, typical Operating Time Battery Charging 2-bay intelligent charger powered via AC outlet or optional 12 V from car AC Operation Power Saving Video Output Weight AC adapter 110/220 V ac, Option 50/60 Hz Automatic shutdown and standby modes (user specified) Interfaces RS170 EIA/NTSC or CCIR/PAL composite video Physical Characteristics 4.4 lbs including battery Size...

User Manual
Page 129
... temperature calibration range camera and battery information view battery info, 8-3 view camera info, 8-2 camera overview camera parts, 2-2 parts descriptions, 2-4 camera settings restore factory settings, 6-7 save and reload, 6-6 capture image, 1-10, See save image mode and saving images center box temperatures, 2-9 centerpoint temperature, 2-8 centerpoint/centerbox, 2-10 charging batteries, 8-4 cleaning camera body, 8-1 display screen, 8-1 lenses, 8-1 cold cursor temperature, 2-9 color alarms, 5-8 color controls, 5-4 color palette, 4-2, See adjust temperature span, 4-3 changing, 4-2 hiding...
... temperature calibration range camera and battery information view battery info, 8-3 view camera info, 8-2 camera overview camera parts, 2-2 parts descriptions, 2-4 camera settings restore factory settings, 6-7 save and reload, 6-6 capture image, 1-10, See save image mode and saving images center box temperatures, 2-9 centerpoint temperature, 2-8 centerpoint/centerbox, 2-10 charging batteries, 8-4 cleaning camera body, 8-1 display screen, 8-1 lenses, 8-1 cold cursor temperature, 2-9 color alarms, 5-8 color controls, 5-4 color palette, 4-2, See adjust temperature span, 4-3 changing, 4-2 hiding...

User Manual
Page 131
... enabling/disabling, 4-6 palette visible, 2-10 part number, B-4 pause image mode, 3-1 PIC. safety information, 1-2 saturation colors. See level and span spot temperatures. See camera overview onscreen logo, 4-7 -P- See display screen, temperature markers temperature units, 2-8 setting, 6-3 thumbnail browser, 5-7 time, 2-8 changing, 6-5 changing format, 6-5 torch control, 2-10, 5-5 training thermography, E-1 trigger button, 2-5 troubleshooting, B-1 -U- See display screen, user-defined temperature markers -V- See programmable image capture recording control images, 5-6 reset switch.
... enabling/disabling, 4-6 palette visible, 2-10 part number, B-4 pause image mode, 3-1 PIC. safety information, 1-2 saturation colors. See level and span spot temperatures. See camera overview onscreen logo, 4-7 -P- See display screen, temperature markers temperature units, 2-8 setting, 6-3 thumbnail browser, 5-7 time, 2-8 changing, 6-5 changing format, 6-5 torch control, 2-10, 5-5 training thermography, E-1 trigger button, 2-5 troubleshooting, B-1 -U- See display screen, user-defined temperature markers -V- See programmable image capture recording control images, 5-6 reset switch.


