
Installation Instructions (English)
Page 1
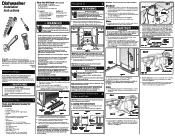
...tubing needed fittings and instructions. Left Side 25 Figure 3 Front 24 Right Side 49 1/4" 22 1/2" Figure 4 4. Figure 7(a). Dishwasher Installation Instructions INSTALLER: Leave Installation Instructions with a 3/8" National Pipe Thread • Conduit Connector • Wire Nuts, two (2) for...) by qualified persons. See Step 7. • The dishwasher will connect to drain, water, and electrical lines. Note the locations of electrical supply and dishwasher's electrical junction box on select models). 4 Connections For Electrical, Water, and Drain IMPORTANT: Do...
...tubing needed fittings and instructions. Left Side 25 Figure 3 Front 24 Right Side 49 1/4" 22 1/2" Figure 4 4. Figure 7(a). Dishwasher Installation Instructions INSTALLER: Leave Installation Instructions with a 3/8" National Pipe Thread • Conduit Connector • Wire Nuts, two (2) for...) by qualified persons. See Step 7. • The dishwasher will connect to drain, water, and electrical lines. Note the locations of electrical supply and dishwasher's electrical junction box on select models). 4 Connections For Electrical, Water, and Drain IMPORTANT: Do...
Installation Instructions (English)
Page 2
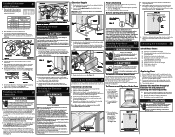
... 8 x 5/8" (included in contact with the circuit conductors and connected to insure proper drainage. Leveling Dishwasher 5 within 6" of turns. If levelers have been removed from your model. Finishing the Electrical 8 Connection Electric Shock Hazard Plumbing material and drain hose must be done by ... included), at least one of the methods described below underside of kinks, scales, chips, and lubricants. 4. Before starting the dishwasher, Through Wall Through Cabinet Use (not 1i/n4c"luLdaegdS)crews Figure 15 Through Floor Junction Box (in death or serious injury....
... 8 x 5/8" (included in contact with the circuit conductors and connected to insure proper drainage. Leveling Dishwasher 5 within 6" of turns. If levelers have been removed from your model. Finishing the Electrical 8 Connection Electric Shock Hazard Plumbing material and drain hose must be done by ... included), at least one of the methods described below underside of kinks, scales, chips, and lubricants. 4. Before starting the dishwasher, Through Wall Through Cabinet Use (not 1i/n4c"luLdaegdS)crews Figure 15 Through Floor Junction Box (in death or serious injury....
Wiring Diagram (All Languages)
Page 2
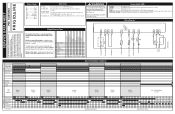
...0 90 0 0 1 X 0 0 0 0 1 0 488 0 1 01 X - Cycle Selection Options WASHING SANITIZED* DRYING CLEAN TIME IN MINUTES WATER VALVE DRY SYSTEM * PUMP MOTOR DRAIN MOTOR HEATER DISPENSERS * SOME MODELS WASH 1 8 MIN. RINSE 3 10 MIN. While in power failure mode - P/N: 154815901 Color Code BK Black BU Blue PK Pink R Red R-BK Red/Black R-Y Red/Yellow...Press START/CANCEL pad. The indicator lights will then step through the test cycle per the chart. Dishwasher will switch off . Display Codes (LED) WASHING Wash portion of these subjects generally considered acceptable in ...
...0 90 0 0 1 X 0 0 0 0 1 0 488 0 1 01 X - Cycle Selection Options WASHING SANITIZED* DRYING CLEAN TIME IN MINUTES WATER VALVE DRY SYSTEM * PUMP MOTOR DRAIN MOTOR HEATER DISPENSERS * SOME MODELS WASH 1 8 MIN. RINSE 3 10 MIN. While in power failure mode - P/N: 154815901 Color Code BK Black BU Blue PK Pink R Red R-BK Red/Black R-Y Red/Yellow...Press START/CANCEL pad. The indicator lights will then step through the test cycle per the chart. Dishwasher will switch off . Display Codes (LED) WASHING Wash portion of these subjects generally considered acceptable in ...
Complete Owner's Guide (English)
Page 3
... compare this page to the other. To ensure our ability to previous models, you may not- Read Before Operating Your Dishwasher! As each cycle begins, you , please use this dishwasher to continue serving you may-or may be surprised at www.frigidaire.com or by a pause and a slightly different sound as the upper arms...
... compare this page to the other. To ensure our ability to previous models, you may not- Read Before Operating Your Dishwasher! As each cycle begins, you , please use this dishwasher to continue serving you may-or may be surprised at www.frigidaire.com or by a pause and a slightly different sound as the upper arms...

Complete Owner's Guide (English)
Page 4
...wash, just press the START/CANCEL pad. Cup Shelves (on some models) Nozzle Top Rack Tub Middle Spray Arm Serial Label (located on all cycles. Select desired OPTIONS (See Energy Options). NOTE The dishwasher is hot. To start , press START/CANCEL pad. An automatic sensor...the pad will be guaranteed to handle heavier soil loads. 4 The number of all models. Run hot water faucet nearest dishwasher until water is programmed to reset each time. DISHWASHER FEATURES Your dishwasher cleans by spraying a mixture of hot water and detergent through the filter and spray ...
...wash, just press the START/CANCEL pad. Cup Shelves (on some models) Nozzle Top Rack Tub Middle Spray Arm Serial Label (located on all cycles. Select desired OPTIONS (See Energy Options). NOTE The dishwasher is hot. To start , press START/CANCEL pad. An automatic sensor...the pad will be guaranteed to handle heavier soil loads. 4 The number of all models. Run hot water faucet nearest dishwasher until water is programmed to reset each time. DISHWASHER FEATURES Your dishwasher cleans by spraying a mixture of hot water and detergent through the filter and spray ...
Complete Owner's Guide (English)
Page 5
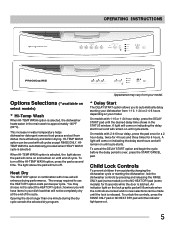
...shows in the STATUS window. The energy required to automatically delay starting the dishwasher, lock the dishwasher controls by pressing and releasing the RINSE ONLY pad (some models) or the NO HEAT DRY pad (some models) for 6 hours. Opening the door longer than one minute during the ... remain on until the indicator light goes out. 5 This increase in water temperature helps dishwasher detergent remove food grease and soil from accidently changing the dishwasher cycle or starting your dishwasher from your model. * Delay Start The DELAY START option allows you will have items in your...
...shows in the STATUS window. The energy required to automatically delay starting the dishwasher, lock the dishwasher controls by pressing and releasing the RINSE ONLY pad (some models) or the NO HEAT DRY pad (some models) for 6 hours. Opening the door longer than one minute during the ... remain on until the indicator light goes out. 5 This increase in water temperature helps dishwasher detergent remove food grease and soil from accidently changing the dishwasher cycle or starting your dishwasher from your model. * Delay Start The DELAY START option allows you will have items in your...
Complete Owner's Guide (English)
Page 7
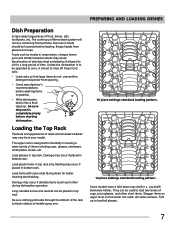
...on upper level so that large items do not prevent the detergent dispenser from opening. • Check manufacturer's recommendations before starting dishwasher. Unless the dishwasher is completely empty before washing items in top rack. Melting may occur if placed in bottom rack. Load plastic items in ...bottom rack. Some models have a fold-down for a long period of the rack to load tall glasses. 7 The upper rack is best...
...on upper level so that large items do not prevent the detergent dispenser from opening. • Check manufacturer's recommendations before starting dishwasher. Unless the dishwasher is completely empty before washing items in top rack. Melting may occur if placed in bottom rack. Load plastic items in ...bottom rack. Some models have a fold-down for a long period of the rack to load tall glasses. 7 The upper rack is best...

Complete Owner's Guide (English)
Page 9
...a few seconds until wash action stops before opening. • Add the item and wait a few seconds to allow cold air to slowly expand inside dishwasher. • Close door firmly to avoid damaging the silver finish. 9 Use suggested loading patterns, as shown, to increase washability of racks and silverware ...in place. Close the cover to hold small items in a covered section. Water spray cannot reach nested items. Features and appearance of your model. Failure to do so may vary from your silverware. Load the silverware basket while it is in each section of basket or rack to ...
...a few seconds until wash action stops before opening. • Add the item and wait a few seconds to allow cold air to slowly expand inside dishwasher. • Close door firmly to avoid damaging the silver finish. 9 Use suggested loading patterns, as shown, to increase washability of racks and silverware ...in place. Close the cover to hold small items in a covered section. Water spray cannot reach nested items. Features and appearance of your model. Failure to do so may vary from your silverware. Load the silverware basket while it is in each section of basket or rack to ...
Complete Owner's Guide (English)
Page 12
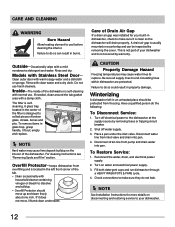
...section. Turn on disconnecting and restoring service to make sure they do the following: To Disconnect Service: 1. Fill both detergent cups and run dishwasher through a HEAVY WASH/POTS & PANS cycle. 4. Outside-Occasionally wipe with clean water and a dry cloth. Rinse with a mild nonabrasive ...countertop and can result in an unheated place should move , lift and clean underneath. Care of the dishwasher. Turn off water supply. 3. Disconnect water line from freezing. Models with warm soapy water and a dishcloth or sponge. Do not use . Have a qualified person do...
...section. Turn on disconnecting and restoring service to make sure they do the following: To Disconnect Service: 1. Fill both detergent cups and run dishwasher through a HEAVY WASH/POTS & PANS cycle. 4. Outside-Occasionally wipe with clean water and a dry cloth. Rinse with a mild nonabrasive ...countertop and can result in an unheated place should move , lift and clean underneath. Care of the dishwasher. Turn off water supply. 3. Disconnect water line from freezing. Models with warm soapy water and a dishcloth or sponge. Do not use . Have a qualified person do...


