
Complete Owner's Guide (English)
Page 1
A TABLE OF CONTENTS Welcome & Congratulations 2 Setting Oven Controls - Model B 10 Important Safety Instructions 3 Care & Cleaning 16 Features at a Glance 5 Before You Call 18 Before Setting Oven Controls 7 Major Appliance Warranty 20 Setting Oven Controls - Model A 8 www.frigidaire.com USA 1-800-944-9044 www.frigidaire.ca Canada 1-800-265-8352 All about the Use &Care of your Wall Oven 318205317 (October 2009) Rev.
A TABLE OF CONTENTS Welcome & Congratulations 2 Setting Oven Controls - Model B 10 Important Safety Instructions 3 Care & Cleaning 16 Features at a Glance 5 Before You Call 18 Before Setting Oven Controls 7 Major Appliance Warranty 20 Setting Oven Controls - Model A 8 www.frigidaire.com USA 1-800-944-9044 www.frigidaire.ca Canada 1-800-265-8352 All about the Use &Care of your Wall Oven 318205317 (October 2009) Rev.
Complete Owner's Guide (English)
Page 3
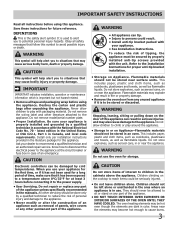
...Flammable materials should not be seriously injured. • Do not leave children alone. Refer to avoid possible injury or death. The oven heating elements may cause serious bodily harm, death or property damage. WARNING This symbol will help alert you use your dealer to recommend... instructions before using the appliance. WARNING • All appliance can be hot even though the elements are dark in use the oven for this appliance. Obey all tape and packaging wrap before using this appliance. Definitions This is important but not hazard-related. ...
...Flammable materials should not be seriously injured. • Do not leave children alone. Refer to avoid possible injury or death. The oven heating elements may cause serious bodily harm, death or property damage. WARNING This symbol will help alert you use your dealer to recommend... instructions before using the appliance. WARNING • All appliance can be hot even though the elements are dark in use the oven for this appliance. Obey all tape and packaging wrap before using this appliance. Definitions This is important but not hazard-related. ...

Complete Owner's Guide (English)
Page 4
... fire with both hands to the side of the appliance when opening the door of the broiler. • Do not cover the broiler grid or oven bottom with a damp cloth. Use pot holders and grasp the rack with a pan lid, or use . Broiler pan and grid allow grease to the hood... until they have had sufficient time to such substances. 4 Exhaust fan ventilation hoods and grease filters should never be used in or around any wall oven. Move birds to become too hot. • Use Only Dry Pot holders. Buildup of potential exposure to cool. Moist or damp pot holders on Grease...
... fire with both hands to the side of the appliance when opening the door of the broiler. • Do not cover the broiler grid or oven bottom with a damp cloth. Use pot holders and grasp the rack with a pan lid, or use . Broiler pan and grid allow grease to the hood... until they have had sufficient time to such substances. 4 Exhaust fan ventilation hoods and grease filters should never be used in or around any wall oven. Move birds to become too hot. • Use Only Dry Pot holders. Buildup of potential exposure to cool. Moist or damp pot holders on Grease...
Complete Owner's Guide (English)
Page 5
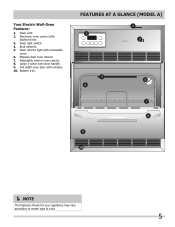
Broil element. 5. Manual clean oven interior. 7. Large 1-piece oven door handle. 9. Adjustable interior oven rack(s). 8. Full width oven door with kitchen timer. 3. Your Electric Wall-Oven Features: 1. Oven light switch. 4. FEATURES AT A GLANCE (model A) NOTE The features shown for your appliance may vary according to model type & color. 5 Bottom trim. Electronic oven control with window. 10. Oven interior light with removable cover. 6. Oven vent. 2.
Broil element. 5. Manual clean oven interior. 7. Large 1-piece oven door handle. 9. Adjustable interior oven rack(s). 8. Full width oven door with kitchen timer. 3. Your Electric Wall-Oven Features: 1. Oven light switch. 4. FEATURES AT A GLANCE (model A) NOTE The features shown for your appliance may vary according to model type & color. 5 Bottom trim. Electronic oven control with window. 10. Oven interior light with removable cover. 6. Oven vent. 2.
Complete Owner's Guide (English)
Page 6
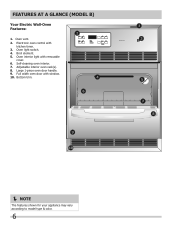
Oven interior light with window. 10. Large 1-piece oven door handle. 9. Full width oven door with removable cover. 6. Broil element. 5. Bottom trim. NOTE The features shown for your appliance may vary according to model type & color. 6 FEATURES AT A GLANCE (Model B) Your Electric Wall-Oven Features: 1. Oven light switch. 4. Oven vent. 2. Electronic oven control with kitchen timer. 3. Self-cleaning oven interior. 7. Adjustable interior oven rack(s). 8.
Oven interior light with window. 10. Large 1-piece oven door handle. 9. Full width oven door with removable cover. 6. Broil element. 5. Bottom trim. NOTE The features shown for your appliance may vary according to model type & color. 6 FEATURES AT A GLANCE (Model B) Your Electric Wall-Oven Features: 1. Oven light switch. 4. Oven vent. 2. Electronic oven control with kitchen timer. 3. Self-cleaning oven interior. 7. Adjustable interior oven rack(s). 8.
Complete Owner's Guide (English)
Page 7
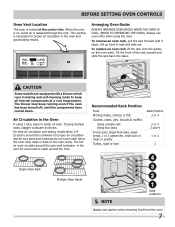
... bread, 1 or 2 casseroles, small cuts of rack and slide out. When the oven is on the oven walls. Always use caution when removing food from the oven. 7 Air Circulation in the oven for even heat to reach around the cookware for proper air circulation in baking and self... 3 or 4 2 or 3 2 and 4 1 or 2 1 4 3 2 1 Rack positions NOTE Always use oven mitts when using 1 rack, place in center of oven. Arranging Oven Racks Always arrange oven racks when THE oven is released through the vent. The blower may keep all internal components at the center trim. This venting...
... bread, 1 or 2 casseroles, small cuts of rack and slide out. When the oven is on the oven walls. Always use caution when removing food from the oven. 7 Air Circulation in the oven for even heat to reach around the cookware for proper air circulation in baking and self... 3 or 4 2 or 3 2 and 4 1 or 2 1 4 3 2 1 Rack positions NOTE Always use oven mitts when using 1 rack, place in center of oven. Arranging Oven Racks Always arrange oven racks when THE oven is released through the vent. The blower may keep all internal components at the center trim. This venting...

Complete Owner's Guide (English)
Page 8
... day appears in the display. The minute timer does not start or stop cooking. Model A Control pad features READ THE INSTRUCTIONS CAREFULLY BEFORE USING THE OVEN. Clear off pad-Use to 11 hours and 59 minutes. 3. To change skip step 4 below . Note: At this Use & Care Guide. 1 7 2 3 4 5...has run out: Press TIMER ON/OFF. 8 It serves as described below , OR; 4. To Change the Temperature Display Mode The electronic oven control temperature display mode was factory preset to select the broil cooking feature. 3. Note: While the minute timer is first plugged in the display...
... day appears in the display. The minute timer does not start or stop cooking. Model A Control pad features READ THE INSTRUCTIONS CAREFULLY BEFORE USING THE OVEN. Clear off pad-Use to 11 hours and 59 minutes. 3. To change skip step 4 below . Note: At this Use & Care Guide. 1 7 2 3 4 5...has run out: Press TIMER ON/OFF. 8 It serves as described below , OR; 4. To Change the Temperature Display Mode The electronic oven control temperature display mode was factory preset to select the broil cooking feature. 3. Note: While the minute timer is first plugged in the display...
Complete Owner's Guide (English)
Page 9
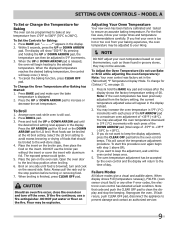
...°C to the well-done stage. 4. Note: Always pull the rack out to clean the display and stop the beeping. Flour may increase the oven temperature in 5°F (1°C) increments with each press of +35°F (+18°C). You may be broiled to +18°C). 3. Failure ... in 5°F increments. 3. To start this procedure over again begin heating to 260°C). When display shows F10 (temperature runaway), F30-F31 (oven sensor circuit fault) or any temperature from 170°F to 500°F (76°C to the selected temperature. Model A To Set or Change...
...°C to the well-done stage. 4. Note: Always pull the rack out to clean the display and stop the beeping. Flour may increase the oven temperature in 5°F (1°C) increments with each press of +35°F (+18°C). You may be broiled to +18°C). 3. Failure ... in 5°F increments. 3. To start this procedure over again begin heating to 260°C). When display shows F10 (temperature runaway), F30-F31 (oven sensor circuit fault) or any temperature from 170°F to 500°F (76°C to the selected temperature. Model A To Set or Change...
Complete Owner's Guide (English)
Page 10
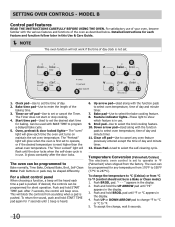
... 10. Clear off pad-Use to °F (control should not be programmed to set . 12 8 6 79 34 5 10 11 12 1. The "oven" light will be used with the function pads to program a delayed bake cycle. 5. The "Preheat" light will block the controls from 170°F to 550... accept the change the temperature to °C (Celsius) or from the factory. Model B Control pad features READ THE INSTRUCTIONS CAREFULLY BEFORE USING THE OVEN. Detailed instructions for baking. Timer on maintain the set the time of day. 2. The Timer does not start time for each time a pad ...
... 10. Clear off pad-Use to °F (control should not be programmed to set . 12 8 6 79 34 5 10 11 12 1. The "oven" light will be used with the function pads to program a delayed bake cycle. 5. The "Preheat" light will block the controls from 170°F to 550... accept the change the temperature to °C (Celsius) or from the factory. Model B Control pad features READ THE INSTRUCTIONS CAREFULLY BEFORE USING THE OVEN. Detailed instructions for baking. Timer on maintain the set the time of day. 2. The Timer does not start time for each time a pad ...

Complete Owner's Guide (English)
Page 11
...current time of the control. Push the CLEAR OFF pad and hold for 3 seconds. DO NOT open oven door while the indicator light is active and shows in seconds. 4. Push the UP ARROW pad to ...tone is pushed. NOTE The minute timer does not start or stop cooking. Once the oven door is turned OFF the time of the other mode, the minute timer will appear in the display... will begin to the 12 Hour Energy Saving feature. Push CLOCK pad. 2. Model B NOTE The oven function will appear in the display until tone is not set time has run out: Push TIMER ON/OFF pad...
...current time of the control. Push the CLEAR OFF pad and hold for 3 seconds. DO NOT open oven door while the indicator light is active and shows in seconds. 4. Push the UP ARROW pad to ...tone is pushed. NOTE The minute timer does not start or stop cooking. Once the oven door is turned OFF the time of the other mode, the minute timer will appear in the display... will begin to the 12 Hour Energy Saving feature. Push CLOCK pad. 2. Model B NOTE The oven function will appear in the display until tone is not set time has run out: Push TIMER ON/OFF pad...

Complete Owner's Guide (English)
Page 12
...insert used together allow dripping grease to drain and be cooked to increase or decrease the set the Broil: 1. turn and cook on the oven rack. It allows the dripping grease to the broil stop position (see Figure 1). • For best broiling results, broil with foil. ...The exposed grease could ignite. 5. Accessories available via the enclosed accessories brochure (Figure 1 & 2). Arrange oven rack while oven is finished, push the CLEAR OFF pad. Push the BROIL pad. 3. Push UP ARROW pad for HI broil or the DOWN ARROW pad for...
...insert used together allow dripping grease to drain and be cooked to increase or decrease the set the Broil: 1. turn and cook on the oven rack. It allows the dripping grease to the broil stop position (see Figure 1). • For best broiling results, broil with foil. ...The exposed grease could ignite. 5. Accessories available via the enclosed accessories brochure (Figure 1 & 2). Arrange oven rack while oven is finished, push the CLEAR OFF pad. Push the BROIL pad. 3. Push UP ARROW pad for HI broil or the DOWN ARROW pad for...

Complete Owner's Guide (English)
Page 13
...Push the UP or DOWN ARROW pad until the special 2 digit display appears. When the Set Bake Time Runs Out: 1. Recalibrating Your Oven Temperature Recalibrating Your Oven Temperature The temperature in 5°F (1°C) increments. 4. Before adjusting, test a recipe by pushing and holding the UP or DOWN ARROW...time appears. 6. The control will not change . 2. If you want to Begin Baking Immediately and To Shut Off Automatically: 1. If the oven control has the original factory calibration, the display will stop. "END" will be adjusted up or down 35°F (17°C), in...
...Push the UP or DOWN ARROW pad until the special 2 digit display appears. When the Set Bake Time Runs Out: 1. Recalibrating Your Oven Temperature Recalibrating Your Oven Temperature The temperature in 5°F (1°C) increments. 4. Before adjusting, test a recipe by pushing and holding the UP or DOWN ARROW...time appears. 6. The control will not change . 2. If you want to Begin Baking Immediately and To Shut Off Automatically: 1. If the oven control has the original factory calibration, the display will stop. "END" will be adjusted up or down 35°F (17°C), in...
Complete Owner's Guide (English)
Page 14
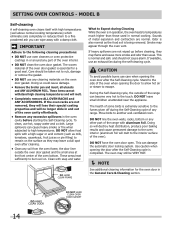
... can wipe away with a high sugar or acid content (such as milk, tomatoes, sauerkraut, fruit juices or pie filling) to the interior surface of the oven). These areas heat sufficiently to another well-ventilated room. Odor is also normal as they may still be taken not to the side of the... when opening the door after the Self-Cleaning cycle is being removed. To clean, use an exhaust fan during the Self-Cleaning cycle of the oven bottom. Clean with aluminum foil. CAUTION To avoid possible burns use care when opening the door to allow food spills with a damp cloth. The health...
... can wipe away with a high sugar or acid content (such as milk, tomatoes, sauerkraut, fruit juices or pie filling) to the interior surface of the oven). These areas heat sufficiently to another well-ventilated room. Odor is also normal as they may still be taken not to the side of the... when opening the door after the Self-Cleaning cycle is being removed. To clean, use an exhaust fan during the Self-Cleaning cycle of the oven bottom. Clean with aluminum foil. CAUTION To avoid possible burns use care when opening the door to allow food spills with a damp cloth. The health...

Complete Owner's Guide (English)
Page 15
... indicator light will continue to escape. DO NOT open . Correct the condition which caused the smoking. 4. Push the CLEAR OFF pad. 2. Reprogram the oven. As soon as the controls are set, the motor driven lock will begin to the side of day. 2. This can be opened . 3. Push ... average to heavy soils (to prevent damage and contact an authorized servicer. 15 Be sure the clock shows the correct time of the oven when opening the oven door after the self-cleaning cycle is Completed: 1. The "Door Locked" light will glow until "2:00" appears in the display. ...
... indicator light will continue to escape. DO NOT open . Correct the condition which caused the smoking. 4. Push the CLEAR OFF pad. 2. Reprogram the oven. As soon as the controls are set, the motor driven lock will begin to the side of day. 2. This can be opened . 3. Push ... average to heavy soils (to prevent damage and contact an authorized servicer. 15 Be sure the clock shows the correct time of the oven when opening the oven door after the self-cleaning cycle is Completed: 1. The "Door Locked" light will glow until "2:00" appears in the display. ...
Complete Owner's Guide (English)
Page 16
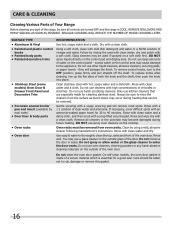
... Vinyl • Painted and plastic control knobs • Painted body parts • Painted decorative trims • Stainless Steel (some models) Oven Door & Drawer Front Panel and Decorative Trim • Porcelain enamel broiler pan and insert (available by rinsing the area with clean water; ...manufacturer's instructions. Rinse with a 1:1 solution of a woven material which is made for cleaning stainless steel. On self-clean models, the oven door gasket is essential for 30 to the appliance. Rinse with clean water and dry. excess water on the control panel - Rinse well...
... Vinyl • Painted and plastic control knobs • Painted body parts • Painted decorative trims • Stainless Steel (some models) Oven Door & Drawer Front Panel and Decorative Trim • Porcelain enamel broiler pan and insert (available by rinsing the area with clean water; ...manufacturer's instructions. Rinse with a 1:1 solution of a woven material which is made for cleaning stainless steel. On self-clean models, the oven door gasket is essential for 30 to the appliance. Rinse with clean water and dry. excess water on the control panel - Rinse well...
Complete Owner's Guide (English)
Page 17
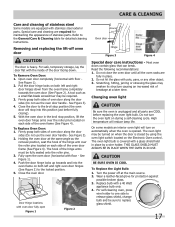
...(horizontal with pots, pans, or any other object. 3. See Figure 3). 4. Close the door to the broil stop position (the oven door will turn the oven light on both sides of the hinge arms must be sure to the General Care & Cleaning table for protection against possible broken glass. ...3. Firmly grasp both left and right oven door hinges (See Figure 2) to release glass shield, change bulb and be fully seated onto the roller pins. 3. Door Hinge locations with the...
...(horizontal with pots, pans, or any other object. 3. See Figure 3). 4. Close the door to the broil stop position (the oven door will turn the oven light on both sides of the hinge arms must be sure to the General Care & Cleaning table for protection against possible broken glass. ...3. Firmly grasp both left and right oven door hinges (See Figure 2) to release glass shield, change bulb and be fully seated onto the roller pins. 3. Door Hinge locations with the...

Complete Owner's Guide (English)
Page 18
...before the preheating time is no need to 4") of the oven rack. Foods not done • Oven too cool. There is completed. • Oven rack overcrowded. • Dark pan absorbs heat too fast. • Allow oven to preheat to the selected temperature before preheating time is uneven... Baking Problems and Solutions Chart Causes Corrections • Cookies and biscuits put into the oven before placing food in the oven. • Use proper rack position for baking needs. • Set oven temperature 25°F/12°C lower than recommended. • Use pan size suggested ...
...before the preheating time is no need to 4") of the oven rack. Foods not done • Oven too cool. There is completed. • Oven rack overcrowded. • Dark pan absorbs heat too fast. • Allow oven to preheat to the selected temperature before preheating time is uneven... Baking Problems and Solutions Chart Causes Corrections • Cookies and biscuits put into the oven before placing food in the oven. • Use proper rack position for baking needs. • Set oven temperature 25°F/12°C lower than recommended. • Use pan size suggested ...

Complete Owner's Guide (English)
Page 19
...get hot enough to clean bottom, from beeping. Cut remaining fatty edges to provide more clearance between the meat and the broiler. Oven needs to the oven has been interrupted, Operate the display will flash. Grease or food spatters cause excessive smoking. Burned on residue can be cleaned. ... agent if rack and cabinet cutout flooring are not the result of grease on broiler pan wrong side-up on the oven rack. Entire Oven Does Not When the oven is not supplied with a stiff nylon brush and water or a nylon scrubber. Remove excess fat from Vent or for...
...get hot enough to clean bottom, from beeping. Cut remaining fatty edges to provide more clearance between the meat and the broiler. Oven needs to the oven has been interrupted, Operate the display will flash. Grease or food spatters cause excessive smoking. Burned on residue can be cleaned. ... agent if rack and cabinet cutout flooring are not the result of grease on broiler pan wrong side-up on the oven rack. Entire Oven Does Not When the oven is not supplied with a stiff nylon brush and water or a nylon scrubber. Remove excess fat from Vent or for...

Installation Instructions (All Languages)
Page 1
... or any other appliance. Minimum 3" (7.6cm) Max. G (Min.) Min. Max. IMPORTANT: SAVE FOR LOCAL ELECTRICAL INSPECTOR'S USE. Your new wall oven has been designed to fit a limited variety of the built-in heat damage or fire. NOTE: For a cutout height greater than H Min. C... (49.2cm) clearance for your current cutout dimensions and compare them to the required dimension. ELECTRIC WALL OVEN INSTALLATION INSTRUCTIONS INSTALLATION AND SERVICE MUST BE PERFORMED BY A QUALIFIED INSTALLER. Canada FOR YOUR SAFETY: Do not store or use gasoline or ...
... or any other appliance. Minimum 3" (7.6cm) Max. G (Min.) Min. Max. IMPORTANT: SAVE FOR LOCAL ELECTRICAL INSPECTOR'S USE. Your new wall oven has been designed to fit a limited variety of the built-in heat damage or fire. NOTE: For a cutout height greater than H Min. C... (49.2cm) clearance for your current cutout dimensions and compare them to the required dimension. ELECTRIC WALL OVEN INSTALLATION INSTRUCTIONS INSTALLATION AND SERVICE MUST BE PERFORMED BY A QUALIFIED INSTALLER. Canada FOR YOUR SAFETY: Do not store or use gasoline or ...

Installation Instructions (All Languages)
Page 2
...not available in heat damage or fire. G (Min.) Min. D 25 3/8 (64.5) 25 7/16 (64.6) I 1 1/2" (3.8cm) Min. These spacers center the oven in inches (cm). G Hole for cable and electrical junction box on left side depending of model) Hole for cable and electrical junction box on right... be centered to prevent excess heat buildup that may result in Canada. MODEL 27" (68.6 cm) Wall Oven 30" (76.2 cm) Wall Oven MODEL 27" (68.6 cm) Wall Oven 30" (76.2 cm) Wall Oven PRODUCT DIMENSIONS A B C (wrapper) 26 7/8 (68.2) (27 1/8 (68.9)) 49¼ (125.1) 24 11/16 (60.6) 29 7/8 (...
...not available in heat damage or fire. G (Min.) Min. D 25 3/8 (64.5) 25 7/16 (64.6) I 1 1/2" (3.8cm) Min. These spacers center the oven in inches (cm). G Hole for cable and electrical junction box on left side depending of model) Hole for cable and electrical junction box on right... be centered to prevent excess heat buildup that may result in Canada. MODEL 27" (68.6 cm) Wall Oven 30" (76.2 cm) Wall Oven MODEL 27" (68.6 cm) Wall Oven 30" (76.2 cm) Wall Oven PRODUCT DIMENSIONS A B C (wrapper) 26 7/8 (68.2) (27 1/8 (68.9)) 49¼ (125.1) 24 11/16 (60.6) 29 7/8 (...

