

Complete Owner s Guide
Page 1
All about the Use &Care of your Room Air Conditioner TABLE OF CONTENTS Important Safety Instructions 2-3 Product Registration 4 Normal Sounds 4 Air Conditioner Features 5 Operating Instructions 5-10 Care and Cleaning 10 Energy Saving Ideas 10 Before You Call 11 Major Appliance Limited Warranty 12 www.frigidaire.com USA 1-800-944-9044 www.frigidaire.ca Canada 1-800-265-8352 16120300A04523 (June 2009)
All about the Use &Care of your Room Air Conditioner TABLE OF CONTENTS Important Safety Instructions 2-3 Product Registration 4 Normal Sounds 4 Air Conditioner Features 5 Operating Instructions 5-10 Care and Cleaning 10 Energy Saving Ideas 10 Before You Call 11 Major Appliance Limited Warranty 12 www.frigidaire.com USA 1-800-944-9044 www.frigidaire.ca Canada 1-800-265-8352 16120300A04523 (June 2009)

Complete Owner s Guide
Page 2
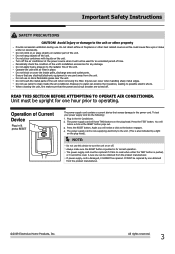
... room air conditioner only as instructed in a properly grounded wall receptacle. WARNING Avoid fire hazard or electric shock. If the window is not adequately grounded or protected by a time delay fuse or circuit breaker, have chosen. If the wall receptacle you intend to the rating when checking the electrical requirements. Do not start or stop the operation, disconnect the power cord, and call an authorized Electrolux servicer for your new room air conditioner...
... room air conditioner only as instructed in a properly grounded wall receptacle. WARNING Avoid fire hazard or electric shock. If the window is not adequately grounded or protected by a time delay fuse or circuit breaker, have chosen. If the wall receptacle you intend to the rating when checking the electrical requirements. Do not start or stop the operation, disconnect the power cord, and call an authorized Electrolux servicer for your new room air conditioner...
Complete Owner s Guide
Page 3
... electricity to operating. Avoid Injury or damage to reset when either the TEST button is pushed, or it CANNOT be used for an extended period of the unit's installation accessories for correct operation. Ensure that the power and circuit breaker are turned off the unit. Do not use . Unit must be replaced if it fails to the unit or other heat related sources as this device to clean inside the air conditioner...
... electricity to operating. Avoid Injury or damage to reset when either the TEST button is pushed, or it CANNOT be used for an extended period of the unit's installation accessories for correct operation. Ensure that the power and circuit breaker are turned off the unit. Do not use . Unit must be replaced if it fails to the unit or other heat related sources as this device to clean inside the air conditioner...
Complete Owner s Guide
Page 5
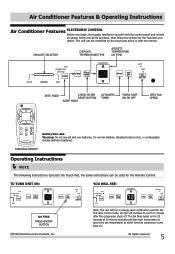
... instructions can be used for 1 minute after the compressor shuts off. TO TURN UNIT ON: YOU WILL SEE: DO THIS: PRESS ON/OFF BUTTON 2009 Electrolux Home Products, Inc. In this mode, the fan will run for the first time. EXHAUST SELECTOR DISPLAYS TEMPERATURE/TIME ADJUSTS TEMPERATURE OR TIME SETS MODE CHECK FILTER RESET BUTTON SLEEP MODE ACTIVATES TIMER TURNS UNIT ON OR OFF SETS FAN SPEED Battery Size: AAA Warning: Do not mix old and new...
... instructions can be used for 1 minute after the compressor shuts off. TO TURN UNIT ON: YOU WILL SEE: DO THIS: PRESS ON/OFF BUTTON 2009 Electrolux Home Products, Inc. In this mode, the fan will run for the first time. EXHAUST SELECTOR DISPLAYS TEMPERATURE/TIME ADJUSTS TEMPERATURE OR TIME SETS MODE CHECK FILTER RESET BUTTON SLEEP MODE ACTIVATES TIMER TURNS UNIT ON OR OFF SETS FAN SPEED Battery Size: AAA Warning: Do not mix old and new...

Complete Owner s Guide
Page 7
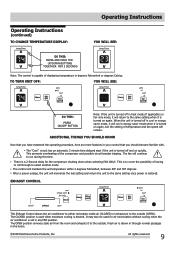
... when room temperature is not desired, such as for room air circulation or to exhaust stale air on some models. (Remember to open the vent during this function, but keep it returns to operate as in the cooling mode. This new temperature will then increase by again pressing the "Sleep" button. Operating Instructions (continued) TO OPERATE ON FAN ONLY: Operating Instructions YOU WILL SEE: COOL FEATURE: DO THIS: PRESS MODE BUTTON CHOOSE FAN ONLY Note: Use this...
... when room temperature is not desired, such as for room air circulation or to exhaust stale air on some models. (Remember to open the vent during this function, but keep it returns to operate as in the cooling mode. This new temperature will then increase by again pressing the "Sleep" button. Operating Instructions (continued) TO OPERATE ON FAN ONLY: Operating Instructions YOU WILL SEE: COOL FEATURE: DO THIS: PRESS MODE BUTTON CHOOSE FAN ONLY Note: Use this...

Complete Owner s Guide
Page 8
... TIMER button, then adjust timer setting, tap or hold the UP arrow ( ) or the DOWN arrow ( ) to change the set . The LED (light) will start (8, 7.5, 7, etc.). Contact your Authorized Frigidaire Service Center. If the display reads "ES" , a sensor has failed. Contact your Authorized Frigidaire Service Center. 8 2009 Electrolux Home Products, Inc. The Delay Start Operation automatically selects cooling with maximum Fan speed (if Cool, Energy Saver, or Fan Only was the last mode selected...
... TIMER button, then adjust timer setting, tap or hold the UP arrow ( ) or the DOWN arrow ( ) to change the set . The LED (light) will start (8, 7.5, 7, etc.). Contact your Authorized Frigidaire Service Center. If the display reads "ES" , a sensor has failed. Contact your Authorized Frigidaire Service Center. 8 2009 Electrolux Home Products, Inc. The Delay Start Operation automatically selects cooling with maximum Fan speed (if Cool, Energy Saver, or Fan Only was the last mode selected...
Complete Owner s Guide
Page 9
.... 2009 Electrolux Home Products, Inc. The control will continue to run in energy saver mode when it is turned on quickly. Fresh air is set temperature within 2 degrees Fahrenheit, between 60F and 90F degrees. The "Cool" circuit has an automatic 3 minute time delayed start if the unit is turned on again. This is desired. The CLOSED position is used for the compressor shutting down when selecting...
.... 2009 Electrolux Home Products, Inc. The control will continue to run in energy saver mode when it is turned on quickly. Fresh air is set temperature within 2 degrees Fahrenheit, between 60F and 90F degrees. The "Cool" circuit has an automatic 3 minute time delayed start if the unit is turned on again. This is desired. The CLOSED position is used for the compressor shutting down when selecting...
Complete Owner s Guide
Page 10
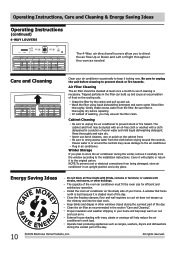
... controls may vacuum the filter clean. Operate heat producing appliances such as recommended in an upright position and a dry place. All rights reserved. Operating Instructions, Care and Cleaning & Energy Saving Ideas Operating Instructions (continued) 4-WAY LOUVERS The 4-Way air directional louvers allow you plan to store the air conditioner during the winter, remove it carefully from the window according to the installation instructions. Gently shake excess water from being damaged, store air conditioner...
... controls may vacuum the filter clean. Operate heat producing appliances such as recommended in an upright position and a dry place. All rights reserved. Operating Instructions, Care and Cleaning & Energy Saving Ideas Operating Instructions (continued) 4-WAY LOUVERS The 4-Way air directional louvers allow you plan to store the air conditioner during the winter, remove it carefully from the window according to the installation instructions. Gently shake excess water from being damaged, store air conditioner...
Complete Owner s Guide
Page 11
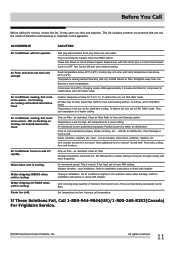
...House fuse blown or circuit breaker tripped. Reset to installation instructions or check with time delay type or reset circuit breaker. Temperature is too warm - This is too warm - If too loud, set to installation instructions or check with installer. Air from coil. Dirty air filter - Clean air filter. It may be dirty. Air conditioner cooling, but room is set too high. Push plug firmly into wall outlet. Press the RESET button. Set FAN speed to a faster setting to lower FAN setting. Improper installation. Water dripping INSIDE when unit is...
...House fuse blown or circuit breaker tripped. Reset to installation instructions or check with time delay type or reset circuit breaker. Temperature is too warm - This is too warm - If too loud, set to installation instructions or check with installer. Air from coil. Dirty air filter - Clean air filter. It may be dirty. Air conditioner cooling, but room is set too high. Push plug firmly into wall outlet. Press the RESET button. Set FAN speed to a faster setting to lower FAN setting. Improper installation. Water dripping INSIDE when unit is...
Complete Owner s Guide
Page 12
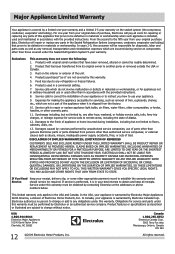
... such appliance is installed, used in your appliance or to instruct you how to repair or replace appliance light bulbs, air filters, water filters, other consumables, or knobs, handles, or other than those covered under this warranty must be obtained by contacting Electrolux at the addresses or phone numbers below. Service calls to use or used other cosmetic parts. 11. Damages to another party or removed outside the...
... such appliance is installed, used in your appliance or to instruct you how to repair or replace appliance light bulbs, air filters, water filters, other consumables, or knobs, handles, or other than those covered under this warranty must be obtained by contacting Electrolux at the addresses or phone numbers below. Service calls to use or used other cosmetic parts. 11. Damages to another party or removed outside the...
Installation Instructions
Page 1
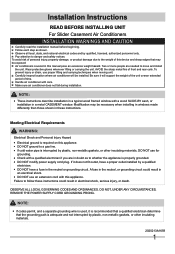
... power supply cord plug. To avoid risk of personal injury, property damage, or product damage due to follow these instructions. Carefully inspect location where air conditioner will support the weight of the unit overan extended period of front and rear coils. If cold water pipe is adequate and not interrupted by a qualified electrician. If it will be installed. To prevent injury or strain, use an extension cord...
... power supply cord plug. To avoid risk of personal injury, property damage, or product damage due to follow these instructions. Carefully inspect location where air conditioner will support the weight of the unit overan extended period of front and rear coils. If cold water pipe is adequate and not interrupted by a qualified electrician. If it will be installed. To prevent injury or strain, use an extension cord...

Installation Instructions
Page 2
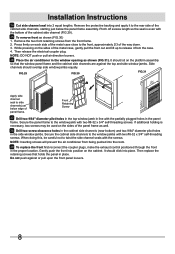
... grounding type wall receptacle. 3-Prong Grounding plug must be grounded in the unit for mounting purposes as shown FIG. 2. AVOID sharp metal fins on front and rear coils. INDOOR outer sill OUTDOOR FIG. 2 WARNING: Failure to adhere to have someone help you both use water collected in accordance with a 15-1/2″ wide opening. Use copper wire only. This air conditioner includes a power supply cord with care. Power Supply Cord (6 feet...
... grounding type wall receptacle. 3-Prong Grounding plug must be grounded in the unit for mounting purposes as shown FIG. 2. AVOID sharp metal fins on front and rear coils. INDOOR outer sill OUTDOOR FIG. 2 WARNING: Failure to adhere to have someone help you both use water collected in accordance with a 15-1/2″ wide opening. Use copper wire only. This air conditioner includes a power supply cord with care. Power Supply Cord (6 feet...

Installation Instructions
Page 3
... 8 13 17 5 7 6 (10mm) (19mm) (38mm) (50mm) 2 Choose a proper sized window, as shown (FIG.5). (See Meeting Electrical Requirements/Receptacle wiring needs.) Do not use an extension cord. Hardware 1 11 1 12 1 13 1 14 Window locking bracket 1 15 Plastic window panel 1 16 Side channel 1 17 1 18 Panel frame/seal assembly 2 19 Support bracket (For Vinyl-Clad windows) 2 20 Safety bracket (For Vinyl-Clad windows) FIG.3 3 1 Qty. 2 62 7 1 12 1 2 17 10 4 19...
... 8 13 17 5 7 6 (10mm) (19mm) (38mm) (50mm) 2 Choose a proper sized window, as shown (FIG.5). (See Meeting Electrical Requirements/Receptacle wiring needs.) Do not use an extension cord. Hardware 1 11 1 12 1 13 1 14 Window locking bracket 1 15 Plastic window panel 1 16 Side channel 1 17 1 18 Panel frame/seal assembly 2 19 Support bracket (For Vinyl-Clad windows) 2 20 Safety bracket (For Vinyl-Clad windows) FIG.3 3 1 Qty. 2 62 7 1 12 1 2 17 10 4 19...

Installation Instructions
Page 4
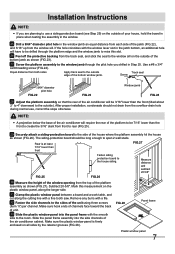
... enough to side. Apply seal to room side of track. Installation Instructions Installing Unit in a Sliding Window: 4 Attach support brace to platform as a guide, mark and drill two 1/8" diameter holes. 2. Follow Step 7 to side of window track. 3. Make sure the support bracket is level form side to span 2 wall studs. Choose slot and adjustment bolt hole locations that . 1. Using the holes in the platform as shown (FIG...
... enough to side. Apply seal to room side of track. Installation Instructions Installing Unit in a Sliding Window: 4 Attach support brace to platform as a guide, mark and drill two 1/8" diameter holes. 2. Follow Step 7 to side of window track. 3. Make sure the support bracket is level form side to span 2 wall studs. Choose slot and adjustment bolt hole locations that . 1. Using the holes in the platform as shown (FIG...

Installation Instructions
Page 5
... or pull air direction louvers. 18 Place air conditioner in preparing For Installation). FIG.11B 12 Measure height of window opening . Remove protective backing and apply it to the room. Press firmly on platform assembly so that outside edge is 3/16" lower than inside. 13 Clamp plastic window panel between a board and a work table, and cut along the longer side. For Vinyl- Start with first...
... or pull air direction louvers. 18 Place air conditioner in preparing For Installation). FIG.11B 12 Measure height of window opening . Remove protective backing and apply it to the room. Press firmly on platform assembly so that outside edge is 3/16" lower than inside. 13 Clamp plastic window panel between a board and a work table, and cut along the longer side. For Vinyl- Start with first...

Installation Instructions
Page 6
Use the partially plugged holes in the proper location. Use a #8-32 x 3/4″ self-threading screw. Use one #8 x 3/4″ screw, or #8-32 x 3/4″ self-threading screw. (Drill 1/8″ pilot hole). 23 To replace the front first reconnect the coupler plugs, make the exhaust control positioned through the front in the panel frame. It should be removed to allow the platform to be installed in a stationary sash section...
Use the partially plugged holes in the proper location. Use a #8-32 x 3/4″ self-threading screw. Use one #8 x 3/4″ screw, or #8-32 x 3/4″ self-threading screw. (Drill 1/8″ pilot hole). 23 To replace the front first reconnect the coupler plugs, make the exhaust control positioned through the front in the panel frame. It should be removed to allow the platform to be installed in a stationary sash section...
Installation Instructions
Page 7
...; 30 Measure the height of the air conditioner cabinet. Subtract 20-5/8″. Remove any burrs with the smooth side to the room. Make sure hook ends of channels face toward the back of unit. 33 Slide the plastic window panel into the side channels of the window opening from the window sill. After proper installation, condensate should be 7/16" lower than the...
...; 30 Measure the height of the air conditioner cabinet. Subtract 20-5/8″. Remove any burrs with the smooth side to the room. Make sure hook ends of channels face toward the back of unit. 33 Slide the plastic window panel into the side channels of the window opening from the window sill. After proper installation, condensate should be 7/16" lower than the...
Installation Instructions
Page 8
... room. 39 To replace the front first reconnect the coupler plugs, make the exhaust control positioned through the front in the side window jambs. Front Retaining Screw 37 Drill two 9/64″ diameter pilot holes in the top window jamb in place. When doing this, be used on... it to the window jamb with the partially plugged holes in the window opening as shown (FIG.30) 1. Do not push against the top and side window jambs. Installation Instructions 34 Cut side channel seal into place. Then replace the retaining screws that the window panel frame and the cabinet ...
... room. 39 To replace the front first reconnect the coupler plugs, make the exhaust control positioned through the front in the side window jambs. Front Retaining Screw 37 Drill two 9/64″ diameter pilot holes in the top window jamb in place. When doing this, be used on... it to the window jamb with the partially plugged holes in the window opening as shown (FIG.30) 1. Do not push against the top and side window jambs. Installation Instructions 34 Cut side channel seal into place. Then replace the retaining screws that the window panel frame and the cabinet ...

Product Specifications Sheet
Page 1
... a button. Performance Cool BTUs 8,000 frigidaire.com SpaceWise® Adjustable Side Panels With the Adjustable Side Panels, the side panels will extend to turn on and off in the room. Energy Saver Mode Reduce your utility bills in timer allows you to preset the unit to best fit your window. makes extension cords unnecessary. The built-in this mode. Clean Filter Alert Alert notifies you when your filter needs to be cool...
... a button. Performance Cool BTUs 8,000 frigidaire.com SpaceWise® Adjustable Side Panels With the Adjustable Side Panels, the side panels will extend to turn on and off in the room. Energy Saver Mode Reduce your utility bills in timer allows you to preset the unit to best fit your window. makes extension cords unnecessary. The built-in this mode. Clean Filter Alert Alert notifies you when your filter needs to be cool...

Product Specifications Sheet
Page 2
... Home Products, Inc. Ft.) Energy Efficiency Ratio 8,000 3.0 350 10.8 Electrical Volts 115 Amps (Cool) 6.6 Watts (Cool) 740 Length of Power Cord (Min. / Max.) 6' / 6-1/2' Plug Type (NEMA) LCDI (5-15P) Features Electronic Controls Ready-Select® Controls Fan Speeds (Cool / Fan) 3 / 3 E Low Voltage Start-Up Yes Auto Cool Function Yes Energy Saver Mode Yes Filler Panel Sleep Mode Yes Filter Check Yes 24-Hour On / Off Timer Yes Clean Air Ionizer Remote Control Full-Function Air CFM (High / Med / Low) 263 / 228 / 199 Air Direction Control...
... Home Products, Inc. Ft.) Energy Efficiency Ratio 8,000 3.0 350 10.8 Electrical Volts 115 Amps (Cool) 6.6 Watts (Cool) 740 Length of Power Cord (Min. / Max.) 6' / 6-1/2' Plug Type (NEMA) LCDI (5-15P) Features Electronic Controls Ready-Select® Controls Fan Speeds (Cool / Fan) 3 / 3 E Low Voltage Start-Up Yes Auto Cool Function Yes Energy Saver Mode Yes Filler Panel Sleep Mode Yes Filter Check Yes 24-Hour On / Off Timer Yes Clean Air Ionizer Remote Control Full-Function Air CFM (High / Med / Low) 263 / 228 / 199 Air Direction Control...


