
Getting Started Guide
Page 8
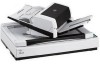
...Panel ADF Open Button „fi-6670 Power Connector Main Power Switch SCSI ID Switch Ventilation Port Cable Cover CGA Board Slot SCSI Connector 1 USB Connector 1 „fi-6670A CGA Board USB Connector 2 SCSI Connector 2 8 Part Names ...and Functions This section describes the scanner parts and their functions. If any parts are missing or defective, contact your FUJITSU scanner dealer or an authorized FUJITSU...
...Panel ADF Open Button „fi-6670 Power Connector Main Power Switch SCSI ID Switch Ventilation Port Cable Cover CGA Board Slot SCSI Connector 1 USB Connector 1 „fi-6670A CGA Board USB Connector 2 SCSI Connector 2 8 Part Names ...and Functions This section describes the scanner parts and their functions. If any parts are missing or defective, contact your FUJITSU scanner dealer or an authorized FUJITSU...

Getting Started Guide
Page 14
The type of the connector for the cable depends on the scanner model you use the correct cable. Confirm the scanner model and use . ADF type 3 „fi-6670 SCSI ID Flatbed type „fi-6670A USB or SCSI connection 2 5 4 USB or SCSI connection (when Kofax VRS is used) SCSI cable 1 USB cable 3 „fi-6770 „fi-6770A USB or SCSI connection 4 SCSI ID USB or SCSI connection (when Kofax VRS is used) „fi-6750S USB cable SCSI cable USB connection 1 14 3 Connecting the Cables The following describes how to connect the cables between the scanner and your computer.
The type of the connector for the cable depends on the scanner model you use the correct cable. Confirm the scanner model and use . ADF type 3 „fi-6670 SCSI ID Flatbed type „fi-6670A USB or SCSI connection 2 5 4 USB or SCSI connection (when Kofax VRS is used) SCSI cable 1 USB cable 3 „fi-6770 „fi-6770A USB or SCSI connection 4 SCSI ID USB or SCSI connection (when Kofax VRS is used) „fi-6750S USB cable SCSI cable USB connection 1 14 3 Connecting the Cables The following describes how to connect the cables between the scanner and your computer.

Getting Started Guide
Page 15
.... • You cannot connect multiple computers to the scanner at the factory is [5]. The following SCSI cable types depending on the connector (1 or 2) used on the fi-6670A or fi-6770A, connect the cable to the computer. On the scanner side, use the first stage USB hub... the Hub be purchased. • SCSI cable: Use a SCSI cable whose connector on the computer side mates to the connector on the SCSI card installed on the Fujitsu website (FAQ): http://www.fujitsu.com/global/support/computing/peripheral/scanners/scsi/ • In a SCSI daisy chain formation, connect the scanner ...
.... • You cannot connect multiple computers to the scanner at the factory is [5]. The following SCSI cable types depending on the connector (1 or 2) used on the fi-6670A or fi-6770A, connect the cable to the computer. On the scanner side, use the first stage USB hub... the Hub be purchased. • SCSI cable: Use a SCSI cable whose connector on the computer side mates to the connector on the SCSI card installed on the Fujitsu website (FAQ): http://www.fujitsu.com/global/support/computing/peripheral/scanners/scsi/ • In a SCSI daisy chain formation, connect the scanner ...

Getting Started Guide
Page 22
...If "U" is automatically detected, and the [Found New Hardware] dialog box appears. Then, turn on page 12). If the connection is made via SCSI Connector 2, there is turned ON, and the Power LED on the scanner. 1) Press the "I" side of the main power switch of the Function... Function Number Display Power [Power] button Function Number Display 2 Turn on your computer. 3 The scanner is displayed on the Operator Panel. For a SCSI connection, turn on your computer. Note that the Function Number Display shows "1." The scanner is no need to "Section 2 Installing the Scanner" (on...
...If "U" is automatically detected, and the [Found New Hardware] dialog box appears. Then, turn on page 12). If the connection is made via SCSI Connector 2, there is turned ON, and the Power LED on the scanner. 1) Press the "I" side of the main power switch of the Function... Function Number Display Power [Power] button Function Number Display 2 Turn on your computer. 3 The scanner is displayed on the Operator Panel. For a SCSI connection, turn on your computer. Note that the Function Number Display shows "1." The scanner is no need to "Section 2 Installing the Scanner" (on...

Getting Started Guide
Page 23
When the connection is made via SCSI/USB Connector 2, select "Kofax VRS Scanner." Model fi-6670 fi-6670A fi-6770 fi-6770A fi-6750S TWAIN FUJITSU TWAIN32 ISIS/VRS FUJITSU ISIS Kofax VRS FUJITSU fi-6670dj FUJITSU fi-6770dj Fujitsu fi-6670 Fujitsu fi-6770 Kofax VRS Scanner FUJITSU fi-6750Sj Fujitsu fi-6750S -- 23 If the connection is connected to use , and then click the [Select] button. The list of scanner models...
When the connection is made via SCSI/USB Connector 2, select "Kofax VRS Scanner." Model fi-6670 fi-6670A fi-6770 fi-6770A fi-6750S TWAIN FUJITSU TWAIN32 ISIS/VRS FUJITSU ISIS Kofax VRS FUJITSU fi-6670dj FUJITSU fi-6770dj Fujitsu fi-6670 Fujitsu fi-6770 Kofax VRS Scanner FUJITSU fi-6750Sj Fujitsu fi-6750S -- 23 If the connection is connected to use , and then click the [Select] button. The list of scanner models...

Getting Started Guide
Page 24
...after the [OK] button is properly connected to "Chapter 8 Troubleshooting" in the dialog box. ■ FUJITSU ISIS scanner driver Configure scan settings, and then click the [OK] button. 24 You only check the operation...of the scanner driver may be displayed again after you do not have connected the cable properly, then refer to SCSI/USB Connector 2. In such case, click the [Scan] button in the Operator's Guide. 10 Select the [... scanner settings such as the resolution and paper size. ■ FUJITSU TWAIN 32 scanner driver Configure scan settings, and then click the [OK] button.
...after the [OK] button is properly connected to "Chapter 8 Troubleshooting" in the dialog box. ■ FUJITSU ISIS scanner driver Configure scan settings, and then click the [OK] button. 24 You only check the operation...of the scanner driver may be displayed again after you do not have connected the cable properly, then refer to SCSI/USB Connector 2. In such case, click the [Scan] button in the Operator's Guide. 10 Select the [... scanner settings such as the resolution and paper size. ■ FUJITSU TWAIN 32 scanner driver Configure scan settings, and then click the [OK] button.
