User Manual
Page 1
Model and attachements are subject to change DESIGN EASY JUICER GASTROBACK® INSTRUCTIONS FOR USE AND INCLUDES RECIPES Art.-Nr. 40118 Read all provided instructions before first usage!
Model and attachements are subject to change DESIGN EASY JUICER GASTROBACK® INSTRUCTIONS FOR USE AND INCLUDES RECIPES Art.-Nr. 40118 Read all provided instructions before first usage!
User Manual
Page 3
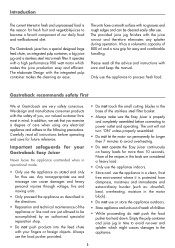
...3 Empty the pulp container and juice jug in time to avoid run-over and splatter which makes the juice production easy and efficient. The Gastroback juicer has a special designed large feed chute, an integrated pulp container, a big juice jug and a stainless steel micro mesh filter. It operates...into the feed chute with your Gastroback Easy Juicer Never leave the appliance unattended when in operational mode. • Only use . The units have a smooth surface with the safety of 800 ml and a nice grip for easy and comfortable handling. We design and manufacture consumer products with no...
...3 Empty the pulp container and juice jug in time to avoid run-over and splatter which makes the juice production easy and efficient. The Gastroback juicer has a special designed large feed chute, an integrated pulp container, a big juice jug and a stainless steel micro mesh filter. It operates...into the feed chute with your Gastroback Easy Juicer Never leave the appliance unattended when in operational mode. • Only use . The units have a smooth surface with the safety of 800 ml and a nice grip for easy and comfortable handling. We design and manufacture consumer products with no...
User Manual
Page 8
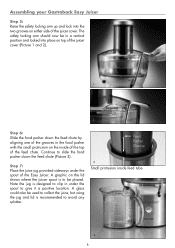
...of the grooves in under the spout of the juicer cover. A graphic on either side of the Easy Juicer. A glass could also be used to collect the juice, but using the jug and lid is designed to avoid any splatter. Assembling your Gastroback Easy Juicer Step 5: Raise the safety locking arm up ... on the inside feed tube. 4 8 The safety locking arm should now be placed. Food Pusher Groove 3 Small protrusion inside of the top of the juicer cover (Picture 1 and 2). 1 2 Step 6: Slide the food pusher down the feed chute (Picture 3). Step 7: Place the juice jug provided sideways ...
...of the grooves in under the spout of the juicer cover. A graphic on either side of the Easy Juicer. A glass could also be used to collect the juice, but using the jug and lid is designed to avoid any splatter. Assembling your Gastroback Easy Juicer Step 5: Raise the safety locking arm up ... on the inside feed tube. 4 8 The safety locking arm should now be placed. Food Pusher Groove 3 Small protrusion inside of the top of the juicer cover (Picture 1 and 2). 1 2 Step 6: Slide the food pusher down the feed chute (Picture 3). Step 7: Place the juice jug provided sideways ...