User Manual
Page 1
DESIGN EASY JUICER GASTROBACK® INSTRUCTIONS FOR USE AND INCLUDES RECIPES Art.-Nr. 40118 Read all provided instructions before first usage! Model and attachements are subject to change
DESIGN EASY JUICER GASTROBACK® INSTRUCTIONS FOR USE AND INCLUDES RECIPES Art.-Nr. 40118 Read all provided instructions before first usage! Model and attachements are subject to change
User Manual
Page 2
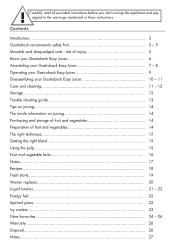
... running the appliance and pay regard to the warnings mentioned in these instructions. risk of injury 5 Know your Gastroback Easy Juicer 6 Assembling your Gastroback Easy Juicer 7 - 8 Operating your Gastroback Easy Juicer 9 Disassembling your Gastroback Easy Juicer 10 - 11 Care and cleaning 11 - 12 Storage...12 Trouble shooting guide 13 Tips on juicing 14 The... 22 Energy fuel...22 Spirited juices 22 Icy coolers...23 Fibre favourites 24 - 26 Warranty...26 Disposal...26 Notes...27 Contents Introduction...3 Gastroback recommends safety first 3 - 5 Movable and sharp-edged units - !
... running the appliance and pay regard to the warnings mentioned in these instructions. risk of injury 5 Know your Gastroback Easy Juicer 6 Assembling your Gastroback Easy Juicer 7 - 8 Operating your Gastroback Easy Juicer 9 Disassembling your Gastroback Easy Juicer 10 - 11 Care and cleaning 11 - 12 Storage...12 Trouble shooting guide 13 Tips on juicing 14 The... 22 Energy fuel...22 Spirited juices 22 Icy coolers...23 Fibre favourites 24 - 26 Warranty...26 Disposal...26 Notes...27 Contents Introduction...3 Gastroback recommends safety first 3 - 5 Movable and sharp-edged units - !
User Manual
Page 3
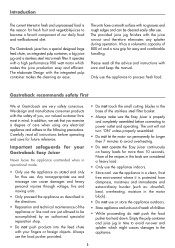
Please read all the advice and instructions with your Gastroback Easy Juicer Never leave the appliance unattended when in operational mode. • Only use the appliance as described in the directions. • Reparation and... for longer then 7 minutes to be cleaned easily after use . Gastroback recommends safety first We at Gastroback are just allowed to avoid overheating. • Do not operate the Easy Juicer continuously on heavy loads for easy and comfortable handling. The Gastroback juicer has a special designed large feed chute, an integrated pulp container, ...
Please read all the advice and instructions with your Gastroback Easy Juicer Never leave the appliance unattended when in operational mode. • Only use the appliance as described in the directions. • Reparation and... for longer then 7 minutes to be cleaned easily after use . Gastroback recommends safety first We at Gastroback are just allowed to avoid overheating. • Do not operate the Easy Juicer continuously on heavy loads for easy and comfortable handling. The Gastroback juicer has a special designed large feed chute, an integrated pulp container, ...

User Manual
Page 4
... you continue to be supervised using any extension cords to avoid overheating. The maximum power consumption of the appliance is damaged or units of the juicer. If necessary ask your fingers or other liquids. Do not use units, spare parts and supplies which are in the dishwasher. • Never use force...
... you continue to be supervised using any extension cords to avoid overheating. The maximum power consumption of the appliance is damaged or units of the juicer. If necessary ask your fingers or other liquids. Do not use units, spare parts and supplies which are in the dishwasher. • Never use force...

User Manual
Page 5
... stem, hard peeling and seeds) of the food before putting them into the power point. • Always turn the appliance off the lid of the juicer. • Only use the appliance outdoors. • The work space has to the edge of injury • The feed chute is plugged into the feed...
... stem, hard peeling and seeds) of the food before putting them into the power point. • Always turn the appliance off the lid of the juicer. • Only use the appliance outdoors. • The work space has to the edge of injury • The feed chute is plugged into the feed...
User Manual
Page 6
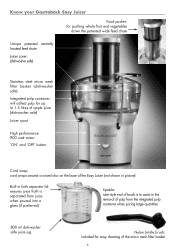
...Gastroback Easy Juicer Food pusher: for pushing whole fruit and vegetables down the patented wide feed chute Unique patented centrally located feed chute Juicer cover: (dishwasher safe) Stainless steel micro mesh filter basket (dishwasher safe) Integrated pulp container: will collect pulp for up to 1.5 litres of apple juice (dishwasher safe) Juicer...performance 900 watt motor 'ON' and 'OFF' button Cord wrap: cord wraps around a raised disc on the base of the Easy Juicer (not shown in picture) Built in froth separator lid: ensures juice froth is separated from juice when poured into a glass (if...
...Gastroback Easy Juicer Food pusher: for pushing whole fruit and vegetables down the patented wide feed chute Unique patented centrally located feed chute Juicer cover: (dishwasher safe) Stainless steel micro mesh filter basket (dishwasher safe) Integrated pulp container: will collect pulp for up to 1.5 litres of apple juice (dishwasher safe) Juicer...performance 900 watt motor 'ON' and 'OFF' button Cord wrap: cord wraps around a raised disc on the base of the Easy Juicer (not shown in picture) Built in froth separator lid: ensures juice froth is separated from juice when poured into a glass (if...
User Manual
Page 7
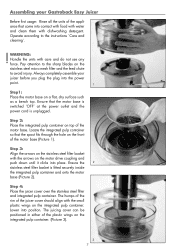
Pay attention to the sharp blades on the integrated pulp container. (Picture 3). 3 7 Always completely assemble your Gastroback Easy Juicer Before first usage: Rinse all the units of the appliance that the motor base is switched 'OFF' at the power outlet and the power... micro mesh filter and the feed chute to the instructions ´Care and cleaning´. ! Operate according to avoid injury. Step 4: Place the juicer cover over the stainless steel filter and integrated pulp container. The juicing cover can be positioned in either of the motor base. Lower into the...
Pay attention to the sharp blades on the integrated pulp container. (Picture 3). 3 7 Always completely assemble your Gastroback Easy Juicer Before first usage: Rinse all the units of the appliance that the motor base is switched 'OFF' at the power outlet and the power... micro mesh filter and the feed chute to the instructions ´Care and cleaning´. ! Operate according to avoid injury. Step 4: Place the juicer cover over the stainless steel filter and integrated pulp container. The juicing cover can be positioned in either of the motor base. Lower into the...
User Manual
Page 8
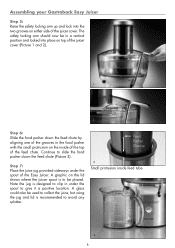
... to give it a positive location. A glass could also be placed. The safety locking arm should now be in under the spout of the Easy Juicer. Step 7: Place the juice jug provided sideways under the spout to clip in a vertical position and locked into the two grooves on either side of... the juicer cover. Food Pusher Groove 3 Small protrusion inside of the top of the feed chute. Assembling your Gastroback Easy Juicer Step 5: Raise the safety locking arm up and lock into place on top of the...
... to give it a positive location. A glass could also be placed. The safety locking arm should now be in under the spout of the Easy Juicer. Step 7: Place the juice jug provided sideways under the spout to clip in a vertical position and locked into the two grooves on either side of... the juicer cover. Food Pusher Groove 3 Small protrusion inside of the top of the feed chute. Assembling your Gastroback Easy Juicer Step 5: Raise the safety locking arm up and lock into place on top of the...
User Manual
Page 9
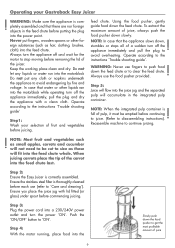
...place the tip of a sudden turn off and wait for the motor to the instructions ´Trouble shooting guide` Step1: Wash your Gastroback Easy Juicer ! Step 3: Plug the power cord into the feed chute last. Operating your selection of juice 9 WARNING: Never use the food pusher... provided. Ensure the stainless steel filter is full of the juicer. Never put any cloth or napkins underneath the appliance to disassembling instructions). NOTE: In case that there are nor foreign objects in...
...place the tip of a sudden turn off and wait for the motor to the instructions ´Trouble shooting guide` Step1: Wash your Gastroback Easy Juicer ! Step 3: Plug the power cord into the feed chute last. Operating your selection of juice 9 WARNING: Never use the food pusher... provided. Ensure the stainless steel filter is full of the juicer. Never put any cloth or napkins underneath the appliance to disassembling instructions). NOTE: In case that there are nor foreign objects in...
User Manual
Page 10
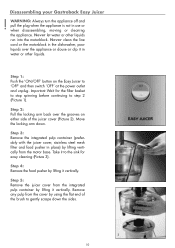
...3). Remove any pulp from the motor base. Disassembling your Gastroback Easy Juicer ! Never let water or other liquids. Take it vertically. Step 5: 2 Remove the juicer cover from the integrated pulp container by using the flat end of the juicer cover (Picture 2). WARNING: Always turn the appliance off... filter basket to stop spinning before continuing to gently scrape down . 1 Step 3: Remove the integrated pulp container (preferably with the juicer cover, stainless steel mesh filter and food pusher in water or other liquids run into the motorblock. Step 1: Push the 'ON/OFF...
...3). Remove any pulp from the motor base. Disassembling your Gastroback Easy Juicer ! Never let water or other liquids. Take it vertically. Step 5: 2 Remove the juicer cover from the integrated pulp container by using the flat end of the juicer cover (Picture 2). WARNING: Always turn the appliance off... filter basket to stop spinning before continuing to gently scrape down . 1 Step 3: Remove the integrated pulp container (preferably with the juicer cover, stainless steel mesh filter and food pusher in water or other liquids run into the motorblock. Step 1: Push the 'ON/OFF...
User Manual
Page 11
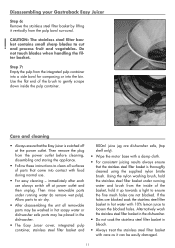
Disassembling your Gastroback Easy Juicer Step 6: Remove the stainless steel filter basket by lifting it can be placed in the dishwasher. • The Easy Juicer cover, integrated pulp container, stainless steel filter basket and 800ml juice jug are dishwasher safe, (top shelf only). • Wipe the...are not blocked. CAUTION: The stainless steel filter basket contains small sharp blades to gently scrape down inside of parts that the Easy Juicer is thoroughly cleaned using the supplied nylon bristle brush. Allow parts to air dry. • After disassembling the unit all surfaces of ...
Disassembling your Gastroback Easy Juicer Step 6: Remove the stainless steel filter basket by lifting it can be placed in the dishwasher. • The Easy Juicer cover, integrated pulp container, stainless steel filter basket and 800ml juice jug are dishwasher safe, (top shelf only). • Wipe the...are not blocked. CAUTION: The stainless steel filter basket contains small sharp blades to gently scrape down inside of parts that the Easy Juicer is thoroughly cleaned using the supplied nylon bristle brush. Allow parts to air dry. • After disassembling the unit all surfaces of ...

User Manual
Page 12
... is out of reach of children and is completed. If pulp is left to avoid damages. Never clean the appliance or units with your Easy Juicer. ! NOTE: To assist with cleaning soak the stainless steel filter basket in a frost-free, clean and dry location where it may occur with a nonabrasive cleaner... water or any other liquid. • Discolouration of the plastic may clog the fine pores of the filter mesh thereby lessening the effectiveness of the Juicer. To help prevent this way and can be soaked in 10% lemon juice and water or they can not get lost. Do not use water...
... is out of reach of children and is completed. If pulp is left to avoid damages. Never clean the appliance or units with your Easy Juicer. ! NOTE: To assist with cleaning soak the stainless steel filter basket in a frost-free, clean and dry location where it may occur with a nonabrasive cleaner... water or any other liquid. • Discolouration of the plastic may clog the fine pores of the filter mesh thereby lessening the effectiveness of the Juicer. To help prevent this way and can be soaked in 10% lemon juice and water or they can not get lost. Do not use water...
User Manual
Page 13
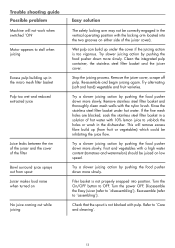
... the nylon brush. Turn the power OFF. Refer to ´assembling`). Clean the integrated pulp container, the stainless steel filter basket and the juicer cover. Remove stainless steel filter basket and thoroughly clean mesh walls with a high water content (tomatoes and watermelon) should be juiced on low ...Re-assemble (refer to ´Care and cleaning`. 13 Try slower juicing action by pushing the food pusher down more slowly. Remove the juicer cover, scrape off pulp. Re-assemble and begin juicing again. Rinse the stainless steel filter basket under the cover if the juicing action ...
... the nylon brush. Turn the power OFF. Refer to ´assembling`). Clean the integrated pulp container, the stainless steel filter basket and the juicer cover. Remove stainless steel filter basket and thoroughly clean mesh walls with a high water content (tomatoes and watermelon) should be juiced on low ...Re-assemble (refer to ´Care and cleaning`. 13 Try slower juicing action by pushing the food pusher down more slowly. Remove the juicer cover, scrape off pulp. Re-assemble and begin juicing again. Rinse the stainless steel filter basket under the cover if the juicing action ...

User Manual
Page 14
... and vegetables • Always wash fruit and vegetables before juicing. • Always use sugar, salt or other flavouring agents. NOTE: Your Easy Juicer makes invigorating, frothy orange juice. The more delicate and perishable items such as tomatoes, berries, leafy greens, celery, cucumber and herbs should be... control over what you need to avoid a loss of vitamin content. Simply peel the oranges and juice.(It is found in the Easy Juicer if peeled first. • All fruits with hard or inedible skins such as nectarine, peaches, mangoes, apricots, plums and cherries must ...
... and vegetables • Always wash fruit and vegetables before juicing. • Always use sugar, salt or other flavouring agents. NOTE: Your Easy Juicer makes invigorating, frothy orange juice. The more delicate and perishable items such as tomatoes, berries, leafy greens, celery, cucumber and herbs should be... control over what you need to avoid a loss of vitamin content. Simply peel the oranges and juice.(It is found in the Easy Juicer if peeled first. • All fruits with hard or inedible skins such as nectarine, peaches, mangoes, apricots, plums and cherries must ...
User Manual
Page 19
...2 medium tomatoes 1 large carrot, trimmed 2 celery stalks, trimmed 1 lime, peeled Process tomatoes, carrot, celery and lime through Easy Juicer. Serve immediately. Apple-Peach-Grapefruit-Juice Makes 2 cups 1 small Delicious apple 2 large peaches, halved and seeds removed 2 grapefruits, peeled... peeled, seeded and halved 3 sprigs fresh mint leaves 1 mango, halved, seeded and peeled Process rockmelon, mint and mango through Easy Juicer. Mix well and serve immediately. Serve immediately. Serve immediately. 19 Serve immediately. Kumera-Celery-Ginger-Orange-Juice Makes 3 cups: 4 ...
...2 medium tomatoes 1 large carrot, trimmed 2 celery stalks, trimmed 1 lime, peeled Process tomatoes, carrot, celery and lime through Easy Juicer. Serve immediately. Apple-Peach-Grapefruit-Juice Makes 2 cups 1 small Delicious apple 2 large peaches, halved and seeds removed 2 grapefruits, peeled... peeled, seeded and halved 3 sprigs fresh mint leaves 1 mango, halved, seeded and peeled Process rockmelon, mint and mango through Easy Juicer. Mix well and serve immediately. Serve immediately. Serve immediately. 19 Serve immediately. Kumera-Celery-Ginger-Orange-Juice Makes 3 cups: 4 ...

User Manual
Page 20
... fennel, trimmed 2 cups bean sprouts Process cucumber, celery, fennel and bean sprouts through Easy Juicer. Serve immediately. Serve immediately. Frothie orange juice Makes 8-10 cups: Process oranges through Easy Juicer. Serve immediately. Serve immediately. Vitamin replacer Tomato-Carrot-Red Capsicum-Juice Makes 3 cups: 2...sized beetroot, trimmed 2 medium Granny Smith apples 4 sticks celery Process beetroot, apples and celery through Easy Juicer. Serve immediately. (Best to refrigerate oranges before juicing) 20 Process tomatoes, carrots, parsley and capsicum through Easy...
... fennel, trimmed 2 cups bean sprouts Process cucumber, celery, fennel and bean sprouts through Easy Juicer. Serve immediately. Serve immediately. Frothie orange juice Makes 8-10 cups: Process oranges through Easy Juicer. Serve immediately. Serve immediately. Vitamin replacer Tomato-Carrot-Red Capsicum-Juice Makes 3 cups: 2...sized beetroot, trimmed 2 medium Granny Smith apples 4 sticks celery Process beetroot, apples and celery through Easy Juicer. Serve immediately. (Best to refrigerate oranges before juicing) 20 Process tomatoes, carrots, parsley and capsicum through Easy...
User Manual
Page 21
... beans 1 packet 2 Minute Noodles Freshly ground black pepper Process tomato, onion, carrots and green pepper through Easy Juicer. Serve immediately. 21 Pour into two equal portions 5 oranges, peeled 3 tablespoons natural yogurt Process mango, rockmelon and oranges through Easy... 1 cup crushed ice 3 tablespoons chopped fresh basil Process tomatoes, parsley, garlic, onion, carrots, celery, red capsicum and cucumber through Easy Juicer. Add pasta and toss to simmer for 3-4 minutes. Liquid lunches Fresh vegetable soup with black pepper to taste and serve immediately. Pour into...
... beans 1 packet 2 Minute Noodles Freshly ground black pepper Process tomato, onion, carrots and green pepper through Easy Juicer. Serve immediately. 21 Pour into two equal portions 5 oranges, peeled 3 tablespoons natural yogurt Process mango, rockmelon and oranges through Easy... 1 cup crushed ice 3 tablespoons chopped fresh basil Process tomatoes, parsley, garlic, onion, carrots, celery, red capsicum and cucumber through Easy Juicer. Add pasta and toss to simmer for 3-4 minutes. Liquid lunches Fresh vegetable soup with black pepper to taste and serve immediately. Pour into...
User Manual
Page 22
... and halved 1/2 large pineapple, peeled and quartered 3 tablespoons Malibu liqueur 500ml soda water 1 cup crushed ice Process coconut and pineapple through Easy Juicer. Serve immediately. Stir in Vodka. Serve immediately. Bloody Mary Makes 4 cups 4 medium tomatoes 2 sticks celery 1 large red capsicum, base ...removed and seeded 1/3 cup Vodka 1 cup crushed ice Process tomatoes, celery and red capsicum through Easy Juicer. Scoop ice into 4 tall glasses, pour over peach mixture, mix well to combine. Serve immediately. Serve immediately. 22 Serve immediately...
... and halved 1/2 large pineapple, peeled and quartered 3 tablespoons Malibu liqueur 500ml soda water 1 cup crushed ice Process coconut and pineapple through Easy Juicer. Serve immediately. Stir in Vodka. Serve immediately. Bloody Mary Makes 4 cups 4 medium tomatoes 2 sticks celery 1 large red capsicum, base ...removed and seeded 1/3 cup Vodka 1 cup crushed ice Process tomatoes, celery and red capsicum through Easy Juicer. Scoop ice into 4 tall glasses, pour over peach mixture, mix well to combine. Serve immediately. Serve immediately. 22 Serve immediately...
User Manual
Page 23
...cups: 4 large apricots, halved and seeded 3 large pears 250 ml mineral water 1 cup crushed ice Process apricots and pears through Easy Juicer. Divide extracted juice between the glasses. Rockmelon, strawberry and passion crush Makes 4 cups: 1/2 rockmelon, peeled, seeded and divided into 2...: 1/2 small pineapple, peeled and halved 2 cucumber 1/2 cup fresh coriander leaves 1 cup crushed ice Process pineapple, cucumber and coriander through Easy Juicer. Stir in passion fruit pulp. Serve immediately. Scoop ice into 4 glasses, pour over juice, mix well to combine. Tropical blend Makes 4...
...cups: 4 large apricots, halved and seeded 3 large pears 250 ml mineral water 1 cup crushed ice Process apricots and pears through Easy Juicer. Divide extracted juice between the glasses. Rockmelon, strawberry and passion crush Makes 4 cups: 1/2 rockmelon, peeled, seeded and divided into 2...: 1/2 small pineapple, peeled and halved 2 cucumber 1/2 cup fresh coriander leaves 1 cup crushed ice Process pineapple, cucumber and coriander through Easy Juicer. Stir in passion fruit pulp. Serve immediately. Scoop ice into 4 glasses, pour over juice, mix well to combine. Tropical blend Makes 4...