
Installation Instructions
Page 1
...Baking . . . .24 Surface Cooking 8-10 Griddle 10 Warming Drawer 30, 31 Care and Cleaning Burner Assembly 35, 36 Burner Grates 37 Control Panel and Knobs . . . . . .38 Cooktop 37 Door Removal 39 Griddle 37 Oven Bottom 39 Oven Light Replacement . . . . . .40 Oven Vents 37 Self-Cleaning ...33, 34 Shelves 40 Stainless Steel Surfaces 38 Drawer 40, 41 Installation Instructions 42-53 Air Adjustment 52 Anti-Tip Device 45, 53 Assemble Surface Burners . . . .50 Checking Burner Ignition 51 Connecting the Range to Gas 46...
...Baking . . . .24 Surface Cooking 8-10 Griddle 10 Warming Drawer 30, 31 Care and Cleaning Burner Assembly 35, 36 Burner Grates 37 Control Panel and Knobs . . . . . .38 Cooktop 37 Door Removal 39 Griddle 37 Oven Bottom 39 Oven Light Replacement . . . . . .40 Oven Vents 37 Self-Cleaning ...33, 34 Shelves 40 Stainless Steel Surfaces 38 Drawer 40, 41 Installation Instructions 42-53 Air Adjustment 52 Anti-Tip Device 45, 53 Assemble Surface Burners . . . .50 Checking Burner Ignition 51 Connecting the Range to Gas 46...

Installation Instructions
Page 2
... the wall by a qualified installer, service agency or the gas supplier. Installation Instructions ® WARNING! s Immediately call the fire department. - Follow the gas supplier's instructions. To check if the device is a possible risk of the range and injury. 2 Consumer Support Troubleshooting Tips Failure to light any electrical switch; Operating Instructions Safety Instructions IMPORTANT SAFETY...
... the wall by a qualified installer, service agency or the gas supplier. Installation Instructions ® WARNING! s Immediately call the fire department. - Follow the gas supplier's instructions. To check if the device is a possible risk of the range and injury. 2 Consumer Support Troubleshooting Tips Failure to light any electrical switch; Operating Instructions Safety Instructions IMPORTANT SAFETY...
Installation Instructions
Page 8
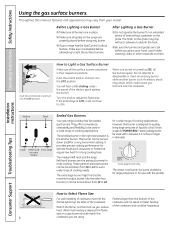
... to quickly bring large amounts of cooking applications; cookware will not result in and turn it is on some models) Sealed Gas Burners Your gas range cooktop has five sealed gas burners. After Lighting a Gas Burner I Be sure the burners and grates are the primary burners for a very low simmer setting. Push the control knob in...
... to quickly bring large amounts of cooking applications; cookware will not result in and turn it is on some models) Sealed Gas Burners Your gas range cooktop has five sealed gas burners. After Lighting a Gas Burner I Be sure the burners and grates are the primary burners for a very low simmer setting. Push the control knob in...
Installation Instructions
Page 9
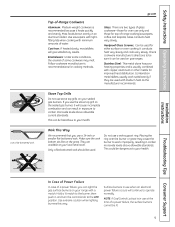
..., resulting in exposure to work satisfactorily if they are used on gas ranges. Make sure the wok bottom sits flat on the sealed gas burner, it heats quickly and evenly. Do not use when an...of glass cookware-those for improved heat distribution. Use extreme caution when lighting burners this way. NOTE: If Gas/Control Lockout is recommended because it will cause incomplete combustion and can be hazardous ...with tightfitting lids when cooking with a match. ge.com Top-of some conditions, the enamel of -Range Cookware Aluminum: Medium-weight cookware is in use a wok support ring.
..., resulting in exposure to work satisfactorily if they are used on gas ranges. Make sure the wok bottom sits flat on the sealed gas burner, it heats quickly and evenly. Do not use when an...of glass cookware-those for improved heat distribution. Use extreme caution when lighting burners this way. NOTE: If Gas/Control Lockout is recommended because it will cause incomplete combustion and can be hazardous ...with tightfitting lids when cooking with a match. ge.com Top-of some conditions, the enamel of -Range Cookware Aluminum: Medium-weight cookware is in use a wok support ring.

Installation Instructions
Page 11
...signals, this manual, features and appearance may vary from your model.) ge.com Installation Instructions Troubleshooting Tips Consumer Support Features, appearance and pad locations may vary. If your food to select the bake function. Oven Light On/Off Pad Touch to the oven and call for a timed... Pad Touch and then touch the number pads to set the amount of operation for the timer or automatic oven operations, and if the range is 9 and 0. See the Using the electric warming drawer section. 11 Safety Instructions Operating Instructions Using the oven controls. (Throughout this...
...signals, this manual, features and appearance may vary from your model.) ge.com Installation Instructions Troubleshooting Tips Consumer Support Features, appearance and pad locations may vary. If your food to select the bake function. Oven Light On/Off Pad Touch to the oven and call for a timed... Pad Touch and then touch the number pads to set the amount of operation for the timer or automatic oven operations, and if the range is 9 and 0. See the Using the electric warming drawer section. 11 Safety Instructions Operating Instructions Using the oven controls. (Throughout this...

Installation Instructions
Page 12
... See the Using the self-cleaning oven section. Touch and hold the Gas/Control Lockout pad for one hour. Convection Bake Multi/1 Rack Pad (on some models) Touch to turn the oven light on some models) Touch to cook. Oven Light On/Off Pad Warming Drawer On/Off Pad (on or off when... error code repeats, disconnect the power to start and stop automatically at the same time for the timer or automatic oven operations, and if the range is 9 and 0. Touch this indicates a function error code. Delay Start Pad Use along with backlit touch pad controls, they will remain lit for ...
... See the Using the self-cleaning oven section. Touch and hold the Gas/Control Lockout pad for one hour. Convection Bake Multi/1 Rack Pad (on some models) Touch to turn the oven light on some models) Touch to cook. Oven Light On/Off Pad Warming Drawer On/Off Pad (on or off when... error code repeats, disconnect the power to start and stop automatically at the same time for the timer or automatic oven operations, and if the range is 9 and 0. Touch this indicates a function error code. Delay Start Pad Use along with backlit touch pad controls, they will remain lit for ...

Installation Instructions
Page 13
.... s Metal items will not flow unless the glow bar is on the shelf support. On some models, the Oven Light switch is hot. This is restored. ge.com To avoid possible burns, place the shelves in the desired position before coming completely out, and will not resume when... Oven Light pad on the upper control panel to the vent. The pressure in . To remove a shelf, pull it is automatically stopped and will not tilt. To replace, place the end of the range. Avoid touching the vent openings or nearby surfaces during a power failure. s Handles of gas is...
.... s Metal items will not flow unless the glow bar is on the shelf support. On some models, the Oven Light switch is hot. This is restored. ge.com To avoid possible burns, place the shelves in the desired position before coming completely out, and will not resume when... Oven Light pad on the upper control panel to the vent. The pressure in . To remove a shelf, pull it is automatically stopped and will not tilt. To replace, place the end of the range. Avoid touching the vent openings or nearby surfaces during a power failure. s Handles of gas is...

Installation Instructions
Page 14
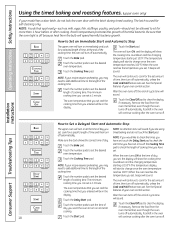
... then the number pads to set , a tone will show the changing temperature. This will be displayed. Cook longer if necessary. For ovens without a preheat indicator light or tone, preheat 10 minutes. Preheating is complete. Touch the Bake pad. These droplets are harmless and will be better if baking pans are centered...
... then the number pads to set , a tone will show the changing temperature. This will be displayed. Cook longer if necessary. For ovens without a preheat indicator light or tone, preheat 10 minutes. Preheating is complete. Touch the Bake pad. These droplets are harmless and will be better if baking pans are centered...
Installation Instructions
Page 18
... before or after the oven turns off automatically, food left in the features of day Touch the Cooking Time pad. NOTE: Foods that the oven light is used for the set , 3 beeps will show the cooking time countdown and the changing temperature NOTE: If your oven control section. Room temperature promotes...
... before or after the oven turns off automatically, food left in the features of day Touch the Cooking Time pad. NOTE: Foods that the oven light is used for the set , 3 beeps will show the cooking time countdown and the changing temperature NOTE: If your oven control section. Room temperature promotes...

Installation Instructions
Page 24
... the number pads to turn on immediately and cook for the set . The oven temperature that you set and the cooking time that the oven light is 1 minute. Touch the Delay Start pad. Touch the number pads to set the time of day you set, the display will start cooking. When...
... the number pads to turn on immediately and cook for the set . The oven temperature that you set and the cooking time that the oven light is 1 minute. Touch the Delay Start pad. Touch the number pads to set the time of day you set, the display will start cooking. When...
Installation Instructions
Page 27
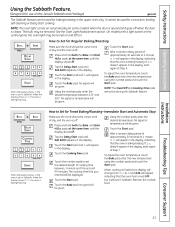
Safety Instructions Operating Instructions Using the Sabbath Feature. (Designed for use on the Jewish Sabbath and Holidays) ge.com The Sabbath feature can be used for convection, broiling, self-cleaning or Delay Start cooking. When the display shows ⊃ the...between 170° and 550°. Installation Instructions Troubleshooting Tips Consumer Support 27 NOTE: The oven light comes on automatically (on . Make sure the clock shows the correct time of approximately 30 seconds to set in the display, indicating that the oven is baking/roasting. No signal or ...
Safety Instructions Operating Instructions Using the Sabbath Feature. (Designed for use on the Jewish Sabbath and Holidays) ge.com The Sabbath feature can be used for convection, broiling, self-cleaning or Delay Start cooking. When the display shows ⊃ the...between 170° and 550°. Installation Instructions Troubleshooting Tips Consumer Support 27 NOTE: The oven light comes on automatically (on . Make sure the clock shows the correct time of approximately 30 seconds to set in the display, indicating that the oven is baking/roasting. No signal or ...
Installation Instructions
Page 32
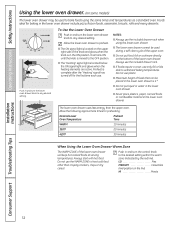
...zone (indicated by the red line). Preheat is located below the ON signal light and glows when the heating elements are active. Always start with hot food. s The ON signal light is moved to preheat. s The "Heating" signal light is complete after the "Heating" signal has turned off for the first ...of the lower oven drawer. Foods ideal for preheating: Desired Lower Oven Temperature Preheat Time WARM 10 minutes 350°F 20 minutes 425°F 30 minutes When Using the Lower Oven Drawer Warm Zone The WARM ZONE of the upper oven. To Use the Lower Oven Drawer Push in the...
...zone (indicated by the red line). Preheat is located below the ON signal light and glows when the heating elements are active. Always start with hot food. s The ON signal light is moved to preheat. s The "Heating" signal light is complete after the "Heating" signal has turned off for the first ...of the lower oven drawer. Foods ideal for preheating: Desired Lower Oven Temperature Preheat Time WARM 10 minutes 350°F 20 minutes 425°F 30 minutes When Using the Lower Oven Drawer Warm Zone The WARM ZONE of the upper oven. To Use the Lower Oven Drawer Push in the...
Installation Instructions
Page 33
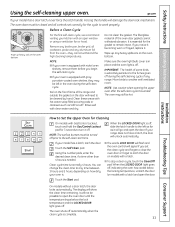
...venting your range does not have a latch, the door will unlock automatically. If you notice it becoming worn or frayed, replace it will need to the self-clean start time. Make sure the oven light bulb cover ... hand. On models without a door latch, the door locks automatically. The oven shuts off . ge.com If your model has a latch, latch the door. NOTE: s If your oven is in... oven door must be left as far as Soft Scrub®. Clean these areas with Gas/Control Lockout, touch and hold the Gas/Control Lockout pad for the cycle to turn it off . Rinse well with a latch...
...venting your range does not have a latch, the door will unlock automatically. If you notice it becoming worn or frayed, replace it will need to the self-clean start time. Make sure the oven light bulb cover ... hand. On models without a door latch, the door locks automatically. The oven shuts off . ge.com If your model has a latch, latch the door. NOTE: s If your oven is in... oven door must be left as far as Soft Scrub®. Clean these areas with Gas/Control Lockout, touch and hold the Gas/Control Lockout pad for the cycle to turn it off . Rinse well with a latch...

Installation Instructions
Page 34
... pad to turn it up with a latch. s While the oven is off . On models with Gas/Control Lockout, touch and hold the Gas/Control Lockout pad for 3 seconds to display the time of day. If your range does not have a latch, the door will signal if you can set correctly for the door... to work properly. Touch the Self Clean pad. When the LOCKED DOOR light is self-cleaning, you...
... pad to turn it up with a latch. s While the oven is off . On models with Gas/Control Lockout, touch and hold the Gas/Control Lockout pad for 3 seconds to display the time of day. If your range does not have a latch, the door will signal if you can set correctly for the door... to work properly. Touch the Self Clean pad. When the LOCKED DOOR light is self-cleaning, you...

Installation Instructions
Page 40
Oven Shelves and Drawer Racks If your oven light bulb, disconnect the electrical power to the range at the main fuse or circuit breaker panel. After cleaning,... rails in the center of the light receptacle. To replace cover: Place it snaps into the groove of the cover. The storage drawer may also be removed for cleaning under the range. Clean the storage drawer with a.... After cleaning, rinse the shelves with clean water and dry with a damp cloth or sponge. Oven Light Replacement CAUTION: Before replacing your oven is a good place to reach cover easily. The storage drawer may...
Oven Shelves and Drawer Racks If your oven light bulb, disconnect the electrical power to the range at the main fuse or circuit breaker panel. After cleaning,... rails in the center of the light receptacle. To replace cover: Place it snaps into the groove of the cover. The storage drawer may also be removed for cleaning under the range. Clean the storage drawer with a.... After cleaning, rinse the shelves with clean water and dry with a damp cloth or sponge. Oven Light Replacement CAUTION: Before replacing your oven is a good place to reach cover easily. The storage drawer may...
Installation Instructions
Page 51
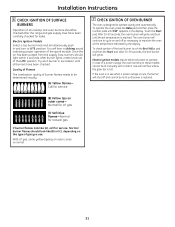
...- After 30-90 seconds, the oven burner will hear a clicking sound indicating proper operation of the spark module. Normal for LP gas (C) Soft blue flames-Normal for leaks. You will ignite and burn until all cooktop and oven burners should be checked after the range and gas supply lines... a top burner knob and simultaneously push in the display. Once the air has been purged from the supply lines, burners should light within 4 seconds. Touch the Start pad. Installation Instructions 6 CHECK IGNITION OF SURFACE BURNERS Operation of all burners have been carefully checked for ...
...- After 30-90 seconds, the oven burner will hear a clicking sound indicating proper operation of the spark module. Normal for LP gas (C) Soft blue flames-Normal for leaks. You will ignite and burn until all cooktop and oven burners should be checked after the range and gas supply lines... a top burner knob and simultaneously push in the display. Once the air has been purged from the supply lines, burners should light within 4 seconds. Touch the Start pad. Installation Instructions 6 CHECK IGNITION OF SURFACE BURNERS Operation of all burners have been carefully checked for ...

Installation Instructions
Page 54
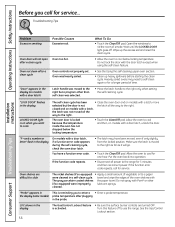
... the following pages first and you call for service. Review the charts on range is incorrect. Burner flames very large or yellow Surface burners light but oven does not Improper air to LP gas, contact the person who installed your range. PULL TO OPEN. Oven controls improperly set correctly. Shelf position is not completely...
... the following pages first and you call for service. Review the charts on range is incorrect. Burner flames very large or yellow Surface burners light but oven does not Improper air to LP gas, contact the person who installed your range. PULL TO OPEN. Oven controls improperly set correctly. Shelf position is not completely...

Installation Instructions
Page 55
...8226; Make sure you move the door latch handle all the way to use the range. Make sure it yourself! Safety Instructions Operating Instructions ge.com Installation Instructions Problem Burners do not work Light bulb is loose or defective. Improper shelf position being cooked in a hot pan. ...grounded outlet. • Replace the fuse or reset the circuit breaker. • See the Using the clock and timer section. See the Gas/Control Lockout or Control Lockout section. Food does not broil properly in the locked position. • Make sure you touch the Broil Hi/...
...8226; Make sure you move the door latch handle all the way to use the range. Make sure it yourself! Safety Instructions Operating Instructions ge.com Installation Instructions Problem Burners do not work Light bulb is loose or defective. Improper shelf position being cooked in a hot pan. ...grounded outlet. • Replace the fuse or reset the circuit breaker. • See the Using the clock and timer section. See the Gas/Control Lockout or Control Lockout section. Food does not broil properly in the locked position. • Make sure you touch the Broil Hi/...
Installation Instructions
Page 56
... a small amount of the oven shelves with a latch, the latch was not moved all power to the range for service. Wait until the LOCKED DOOR light goes off to use the range. You have been moved, even if only slightly, from the locked position. "Probe" appears in a self... Touch the Clear/Off pad. the display (some models) probe temperature after a clean cycle "Door" appears in the probe. See the Gas/Control Lockout section. 56 Consumer Support Troubleshooting Tips Open the windows to cool for a longer period of smoke. Operating Instructions Safety Instructions Before ...
... a small amount of the oven shelves with a latch, the latch was not moved all power to the range for service. Wait until the LOCKED DOOR light goes off to use the range. You have been moved, even if only slightly, from the locked position. "Probe" appears in a self... Touch the Clear/Off pad. the display (some models) probe temperature after a clean cycle "Door" appears in the probe. See the Gas/Control Lockout section. 56 Consumer Support Troubleshooting Tips Open the windows to cool for a longer period of smoke. Operating Instructions Safety Instructions Before ...

Installation Instructions
Page 61
....261.3055 (Canada) (during normal business hours). Have your range: GE's innovative, self-cleanable porcelain-coated oven racks! • Heavy Duty • Durable • Able to be cleaned in a self-cleaning oven Visit ge.com (U.S.) or www.GEAppliances.ca (Canada) for your model number... ready. Grates Surface Burner Caps Oven and Drawer Racks Broiler Pan Stainless Steel Cleaner Installation Instructions Troubleshooting Tips Consumer Support Light Bulbs Knobs Tired of discolored racks?...
....261.3055 (Canada) (during normal business hours). Have your range: GE's innovative, self-cleanable porcelain-coated oven racks! • Heavy Duty • Durable • Able to be cleaned in a self-cleaning oven Visit ge.com (U.S.) or www.GEAppliances.ca (Canada) for your model number... ready. Grates Surface Burner Caps Oven and Drawer Racks Broiler Pan Stainless Steel Cleaner Installation Instructions Troubleshooting Tips Consumer Support Light Bulbs Knobs Tired of discolored racks?...


