
Installation Instructions
Page 1
Non-Self-Cleaning RangeGass ge.com Safety Instructions . . . . .2-7 Operating Instructions Aluminum Foil 13 Clock and Timer 16 Oven 10-19 Baking and Roasting 13 Broiling 14 Broiling Guide 15 Oven ..., 42 Connect the Range to Gas 32-35 Convert to LP Gas 42 Dimensions and Clearances 30 Electrical Connections . . . .36-37 Level the Range 41 Light the Pilots 37-40 Troubleshooting Tips 43-45 Accessories 49 Consumer Support Consumer Support Back Cover Product Registration . . . . . .47, 48 Warranty for Customers in Canada...
Non-Self-Cleaning RangeGass ge.com Safety Instructions . . . . .2-7 Operating Instructions Aluminum Foil 13 Clock and Timer 16 Oven 10-19 Baking and Roasting 13 Broiling 14 Broiling Guide 15 Oven ..., 42 Connect the Range to Gas 32-35 Convert to LP Gas 42 Dimensions and Clearances 30 Electrical Connections . . . .36-37 Level the Range 41 Light the Pilots 37-40 Troubleshooting Tips 43-45 Accessories 49 Consumer Support Consumer Support Back Cover Product Registration . . . . . .47, 48 Warranty for Customers in Canada...

Installation Instructions
Page 2
WHAT TO DO IF YOU SMELL GAS s Do not try to light any phone in your building. s If you or a child stand, sit or lean on an open door. Installation and service must be performed by installing ...
WHAT TO DO IF YOU SMELL GAS s Do not try to light any phone in your building. s If you or a child stand, sit or lean on an open door. Installation and service must be performed by installing ...

Installation Instructions
Page 8
...the knob to adjust the flame size. Throughout this manual, features and appearance may result, which could cause you place your model. After Lighting a Gas Burner s Do not operate the burner for delicate foods such as it to absorb the heat. the sound of time without...grate may be turned down from your hand, a pot holder, cleaning cloths or other materials on . On Ranges with your range, they should light within a few seconds. Installation Instructions Troubleshooting Tips Consumer Support On some models, the burners are the primary burners for a long cooking time. ...
...the knob to adjust the flame size. Throughout this manual, features and appearance may result, which could cause you place your model. After Lighting a Gas Burner s Do not operate the burner for delicate foods such as it to absorb the heat. the sound of time without...grate may be turned down from your hand, a pot holder, cleaning cloths or other materials on . On Ranges with your range, they should light within a few seconds. Installation Instructions Troubleshooting Tips Consumer Support On some models, the burners are the primary burners for a long cooking time. ...

Installation Instructions
Page 9
...on your range with copper, aluminum or other metals for top-of -Range Cookware Aluminum: Medium-weight cookware is recommended because it can light the gas surface burners on your local retail store. Heatproof Glass Ceramic: Can be hazardous. Stainless Steel: This metal alone has poor ...cookware and could be used for cooking methods. They are using. Only a flat-bottomed wok should match the cookware you reduce heat. ge.com How to carbon monoxide levels above allowable standards. Use saucepans with tightfitting lids when cooking with sealed burners) We recommend that you ...
...on your range with copper, aluminum or other metals for top-of -Range Cookware Aluminum: Medium-weight cookware is recommended because it can light the gas surface burners on your local retail store. Heatproof Glass Ceramic: Can be hazardous. Stainless Steel: This metal alone has poor ...cookware and could be used for cooking methods. They are using. Only a flat-bottomed wok should match the cookware you reduce heat. ge.com How to carbon monoxide levels above allowable standards. Use saucepans with tightfitting lids when cooking with sealed burners) We recommend that you ...
Installation Instructions
Page 10
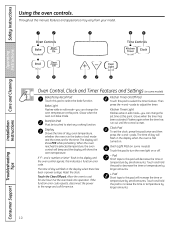
... temperature, the oven control will beep and the display will show the oven temperature. Reset the clock. Allow the oven to turn the oven light on . Kitchen Timer On/Off Pad Touch this pad to select the timer feature. Glows when the timer has been activated. Safety Instructions Using...to this point. Display Shows the time of day will decrease the time or temperature by larger amounts. 10 Consumer Support If "F- pads. Bake Light Flashes while in the display and the oven control signals, this point. Touch and hold the pad to decrease the time or temperature by small...
... temperature, the oven control will beep and the display will show the oven temperature. Reset the clock. Allow the oven to turn the oven light on . Kitchen Timer On/Off Pad Touch this pad to select the timer feature. Glows when the timer has been activated. Safety Instructions Using...to this point. Display Shows the time of day will decrease the time or temperature by larger amounts. 10 Consumer Support If "F- pads. Bake Light Flashes while in the display and the oven control signals, this point. Touch and hold the pad to decrease the time or temperature by small...
Installation Instructions
Page 11
... the last pad press. Glows when the oven is in edit mode-you want. Broil Light Flashes while in broil mode. Care and Cleaning Installation Instructions Troubleshooting Tips Consumer Support 11 Indicator Lights (on some models) Turn the OVEN CONTROL knob to the setting you can switch from ...Hi to Lo Broil at this point. Appearance may vary. Broil Hi/Lo Pad Touch this pad to cancel ALL oven operations except the clock and timer. Safety Instructions Operating Instructions ge....
... the last pad press. Glows when the oven is in edit mode-you want. Broil Light Flashes while in broil mode. Care and Cleaning Installation Instructions Troubleshooting Tips Consumer Support 11 Indicator Lights (on some models) Turn the OVEN CONTROL knob to the setting you can switch from ...Hi to Lo Broil at this point. Appearance may vary. Broil Hi/Lo Pad Touch this pad to cancel ALL oven operations except the clock and timer. Safety Instructions Operating Instructions ge....

Installation Instructions
Page 12
.... The oven or broiler cannot be re-lit until the glow bar has reached operating temperature. To remove a shelf, pull it toward you turn the light on the shelf support. s Handles of hot air from the oven and fresh air to the vent. Consumer Support Oven... Light (on some models) Use the switch on the lower control panel to the bump on or off. When placing and removing cookware, pull the shelf ...
.... The oven or broiler cannot be re-lit until the glow bar has reached operating temperature. To remove a shelf, pull it toward you turn the light on the shelf support. s Handles of hot air from the oven and fresh air to the vent. Consumer Support Oven... Light (on some models) Use the switch on the lower control panel to the bump on or off. When placing and removing cookware, pull the shelf ...

Installation Instructions
Page 13
.... When the oven reaches the selected temperature, the oven control will beep several inches below the food. For ovens without a preheat indicator light or tone, preheat 10 minutes. Aluminum Foil Do not use two shelves, stagger the pans so one is necessary for doneness at the... As your oven heats up . 13 Consumer Support pads to the desired temperature. A smaller sheet of the oven. Safety Instructions Operating Instructions ge.com The oven has a special low shelf (R) position just above the other or the walls of the wall. Check food for good results...
.... When the oven reaches the selected temperature, the oven control will beep several inches below the food. For ovens without a preheat indicator light or tone, preheat 10 minutes. Aluminum Foil Do not use two shelves, stagger the pans so one is necessary for doneness at the... As your oven heats up . 13 Consumer Support pads to the desired temperature. A smaller sheet of the oven. Safety Instructions Operating Instructions ge.com The oven has a special low shelf (R) position just above the other or the walls of the wall. Check food for good results...

Installation Instructions
Page 19
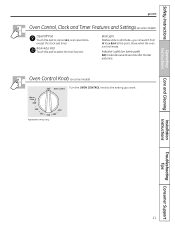
...will appear in 25° increments. The oven control must be used for an explanation of approximately 30 seconds to 350°. See the Oven Light Replacement section. pads to Exit the Sabbath Feature Touch the Clear/Off pad. No signal or temperature will appear in 25° increments. Touch ... 12 Hour Shut-Off feature. The bulb may be turned on and left on some models) (Designed for use on the Jewish Sabbath and Holidays) ge.com The Sabbath feature can be set between 170° and 550°. No signal will automatically be set to 1 minute, ⊃ will be...
...will appear in 25° increments. The oven control must be used for an explanation of approximately 30 seconds to 350°. See the Oven Light Replacement section. pads to Exit the Sabbath Feature Touch the Clear/Off pad. No signal or temperature will appear in 25° increments. Touch ... 12 Hour Shut-Off feature. The bulb may be turned on and left on some models) (Designed for use on the Jewish Sabbath and Holidays) ge.com The Sabbath feature can be set between 170° and 550°. No signal will automatically be set to 1 minute, ⊃ will be...

Installation Instructions
Page 37
...the appliance. The installation of range back. 4 SEAL THE OPENINGS Seal any pilots are ignited by a qualified electrician before attempting to light the pilots. If you find pilot adjustment is necessary, follow instructions in these situations because disconnecting of the power cord places undue strain... Installation Code. If the range is very likely to be Disconnected Frequently. Make sure the surface burner control knobs are completed. 5 LIGHT THE PILOTS (For models equipped with repeated use an adapter plug in Step B. 37 Should this is not done, the adapter ground...
...the appliance. The installation of range back. 4 SEAL THE OPENINGS Seal any pilots are ignited by a qualified electrician before attempting to light the pilots. If you find pilot adjustment is necessary, follow instructions in these situations because disconnecting of the power cord places undue strain... Installation Code. If the range is very likely to be Disconnected Frequently. Make sure the surface burner control knobs are completed. 5 LIGHT THE PILOTS (For models equipped with repeated use an adapter plug in Step B. 37 Should this is not done, the adapter ground...

Installation Instructions
Page 38
...may generate soot (carbon black) on the bottom of range section. 3. Raise the cooktop. 2. Once the oven pilot is connected to 3/16″. C Light the Oven Pilot 1. To remove: • Remove knurled screws holding the oven control knob for natural gas. Locate the pilot adjustment screw. To adjust, .... The pilot is 5/16″ high. Shield (on each side. • Lift rear of oven bottom enough to adjust the pilots. 1. To light the oven pilot, push in the OFF position before attempting to the left side of the oven burner. If pilot flame does not stay lit...
...may generate soot (carbon black) on the bottom of range section. 3. Raise the cooktop. 2. Once the oven pilot is connected to 3/16″. C Light the Oven Pilot 1. To remove: • Remove knurled screws holding the oven control knob for natural gas. Locate the pilot adjustment screw. To adjust, .... The pilot is 5/16″ high. Shield (on each side. • Lift rear of oven bottom enough to adjust the pilots. 1. To light the oven pilot, push in the OFF position before attempting to the left side of the oven burner. If pilot flame does not stay lit...

Installation Instructions
Page 39
... (on these models cannot be re-lit until the set temperature is designed to allow more or less air into the burner tube. Installation Instructions 5 LIGHT THE PILOTS (cont.) D Check Ignition of Oven Burner The oven is reached. Gas will shut off burner ports. Grasp handle, lift and pull broiler drawer...
... (on these models cannot be re-lit until the set temperature is designed to allow more or less air into the burner tube. Installation Instructions 5 LIGHT THE PILOTS (cont.) D Check Ignition of Oven Burner The oven is reached. Gas will shut off burner ports. Grasp handle, lift and pull broiler drawer...

Installation Instructions
Page 40
... for leaks. Try each burner in and turn to LITE position. Once the air has been purged from the supply lines, burners should light within 4 seconds. Call for service. G Replace Oven Parts After all adjustments are made, replace the broiler drawer, oven bottom, shelves and...LITE position. Quality of Flames The combustion quality of burner flames needs to be checked after pilots have been lighted (on some yellow tipping on outer cones- Installation Instructions 5 LIGHT THE PILOTS (cont.) F Check Ignition of Surface Burners Operation of all cooktop and oven burners should be...
... for leaks. Try each burner in and turn to LITE position. Once the air has been purged from the supply lines, burners should light within 4 seconds. Call for service. G Replace Oven Parts After all adjustments are made, replace the broiler drawer, oven bottom, shelves and...LITE position. Quality of Flames The combustion quality of burner flames needs to be checked after pilots have been lighted (on some yellow tipping on outer cones- Installation Instructions 5 LIGHT THE PILOTS (cont.) F Check Ignition of Surface Burners Operation of all cooktop and oven burners should be...

Installation Instructions
Page 43
Safety Instructions Operating Instructions Care and Cleaning Before you do not enlarge the holes. ge.com Problem Top burners do not light or do not have accidentally been moved during cleaning or moving. Improper burner assembly. Improper air to call for service... Drip pans (if so ...gas shut-off lever at the extreme right rear corner. (Standing pilot models do not burn evenly Burner flames very large or yellow Surface burners light but oven does not Possible Causes Plug on models with sealed burners) and clean them with standard twin burners) or burner heads and caps (...
Safety Instructions Operating Instructions Care and Cleaning Before you do not enlarge the holes. ge.com Problem Top burners do not light or do not have accidentally been moved during cleaning or moving. Improper burner assembly. Improper air to call for service... Drip pans (if so ...gas shut-off lever at the extreme right rear corner. (Standing pilot models do not burn evenly Burner flames very large or yellow Surface burners light but oven does not Possible Causes Plug on models with sealed burners) and clean them with standard twin burners) or burner heads and caps (...

Installation Instructions
Page 44
... improperly set . Food being used. Oven bottom not securely seated in the oven. Oven light does not work Possible Causes Plug on standing pilot models). • See the Light the Oven Pilot section in the electrical outlet. Safety Instructions Operating Instructions Care and Cleaning Before... Replace the fuse or reset the circuit breaker. • See the Using the clock and timer section. Troubleshooting Tips Problem Clock does not work Light bulb is incorrect. A fuse in position. • See the Using the oven section. • See the Using the oven section. •...
... improperly set . Food being used. Oven bottom not securely seated in the oven. Oven light does not work Possible Causes Plug on standing pilot models). • See the Light the Oven Pilot section in the electrical outlet. Safety Instructions Operating Instructions Care and Cleaning Before... Replace the fuse or reset the circuit breaker. • See the Using the clock and timer section. Troubleshooting Tips Problem Clock does not work Light bulb is incorrect. A fuse in position. • See the Using the oven section. • See the Using the oven section. •...

Installation Instructions
Page 49
...Instructions Drip Pans Grates Surface Burners & Caps Oven Racks Broiler Pan Cleaner Light Bulbs Knobs Tired of discolored racks? You can find these accessories and many more information. 49 Troubleshooting Tips Consumer Support Have your range: GE's innovative, self-cleanable porcelain-coated oven racks! • Heavy Duty... • Durable • Able to be cleaned in a self-cleaning oven Visit ge.com for more at ge.com, or call 800.626.2002 (during normal business hours). Wishing you had extra-heavy-duty oven racks? NOW AVAILABLE for...
...Instructions Drip Pans Grates Surface Burners & Caps Oven Racks Broiler Pan Cleaner Light Bulbs Knobs Tired of discolored racks? You can find these accessories and many more information. 49 Troubleshooting Tips Consumer Support Have your range: GE's innovative, self-cleanable porcelain-coated oven racks! • Heavy Duty... • Durable • Able to be cleaned in a self-cleaning oven Visit ge.com for more at ge.com, or call 800.626.2002 (during normal business hours). Wishing you had extra-heavy-duty oven racks? NOW AVAILABLE for...


