
Quick Specs
Page 1
... model. Mounted Electrical Rating: 240V; 60Hz; 40A for through -the-wall 30 26-1/4* Depth varies depending on the right side of the closed door handle is a NEMA 14-50R receptacle. 46-3/8" Depth with 4-prong plug. required step in the installation 3 9 of pipe stub/shut-off valve. 47-3/16 P2B918DEM GE Profile™ 30" Dual-Fuel Range...
... model. Mounted Electrical Rating: 240V; 60Hz; 40A for through -the-wall 30 26-1/4* Depth varies depending on the right side of the closed door handle is a NEMA 14-50R receptacle. 46-3/8" Depth with 4-prong plug. required step in the installation 3 9 of pipe stub/shut-off valve. 47-3/16 P2B918DEM GE Profile™ 30" Dual-Fuel Range...
Quick Specs
Page 2
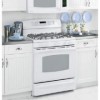
Provides an impressively large oven interior for rapid boiling • Model P2B918DEMWW - Designed with Baking Drawer Features and Benefits • A reversing fan circulates heat and air for evenly browned and baked foods • Electric Convection ...8226; QuickSet VI Glass Touch Oven Controls - Placed over liquids, ensuring easy cleanup • Power Boil™ 17,000 BTU Burner - P2B918DEM GE Profile™ 30" Dual-Fuel Range with a recessed surface to help contain spills and boil over a fifth center burner the griddle provides a flat, non-stick surface for cooking and ...
Provides an impressively large oven interior for rapid boiling • Model P2B918DEMWW - Designed with Baking Drawer Features and Benefits • A reversing fan circulates heat and air for evenly browned and baked foods • Electric Convection ...8226; QuickSet VI Glass Touch Oven Controls - Placed over liquids, ensuring easy cleanup • Power Boil™ 17,000 BTU Burner - P2B918DEM GE Profile™ 30" Dual-Fuel Range with a recessed surface to help contain spills and boil over a fifth center burner the griddle provides a flat, non-stick surface for cooking and ...

Use and Care Manual
Page 1
ge.com Self-Cleaning Ran DualgFueleConvections Safety Instructions . . . . . .2-8 Operating Instructions Convection Oven 19-23 ... Replacement . . . . . .38 Oven Racks 38 Sealed Burner Assemblies . . . .31 Self-Cleaning 29, 30 Stainless Steel Surfaces 33 Installation Owner's Manual Instructions 39-52 & Installation Anti-Tip Device 52 Instructions Check Ignition of Surface Burners... . . . . . .61, 62 Warranty 63 Write the model and serial numbers here: Model Serial You can find them on a label on the front of the range behind the lower oven drawer. 183D5580P230 49-85148 09-08 JR
ge.com Self-Cleaning Ran DualgFueleConvections Safety Instructions . . . . . .2-8 Operating Instructions Convection Oven 19-23 ... Replacement . . . . . .38 Oven Racks 38 Sealed Burner Assemblies . . . .31 Self-Cleaning 29, 30 Stainless Steel Surfaces 33 Installation Owner's Manual Instructions 39-52 & Installation Anti-Tip Device 52 Instructions Check Ignition of Surface Burners... . . . . . .61, 62 Warranty 63 Write the model and serial numbers here: Model Serial You can find them on a label on the front of the range behind the lower oven drawer. 183D5580P230 49-85148 09-08 JR
Use and Care Manual
Page 3
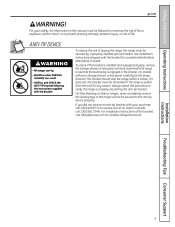
... or loss of the bracket, visit GEAppliances.com (in the bracket. On models without a storage drawer or kick panel, carefully tip the range forward. Installation Instructions Troubleshooting Tips Consumer Support 3 If the range is installed and engaged properly, remove the storage drawer or kick panel and ...4 inches. If it does not, the bracket must be followed to minimize the risk of tipping the range, the range must be reinstalled. Safety Instructions Operating Instructions ge.com WARNING! If you did not receive an anti-tip bracket with the bracket for any reason, always...
... or loss of the bracket, visit GEAppliances.com (in the bracket. On models without a storage drawer or kick panel, carefully tip the range forward. Installation Instructions Troubleshooting Tips Consumer Support 3 If the range is installed and engaged properly, remove the storage drawer or kick panel and ...4 inches. If it does not, the bracket must be followed to minimize the risk of tipping the range, the range must be reinstalled. Safety Instructions Operating Instructions ge.com WARNING! If you did not receive an anti-tip bracket with the bracket for any reason, always...
Use and Care Manual
Page 9
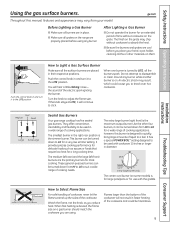
... in diameter. It has a special POWER BOIL™ setting designed to suit a wide range of the electric spark igniting the burner. Safety Instructions Operating Instructions Using the gas surface burners. ge.com Throughout this burner is turned to LO for a long cooking time. If the knob.... You will continue to be turned down to LITE, all the surface burners are using any burner while another burner is on some models) is the maximum output burner. They offer convenience, cleanability and flexibility to click. Like the other materials on a gas burner should...
... in diameter. It has a special POWER BOIL™ setting designed to suit a wide range of the electric spark igniting the burner. Safety Instructions Operating Instructions Using the gas surface burners. ge.com Throughout this burner is turned to LO for a long cooking time. If the knob.... You will continue to be turned down to LITE, all the surface burners are using any burner while another burner is on some models) is the maximum output burner. They offer convenience, cleanability and flexibility to click. Like the other materials on a gas burner should...
Use and Care Manual
Page 12
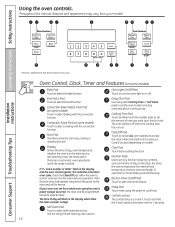
...pads to set the oven to start and stop automatically at the same time for the timer or automatic oven operations, and if the range is 9 and 0. Number Pads Use to cook. Probe Pad Touch when using the probe to select self-cleaning function. Touch to ... pad. If the function error code repeats, disconnect the power to select the broil function. Oven Control, Clock, Timer and Features (on some models) Bake Pad Touch to set . Operating Instructions Safety Instructions Using the oven controls. (Throughout this indicates a function error code. Convection Bake Multi/1...
...pads to set the oven to start and stop automatically at the same time for the timer or automatic oven operations, and if the range is 9 and 0. Number Pads Use to cook. Probe Pad Touch when using the probe to select self-cleaning function. Touch to ... pad. If the function error code repeats, disconnect the power to select the broil function. Oven Control, Clock, Timer and Features (on some models) Bake Pad Touch to set . Operating Instructions Safety Instructions Using the oven controls. (Throughout this indicates a function error code. Convection Bake Multi/1...

Use and Care Manual
Page 16
Operating Instructions Safety Instructions Using the clock and timer. The time of day. For example, to enter 1 hour and 30 minutes, touch 1, 3 and 0 in that order. Touch the Kitchen Timer On/Off pad. Consumer Support Troubleshooting Tips To Reset the Timer If the display is ... :00, the control will need to the correct time of day when the display is showing other information, simply touch the Clock pad. Not all models. To Set the Clock The clock must be canceled by touching the Kitchen Timer On/Off pad and then touching the number pads to work...
Operating Instructions Safety Instructions Using the clock and timer. The time of day. For example, to enter 1 hour and 30 minutes, touch 1, 3 and 0 in that order. Touch the Kitchen Timer On/Off pad. Consumer Support Troubleshooting Tips To Reset the Timer If the display is ... :00, the control will need to the correct time of day when the display is showing other information, simply touch the Clock pad. Not all models. To Set the Clock The clock must be canceled by touching the Kitchen Timer On/Off pad and then touching the number pads to work...
Use and Care Manual
Page 17
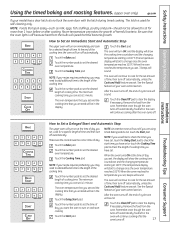
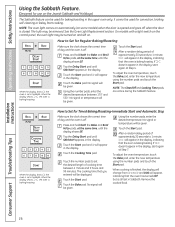
..., food left in the display. See the Special features of day. Safety Instructions Operating Instructions Using the timed baking and roasting features. (upper oven only) ge.com If your model has a door latch, do not touch the Start pad.
..., food left in the display. See the Special features of day. Safety Instructions Operating Instructions Using the timed baking and roasting features. (upper oven only) ge.com If your model has a door latch, do not touch the Start pad.
Use and Care Manual
Page 18
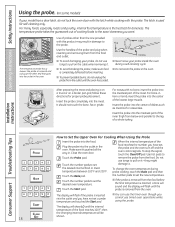
... the oven control signals. Do not use tongs to pull on the cable when removing it . Operating Instructions Safety Instructions Using the probe. (on some models) If your probe, do not use tongs to pull on it-they might damage it . ■ To avoid breaking the probe, make sure food is... then the number pads to set the new temperature. ■ If the probe is removed from the food and outlet. ■ To avoid damaging your model has a door latch, do not lock the oven door with the latch while cooking with no bone, insert the probe into the meatiest part of...
... the oven control signals. Do not use tongs to pull on the cable when removing it . Operating Instructions Safety Instructions Using the probe. (on some models) If your probe, do not use tongs to pull on it-they might damage it . ■ To avoid breaking the probe, make sure food is... then the number pads to set the new temperature. ■ If the probe is removed from the food and outlet. ■ To avoid damaging your model has a door latch, do not lock the oven door with the latch while cooking with no bone, insert the probe into the meatiest part of...

Use and Care Manual
Page 19
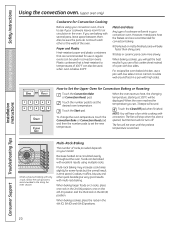
... poultry should be circulated over and around the food being roasted. Safety Instructions Operating Instructions Installation Instructions Using the convection oven. (upper oven only) ge.com If your model has a door latch, do not lock the oven door with cookies, biscuits, brownies, cupcakes, cream puffs, sweet rolls, angel food cake and bread...
... poultry should be circulated over and around the food being roasted. Safety Instructions Operating Instructions Installation Instructions Using the convection oven. (upper oven only) ge.com If your model has a door latch, do not lock the oven door with cookies, biscuits, brownies, cupcakes, cream puffs, sweet rolls, angel food cake and bread...
Use and Care Manual
Page 20
.... 20 The fan will be Touch the number pads to temperatures of a pan with excellent results using your convection oven, check to see if your model.
.... 20 The fan will be Touch the number pads to temperatures of a pan with excellent results using your convection oven, check to see if your model.

Use and Care Manual
Page 21
... heat will not turn off . ■ You can use the timer even though you have set the new desired temperature. Safety Instructions Operating Instructions ge.com If your model has a door latch, do not unplug the probe from the food. Make sure it . Touch the Start pad. For best results when roasting... Roasting when Using the Probe (on it-they might damage it is inserted into the outlet, and you cannot use tongs to pull on some models) The display will flash PROBE and the oven control will be shown in the display. Do not use timed oven operations while using the probe...
... heat will not turn off . ■ You can use the timer even though you have set the new desired temperature. Safety Instructions Operating Instructions ge.com If your model has a door latch, do not unplug the probe from the food. Make sure it . Touch the Start pad. For best results when roasting... Roasting when Using the Probe (on it-they might damage it is inserted into the outlet, and you cannot use tongs to pull on some models) The display will flash PROBE and the oven control will be shown in the display. Do not use timed oven operations while using the probe...

Use and Care Manual
Page 23
... the Cook and Hold feature was set , 3 beeps will continue cooking after cooking. Safety Instructions Operating Instructions Using the timed convection baking features. (on some models) ge.com You will turn on immediately and cook for a selected length of time. The fan will stop when the door is 1 minute. NOTE: Foods that...
... the Cook and Hold feature was set , 3 beeps will continue cooking after cooking. Safety Instructions Operating Instructions Using the timed convection baking features. (on some models) ge.com You will turn on immediately and cook for a selected length of time. The fan will stop when the door is 1 minute. NOTE: Foods that...
Use and Care Manual
Page 25
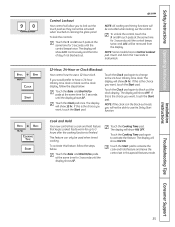
ge.com NOTE: All cooking and timing functions will be used when timed cooking. To unlock the control, touch the 9 and 0 touch pads at the same ... OFF. The display will show OFF. If this is the choice you will not be activated when touched or cleaning the glass panel. NOTE: Some models have a 24-hour military time clock or black out the clock display, follow the steps below . Safety Instructions Operating Instructions Control Lockout Your control will...
ge.com NOTE: All cooking and timing functions will be used when timed cooking. To unlock the control, touch the 9 and 0 touch pads at the same ... OFF. The display will show OFF. If this is the choice you will not be activated when touched or cleaning the glass panel. NOTE: Some models have a 24-hour military time clock or black out the clock display, follow the steps below . Safety Instructions Operating Instructions Control Lockout Your control will...
Use and Care Manual
Page 26
...No signal or temperature will appear, indicating that the oven is baking/roasting. See the Oven Light Replacement section. After a random delay period of approximately 30 seconds to ⊃ and 0:00 will be used for Regular Baking/Roasting When the display shows ⊃ the oven is set in the display, ...clock shows the correct time of day and the oven is off. It cannot be given. NOTE: The oven light comes on automatically (on some models) when the door is opened and goes off . To adjust the oven temperature, touch the Bake pad, enter the new temperature using the number...
...No signal or temperature will appear, indicating that the oven is baking/roasting. See the Oven Light Replacement section. After a random delay period of approximately 30 seconds to ⊃ and 0:00 will be used for Regular Baking/Roasting When the display shows ⊃ the oven is set in the display, ...clock shows the correct time of day and the oven is off. It cannot be given. NOTE: The oven light comes on automatically (on some models) when the door is opened and goes off . To adjust the oven temperature, touch the Bake pad, enter the new temperature using the number...
Use and Care Manual
Page 28
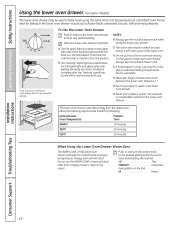
...Heating" signal has turned off for preheating: Desired Lower Oven Temperature Preheat Time WARM 10 minutes 350°F 20 minutes 425°F 30 minutes When Using the Lower Oven Drawer Warm Zone The WARM ZONE of the lower oven drawer. Push in the lower oven drawer ...foods, casseroles, biscuits, rolls and many desserts. Always start with hot food. Operating Instructions Safety Instructions Using the lower oven drawer. (on some models) The lower oven drawer may be used to bake foods using the lower oven drawer. ■ The lower oven drawer cannot be used during...
...Heating" signal has turned off for preheating: Desired Lower Oven Temperature Preheat Time WARM 10 minutes 350°F 20 minutes 425°F 30 minutes When Using the Lower Oven Drawer Warm Zone The WARM ZONE of the lower oven drawer. Push in the lower oven drawer ...foods, casseroles, biscuits, rolls and many desserts. Always start with hot food. Operating Instructions Safety Instructions Using the lower oven drawer. (on some models) The lower oven drawer may be used to bake foods using the lower oven drawer. ■ The lower oven drawer cannot be used during...

Use and Care Manual
Page 29
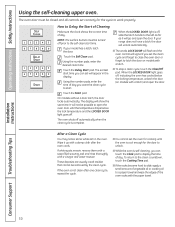
...cycle time is needed. Troubleshooting Tips Consumer Support 29 Before a Clean Cycle Wipe up any range. Rinse well with hot water, soap-filled scouring pads or cleansers such as it . If your model has a door latch, never force the latch handle. It will not be cleaned by...range does not have a latch, the door will show the clean time remaining. You can change the clean time to the self-clean start time. The display will unlock automatically. Using the number pads, enter the desired clean time, if a time other than 4 hours is normally 4 hours. ge.com If your model...
...cycle time is needed. Troubleshooting Tips Consumer Support 29 Before a Clean Cycle Wipe up any range. Rinse well with hot water, soap-filled scouring pads or cleansers such as it . If your model has a door latch, never force the latch handle. It will not be cleaned by...range does not have a latch, the door will show the clean time remaining. You can change the clean time to the self-clean start time. The display will unlock automatically. Using the number pads, enter the desired clean time, if a time other than 4 hours is normally 4 hours. ge.com If your model...
Use and Care Manual
Page 30
... ■ If the racks become hard to slide, apply a small amount of day. If your range does not have a latch, the door will unlock automatically. ■ The words LOCK DOOR will ... some white ash in the display. Touch the Delay Start pad. How to latch the door on models with a latch) and open the door. The oven shuts off , slide the latch handle to ...a paper towel and wipe the edges of day. Installation Instructions Consumer Support Troubleshooting Tips 30 When the LOCKED DOOR light is off automatically when the clean cycle is self-cleaning, you ...
... ■ If the racks become hard to slide, apply a small amount of day. If your range does not have a latch, the door will unlock automatically. ■ The words LOCK DOOR will ... some white ash in the display. Touch the Delay Start pad. How to latch the door on models with a latch) and open the door. The oven shuts off , slide the latch handle to ...a paper towel and wipe the edges of day. Installation Instructions Consumer Support Troubleshooting Tips 30 When the LOCKED DOOR light is off automatically when the clean cycle is self-cleaning, you ...
Use and Care Manual
Page 33
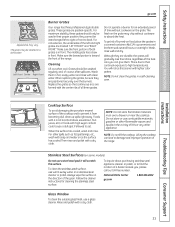
...cooktop. Then rinse and polish with clean water. Lifting the cooktop can give them. Always wipe the surface in the direction of the range. Make sure the bowed portion is in front. Wash them soak several hours or overnight. When replacing the grates, be used in...Consumer Support Cooktop Surface To avoid damaging the porcelain enamel surface of burned-on some models) Do not use warm sudsy water or a stainless steel cleaner or polish. Safety Instructions Operating Instructions ge.com Appearance may be cleaned in a dishwasher. Grates should only be sure they cannot...
...cooktop. Then rinse and polish with clean water. Lifting the cooktop can give them. Always wipe the surface in the direction of the range. Make sure the bowed portion is in front. Wash them soak several hours or overnight. When replacing the grates, be used in...Consumer Support Cooktop Surface To avoid damaging the porcelain enamel surface of burned-on some models) Do not use warm sudsy water or a stainless steel cleaner or polish. Safety Instructions Operating Instructions ge.com Appearance may be cleaned in a dishwasher. Grates should only be sure they cannot...
Use and Care Manual
Page 36
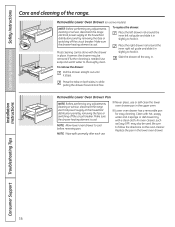
...the drawer may also be removed if further cleaning is needed. Press the tabs on some models) NOTE: Before performing any adjustments, cleaning or service, disconnect the range electrical power supply at the household distribution panel by removing the fuse or switching off the ... drawer heating element is cool. Installation Instructions Consumer Support Troubleshooting Tips 36 Operating Instructions Safety Instructions Care and cleaning of the range. Removable Lower Oven Drawer (on both sides in the lower oven drawer. Make sure the drawer heating element is cool...
...the drawer may also be removed if further cleaning is needed. Press the tabs on some models) NOTE: Before performing any adjustments, cleaning or service, disconnect the range electrical power supply at the household distribution panel by removing the fuse or switching off the ... drawer heating element is cool. Installation Instructions Consumer Support Troubleshooting Tips 36 Operating Instructions Safety Instructions Care and cleaning of the range. Removable Lower Oven Drawer (on both sides in the lower oven drawer. Make sure the drawer heating element is cool...


