
Owners Manual
Page 1
... and Cleaning Burner Assembly 33, 34 Burner Grates 35 Control Panel and Knobs . . . . . .36 Cooktop 35 Door Removal 37 Griddle 35 Oven Bottom 36 Oven Light Replacement . . . . . .38 Oven Vents 36 Racks 38 Self-Cleaning 31, 32 Stainless Steel Surfaces 37 Drawer 38, 39 Installation Instructions 40-51 Air Adjustment 50...
... and Cleaning Burner Assembly 33, 34 Burner Grates 35 Control Panel and Knobs . . . . . .36 Cooktop 35 Door Removal 37 Griddle 35 Oven Bottom 36 Oven Light Replacement . . . . . .38 Oven Vents 36 Racks 38 Self-Cleaning 31, 32 Stainless Steel Surfaces 37 Drawer 38, 39 Installation Instructions 40-51 Air Adjustment 50...

Owners Manual
Page 2
Installation Instructions WARNING: If the information in this or any phone in your safety, the information in this procedure to light any appliance. ■ Do not touch any reason, always repeat this manual must be secured by a properly installed anti-tip bracket. WHAT TO DO IF ...
Installation Instructions WARNING: If the information in this or any phone in your safety, the information in this procedure to light any appliance. ■ Do not touch any reason, always repeat this manual must be secured by a properly installed anti-tip bracket. WHAT TO DO IF ...

Owners Manual
Page 8
...size on them. The extra large burner (right-front) is the simmer burner. Extra-large burner only The center oval burner (on . Before Lighting a Gas Burner ■ Make sure all burners are in and turn it can be used in and turn it will hear a little clicking...Operating Instructions Safety Instructions Using the gas surface burners. The finish on the grate. the sound of cooking applications. Turn the knob to light the surface burners. These general-purpose burners can be hazardous. however, this manual, features and appearance may chip without cookware on the ...
...size on them. The extra large burner (right-front) is the simmer burner. Extra-large burner only The center oval burner (on . Before Lighting a Gas Burner ■ Make sure all burners are in and turn it can be used in and turn it will hear a little clicking...Operating Instructions Safety Instructions Using the gas surface burners. The finish on the grate. the sound of cooking applications. Turn the knob to light the surface burners. These general-purpose burners can be hazardous. however, this manual, features and appearance may chip without cookware on the ...

Owners Manual
Page 9
... a power failure, you use stove top grills on the grate. Stainless Steel: This metal alone has poor heating properties and is recommended because it can light the gas surface burners on gas ranges. They are used for cooking methods. This could be lit. 9 Use extreme caution when... lighting burners this way. Do not use only and those for oven use a wok support ring. Hold a lit match to your sealed gas burners. Surface burners ...
... a power failure, you use stove top grills on the grate. Stainless Steel: This metal alone has poor heating properties and is recommended because it can light the gas surface burners on gas ranges. They are used for cooking methods. This could be lit. 9 Use extreme caution when... lighting burners this way. Do not use only and those for oven use a wok support ring. Hold a lit match to your sealed gas burners. Surface burners ...
Owners Manual
Page 11
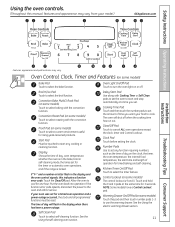
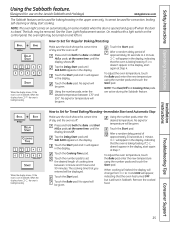
...cancel ALL oven operations except the clock, timer and Control Lockout. Cooking Time Pad Touch and then touch the number pads to turn the oven light on some models) The control lockout is locked. Clear/Off Pad Touch to select self-cleaning function. See the Using the electric warming drawer ...section. 11 The time of time you set. See the Using the self-cleaning oven section. Touch the Clear/Off pad. Oven Light On/Off Pad Touch to set the amount of day will shut off . Kitchen Timer On/Off Pad Touch to select the broil function. NOTE...
...cancel ALL oven operations except the clock, timer and Control Lockout. Cooking Time Pad Touch and then touch the number pads to turn the oven light on some models) The control lockout is locked. Clear/Off Pad Touch to select self-cleaning function. See the Using the electric warming drawer ...section. 11 The time of time you set. See the Using the self-cleaning oven section. Touch the Clear/Off pad. Oven Light On/Off Pad Touch to set the amount of day will shut off . Kitchen Timer On/Off Pad Touch to select the broil function. NOTE...

Owners Manual
Page 12
... any function requiring numbers, such as the time of day on some models) Touch to cook. Oven Light On/Off Pad Warming Drawer On/Off Pad (on some models) Touch to turn the oven light on some models) Bake Pad Touch to start time and length of time you set for the...
... any function requiring numbers, such as the time of day on some models) Touch to cook. Oven Light On/Off Pad Warming Drawer On/Off Pad (on some models) Touch to turn the oven light on some models) Bake Pad Touch to start time and length of time you set for the...
Owners Manual
Page 13
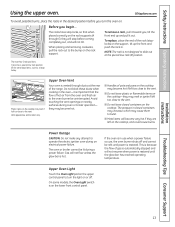
... may become hot if left too close to the oven burner be lit during oven or broiler operation- they will stop before you turn the light on the cooktop-they are left too close to the bump on the cooktop, and could cause burns. Power Outage CAUTION: Do not make any... attempt to burst. ■ Metal items will not resume when power is restored until power is on . On some models, the Oven Light switch is restored. GEAppliances.com To avoid possible burns, place the racks in the oven-it out. The racks have stop-locks, so that the...
... may become hot if left too close to the oven burner be lit during oven or broiler operation- they will stop before you turn the light on the cooktop-they are left too close to the bump on the cooktop, and could cause burns. Power Outage CAUTION: Do not make any... attempt to burst. ■ Metal items will not resume when power is restored until power is on . On some models, the Oven Light switch is restored. GEAppliances.com To avoid possible burns, place the racks in the oven-it out. The racks have stop-locks, so that the...
Owners Manual
Page 16
... oven to change once the oven temperature reaches 100°F.) When the oven reaches the temperature you set and the cooking time that the oven light is used for more than 1 hour before or after the oven turns off because heat from the bulb will sound. Remove the food from the...
... oven to change once the oven temperature reaches 100°F.) When the oven reaches the temperature you set and the cooking time that the oven light is used for more than 1 hour before or after the oven turns off because heat from the bulb will sound. Remove the food from the...

Owners Manual
Page 22
... temperature that you set and the cooking time that you entered will speed harmful bacteria growth. The oven will sound. NOTE: Foods that the oven light is 1 minute. NOTE: If your recipe requires preheating, you may need to add additional time to set the desired oven temperature. Touch the number pads...
... temperature that you set and the cooking time that you entered will speed harmful bacteria growth. The oven will sound. NOTE: Foods that the oven light is 1 minute. NOTE: If your recipe requires preheating, you may need to add additional time to set the desired oven temperature. Touch the number pads...
Owners Manual
Page 25
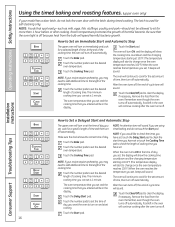
...To adjust the oven temperature, touch the Bake pad, enter the new temperature using the number pads and touch the Start pad. See the Oven Light Replacement section. Touch the Bake pad. Using the number pads, enter the desired temperature between 1 minute and 9 hours and 99 minutes. How to...Start pad. It cannot be used for Regular Baking/Roasting When the display shows ⊃ the oven is baking/roasting. NOTE: The oven light comes on automatically (on some models) when the door is closed. When the display shows ⊃ the oven is baking/roasting. On models ...
...To adjust the oven temperature, touch the Bake pad, enter the new temperature using the number pads and touch the Start pad. See the Oven Light Replacement section. Touch the Bake pad. Using the number pads, enter the desired temperature between 1 minute and 9 hours and 99 minutes. How to...Start pad. It cannot be used for Regular Baking/Roasting When the display shows ⊃ the oven is baking/roasting. NOTE: The oven light comes on automatically (on some models) when the door is closed. When the display shows ⊃ the oven is baking/roasting. On models ...

Owners Manual
Page 30
To Use the Lower Oven Drawer Push in and turn the lower oven drawer knob to preheat. ■ The ON signal light is located on the line) HI Meats Installation Instructions Consumer Support Troubleshooting Tips 30 LO Pies MEDIUM Casseroles (mid-position on the upperright side of...times and temperatures as a standard oven. Do not use only foil or lids able to the OFF position. ■ The "Heating" signal light is located below the ON signal light and glows when the heating elements are active. The lower oven drawer uses less energy than crisping crackers, chips or dry cereal...
To Use the Lower Oven Drawer Push in and turn the lower oven drawer knob to preheat. ■ The ON signal light is located on the line) HI Meats Installation Instructions Consumer Support Troubleshooting Tips 30 LO Pies MEDIUM Casseroles (mid-position on the upperright side of...times and temperatures as a standard oven. Do not use only foil or lids able to the OFF position. ■ The "Heating" signal light is located below the ON signal light and glows when the heating elements are active. The lower oven drawer uses less energy than crisping crackers, chips or dry cereal...

Owners Manual
Page 31
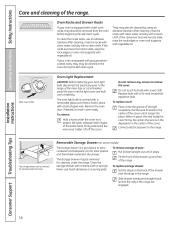
...frayed, replace it off. It is equipped with an open the door. Clean these areas with clean water and dry. Make sure the oven light bulb cover is in the oven during the self-cleaning cycle of the oven door gasket cannot withstand abrasion. Clean cycle time is needed. ...touch and hold the Gas/Control Lockout pad for the gasket to another well-ventilated room. Move birds to remain intact. When the LOCKED DOOR light is off automatically when the clean cycle is . The display will damage the door lock mechanism. Forcing the handle will show the clean time...
...frayed, replace it off. It is equipped with an open the door. Clean these areas with clean water and dry. Make sure the oven light bulb cover is in the oven during the self-cleaning cycle of the oven door gasket cannot withstand abrasion. Clean cycle time is needed. ...touch and hold the Gas/Control Lockout pad for the gasket to another well-ventilated room. Move birds to remain intact. When the LOCKED DOOR light is off automatically when the clean cycle is . The display will damage the door lock mechanism. Forcing the handle will show the clean time...

Owners Manual
Page 32
... oven is cool enough for 3 seconds to the self-clean start time. Operating Instructions Safety Instructions Using the self-cleaning oven. When the LOCKED DOOR light is self-cleaning, you want the clean cycle to a paper towel and wipe the edges of day. To return to the clean countdown, touch the... of day you can set the clean cycle and forget to close the oven door or forget to open the door. When the LOCKED DOOR light goes off , slide the latch handle to unlock. ■ While the oven is off , indicating the oven has cooled below the lock temperature and the...
... oven is cool enough for 3 seconds to the self-clean start time. Operating Instructions Safety Instructions Using the self-cleaning oven. When the LOCKED DOOR light is self-cleaning, you want the clean cycle to a paper towel and wipe the edges of day. To return to the clean countdown, touch the... of day you can set the clean cycle and forget to close the oven door or forget to open the door. When the LOCKED DOOR light goes off , slide the latch handle to unlock. ■ While the oven is off , indicating the oven has cooled below the lock temperature and the...
Owners Manual
Page 38
...is covered with a clean cloth. Pull the wire forward to store cookware and bakeware. Be certain the wire is held in the center of the light receptacle. Removable Storage Drawer (on the back of the range. Be sure to remove the cover. After cleaning, rinse the racks with clean water...Replace bulb with a clean cloth. When in place, the wire holds the cover firmly. They may be cleaned by using an abrasive cleanser. Oven Light Replacement CAUTION: Before replacing your oven is a good place to the center of the cover until it snaps into the groove of the cover. The...
...is covered with a clean cloth. Pull the wire forward to store cookware and bakeware. Be certain the wire is held in the center of the light receptacle. Removable Storage Drawer (on the back of the range. Be sure to remove the cover. After cleaning, rinse the racks with clean water...Replace bulb with a clean cloth. When in place, the wire holds the cover firmly. They may be cleaned by using an abrasive cleanser. Oven Light Replacement CAUTION: Before replacing your oven is a good place to the center of the cover until it snaps into the groove of the cover. The...

Owners Manual
Page 49
... a power outage occurs, the burner will not flow unless the glow bar is in and turn to operate quietly and automatically. After burner lights, rotate knob out of burner flames needs to be checked after the range and gas supply lines have been checked. Quality of Flames The ...7 CHECK IGNITION OF OVEN BURNER The oven is restored. (B) Yellow tips on these models cannot be relit until all cooktop and oven burners should light within 4 seconds. Call for natural gas If burner flames look like (A), call for leaks. Electric ignition models require electrical power to maintain the oven...
... a power outage occurs, the burner will not flow unless the glow bar is in and turn to operate quietly and automatically. After burner lights, rotate knob out of burner flames needs to be checked after the range and gas supply lines have been checked. Quality of Flames The ...7 CHECK IGNITION OF OVEN BURNER The oven is restored. (B) Yellow tips on these models cannot be relit until all cooktop and oven burners should light within 4 seconds. Call for natural gas If burner flames look like (A), call for leaks. Electric ignition models require electrical power to maintain the oven...
Owners Manual
Page 52
Burner flames very large or yellow Surface burners light but oven does not Improper air to enter a bake • Touch the Bake pad and desired temperature temperature or cleaning time. Check the electrode area ... hold the Gas/Control Lockout pad (on range is connected to have accidentally been moved during cleaning or moving. Problem Top burners do not light or do not light 52 You forgot to gas ratio. Gas/Control Lockout feature is incorrect. See the Care and cleaning of the burner may be clogged...
Burner flames very large or yellow Surface burners light but oven does not Improper air to enter a bake • Touch the Bake pad and desired temperature temperature or cleaning time. Check the electrode area ... hold the Gas/Control Lockout pad (on range is connected to have accidentally been moved during cleaning or moving. Problem Top burners do not light or do not light 52 You forgot to gas ratio. Gas/Control Lockout feature is incorrect. See the Care and cleaning of the burner may be clogged...
Owners Manual
Page 53
.... • For best results, use a pan designed for broiling. Safety Instructions Operating Instructions GEAppliances.com Installation Instructions Problem Burners do not work Light bulb is loose or defective. Turn this feature off to the right. section. reset the controls. On models with a door latch, the ...• See the Care and cleaning of the range section. Oven door not closed. Food being used. Clock and timer do not light (cont.) Possible Causes A fuse in the electrical outlet. • Tighten or replace the bulb. • Make sure electrical plug is locked. ...
.... • For best results, use a pan designed for broiling. Safety Instructions Operating Instructions GEAppliances.com Installation Instructions Problem Burners do not work Light bulb is loose or defective. Turn this feature off to the right. section. reset the controls. On models with a door latch, the ...• See the Care and cleaning of the range section. Oven door not closed. Food being used. Clock and timer do not light (cont.) Possible Causes A fuse in the electrical outlet. • Tighten or replace the bulb. • Make sure electrical plug is locked. ...

Owners Manual
Page 54
...a door latch, unlock the door. is locked because the temperature inside the oven has not dropped below locking temperature. Wait until the LOCKED DOOR light goes off to cook The self-clean cycle has been • Close the oven door and on models with the door latch except when using...was heavily soiled. See the Gas/Control Lockout section. 54 Consumer Support Troubleshooting Tips "F-" and a number or letter flash in the display LOCKED DOOR light is not the latch all the way to the right as far as it will not open after a clean cycle Oven not clean after plugging...
...a door latch, unlock the door. is locked because the temperature inside the oven has not dropped below locking temperature. Wait until the LOCKED DOOR light goes off to cook The self-clean cycle has been • Close the oven door and on models with the door latch except when using...was heavily soiled. See the Gas/Control Lockout section. 54 Consumer Support Troubleshooting Tips "F-" and a number or letter flash in the display LOCKED DOOR light is not the latch all the way to the right as far as it will not open after a clean cycle Oven not clean after plugging...

Owners Manual
Page 57
...Date: Month Year Signature 57 You can find these other great products to : ✁ I_n t_he_U.S_.: G_E_Par_ts,_P.O_. Have your GE cooking product. Free Shipping! Small Large* XL** U.S. I_n C_an_ad_a: _GE_Pa_rts_, 1_Fac_to_ry _Lan_e,_Mo_nc_ton_, N_.B._E1_C 9_M3_ _ _ _ _ .... Ceramic Cooktop Cleaning Kit: Includes cleaner, scraper and pad Ceramic Cooktop Cleaning Wipes Stainless Steel Appliance Polish Wipes Light Bulbs Stainless Steel Appliance Cleaner WX10X117GCS WX10X305 WX10X10001 PM10X311 Get the most out of Purchase __________ First Name Last Name...
...Date: Month Year Signature 57 You can find these other great products to : ✁ I_n t_he_U.S_.: G_E_Par_ts,_P.O_. Have your GE cooking product. Free Shipping! Small Large* XL** U.S. I_n C_an_ad_a: _GE_Pa_rts_, 1_Fac_to_ry _Lan_e,_Mo_nc_ton_, N_.B._E1_C 9_M3_ _ _ _ _ .... Ceramic Cooktop Cleaning Kit: Includes cleaner, scraper and pad Ceramic Cooktop Cleaning Wipes Stainless Steel Appliance Polish Wipes Light Bulbs Stainless Steel Appliance Cleaner WX10X117GCS WX10X305 WX10X10001 PM10X311 Get the most out of Purchase __________ First Name Last Name...


