
Installation Instructions
Page 1
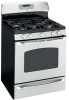
ge.com Self-Cleaning RangeGass In Canada contact us at: www.GEAppliances.ca Safety Instructions . . . .2-7 Operating Instructions Aluminum Foil 14 Clock and Timer 16, 17 Lower ... to Gas 46-48 Dimensions and Clearances . . .44 Electrical Connections . . . . .49, 50 Leveling the Range 52 LP 53 Troubleshooting Tips 54-57 Accessories 61 Owner's Manual & Installation Instructions JGBP85 JGBP88 JGBP89 JGBP90 JGBP92 PGB900 PGB908 PGB910 PGB916 PGB918 PGB975 Consumer Support Consumer Support . . .Back Cover Product Registration 59, 60 Warranty for...
ge.com Self-Cleaning RangeGass In Canada contact us at: www.GEAppliances.ca Safety Instructions . . . .2-7 Operating Instructions Aluminum Foil 14 Clock and Timer 16, 17 Lower ... to Gas 46-48 Dimensions and Clearances . . .44 Electrical Connections . . . . .49, 50 Leveling the Range 52 LP 53 Troubleshooting Tips 54-57 Accessories 61 Owner's Manual & Installation Instructions JGBP85 JGBP88 JGBP89 JGBP90 JGBP92 PGB900 PGB908 PGB910 PGB916 PGB918 PGB975 Consumer Support Consumer Support . . .Back Cover Product Registration 59, 60 Warranty for...

Installation Instructions
Page 2
...Tips If the Anti-Tip device supplied with the range does not fit this application, use any phone in your safety, the information in this manual is installed and engaged properly, carefully tip the range forward. Installation Instructions ® WARNING! If you pull the range out from the wall...this or any electrical switch; WHAT TO DO IF YOU SMELL GAS s Do not try to prevent property damage, personal injury, or loss of this manual. s Do not touch any other appliance. - To check if the device is not followed exactly, a fire or explosion may result, causing property damage...
...Tips If the Anti-Tip device supplied with the range does not fit this application, use any phone in your safety, the information in this manual is installed and engaged properly, carefully tip the range forward. Installation Instructions ® WARNING! If you pull the range out from the wall...this or any electrical switch; WHAT TO DO IF YOU SMELL GAS s Do not try to prevent property damage, personal injury, or loss of this manual. s Do not touch any other appliance. - To check if the device is not followed exactly, a fire or explosion may result, causing property damage...

Installation Instructions
Page 3
... is your range unless it off valve and how to have an ungrounded outlet replaced with a properly grounded, three-prong outlet in accordance with this manual. Safety Instructions Operating Instructions ge.com WARNING!
... is your range unless it off valve and how to have an ungrounded outlet replaced with a properly grounded, three-prong outlet in accordance with this manual. Safety Instructions Operating Instructions ge.com WARNING!

Installation Instructions
Page 6
... oven. No commercial oven cleaner or oven liner of the oven. s Never place, use or self-clean the lower oven drawer pan in this Owner's Manual. REMEMBER: The inside of the drawer and it serviced by a qualified technician. Cooking to hands, face and/or eyes. s Clean only parts listed in the...
... oven. No commercial oven cleaner or oven liner of the oven. s Never place, use or self-clean the lower oven drawer pan in this Owner's Manual. REMEMBER: The inside of the drawer and it serviced by a qualified technician. Cooking to hands, face and/or eyes. s Clean only parts listed in the...

Installation Instructions
Page 7
...is not designed to contain fire until it burns out. SAVE THESE INSTRUCTIONS Installation Instructions Troubleshooting Tips Consumer Support 7 Safety Instructions Operating Instructions ge.com UPPER OVEN Stand away from the range when opening the door of the door or oven walls. WARNING: NEVER cover any broiler ...Off pad, and keep the oven door closed . s If you finish broiling. Pressure could build up and the container could result in this manual. s When using cooking or roasting bags in the oven can catch fire if oven is cool. The hot air and steam that is also...
...is not designed to contain fire until it burns out. SAVE THESE INSTRUCTIONS Installation Instructions Troubleshooting Tips Consumer Support 7 Safety Instructions Operating Instructions ge.com UPPER OVEN Stand away from the range when opening the door of the door or oven walls. WARNING: NEVER cover any broiler ...Off pad, and keep the oven door closed . s If you finish broiling. Pressure could build up and the container could result in this manual. s When using cooking or roasting bags in the oven can catch fire if oven is cool. The hot air and steam that is also...
Installation Instructions
Page 8
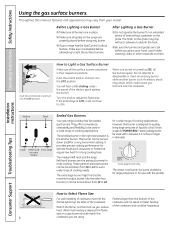
... Medium Small Large Center (oval) Extra Large (on the range are using any burner while another burner is desired, the flame size on . however, this manual, features and appearance may chip without cookware on the grate may vary from HI to absorb the heat. How to knock over hot cookware. You...
... Medium Small Large Center (oval) Extra Large (on the range are using any burner while another burner is desired, the flame size on . however, this manual, features and appearance may chip without cookware on the grate may vary from HI to absorb the heat. How to knock over hot cookware. You...

Installation Instructions
Page 11
... ALL oven operations except the clock, timer and Control Lockout. The oven will flash in the display and the oven control signals, this manual, features and appearance may vary. Number Pads Use to start time and length of day will shut off . Broil Hi/Lo Pad Touch...back into operation. Clock Pad Touch before setting the clock. Touch and hold the 9 and 0 pads at a time you want your model.) ge.com Installation Instructions Troubleshooting Tips Consumer Support Features, appearance and pad locations may vary from your food to select self-cleaning function. Warming Drawer On...
... ALL oven operations except the clock, timer and Control Lockout. The oven will flash in the display and the oven control signals, this manual, features and appearance may vary. Number Pads Use to start time and length of day will shut off . Broil Hi/Lo Pad Touch...back into operation. Clock Pad Touch before setting the clock. Touch and hold the 9 and 0 pads at a time you want your model.) ge.com Installation Instructions Troubleshooting Tips Consumer Support Features, appearance and pad locations may vary from your food to select self-cleaning function. Warming Drawer On...

Installation Instructions
Page 12
Operating Instructions Safety Instructions Using the oven controls. (Throughout this manual, features and appearance may vary. Convection Bake Multi/1 Rack Pad (on the clock, the timer, the oven temperature, the internal food temperature, the start time ...
Operating Instructions Safety Instructions Using the oven controls. (Throughout this manual, features and appearance may vary. Convection Bake Multi/1 Rack Pad (on the clock, the timer, the oven temperature, the internal food temperature, the start time ...

Installation Instructions
Page 38
... solution of vinegar and water. Surface burner knobs have a white line. Operating Instructions Safety Instructions Care and cleaning of your oven control section in this manual. Air openings are located at the rear of the cooktop, at the top and bottom of the oven door, and at the bottom of any...
... solution of vinegar and water. Surface burner knobs have a white line. Operating Instructions Safety Instructions Care and cleaning of your oven control section in this manual. Air openings are located at the rear of the cooktop, at the top and bottom of the oven door, and at the bottom of any...
Installation Instructions
Page 42
... valves, they shall be the T-handle type. • A flexible gas connector, when used, must not exceed 3 feet. Keep this manual. If you should follow. Read them carefully. • IMPORTANT - Installation of this appliance requires basic mechanical skills. • Proper installation ...is in the front of this Owner's Manual and Installation Instructions for future reference. • Note - This range has been design-certified by a licensed plumber or gas fitter. &#...
... valves, they shall be the T-handle type. • A flexible gas connector, when used, must not exceed 3 feet. Keep this manual. If you should follow. Read them carefully. • IMPORTANT - Installation of this appliance requires basic mechanical skills. • Proper installation ...is in the front of this Owner's Manual and Installation Instructions for future reference. • Note - This range has been design-certified by a licensed plumber or gas fitter. &#...

Installation Instructions
Page 43
... packed with the National Electrical Code (ANSI/NFPA 70, latest edition). s Have your range on the range to 200°F. See Electrical Connections in this manual. s Before installing your range installed by the range up to reach items could be less than 0.0122″ thick. s Make sure the wall coverings around...
... packed with the National Electrical Code (ANSI/NFPA 70, latest edition). s Have your range on the range to 200°F. See Electrical Connections in this manual. s Before installing your range installed by the range up to reach items could be less than 0.0122″ thick. s Make sure the wall coverings around...

Installation Instructions
Page 46
... local codes require a hard-piped connection. A. Install male 1/2″ or 3/4″ flare union adapter to the NPT internal thread of the manual shut-off position and turn the gas back on other gas appliances when you are in the system. Use a liquid leak detector at the ... of the range, the use this range on natural gas or, if designed for use an old connector when installing a new range. Install a manual gas line shut-off valve. E. Use a backup wrench on that gas. Installation Instructions 1 PROVIDE ADEQUATE GAS SUPPLY Your range is designed to operate...
... local codes require a hard-piped connection. A. Install male 1/2″ or 3/4″ flare union adapter to the NPT internal thread of the manual shut-off position and turn the gas back on other gas appliances when you are in the system. Use a liquid leak detector at the ... of the range, the use this range on natural gas or, if designed for use an old connector when installing a new range. Install a manual gas line shut-off valve. E. Use a backup wrench on that gas. Installation Instructions 1 PROVIDE ADEQUATE GAS SUPPLY Your range is designed to operate...
Installation Instructions
Page 49
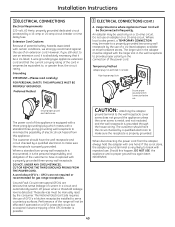
... break with certain conditions, we strongly recommend against the use an adapter on a GFCI-protected circuit but occasional nuisance tripping of current in amperes be manually reset by the use of a UL-listed adapter, available at most hardware stores. The customer should have it be made to minimize the possibility of...
... break with certain conditions, we strongly recommend against the use an adapter on a GFCI-protected circuit but occasional nuisance tripping of current in amperes be manually reset by the use of a UL-listed adapter, available at most hardware stores. The customer should have it be made to minimize the possibility of...
Installation Instructions
Page 51
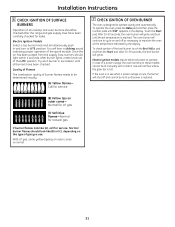
... to maintain the oven at the temperature indicated by the display. Once the air has been purged from the supply lines, burners should be lit manually with a match. Normal burner flames should look like (B) or (C), depending on the type of gas you use when a power outage occurs, the burner will ignite...
... to maintain the oven at the temperature indicated by the display. Once the air has been purged from the supply lines, burners should be lit manually with a match. Normal burner flames should look like (B) or (C), depending on the type of gas you use when a power outage occurs, the burner will ignite...
Installation Instructions
Page 60
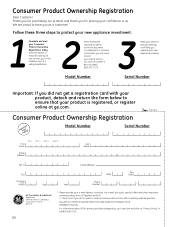
... via e-mail, discounts, special offers and other important communications from GEA's carefully selected partners. Follow these three steps to receive communications from GE Appliances (GEA). It will need should you as a customer! s Check here if you did not get a registration card with your... want to protect your new appliance investment: 1 Complete and mail your Owner's Manual carefully. For information about GEA's privacy and data usage policy, go to ensure that your product is 800.GE.CARES (800.432.2737). 3 Read your Consumer Product Ownership Registration today. Consumer...
... via e-mail, discounts, special offers and other important communications from GEA's carefully selected partners. Follow these three steps to receive communications from GE Appliances (GEA). It will need should you as a customer! s Check here if you did not get a registration card with your... want to protect your new appliance investment: 1 Complete and mail your Owner's Manual carefully. For information about GEA's privacy and data usage policy, go to ensure that your product is 800.GE.CARES (800.432.2737). 3 Read your Consumer Product Ownership Registration today. Consumer...

Installation Instructions
Page 64
... hours. Suite 310, 1 Factory Lane Moncton, N.B. Customers in this manual cover procedures to design for the nearest Mabe service center, or call 1.888.261.2133 Parts and Accessories In the U.S.: ge.com Individuals qualified to service their own appliances can be performed by any... are accepted). For details of the year! Consumer Support. GE Appliances Website In the U.S.: ge.com Have a question or need arise. Try the GE Appliances Website 24 hours a day, any user. You can now download Owner's Manuals, order parts or even schedule service on -line-at your...
... hours. Suite 310, 1 Factory Lane Moncton, N.B. Customers in this manual cover procedures to design for the nearest Mabe service center, or call 1.888.261.2133 Parts and Accessories In the U.S.: ge.com Individuals qualified to service their own appliances can be performed by any... are accepted). For details of the year! Consumer Support. GE Appliances Website In the U.S.: ge.com Have a question or need arise. Try the GE Appliances Website 24 hours a day, any user. You can now download Owner's Manuals, order parts or even schedule service on -line-at your...


