
GIGABYTE GS27QA/ User Manual
Page 2
.... No part of this manual may be reproduced, copied, translated, transmitted, or published in any form or by any means without GIGABYTE's prior written permission. • In order to assist in this monitor, carefully read the User Guide. • For more information, check on our website at: https://www.gigabyte.com The terms HDMI, HDMI High-Definition Multimedia Interface, HDMI Trade...
.... No part of this manual may be reproduced, copied, translated, transmitted, or published in any form or by any means without GIGABYTE's prior written permission. • In order to assist in this monitor, carefully read the User Guide. • For more information, check on our website at: https://www.gigabyte.com The terms HDMI, HDMI High-Definition Multimedia Interface, HDMI Trade...

GIGABYTE GS27QA/ User Manual
Page 3
... 4 Product Overview 5 GETTING STARTED 6 Installing the Stand Base 6 Cable Management 7 Adjusting the Viewing Angle 8 Installing a Wall-Mount Bracket (Optional 9 USING THE DEVICE 10 Turning the Power On/Off 10 Selecting the Input Source 11 OPERATIONS 11 Quick Menu 11 Function Key Guide 13 APPENDICES 22 Specifications 22 Supported Timing List 23 Troubleshooting 25 Basic Care 25 GIGABYTE Service Information 25 SAFETY INFORMATION 26 Safety Precautions 26 Stability Hazard Precautions 27 User Comfort Recommendations 27...
... 4 Product Overview 5 GETTING STARTED 6 Installing the Stand Base 6 Cable Management 7 Adjusting the Viewing Angle 8 Installing a Wall-Mount Bracket (Optional 9 USING THE DEVICE 10 Turning the Power On/Off 10 Selecting the Input Source 11 OPERATIONS 11 Quick Menu 11 Function Key Guide 13 APPENDICES 22 Specifications 22 Supported Timing List 23 Troubleshooting 25 Basic Care 25 GIGABYTE Service Information 25 SAFETY INFORMATION 26 Safety Precautions 26 Stability Hazard Precautions 27 User Comfort Recommendations 27...
GIGABYTE GS27QA/ User Manual
Page 6
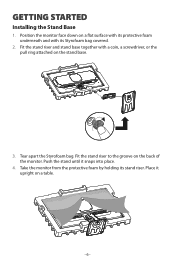
Tear apart the Styrofoam bag. Fit the stand riser to the groove on a table. - 6 - GETTING STARTED Installing the Stand Base 1. Position the monitor face down on a flat surface with its protective foam underneath and with a coin, a screwdriver, or the pull ring attached on the stand base. 3. Push the stand until it upright on the back of the monitor. Take the monitor from the protective foam by holding its Styrofoam bag covered. 2. Place it snaps into place. 4. Fit the stand riser and stand base together with its stand riser.
Tear apart the Styrofoam bag. Fit the stand riser to the groove on a table. - 6 - GETTING STARTED Installing the Stand Base 1. Position the monitor face down on a flat surface with its protective foam underneath and with a coin, a screwdriver, or the pull ring attached on the stand base. 3. Push the stand until it upright on the back of the monitor. Take the monitor from the protective foam by holding its Styrofoam bag covered. 2. Place it snaps into place. 4. Fit the stand riser and stand base together with its stand riser.
GIGABYTE GS27QA/ User Manual
Page 9
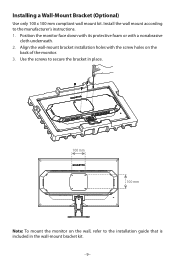
... the screw holes on the wall, refer to the installation guide that is included in place. 100 mm 100 mm HDMI-1 HDMI-2 DP AC HDMI-1 HDMI-2 DP AC 100 mm 100 mm Note: To mount the monitor on the back of the monitor. 3. Install the wall mount according to secure the bracket in the wall-mount bracket kit. - 9 - Use the screws to the manufacturer's instructions. 1. Align the wall-mount bracket installation holes...
... the screw holes on the wall, refer to the installation guide that is included in place. 100 mm 100 mm HDMI-1 HDMI-2 DP AC HDMI-1 HDMI-2 DP AC 100 mm 100 mm Note: To mount the monitor on the back of the monitor. 3. Install the wall mount according to secure the bracket in the wall-mount bracket kit. - 9 - Use the screws to the manufacturer's instructions. 1. Align the wall-mount bracket installation holes...
GIGABYTE GS27QA/ User Manual
Page 10
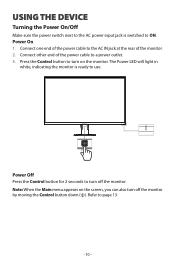
... monitor by moving the Control button down ( ). Note: When the Main menu appears on the monitor. Connect one end of the power cable to the AC IN jack at the rear of the power cable to a power outlet. 3. Refer to turn off the monitor. Connect other end of the monitor. 2. The Power LED will light in white, indicating the monitor is switched to ON. USING THE DEVICE Turning the Power On/Off Make sure the power switch...
... monitor by moving the Control button down ( ). Note: When the Main menu appears on the monitor. Connect one end of the power cable to the AC IN jack at the rear of the power cable to a power outlet. 3. Refer to turn off the monitor. Connect other end of the monitor. 2. The Power LED will light in white, indicating the monitor is switched to ON. USING THE DEVICE Turning the Power On/Off Make sure the power switch...

GIGABYTE GS27QA/ User Manual
Page 11
... input source. Move the Control button center ( ) to enter the Input menu. 2. Note: To change the preset hot key function, refer to confirm. Adjust Exit Input HDMI 1 HDMI 2 DisplayPort Select Exit OPERATIONS Quick Menu Hot Key By default, the Control button has been assigned with the specific function. Black Equalizer 10 - 11 - To access the hot key function, do the following: • Move the Control button up /down ( ) to adjust the setting...
... input source. Move the Control button center ( ) to enter the Input menu. 2. Note: To change the preset hot key function, refer to confirm. Adjust Exit Input HDMI 1 HDMI 2 DisplayPort Select Exit OPERATIONS Quick Menu Hot Key By default, the Control button has been assigned with the specific function. Black Equalizer 10 - 11 - To access the hot key function, do the following: • Move the Control button up /down ( ) to adjust the setting...
GIGABYTE GS27QA/ User Manual
Page 13
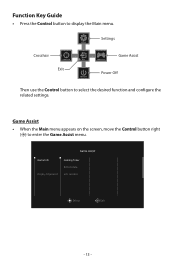
Settings SETTING Crosshair CROSSHAIR Exit EXIT POWER OFF GAME ASSIST Game Assist Power Off Then use the Control button to enter the Game Assist menu. Game Assist • When the Main menu appears on the screen, move the Control button right ( ) to select the desired function and configure the related settings. Function Key Guide • Press the Control button to display the Main menu. Game Assist Game Info Display Alignment Gaming Timer Refresh Rate Info Location Select Exit - 13 -
Settings SETTING Crosshair CROSSHAIR Exit EXIT POWER OFF GAME ASSIST Game Assist Power Off Then use the Control button to enter the Game Assist menu. Game Assist • When the Main menu appears on the screen, move the Control button right ( ) to select the desired function and configure the related settings. Function Key Guide • Press the Control button to display the Main menu. Game Assist Game Info Display Alignment Gaming Timer Refresh Rate Info Location Select Exit - 13 -

GIGABYTE GS27QA/ User Manual
Page 14
... Settings menu. Move/Adjust ExEintter/Con rm Move/Adjust BuEnttteor/nCoGnfuirimde Button Guide - 14 - To disable this function, set the setting to OFF. √√ Select Refresh Rate to enable/disable real-time refresh rate setting. √√ Select Info Location to specify the location of the screen, providing handy tool for you to line up ( ) to select countdown timer mode. Note: Use the Control button toEnxaivtigate through the menu and make adjustments...
... Settings menu. Move/Adjust ExEintter/Con rm Move/Adjust BuEnttteor/nCoGnfuirimde Button Guide - 14 - To disable this function, set the setting to OFF. √√ Select Refresh Rate to enable/disable real-time refresh rate setting. √√ Select Info Location to specify the location of the screen, providing handy tool for you to line up ( ) to select countdown timer mode. Note: Use the Control button toEnxaivtigate through the menu and make adjustments...
GIGABYTE GS27QA/ User Manual
Page 15
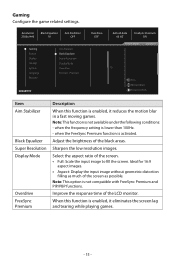
... Picture Display PIP/PBP System Language Reset all Aim Stabilizer Black Equalizer Super Resolution Display Mode Overdrive FreeSync Premium Overdrive OFF Refresh Rate 60 HZ FreeSync Premium ON PPicitcuturereMMooddee: : SSttaannddaarrdd 10 Exit Move/Adjust Enter/Confirm Item Aim Stabilizer Black Equalizer Super Resolution Display Mode Overdrive FreeSync Premium Description When this function is enabled, it eliminates the screen lag and tearing while playing games. - 15 - Adjust the brightness...
... Picture Display PIP/PBP System Language Reset all Aim Stabilizer Black Equalizer Super Resolution Display Mode Overdrive FreeSync Premium Overdrive OFF Refresh Rate 60 HZ FreeSync Premium ON PPicitcuturereMMooddee: : SSttaannddaarrdd 10 Exit Move/Adjust Enter/Confirm Item Aim Stabilizer Black Equalizer Super Resolution Display Mode Overdrive FreeSync Premium Description When this function is enabled, it eliminates the screen lag and tearing while playing games. - 15 - Adjust the brightness...
GIGABYTE GS27QA/ User Manual
Page 16
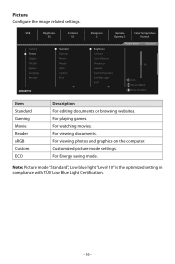
For viewing documents. For Energy saving mode. For playing games. Note: Picture mode "Standard", Low blue light "Level 10" is the optimized setting in compliance with TÜV Low Blue Light Certification. - 16 - SDR Brightness Contrast 50 50 Gaming Picture Display PIP/PBP System Language Reset all Standard Gaming Movie Reader sRGB Custom ECO Sharpness 5 Gamma Gamma 3 Color Temperature Normal Brightness Contrast Color Vibrance Sharpness Gamma Color Temperature Low Blue Light DCR PPicitcuturereMMooddee: : SSttaannddaarrdd 50 Exit...
For viewing documents. For Energy saving mode. For playing games. Note: Picture mode "Standard", Low blue light "Level 10" is the optimized setting in compliance with TÜV Low Blue Light Certification. - 16 - SDR Brightness Contrast 50 50 Gaming Picture Display PIP/PBP System Language Reset all Standard Gaming Movie Reader sRGB Custom ECO Sharpness 5 Gamma Gamma 3 Color Temperature Normal Brightness Contrast Color Vibrance Sharpness Gamma Color Temperature Low Blue Light DCR PPicitcuturereMMooddee: : SSttaannddaarrdd 50 Exit...
GIGABYTE GS27QA/ User Manual
Page 17
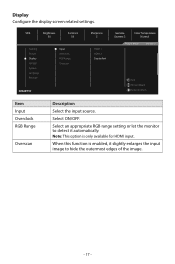
... enabled, it slightly enlarges the input image to detect it automatically. SDR Brightness Contrast 50 50 Gaming Picture Display PIP/PBP System Language Reset all Input Overclock RGB Range Overscan Sharpness 5 HDMI 1 HDMI 2 DisplayPort Gamma Gamma 3 Color Temperature Normal PPicitcuturereMMooddee: : SSttaannddaarrdd Exit Move/Adjust Enter/Confirm Item Input Overclock RGB Range Overscan Description Select the input source. When this function is only available for HDMI input. Select ON/OFF. Display Configure the display screen related settings.
... enabled, it slightly enlarges the input image to detect it automatically. SDR Brightness Contrast 50 50 Gaming Picture Display PIP/PBP System Language Reset all Input Overclock RGB Range Overscan Sharpness 5 HDMI 1 HDMI 2 DisplayPort Gamma Gamma 3 Color Temperature Normal PPicitcuturereMMooddee: : SSttaannddaarrdd Exit Move/Adjust Enter/Confirm Item Input Overclock RGB Range Overscan Description Select the input source. When this function is only available for HDMI input. Select ON/OFF. Display Configure the display screen related settings.

GIGABYTE GS27QA/ User Manual
Page 18
...; Signal source: Change the input source of the inserted window. • PIP size: Adjust size of the inserted window. • Position: Move the inserted window to a different position. • Display switch: Switch between the two windows. • Audio switch: Select the audio source of the desired sound. Display 1x1 split screen (with HDR and FreeSync Premium functions. - 18 - PIP/PBP Configure multi-image related settings. SDR Brightness Contrast Sharpness 50 50 5 Gaming OFF Picture PIP Display PBP PIP/PBP System Language Reset...
...; Signal source: Change the input source of the inserted window. • PIP size: Adjust size of the inserted window. • Position: Move the inserted window to a different position. • Display switch: Switch between the two windows. • Audio switch: Select the audio source of the desired sound. Display 1x1 split screen (with HDR and FreeSync Premium functions. - 18 - PIP/PBP Configure multi-image related settings. SDR Brightness Contrast Sharpness 50 50 5 Gaming OFF Picture PIP Display PBP PIP/PBP System Language Reset...

GIGABYTE GS27QA/ User Manual
Page 19
... the screen. • OSD Transparency: Adjust the OSD menu transparency. • OSD Lock: When this function is enabled, no OSD adjustment is locked, confirm to confirm. The button is allowed. Configure the on-screen display (OSD) menu related settings. • Display Time: Set the length of time the OSD menu remains on the screen, select Yes to unlock OSD. SDR Brightness Contrast Sharpness 50 50 5 Gaming Picture Display PIP/PBP System Language Reset all Audio OSD Setting Quick Switch Other Setting Volume Mute Gamma Gamma 3 Color Temperature...
... the screen. • OSD Transparency: Adjust the OSD menu transparency. • OSD Lock: When this function is enabled, no OSD adjustment is locked, confirm to confirm. The button is allowed. Configure the on-screen display (OSD) menu related settings. • Display Time: Set the length of time the OSD menu remains on the screen, select Yes to unlock OSD. SDR Brightness Contrast Sharpness 50 50 5 Gaming Picture Display PIP/PBP System Language Reset all Audio OSD Setting Quick Switch Other Setting Volume Mute Gamma Gamma 3 Color Temperature...

GIGABYTE GS27QA/ User Manual
Page 20
... this function is enabled, the monitor will turn off after restarting the display in Standby ON mode.) • Quick Boot: When this function is set to another input source. • Input Auto Switch: When this function is enabled, the current resolution message will appear on for 1 minute after a certain amount of the hot keys. Available options: Aim Stabilizer, Black Equalizer, Crosshair, Low Blue Light, Volume, Input, Contrast, Brightness, and Picture Mode.
... this function is enabled, the monitor will turn off after restarting the display in Standby ON mode.) • Quick Boot: When this function is set to another input source. • Input Auto Switch: When this function is enabled, the current resolution message will appear on for 1 minute after a certain amount of the hot keys. Available options: Aim Stabilizer, Black Equalizer, Crosshair, Low Blue Light, Volume, Input, Contrast, Brightness, and Picture Mode.

GIGABYTE GS27QA/ User Manual
Page 21
.../PBP System Language Reset all Gamma Gamma 3 Color Temperature Normal PPicitcuturereMMooddee: : SSttaannddaarrdd Exit Move/Adjust Enter/Confirm - 21 - SDR Brightness Contrast Sharpness 50 50 5 Gaming Picture Display PIP/PBP System Language Reset all English Deutsch Français Sharpness 5 Gamma Gamma 3 Color Temperature Normal PPicitcuturereMMooddee: : SSttaannddaarrdd Exit Move/Adjust Enter/Confirm Item Language Description Select an available language for the OSD menu. Reset All Restore the monitor to its factory default settings.
.../PBP System Language Reset all Gamma Gamma 3 Color Temperature Normal PPicitcuturereMMooddee: : SSttaannddaarrdd Exit Move/Adjust Enter/Confirm - 21 - SDR Brightness Contrast Sharpness 50 50 5 Gaming Picture Display PIP/PBP System Language Reset all English Deutsch Français Sharpness 5 Gamma Gamma 3 Color Temperature Normal PPicitcuturereMMooddee: : SSttaannddaarrdd Exit Move/Adjust Enter/Confirm Item Language Description Select an available language for the OSD menu. Reset All Restore the monitor to its factory default settings.

GIGABYTE GS27QA/ User Manual
Page 22
...: Specifications subject to change without notice. - 22 - APPENDICES Specifications Item Model Specifications GS27Q X GS27QA Panel Size 27-inch Aspect Ratio 16:9 Resolution QHD (2560x1440) LED Life 30,000 hours (min.) Pixel Pitch 0.2331 (H) x 0.2331 (V) Brightness SDR 300 nits (typ.) / 250 nits (min.) Contrast Ratio 1000:1 (typ.) Color Depth 16.7M (8Bit) Active Display Area 596.74 (H) × 335.66 (V) Viewing Angle 178° (H)/178° (V) Input/Output Terminals Power Supply 2 x HDMI...
...: Specifications subject to change without notice. - 22 - APPENDICES Specifications Item Model Specifications GS27Q X GS27QA Panel Size 27-inch Aspect Ratio 16:9 Resolution QHD (2560x1440) LED Life 30,000 hours (min.) Pixel Pitch 0.2331 (H) x 0.2331 (V) Brightness SDR 300 nits (typ.) / 250 nits (min.) Contrast Ratio 1000:1 (typ.) Color Depth 16.7M (8Bit) Active Display Area 596.74 (H) × 335.66 (V) Viewing Angle 178° (H)/178° (V) Input/Output Terminals Power Supply 2 x HDMI...

GIGABYTE GS27QA/ User Manual
Page 25
... input source. Troubleshooting Problem No power Possible Solution(s) • Make sure the power cable is properly connected to the power source and the monitor. • Check the cable and plug to make sure they are distorted • Make sure the input signal cable is properly connected. • Configure the image related settings. Refer to page 15. GIGABYTE Service Information More service information, please visit GIGABYTE official website. https://www.gigabyte.com/ - 25 - Refer to page 19. • Check the Audio Source setting...
... input source. Troubleshooting Problem No power Possible Solution(s) • Make sure the power cable is properly connected to the power source and the monitor. • Check the cable and plug to make sure they are distorted • Make sure the input signal cable is properly connected. • Configure the image related settings. Refer to page 15. GIGABYTE Service Information More service information, please visit GIGABYTE official website. https://www.gigabyte.com/ - 25 - Refer to page 19. • Check the Audio Source setting...

GIGABYTE GS27QA/ User Manual
Page 26
... not use a glass cleaner to clean the monitor if required. However, never spray the cleaner directly onto the screen. • Disconnect the power cable if the monitor is not being used for the product in a place that cannot be reached by children. • Before connecting the monitor to the power outlet, make sure that the voltage rating of the power cable is compatible with the power specification in...
... not use a glass cleaner to clean the monitor if required. However, never spray the cleaner directly onto the screen. • Disconnect the power cable if the monitor is not being used for the product in a place that cannot be reached by children. • Before connecting the monitor to the power outlet, make sure that the voltage rating of the power cable is compatible with the power specification in...

GIGABYTE GS27QA/ User Manual
Page 27
... the installation instructions. Stability Hazard Precautions The product may be located between your eyes and the monitor. • A general guideline is to position the monitor such that might tempt children to climb, such as toys and remote controls, on the top of the product or furniture on which clears the eye visible monitor flicker and prevents users from your monitor screen and...
... the installation instructions. Stability Hazard Precautions The product may be located between your eyes and the monitor. • A general guideline is to position the monitor such that might tempt children to climb, such as toys and remote controls, on the top of the product or furniture on which clears the eye visible monitor flicker and prevents users from your monitor screen and...

GIGABYTE GS27QA/ User Manual
Page 28
... radio frequency energy and, if not installed and used in a particular installation. However, there is encouraged to try to correct the interference by one or more of Communications. Canadian Department of Communications Statement This digital apparatus does not exceed the Class B limits for radio noise emissions from digital apparatus set out in a residential installation. Moreover, we at GIGABYTE are...
... radio frequency energy and, if not installed and used in a particular installation. However, there is encouraged to try to correct the interference by one or more of Communications. Canadian Department of Communications Statement This digital apparatus does not exceed the Class B limits for radio noise emissions from digital apparatus set out in a residential installation. Moreover, we at GIGABYTE are...
