
User Manual
Page 3
...blades with the manufacturer's instructions. 8) Do not install near water. 6) Clean only with a dry cloth. 7) Do not block any way, such as power supply cord or plug is used, use the attachments/accessories specified by the manufacturer. 12) Use only with the cart, stand, tripod, bracket, or ... The wide blade or the third prong is provided for your outlet, consult an electrician for replacement of the obsolete outlet. 10) Protect the power cord from tip-over. 13) Unplug this apparatus during lightning storms or when unused for long periods of the polarized or grounding type plug. ...
...blades with the manufacturer's instructions. 8) Do not install near water. 6) Clean only with a dry cloth. 7) Do not block any way, such as power supply cord or plug is used, use the attachments/accessories specified by the manufacturer. 12) Use only with the cart, stand, tripod, bracket, or ... The wide blade or the third prong is provided for your outlet, consult an electrician for replacement of the obsolete outlet. 10) Protect the power cord from tip-over. 13) Unplug this apparatus during lightning storms or when unused for long periods of the polarized or grounding type plug. ...
User Manual
Page 6
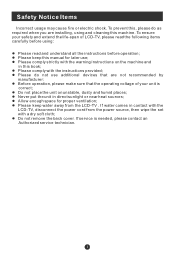
... direct sunlight or near heat sources; l Please comply strictly with the warning instructions on unstable, dusty and humid places; l Please keep water away from the power source, then wipe the set with the instructions provided; If water comes in contact with the LCD-TV, disconnect the...
... direct sunlight or near heat sources; l Please comply strictly with the warning instructions on unstable, dusty and humid places; l Please keep water away from the power source, then wipe the set with the instructions provided; If water comes in contact with the LCD-TV, disconnect the...
User Manual
Page 7
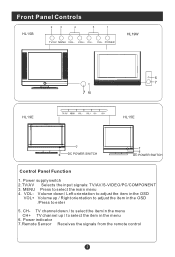
...Press to enter 5. Power supply switch 2.TV/AV Selects the input signals: TV/AV/S-VIDEO/PC/COMPONENT 3. Volume down / to select the item in the menu CH+ TV channel up / Right orientation to adjust the item in the menu 6. CH- Power indicator 7.Remote Sensor ...Receives the signals from the remote control CH+ POWER HL19W HL19E 76 6 7 HL15E DC POWER SWITCH DC POWER SWITCH Control Panel Function 1. Front Panel Controls HL15B 2 3 4 5 1 TV/AV MENU VOL- VOL- TV channel ...
...Press to enter 5. Power supply switch 2.TV/AV Selects the input signals: TV/AV/S-VIDEO/PC/COMPONENT 3. Volume down / to select the item in the menu CH+ TV channel up / Right orientation to adjust the item in the menu 6. CH- Power indicator 7.Remote Sensor ...Receives the signals from the remote control CH+ POWER HL19W HL19E 76 6 7 HL15E DC POWER SWITCH DC POWER SWITCH Control Panel Function 1. Front Panel Controls HL15B 2 3 4 5 1 TV/AV MENU VOL- VOL- TV channel ...
User Manual
Page 12
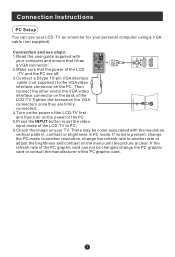
... your computer and ensure that it has a VGA connector; 2.Make sure that the power of the LCD -TV and the PC are firmly connected; 4.Turn on the power of the LCD-TV first , and then turn on the power of the PC; 5.Press the INPUT button to set the video input mode of...
... your computer and ensure that it has a VGA connector; 2.Make sure that the power of the LCD -TV and the PC are firmly connected; 4.Turn on the power of the LCD-TV first , and then turn on the power of the PC; 5.Press the INPUT button to set the video input mode of...
User Manual
Page 13
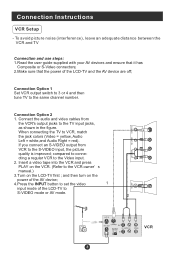
...a regular VCR to conne- Insert a video tape into the VCR and press PLAY on the VCR. (Refer to the VCR owner s manual.) 3.Turn on the power of the AV device; 4.Press the INPUT button to the TV input jacks, as shown in the figure. To avoid picture noise (interference), leave an... and use steps: 1.Read the user guide supplied with your AV devices and ensure that it has Composite or S-Video connectors; 2.Make sure that the power of the LCD-TV to the same channel number. compared to the Video input. 2. Connection Option 2 1. Connect the audio and video cables from V. CR ...
...a regular VCR to conne- Insert a video tape into the VCR and press PLAY on the VCR. (Refer to the VCR owner s manual.) 3.Turn on the power of the AV device; 4.Press the INPUT button to the TV input jacks, as shown in the figure. To avoid picture noise (interference), leave an... and use steps: 1.Read the user guide supplied with your AV devices and ensure that it has Composite or S-Video connectors; 2.Make sure that the power of the LCD-TV to the same channel number. compared to the Video input. 2. Connection Option 2 1. Connect the audio and video cables from V. CR ...
User Manual
Page 15
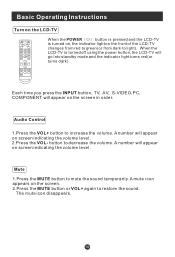
... dark). The mute icon disappears. button to light). CC SLEEP S.MODE GUIDE ARC CH.LIST FAV.LIST When the POWER button is pressed and the LCD-TV is turned off using the power button, the LCD-TV will appear on screen indicating the volume level. 2.Press the VOL- Mute 1.Press the MUTE...
... dark). The mute icon disappears. button to light). CC SLEEP S.MODE GUIDE ARC CH.LIST FAV.LIST When the POWER button is pressed and the LCD-TV is turned off using the power button, the LCD-TV will appear on screen indicating the volume level. 2.Press the VOL- Mute 1.Press the MUTE...
User Manual
Page 23
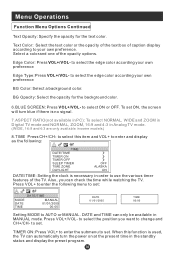
... own preference Edge Type: Press VOL+/VOL- To set ON, the screen will turn blue if there is used, the TV can automatically turn the power on at the present time in the standby status and display the preset program. DATE and TIME can check the time while watching the TV...
... own preference Edge Type: Press VOL+/VOL- To set ON, the screen will turn blue if there is used, the TV can automatically turn the power on at the present time in the standby status and display the preset program. DATE and TIME can check the time while watching the TV...
User Manual
Page 30
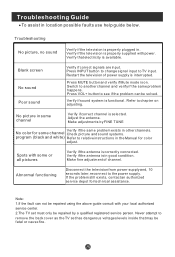
...correctly connected. Make adjustments by a qualified registered service person. Make fine adjustment of power supply is properly plugged in location possible faults use help guide below. Abnormal functioning Disconnect the television from power supply and, 10 seconds later, reconnect to chapter on . Troubleshooting No picture,... and white) Refer to remove the back cover as the TV set must only be repaired using the above guide consult with power. Spots with some or all pictures Verify if the antenna is functional. Verify if the antenna is on adjusting. Verify that may...
...correctly connected. Make adjustments by a qualified registered service person. Make fine adjustment of power supply is properly plugged in location possible faults use help guide below. Abnormal functioning Disconnect the television from power supply and, 10 seconds later, reconnect to chapter on . Troubleshooting No picture,... and white) Refer to remove the back cover as the TV set must only be repaired using the above guide consult with power. Spots with some or all pictures Verify if the antenna is functional. Verify if the antenna is on adjusting. Verify that may...
User Manual
Page 31
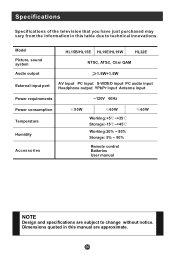
Model Picture, sound system Audio output HL15B/HL15E HL19E/HL19W HL22E NTSC, ATSC, Cliar QAM 1.5W+1.5W External input port AV input PC input S-VIDEO input PC audio input Headphone output YPbPr input Antenna input Power requirements ~120V 60Hz Power consumption Temperature Humidity Accessories 50W 60W Working:+5 ~+35 Storage:-15 ~+45 Working:20% ~ 80...
Model Picture, sound system Audio output HL15B/HL15E HL19E/HL19W HL22E NTSC, ATSC, Cliar QAM 1.5W+1.5W External input port AV input PC input S-VIDEO input PC audio input Headphone output YPbPr input Antenna input Power requirements ~120V 60Hz Power consumption Temperature Humidity Accessories 50W 60W Working:+5 ~+35 Storage:-15 ~+45 Working:20% ~ 80...

