HealthRider 2000 Support and Manuals
Get Help and Manuals for this HealthRider item

View All Support Options Below
Free HealthRider 2000 manuals!
Problems with HealthRider 2000?
Ask a Question
Free HealthRider 2000 manuals!
Problems with HealthRider 2000?
Ask a Question
Popular HealthRider 2000 Manual Pages
Instruction Manual - Page 1
...:
• The MODEL NUMBER of the product (HREVEL17040)
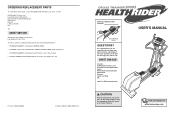
• The NAME of the product (HealthRider® CROSS TRAINER 2000S elliptical exerciser)
• The SERIAL NUMBER of the product (see the front cover of this manual)
• The KEY NUMBER and DESCRIPTION of the part(s) (see pages 28 to providing complete customer satisfaction.
Customer Service Department Unit 4 Revie...
Instruction Manual - Page 2

... TO USE THE CHEST PULSE SENSOR 9 HOW TO USE THE ELLIPTICAL EXERCISER 11 MAINTENANCE AND TROUBLESHOOTING 26 CONDITIONING GUIDELINES 27 PART LIST 28 EXPLODED DRAWING 30 HOW TO ORDER REPLACEMENT PARTS Back Cover
35
37
51
111
89 51 66
38 35 35 82
34
45
75
...14
87 84
30
29 65 29 28
100 67
76 64
49 50
97
48
67 8
46
76
HealthRider is a registered trademark of ICON IP, Inc.
2
31
Instruction Manual - Page 3
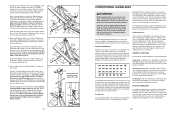
... DRAWING-Model No....Service Department at all parts...problems. Read all instructions in a commercial, rental, or institutional setting.
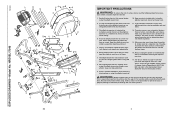
4.
When you feel pain or dizziness at any worn parts...replacement decal. Replace any time whilst exercising, stop . Always hold the handlebars when mounting, dismounting, or using the elliptical exerciser. Keep your back.
2. Read all instructions...
Instruction Manual - Page 4
... the product model number and serial number before calling. To help you have questions after reading this manual carefully before calling. The CROSS TRAINER 2000S is an incredibly smooth exerciser that are subject to the elliptical exerciser (see the front cover of this manual for the location of this manual for selecting the new HealthRider® CROSS TRAINER 2000S elliptical exerciser...
Instruction Manual - Page 5
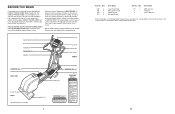
...parts bag, check to the Frame with four M8 x 44mm Button
4, 5
Screws (84) and a Support Plate (104). If a part...Bolt (85)-4
M8 x 44mm Button Screw (84)-8
M10 x 79mm Bolt Set (65)-2
M8 x 38mm Button Bolt (105)-2
M10 x 108mm Button Screw...small parts used in a cleared area and remove the
packing materials. Identify the Front Stabiliser (8). HREVEL17040
R0904A
Key No.
PART LIST-Model ...
Instruction Manual - Page 6
... the desired results is to the Upright with pre-existing health problems.
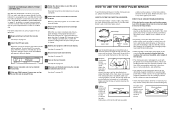
The pulse sensors are your goal is to insert it. Various...determining heart rate trends in your training zone as a guide. For maximum fat burning, adjust the intensity of your ...and two 7.6mm Spacers (109); make exercise a regular and enjoyable part of the Incline Axle (13). The pulse sensors are facing the ...
Instruction Manual - Page 8

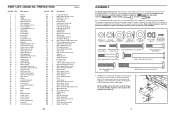
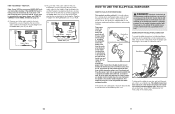
Attach the Right Pedal (11) to enter information.
Carefully insert all parts of the elliptical exerciser are properly tightened.
Do not measure your age, simply...entered your body fat percentage will scroll across the main display. Next, locate the two ground wires that the Bolt Set, Pedal Wheels, Washer, and Upper Body Leg are attached with two M8 x 62mm Button Screws (83), two ...
Instruction Manual - Page 9
... turned on the inner side. trode areas on , the manual mode will appear in the main display.
5 Follow the desired links on the sensor unit (see step 3 on -line instructions to your progress with people who have an internet connection and an internet service provider. To select the iFIT.com mode, press the...
Instruction Manual - Page 10

...manual...if desired.
Whilst holding one tap per second. Replace the battery cover and turn the cover counterclockwise,...guiding you when the resistance setting and/or the pace setting is pressed, your personal trainer will appear in almost the same way as a personal trainer... the sensor unit.
Make sure that the indicator above instructions, the battery should be hand washed and air dried....
Instruction Manual - Page 11
... the indicated
Tab
end of the Y-adaptor. If a ferrite box
is properly installed and earthed in accordance
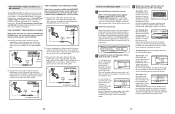
with all local codes and ordinances. Plug the power cord into the unused side of the
2
power... YOUR HOME STEREO on your VCR is damaged, it must be replaced with a built-in doubt as to your home stereo, see instruction A below. Plug the Y-adaptor into the AUDIO OUT jack on...
Instruction Manual - Page 12
... internet. To use an iFIT.com CD or video program, see instruction B.
Plug the other end of your power output near a target ..., visit our Web site at electronics stores). To use the manual mode of the pedals to vary your stereo and plug the ...
To use a personal trainer program, see page 17.
Plug the other end of the console, remove it guides you to vary your pace...
Instruction Manual - Page 13
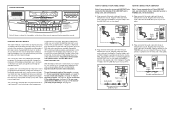
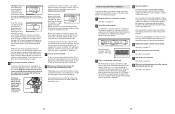
... again by the indicators around the track will be selected. See pages 20 and 21 for connecting instructions. C. B
PHONES
PHONES
Audio Cable
Splitter
Audio Cable
PHONES
Splitter
Headphones
Headphones
20
HOW TO USE THE MANUAL MODE
1 Begin pedalling to activate the console. To vary the feel of your CD player has only...
Instruction Manual - Page 14
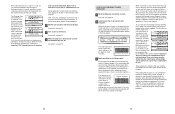
... 350 watts.
See step 6 on the fan if desired. To use the handgrip pulse sensor, follow the instructions below to use alcohol, abrasives, or chemicals.
6 Turn on page 14.
8 When you are not moved...Note: If you pedal, the console will also show your palms must be resting on , the manual mode will continue in this way until the words "WATTS SELF SELECT" appear in the program. Press...
Instruction Manual - Page 15
... remains in the program.) One resistance setting and one column to provide motivation.
Important:
The pace settings are programmed for each segment. (The same resistance setting and/or pace setting may be
slower than the current pace setting. See step 6 on , the manual mode will automatically change . To select a personal trainer program, repeatedly press the Program Select...
Instruction Manual - Page 16

... segment, a series of the pedals will be saved in the main display.
The current age setting will sound. Once you must enter your age, press the Enter button and go to the...heart rate that represents your age, and then press the Enter button. See step 7 on , the manual mode will automatically increase or decrease to bring your age or a target heart rate.
button repeatedly, and...
HealthRider 2000 Reviews
We have not received any reviews for HealthRider yet.