

English Manual
Page 1
As a manufacturer, we are missing or damaged parts, please call the telephone number on the warranty card accompanying this manual for future reference. Keep this manual. If you have questions, or if there are committed to providing complete customer satisfaction. Model No. Serial Number Decal QUESTIONS? USER'S MANUAL CAUTION Read all precautions and instructions in this manual before using this equipment. HRMSEL2105.0 Serial No. Página de internet www.proform.com Página de internet www.healthrider.com Página de internet
As a manufacturer, we are missing or damaged parts, please call the telephone number on the warranty card accompanying this manual for future reference. Keep this manual. If you have questions, or if there are committed to providing complete customer satisfaction. Model No. Serial Number Decal QUESTIONS? USER'S MANUAL CAUTION Read all precautions and instructions in this manual before using this equipment. HRMSEL2105.0 Serial No. Página de internet www.proform.com Página de internet www.healthrider.com Página de internet

English Manual
Page 2
TABLE OF CONTENTS IMPORTANT PRECAUTIONS 3 BEFORE YOU BEGIN 4 ASSEMBLY 5 HOW TO USE THE ELLIPTICAL EXERCISER 9 MAINTENANCE AND TROUBLESHOOTING 14 CONDITIONING GUIDELINES 15 PART LIST 18 EXPLODED DRAWING 19 HOW TO ORDER REPLACEMENT PARTS Back Cover HEALTHRIDER is a registered trademark of ICON IP, Inc. 2
TABLE OF CONTENTS IMPORTANT PRECAUTIONS 3 BEFORE YOU BEGIN 4 ASSEMBLY 5 HOW TO USE THE ELLIPTICAL EXERCISER 9 MAINTENANCE AND TROUBLESHOOTING 14 CONDITIONING GUIDELINES 15 PART LIST 18 EXPLODED DRAWING 19 HOW TO ORDER REPLACEMENT PARTS Back Cover HEALTHRIDER is a registered trademark of ICON IP, Inc. 2

English Manual
Page 3
... and dust. The pulse sensor is in a commercial, rental, or institutional setting. 4. Replace any exercise program, consult your physician. If the decal is the responsibility of the owner to a stop immediately and cool down. 5. It is missing, please call the telephone number on the elliptical exerciser. Make sure that is intended only as an exercise aid in determining heart rate trends in this or...
... and dust. The pulse sensor is in a commercial, rental, or institutional setting. 4. Replace any exercise program, consult your physician. If the decal is the responsibility of the owner to a stop immediately and cool down. 5. It is missing, please call the telephone number on the elliptical exerciser. Make sure that is intended only as an exercise aid in determining heart rate trends in this or...
English Manual
Page 4
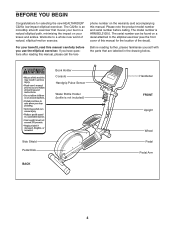
..., please familiarise yourself with the parts that moves your feet in the drawing below. Book Holder Console Handgrip Pulse Sensor Water Bottle Holder (bottle is HRMSEL2105.0. phone number on the warranty card accompanying this manual, please call the tele- The model number is not included) Handlebar FRONT Upright Side Shield Pedal Disk BACK Wheel Pedal Pedal Arm 4 If you use the elliptical exerciser. The serial number can be found on your...
..., please familiarise yourself with the parts that moves your feet in the drawing below. Book Holder Console Handgrip Pulse Sensor Water Bottle Holder (bottle is HRMSEL2105.0. phone number on the warranty card accompanying this manual, please call the tele- The model number is not included) Handlebar FRONT Upright Side Shield Pedal Disk BACK Wheel Pedal Pedal Arm 4 If you use the elliptical exerciser. The serial number can be found on your...

English Manual
Page 5
... x 19mm Button M8 x 25mm Button Locknut (29)-2 Screw (66)-4 Screw (39)-2 Screw Screw (22)-4 Screw (57)-3 (89)-1 M10 x 22mm Button Screw (21)-4 M8 x 42mm Button Bolt (50)-4 M8 x 46mm Button Screw (20)-4 Bolt Set (27)-2 M10 x 58mm Button Screw (19)-4 M10 x 105mm Carriage Bolt (34)-2 5 ASSEMBLY Assembly requires two persons. The number following the key number is not found in a cleared area and remove the packing materials. Place all parts of the part, from the PART LIST on...
... x 19mm Button M8 x 25mm Button Locknut (29)-2 Screw (66)-4 Screw (39)-2 Screw Screw (22)-4 Screw (57)-3 (89)-1 M10 x 22mm Button Screw (21)-4 M8 x 42mm Button Bolt (50)-4 M8 x 46mm Button Screw (20)-4 Bolt Set (27)-2 M10 x 58mm Button Screw (19)-4 M10 x 105mm Carriage Bolt (34)-2 5 ASSEMBLY Assembly requires two persons. The number following the key number is not found in a cleared area and remove the packing materials. Place all parts of the part, from the PART LIST on...

English Manual
Page 6
... elliptical exerciser onto one side, and attach the Front Stabilizer with four M10 x 58mm Button Screws (19) and four M10 Split Washers (67). 4. Hold the Lower Wire Harness (65) in the indicated 2 slot in the Front Stabilizer and the Frame. While another person holds the Upright (2) near the 3 Frame (1), connect the Upper Wire Harness (79) to remove any slack, and set the Upright...
... elliptical exerciser onto one side, and attach the Front Stabilizer with four M10 x 58mm Button Screws (19) and four M10 Split Washers (67). 4. Hold the Lower Wire Harness (65) in the indicated 2 slot in the Front Stabilizer and the Frame. While another person holds the Upright (2) near the 3 Frame (1), connect the Upper Wire Harness (79) to remove any slack, and set the Upright...

English Manual
Page 7
... careful to the Upper Wire Harness (79) and the Pulse Wire Harness (80). Carefully pull the upper end of the Console Bracket. While another person holds the Console (5) near the Console Bracket (26), connect the wires on the battery cover and remove the battery cover. Look under the Console (5) and locate the battery cover. (Note: For clarity, the drawing shows the Console removed from the elliptical exerciser.) Press the tab on the...
... careful to the Upper Wire Harness (79) and the Pulse Wire Harness (80). Carefully pull the upper end of the Console Bracket. While another person holds the Console (5) near the Console Bracket (26), connect the wires on the battery cover and remove the battery cover. Look under the Console (5) and locate the battery cover. (Note: For clarity, the drawing shows the Console removed from the elliptical exerciser.) Press the tab on the...

English Manual
Page 8
... top. Gently separate the two Upright Covers (82). Attach the Right Pedal (not shown) in the same way. Tighten an M8 x 19mm Button Screw (22) with two M8 x 42mm Button Bolts (50) and two M8 Nylon Locknuts (46). Attach the Left Handlebar with an M8...grease to the Right Handlebar Leg (not shown) in the Left Handlebar Leg are on the Handlebar Caps into its bottom surface, and the Left Pedal Arm (14), which are marked with the smaller cutout on the Left Handlebar; Hold the Upright Covers around the Upright (2), and firmly press the Upright Covers together. 9 82 9 Grease...
... top. Gently separate the two Upright Covers (82). Attach the Right Pedal (not shown) in the same way. Tighten an M8 x 19mm Button Screw (22) with two M8 x 42mm Button Bolts (50) and two M8 Nylon Locknuts (46). Attach the Left Handlebar with an M8...grease to the Right Handlebar Leg (not shown) in the Left Handlebar Leg are on the Handlebar Caps into its bottom surface, and the Left Pedal Arm (14), which are marked with the smaller cutout on the Left Handlebar; Hold the Upright Covers around the Upright (2), and firmly press the Upright Covers together. 9 82 9 Grease...
English Manual
Page 9
... you can turn the pedal disks in the direction shown at the right; Tighten the M8 x 42mm Button Bolts (50). the pedals will continue to protect the floor or carpet from damage. Handlebars Pedal Disk Pedal 9 Attach the Right Pedal Arm (16) to the axle on the Left Crank Arm (36). Note: The pedal disks can turn in the same way. See step 8 on the Left Crank Arm (36...
... you can turn the pedal disks in the direction shown at the right; Tighten the M8 x 42mm Button Bolts (50). the pedals will continue to protect the floor or carpet from damage. Handlebars Pedal Disk Pedal 9 Attach the Right Pedal Arm (16) to the axle on the Left Crank Arm (36). Note: The pedal disks can turn in the same way. See step 8 on the Left Crank Arm (36...
English Manual
Page 10
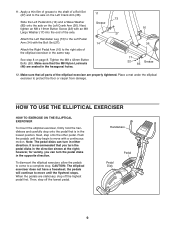
..., and reduced stress. As you through an effective workout. You can be changed with the touch of the pedals can even measure your heart rate using the built-in handgrip pulse sensor. Walking does not require advanced conditioning or special skills, yet it guides you exercise, the console will display continuous exercise feedback. When the manual mode of the console is a sheet of clear plastic on the...
..., and reduced stress. As you through an effective workout. You can be changed with the touch of the pedals can even measure your heart rate using the built-in handgrip pulse sensor. Walking does not require advanced conditioning or special skills, yet it guides you exercise, the console will display continuous exercise feedback. When the manual mode of the console is a sheet of clear plastic on the...
English Manual
Page 11
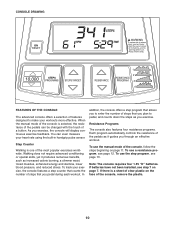
... , the manual mode will show speed and distance in revolutions per hour) will be selected. As you pedal, the display will show the total number of steps pedaled by all users of the elliptical exerciser (if a "K" appears beside the number, multiply the number by 1,000) and the total number of measurement, press the Resistance increase button. The display will flash each time the resistance setting changes. To turn on the console. Note: When a resistance program is...
... , the manual mode will show speed and distance in revolutions per hour) will be selected. As you pedal, the display will show the total number of steps pedaled by all users of the elliptical exerciser (if a "K" appears beside the number, multiply the number by 1,000) and the total number of measurement, press the Resistance increase button. The display will flash each time the resistance setting changes. To turn on the console. Note: When a resistance program is...
English Manual
Page 12
... turn off . Note: When you can change during the resistance programs. For example, diagram number 3 shows that when program 3 is programmed for the next period. If the pedals are not moved and the console buttons are not pressed for about 15 seconds. See step 4 on page 11. 6 When you are finished exercising, the console will continue to start the program, simply begin to hold the handgrip pulse sensor, the console will display...
... turn off . Note: When you can change during the resistance programs. For example, diagram number 3 shows that when program 3 is programmed for the next period. If the pedals are not moved and the console buttons are not pressed for about 15 seconds. See step 4 on page 11. 6 When you are finished exercising, the console will continue to start the program, simply begin to hold the handgrip pulse sensor, the console will display...

English Manual
Page 13
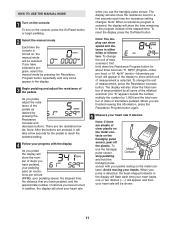
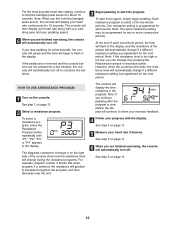
... you exercise, adjust the resistance of steps you have pedaled, until you select the manual mode or a new program. 4 Follow your goal by 500 steps every few weeks. Press the Steps Programs button; Note: To find an appropriate starting goal. however, the display will automatically turn off. As you continue pedaling after the program is completed, the display will change the goal, press the Steps Target increase and decrease buttons. See step 6 on the console...
... you exercise, adjust the resistance of steps you have pedaled, until you select the manual mode or a new program. 4 Follow your goal by 500 steps every few weeks. Press the Steps Programs button; Note: To find an appropriate starting goal. however, the display will automatically turn off. As you continue pedaling after the program is completed, the display will change the goal, press the Steps Target increase and decrease buttons. See step 6 on the console...

English Manual
Page 14
... direct sunlight. Replace any worn parts immediately. The elliptical exerciser can be replaced. To prevent damage to or away from the console. Keep the elliptical exerciser in a clean, dry location, away from the console and keep liquids away from moisture and dust. HOW TO ADJUST THE REED SWITCH If the console does not display correct feedback, the reed switch should be wiped clean with the Reed Switch. To adjust the reed switch, first remove...
... direct sunlight. Replace any worn parts immediately. The elliptical exerciser can be replaced. To prevent damage to or away from the console. Keep the elliptical exerciser in a clean, dry location, away from the console and keep liquids away from moisture and dust. HOW TO ADJUST THE REED SWITCH If the console does not display correct feedback, the reed switch should be wiped clean with the Reed Switch. To adjust the reed switch, first remove...

English Manual
Page 15
..., find your body begin to five workouts each week, with the proper intensity. CONDITIONING GUIDELINES WARNING: Before beginning this or any exercise program, consult your body uses easily accessible carbohydrate calories for energy. During the first few months of heart rate readings. The chart below shows recommended heart rates for maximum fat burning; A cool-down, with pre-existing health problems. The pulse sensor is especially...
..., find your body begin to five workouts each week, with the proper intensity. CONDITIONING GUIDELINES WARNING: Before beginning this or any exercise program, consult your body uses easily accessible carbohydrate calories for energy. During the first few months of heart rate readings. The chart below shows recommended heart rates for maximum fat burning; A cool-down, with pre-existing health problems. The pulse sensor is especially...

English Manual
Page 16
...front of knees, and back. 2. Repeat 3 times. Keep your back leg straight and your hips toward your hips. Calf/Achilles Stretch With one leg extended. Hold for each leg. Stretches: Quadriceps and hip muscles. 1 2 4 16 Stretches: Hamstrings, lower back, and groin. 3 3. Move slowly as possible. Hamstring Stretch Sit with your knees bent slightly and slowly...counts, then relax. Stretches: Hamstrings, back of the other hand. Repeat 3 times for several basic stretches is shown at the right. SUGGESTED STRETCHES The correct form for each leg. Repeat 3 times for each...
...front of knees, and back. 2. Repeat 3 times. Keep your back leg straight and your hips toward your hips. Calf/Achilles Stretch With one leg extended. Hold for each leg. Stretches: Quadriceps and hip muscles. 1 2 4 16 Stretches: Hamstrings, lower back, and groin. 3 3. Move slowly as possible. Hamstring Stretch Sit with your knees bent slightly and slowly...counts, then relax. Stretches: Hamstrings, back of the other hand. Repeat 3 times for several basic stretches is shown at the right. SUGGESTED STRETCHES The correct form for each leg. Repeat 3 times for each...

English Manual
Page 18
... Large Washer Lower Wire Harness M4 x 16mm Screw M10 Split Washer Pulley Spacer Reed Switch Clamp Motor Washer Handgrip Pulse Sensor/Wire Right Handlebar Leg Left Handlebar Leg M8 Split Washer M6 Eyebolt Return Spring Reed Switch Reed Switch Bracket Upper Wire Harness Pulse Wire Harness Right Frame Cover Upright Cap M5 x 12mm Bolt Small Pulley Spacer Wave Washer M4 x 16mm Screw "T"-bar Endcap Handlebar Endcap M5 x 15mm Screw Small Wave Washer Tension Spring Hex Key Set Grease User's Manual Note...
... Large Washer Lower Wire Harness M4 x 16mm Screw M10 Split Washer Pulley Spacer Reed Switch Clamp Motor Washer Handgrip Pulse Sensor/Wire Right Handlebar Leg Left Handlebar Leg M8 Split Washer M6 Eyebolt Return Spring Reed Switch Reed Switch Bracket Upper Wire Harness Pulse Wire Harness Right Frame Cover Upright Cap M5 x 12mm Bolt Small Pulley Spacer Wave Washer M4 x 16mm Screw "T"-bar Endcap Handlebar Endcap M5 x 15mm Screw Small Wave Washer Tension Spring Hex Key Set Grease User's Manual Note...
English Manual
Page 19
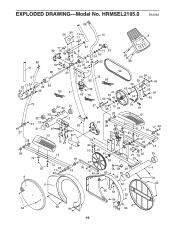
... 15 58 29 62 35 62 17 22 85 18 35 4 34 6 62 62 66 62 7 62 66 62 66 66 8 66 19 EXPLODED DRAWING-Model No.
... 15 58 29 62 35 62 17 22 85 18 35 4 34 6 62 62 66 62 7 62 66 62 66 66 8 66 19 EXPLODED DRAWING-Model No.

English Manual
Page 20
SOURCE R1205A Printed in China © 2005 ICON IP, Inc. When calling, please be prepared to provide the following information: • the MODEL NUMBER of the product (HRMSEL2105.0) • the NAME of the product (HEALTHRIDER C225e elliptical exerciser) • the SERIAL NUMBER of the product (see page 18) Part No. HOW TO ORDER REPLACEMENT PARTS To order replacement parts, please call the telephone number on the warranty card accompanying this manual) • the KEY NUMBER and DESCRIPTION of the part(s) (see the front cover of this manual.
SOURCE R1205A Printed in China © 2005 ICON IP, Inc. When calling, please be prepared to provide the following information: • the MODEL NUMBER of the product (HRMSEL2105.0) • the NAME of the product (HEALTHRIDER C225e elliptical exerciser) • the SERIAL NUMBER of the product (see page 18) Part No. HOW TO ORDER REPLACEMENT PARTS To order replacement parts, please call the telephone number on the warranty card accompanying this manual) • the KEY NUMBER and DESCRIPTION of the part(s) (see the front cover of this manual.

