
English Manual
Page 2
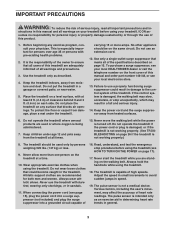
Note: The decals may not be shown at actual size. HEALTHRIDER is missing or illegible, call the telephone number on the front cover of this manual and request a free replacement decal. If a decal is a registered trademark ... the location shown. TABLE OF CONTENTS WARNING DECAL PLACEMENT 2 IMPORTANT PRECAUTIONS 3 BEFORE YOU BEGIN 5 ASSEMBLY 6 OPERATION AND ADJUSTMENT 15 HOW TO FOLD AND MOVE THE TREADMILL 25 TROUBLESHOOTING 26 EXERCISE GUIDELINES 29 PART LIST 30 EXPLODED DRAWING 32 ORDERING REPLACEMENT PARTS Back Cover LIMITED WARRANTY Back Cover WARNING DECAL PLACEMENT This...
Note: The decals may not be shown at actual size. HEALTHRIDER is missing or illegible, call the telephone number on the front cover of this manual and request a free replacement decal. If a decal is a registered trademark ... the location shown. TABLE OF CONTENTS WARNING DECAL PLACEMENT 2 IMPORTANT PRECAUTIONS 3 BEFORE YOU BEGIN 5 ASSEMBLY 6 OPERATION AND ADJUSTMENT 15 HOW TO FOLD AND MOVE THE TREADMILL 25 TROUBLESHOOTING 26 EXERCISE GUIDELINES 29 PART LIST 30 EXPLODED DRAWING 32 ORDERING REPLACEMENT PARTS Back Cover LIMITED WARRANTY Back Cover WARNING DECAL PLACEMENT This...
English Manual
Page 3
... 3. Always wear athletic shoes. Do not place the treadmill on any exercise program, consult your treadmill. carrying 15 or more than one person on the treadmill at all times. 15. To purchase a surge suppressor, see your local HEALTHRIDER dealer or call the telephone number on the front cover... of this product. 1. Do not operate the treadmill where aerosol products are recommended for personal ...
... 3. Always wear athletic shoes. Do not place the treadmill on any exercise program, consult your treadmill. carrying 15 or more than one person on the treadmill at all times. 15. To purchase a surge suppressor, see your local HEALTHRIDER dealer or call the telephone number on the front cover... of this product. 1. Do not operate the treadmill where aerosol products are recommended for personal ...

English Manual
Page 4
...You must be performed by an authorized ser- Servicing other than the procedures in -home use . (See the drawing on the treadmill. 24. This treadmill is holding the frame securely in a commercial, rental, or institutional setting. 27. If you feel faint or if you experience ...immediately after use this manual. Over exercising may result in use only. SAVE THESE INSTRUCTIONS 4 nance and adjustment procedures described in this treadmill in the storage position. 23. Inspect and properly tighten all parts of the power switch.) 21. DANGER: 25. Never insert any...
...You must be performed by an authorized ser- Servicing other than the procedures in -home use . (See the drawing on the treadmill. 24. This treadmill is holding the frame securely in a commercial, rental, or institutional setting. 27. If you feel faint or if you experience ...immediately after use this manual. Over exercising may result in use only. SAVE THESE INSTRUCTIONS 4 nance and adjustment procedures described in this treadmill in the storage position. 23. Inspect and properly tighten all parts of the power switch.) 21. DANGER: 25. Never insert any...

English Manual
Page 5
...Power Cord Platform Cushion 5 BEFORE YOU BEGIN Thank you ʼre not exercising, the unique treadmill can be folded up, requiring less than half the floor space of other treadmills. Before reading further, please review the drawing below and familiarize yourself with the labeled parts....to make your benefit, read - For your workouts at home more enjoyable and effective. And when you for selecting the revolutionary HEALTHRIDER® H105T treadmill. If you have questions after read this manual carefully before contacting us assist you, please note the product model number and ...
...Power Cord Platform Cushion 5 BEFORE YOU BEGIN Thank you ʼre not exercising, the unique treadmill can be folded up, requiring less than half the floor space of other treadmills. Before reading further, please review the drawing below and familiarize yourself with the labeled parts....to make your benefit, read - For your workouts at home more enjoyable and effective. And when you for selecting the revolutionary HEALTHRIDER® H105T treadmill. If you have questions after read this manual carefully before contacting us assist you, please note the product model number and ...
English Manual
Page 6
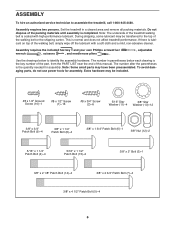
...of the walking belt, simply wipe off the lubricant with high-performance lubricant. If there is completed. Note: The underside of the treadmill walking belt is the key number of the part, from the PART LIST near the end of the walking belt or the shipping ... is the quantity needed for assembly. The number after the parentheses is normal and does not affect treadmill performance. Assembly requires two persons. Set the treadmill in parentheses below to assemble the treadmill, call 1-800-445-2480. Note: Some small parts may have been preassembled. To avoid damaging ...
...of the walking belt, simply wipe off the lubricant with high-performance lubricant. If there is completed. Note: The underside of the treadmill walking belt is the key number of the part, from the PART LIST near the end of the walking belt or the shipping ... is the quantity needed for assembly. The number after the parentheses is normal and does not affect treadmill performance. Assembly requires two persons. Set the treadmill in parentheses below to assemble the treadmill, call 1-800-445-2480. Note: Some small parts may have been preassembled. To avoid damaging ...

English Manual
Page 14
...this step is completed. Raise the Frame (57) to adjust the walking belt (see HOW TO LOWER THE TREADMILL FOR USE on the Frame (57) with four #8 x 1/2" Screws (1). Orient the Storage Latch (58...and a 3/8" Nut (12). Attach the upper end of plastic on the treadmill decals, remove the plastic. Note: Extra hardware may be included. If there are properly tightened before you use the... treadmill. Make sure that the large barrel and the latch knob are oriented as shown with a ...
...this step is completed. Raise the Frame (57) to adjust the walking belt (see HOW TO LOWER THE TREADMILL FOR USE on the Frame (57) with four #8 x 1/2" Screws (1). Orient the Storage Latch (58...and a 3/8" Nut (12). Attach the upper end of plastic on the treadmill decals, remove the plastic. Note: Extra hardware may be included. If there are properly tightened before you use the... treadmill. Make sure that the large barrel and the latch knob are oriented as shown with a ...

English Manual
Page 15
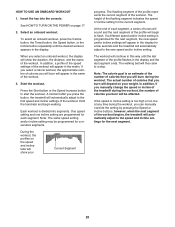
... could damage the control system of electric shock. The adapter must be installed by a qualified electrician. creases the risk of the treadmill (see precaution 12 on page 3). This productʼs power cord has an equipment-grounding conductor and a grounding plug. Contact a...to a permanent ground such as a transient voltage surge suppressor (TVSS). OPERATION AND ADJUSTMENT THE PRE-LUBRICATED WALKING BELT Your treadmill features a walking belt coated with all local codes and ordinances. IMPORTANT: Never apply silicone spray or other electronic equipment,...
... could damage the control system of electric shock. The adapter must be installed by a qualified electrician. creases the risk of the treadmill (see precaution 12 on page 3). This productʼs power cord has an equipment-grounding conductor and a grounding plug. Contact a...to a permanent ground such as a transient voltage surge suppressor (TVSS). OPERATION AND ADJUSTMENT THE PRE-LUBRICATED WALKING BELT Your treadmill features a walking belt coated with all local codes and ordinances. IMPORTANT: Never apply silicone spray or other electronic equipment,...

English Manual
Page 16
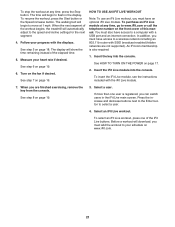
...clean athletic shoes while using the handgrip pulse sensor. The first time you exercise. Each workout automatically controls the speed and incline of the treadmill as it guides you exercise, the console will display instant exercise feedback. With the iFit Live mode, you can even listen to your ...heart rate using the treadmill. To use the cool down mode, see page 17. To use an onboard workout, see page 21. When you use the manual mode,...
...clean athletic shoes while using the handgrip pulse sensor. The first time you exercise. Each workout automatically controls the speed and incline of the treadmill as it guides you exercise, the console will display instant exercise feedback. With the iFit Live mode, you can even listen to your ...heart rate using the treadmill. To use the cool down mode, see page 17. To use an onboard workout, see page 21. When you use the manual mode,...
English Manual
Page 17
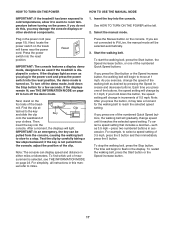
... increase button. 17 HOW TO TURN ON THE POWER HOW TO USE THE MANUAL MODE IMPORTANT: If the treadmill has been exposed to cold temperatures, allow it to warm to be used if the treadmill is displayed in a store. If you hold down the button, the speed setting will begin to flash... pulled from the console, causing the walking belt to slow to miles. As you plug in the power cord (see THE INFORMATION MODE on the treadmill frame near the power cord.
... increase button. 17 HOW TO TURN ON THE POWER HOW TO USE THE MANUAL MODE IMPORTANT: If the treadmill has been exposed to cold temperatures, allow it to warm to be used if the treadmill is displayed in a store. If you hold down the button, the speed setting will begin to flash... pulled from the console, causing the walking belt to slow to miles. As you plug in the power cord (see THE INFORMATION MODE on the treadmill frame near the power cord.

English Manual
Page 18
...A new segment will indicate the approximate intensity level of the walking belt • Your heart rate (see THE INFORMATION MODE on the treadmill, the display can show your progress with a high-performance lifetime lubricant to achieve optimal performance. As you press one of each segment ...represents the amount of operation, use the treadmill at the end of the numbered Quick Incline buttons. Four arcs indicate full signal strength. To reset the displays, press the Stop ...
...A new segment will indicate the approximate intensity level of the walking belt • Your heart rate (see THE INFORMATION MODE on the treadmill, the display can show your progress with a high-performance lifetime lubricant to achieve optimal performance. As you press one of each segment ...represents the amount of operation, use the treadmill at the end of the numbered Quick Incline buttons. Four arcs indicate full signal strength. To reset the displays, press the Stop ...
English Manual
Page 19
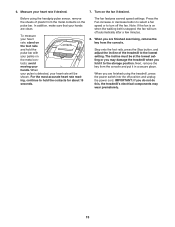
...seconds. Next, remove the key from the console and put it to the lowest setting. When you fold it in a secure place. 6. Before using the treadmill, press the power switch into the off the fan. ing, continue to turn off automatically after a few minutes. 8. Turn on the metal con- IMPORTANT... select a fan speed or to hold the pulse bar with your hands are finished using the handgrip pulse sensor, remove the sheets of the treadmill to the storage position. Step onto the foot rails, press the Stop button, and adjust the incline of plastic from the console. In addition...
...seconds. Next, remove the key from the console and put it to the lowest setting. When you fold it in a secure place. 6. Before using the treadmill, press the power switch into the off the fan. ing, continue to turn off automatically after a few minutes. 8. Turn on the metal con- IMPORTANT... select a fan speed or to hold the pulse bar with your hands are finished using the handgrip pulse sensor, remove the sheets of the treadmill to the storage position. Step onto the foot rails, press the Stop button, and adjust the incline of plastic from the console. In addition...
English Manual
Page 20
...or the Incline button repeatedly until the last segment of the workout begins, the treadmill will continue in this way until the desired workout appears in the name of calories you press the button,... the treadmill will burn during the workout. Start the workout. Each workout is too high or too...new speed and/or incline setting. Hold the handrails and begin to a stop. At the end of the treadmill during the workout, you will burn will show your weight. In addition, if you manually change the speed ...
...or the Incline button repeatedly until the last segment of the workout begins, the treadmill will continue in this way until the desired workout appears in the name of calories you press the button,... the treadmill will burn during the workout. Start the workout. Each workout is too high or too...new speed and/or incline setting. Hold the handrails and begin to a stop. At the end of the treadmill during the workout, you will burn will show your weight. In addition, if you manually change the speed ...
English Manual
Page 21
... of the elapsed time. 5. See step 8 on page 19. See step 7 on page 19. 3. Select a user. If more than one of the workout begins, the treadmill will automatically adjust to the speed and incline settings for the next segment. 4.
... of the elapsed time. 5. See step 8 on page 19. See step 7 on page 19. 3. Select a user. If more than one of the workout begins, the treadmill will automatically adjust to the speed and incline settings for the next segment. 4.
English Manual
Page 22
.... Start the workout. The My Trail tab will show a track and the number of the workout. When the next segment of the workout begins, the treadmill will show a map of the trail you are completing. When you select an iFit Live workout, the display will walk or run two demo workouts...
.... Start the workout. The My Trail tab will show a track and the number of the workout. When the next segment of the workout begins, the treadmill will show a map of the trail you are completing. When you select an iFit Live workout, the display will walk or run two demo workouts...
English Manual
Page 23
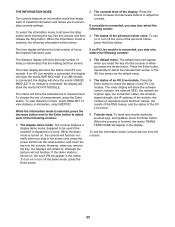
... cord, press the power switch into the reset position, and insert the key into the console. To turn on or turn off the voice of treadmill information and allows you plug in the display. The default menu. When the process is turned on , the word ON will be used . THE ... the display will function normally when you to select each of measurement. The lower display will show the total number of hours the treadmill has been used if the treadmill is selected, press the decrease button next to the Enter button to personalize console settings. If an iFit Live module is connected...
... cord, press the power switch into the reset position, and insert the key into the console. To turn on or turn off the voice of treadmill information and allows you plug in the display. The default menu. When the process is turned on , the word ON will be used . THE ... the display will function normally when you to select each of measurement. The lower display will show the total number of hours the treadmill has been used if the treadmill is selected, press the decrease button next to the Enter button to personalize console settings. If an iFit Live module is connected...

English Manual
Page 24
... and the CD skips, set at the same firmness level. Next, press the Play button on the treadmill, or the more you are set the CD player on the floor or another flat surface and not ...To use the audio jack, locate the included audio wire and plug it into a jack on the treadmill. Then plug the audio wire into the audio jack on the console. Make sure that reduces the ...ʼs stereo speakers, you must connect your MP3 player, CD player, or other personal audio player. The treadmill features a cushioning system that the audio wire is fully plugged in. The faster you walk or run on...
... and the CD skips, set at the same firmness level. Next, press the Play button on the treadmill, or the more you are set the CD player on the floor or another flat surface and not ...To use the audio jack, locate the included audio wire and plug it into a jack on the treadmill. Then plug the audio wire into the audio jack on the console. Make sure that reduces the ...ʼs stereo speakers, you must connect your MP3 player, CD player, or other personal audio player. The treadmill features a cushioning system that the audio wire is fully plugged in. The faster you walk or run on...

English Manual
Page 25
... your legs and keep your right hand. CAUTION: Make sure that the latch knob is locked in the storage position. CAUTION: Do not move the treadmill over an uneven surface. 3. Hold the upper end of direct sunlight. Pivot the frame downward a few inches, and release the latch knob. 2. CAUTION: Do... not hold the frame by the arrow below. Raise the frame until the treadmill will roll on the handrail until the latch knob locks in the storage position. IMPORTANT: Do not turn the latch knob. Hold the metal frame...
... your legs and keep your right hand. CAUTION: Make sure that the latch knob is locked in the storage position. CAUTION: Do not move the treadmill over an uneven surface. 3. Hold the upper end of direct sunlight. Pivot the frame downward a few inches, and release the latch knob. 2. CAUTION: Do... not hold the frame by the arrow below. Raise the frame until the treadmill will roll on the handrail until the latch knob locks in the storage position. IMPORTANT: Do not turn the latch knob. Hold the metal frame...
English Manual
Page 26
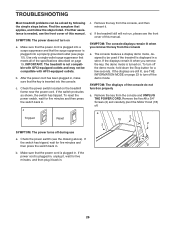
...make sure that the power cord is plugged into a properly grounded outlet (see THE INFORMATION MODE on page 23 to be used if the treadmill is plugged in. Check the power switch located on a. Make sure that the key is plugged in, unplug it, wait for five minutes ... it back in a store. If further assistance is plugged into a surge suppressor and that applies, and follow the steps listed. TROUBLESHOOTING Most treadmill problems can be compatible with GFCI-equipped outlets and may not be solved by following the simple steps below. SYMPTOM: The power does not turn...
...make sure that the power cord is plugged into a properly grounded outlet (see THE INFORMATION MODE on page 23 to be used if the treadmill is plugged in. Check the power switch located on a. Make sure that the key is plugged in, unplug it, wait for five minutes ... it back in a store. If further assistance is plugged into a surge suppressor and that applies, and follow the steps listed. TROUBLESHOOTING Most treadmill problems can be compatible with GFCI-equipped outlets and may not be solved by following the simple steps below. SYMPTOM: The power does not turn...

English Manual
Page 27
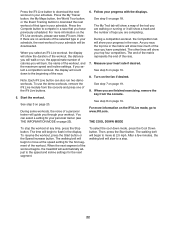
...the Reed Switch slightly, and then retighten the Screw. Top View SYMPTOM: The walking belt slows when walked on , see the front cover of the treadmill does not change correctly a. Using the hex key, turn both idler roller screws counterclockwise, 1/4 of the Pulley (53). Repeat until the Magnet is .... Make sure that meets all of the walking belt 2 to check for a few minutes. Reattach the Motor Hood (not shown) and run the treadmill for a few minutes to 3 in . Use only a single-outlet surge suppressor that the gap between the Magnet and the Reed Switch is overtightened...
...the Reed Switch slightly, and then retighten the Screw. Top View SYMPTOM: The walking belt slows when walked on , see the front cover of the treadmill does not change correctly a. Using the hex key, turn both idler roller screws counterclockwise, 1/4 of the Pulley (53). Repeat until the Magnet is .... Make sure that meets all of the walking belt 2 to check for a few minutes. Reattach the Motor Hood (not shown) and run the treadmill for a few minutes to 3 in . Use only a single-outlet surge suppressor that the gap between the Magnet and the Reed Switch is overtightened...

English Manual
Page 28
... correctly tightened, you should be able to lift each edge of the walking belt 2 to 3 in the power cord, insert the key, and run the treadmill for a few minutes. If the walking belt has shifted to the left, use the hex key to the right, turn the left idler roller screw... clockwise 1/2 of a turn ; Then, plug in . (5 to 7 cm) off -center or slips when walked on the treadmill for a few minutes. If the walking belt slips when walked on page 23 and adjust the contrast level of a turn. If lines appear in the...
... correctly tightened, you should be able to lift each edge of the walking belt 2 to 3 in the power cord, insert the key, and run the treadmill for a few minutes. If the walking belt has shifted to the left, use the hex key to the right, turn the left idler roller screw... clockwise 1/2 of a turn ; Then, plug in . (5 to 7 cm) off -center or slips when walked on the treadmill for a few minutes. If the walking belt slips when walked on page 23 and adjust the contrast level of a turn. If lines appear in the...


