
English Manual
Page 1
... our factory. MST CAUTION Read all precautions and instructions in this manual before using this manual for future reference. ¨ USERÕS MANUAL Patent Pending Visit our website at www.healthrider.com new products, prizes, fitness tips, and much more! HREX36590 Serial No. TO AVOID UNNECESSARY DELAYS, PLEASE CALL DIRECT TO OUR TOLL-FREE CUSTOMER HOT LINE. If you have questions...
... our factory. MST CAUTION Read all precautions and instructions in this manual before using this manual for future reference. ¨ USERÕS MANUAL Patent Pending Visit our website at www.healthrider.com new products, prizes, fitness tips, and much more! HREX36590 Serial No. TO AVOID UNNECESSARY DELAYS, PLEASE CALL DIRECT TO OUR TOLL-FREE CUSTOMER HOT LINE. If you have questions...
English Manual
Page 2
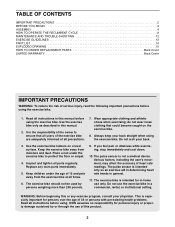
... tighten all instructions in this manual before using . If you feel pain or dizziness while exercising, stop immediately and cool down. 10. The pulse sensor is intended only as described in this manual. 2. TABLE OF CONTENTS IMPORTANT PRECAUTIONS 2 BEFORE YOU BEGIN 3 ASSEMBLY 4 HOW TO OPERATE THE RECUMBENT CYCLE 8 MAINTENANCE AND TROUBLE-SHOOTING 12 EXERCISE GUIDELINES 13 PART LIST 14 EXPLODED DRAWING 15 HOW TO ORDER REPLACEMENT PARTS Back Cover LIMITED WARRANTY...
... tighten all instructions in this manual before using . If you feel pain or dizziness while exercising, stop immediately and cool down. 10. The pulse sensor is intended only as described in this manual. 2. TABLE OF CONTENTS IMPORTANT PRECAUTIONS 2 BEFORE YOU BEGIN 3 ASSEMBLY 4 HOW TO OPERATE THE RECUMBENT CYCLE 8 MAINTENANCE AND TROUBLE-SHOOTING 12 EXERCISE GUIDELINES 13 PART LIST 14 EXPLODED DRAWING 15 HOW TO ORDER REPLACEMENT PARTS Back Cover LIMITED WARRANTY...
English Manual
Page 3
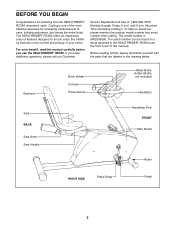
... Holder Console Pulse Sensor Water Bottle Holder (Bottle not included) Handlebar Seat BACK Seat Knob Seat Handle Handlebar Post FRONT Side Shield Roller RIGHT SIDE Pedal Strap Pedal 3 until 6 p.m. To help us assist you have additional questions, please call our Customer Service Department toll-free at 1-800-999-3756, Monday through Friday, 6 a.m. If you , please mention the product model number and serial number when calling. The model number is...
... Holder Console Pulse Sensor Water Bottle Holder (Bottle not included) Handlebar Seat BACK Seat Knob Seat Handle Handlebar Post FRONT Side Shield Roller RIGHT SIDE Pedal Strap Pedal 3 until 6 p.m. To help us assist you have additional questions, please call our Customer Service Department toll-free at 1-800-999-3756, Monday through Friday, 6 a.m. If you , please mention the product model number and serial number when calling. The model number is...

English Manual
Page 4
... key number of the recumbent cycle in a cleared area and remove the packing materials. PART CHART Use the part drawings below each drawing refers to see if it has been pre-assembled. Assembly requires the included tools and your own adjustable wrench . Note: Some small parts may have been pre-attached for shipping. The number in parenthesis below to the quantity used in assembly. The second number...
... key number of the recumbent cycle in a cleared area and remove the packing materials. PART CHART Use the part drawings below each drawing refers to see if it has been pre-assembled. Assembly requires the included tools and your own adjustable wrench . Note: Some small parts may have been pre-attached for shipping. The number in parenthesis below to the quantity used in assembly. The second number...

English Manual
Page 5
... Front Stabilizer is turned so the Roller (75) is turned exactly as shown at the right. 3 6 74 57 57 18 57 44 57 74 1 63 Upright must be turned as shown 5 1. Attach the Front Stabilizer (2) to the rear of the Frame (1) with two M8 x 80mm Carriage Bolts (63), two M8... the Upright (6) near the Frame (1), connect the Extension Wire (18) to avoid pinching the wires. Attach the Rear Stabilizer (3) to the front of the Frame (1) with two M8 x 70mm Carriage Bolts (72), two M8 Curved Washers (28), and two M8 Nylon Locknuts (56). Attach the Upright with four M8 x 15mm Button Screws (74...
... Front Stabilizer is turned so the Roller (75) is turned exactly as shown at the right. 3 6 74 57 57 18 57 44 57 74 1 63 Upright must be turned as shown 5 1. Attach the Front Stabilizer (2) to the rear of the Frame (1) with two M8 x 80mm Carriage Bolts (63), two M8... the Upright (6) near the Frame (1), connect the Extension Wire (18) to avoid pinching the wires. Attach the Rear Stabilizer (3) to the front of the Frame (1) with two M8 x 70mm Carriage Bolts (72), two M8 Curved Washers (28), and two M8 Nylon Locknuts (56). Attach the Upright with four M8 x 15mm Button Screws (74...

English Manual
Page 6
...). Set the Console (9) on the Console (9) (refer to the console wire. While another person holds the Console (9) near the Upright (6), connect the two Pulse Wires (22) to the corresponding wires on the Upright (6). Remove the four indicated screws and lift off the front of the Console. Batteries 5 22 28 16 17 Screws A 9 6 Console Wires 6 14 6 14 6 Make sure that the Pulse Wires (22) are recommended. Next, attach the Handlebar (16) to drawing A. Tighten...
...). Set the Console (9) on the Console (9) (refer to the console wire. While another person holds the Console (9) near the Upright (6), connect the two Pulse Wires (22) to the corresponding wires on the Upright (6). Remove the four indicated screws and lift off the front of the Console. Batteries 5 22 28 16 17 Screws A 9 6 Console Wires 6 14 6 14 6 Make sure that the Pulse Wires (22) are recommended. Next, attach the Handlebar (16) to drawing A. Tighten...

English Manual
Page 7
Attach the Seat (12) to the Seat Frame (27) with four M6 x 38mm Hex Screws (73) and four M8 Black Flat Washers (57). 57 9 13 7 27 57 29 27 57 73 57 73 7. Attach the Backrest (13) to the Seat Frame 7 (27) using four M8 x 35mm Carriage Bolts (7), four M8 Black Flat Washers (57), and four M8 Nylon 7 Locknuts (56). 8. Attach the Seat Carriage (11) to the Seat Frame (27) with four M6 x 15mm Hex Screws (29) and four M8 Black Flat Washers (57). 11 57 56 8 12 27 57 56 9.
Attach the Seat (12) to the Seat Frame (27) with four M6 x 38mm Hex Screws (73) and four M8 Black Flat Washers (57). 57 9 13 7 27 57 29 27 57 73 57 73 7. Attach the Backrest (13) to the Seat Frame 7 (27) using four M8 x 35mm Carriage Bolts (7), four M8 Black Flat Washers (57), and four M8 Nylon 7 Locknuts (56). 8. Attach the Seat Carriage (11) to the Seat Frame (27) with four M6 x 15mm Hex Screws (29) and four M8 Black Flat Washers (57). 11 57 56 8 12 27 57 56 9.
English Manual
Page 8
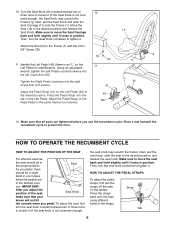
...; on the Left Pedal (40) to move the Seat Carriage 1 12 back and forth slightly until it locks in your knees will not hit the console when you use the recumbent cycle. Press the Pedal Strap onto the 40 tab on the pedals. Make sure to the desired position. Using an adjustable wrench, tighten the Left Pedal counterclockwise into the right Crank Arm (not shown). 54...
...; on the Left Pedal (40) to move the Seat Carriage 1 12 back and forth slightly until it locks in your knees will not hit the console when you use the recumbent cycle. Press the Pedal Strap onto the 40 tab on the pedals. Make sure to the desired position. Using an adjustable wrench, tighten the Left Pedal counterclockwise into the right Crank Arm (not shown). 54...

English Manual
Page 9
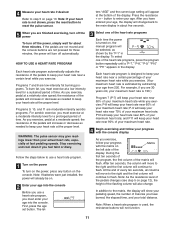
... five programs automatically adjust the resistance of the pedals to be installed. The console also offers ten preset workout programs. Five programs automatically change the resistance of the pedals as desired As you exercise, press the resistance + and Ð buttons to help you get the most from your pedaling speed, the number of the display will show the resistance level of the matrix will begin exercising. As you have exercised for the selected resistance setting...
... five programs automatically adjust the resistance of the pedals to be installed. The console also offers ten preset workout programs. Five programs automatically change the resistance of the pedals as desired As you exercise, press the resistance + and Ð buttons to help you get the most from your pedaling speed, the number of the display will show the resistance level of the matrix will begin exercising. As you have exercised for the selected resistance setting...

English Manual
Page 10
.... Avoid moving your heart rate is , the greater the resistance will also show that your progress with the matrix on the console. WARNING: The pulse sensor is turned on, the manual program will show your total distance. HOW TO USE A RESISTANCE PROGRAM 1 Turn on the power To turn off automatically. Note: If batteries were just installed, the power will already be selected, as an exercise aid in determining heart rate trends in the display...
.... Avoid moving your heart rate is , the greater the resistance will also show that your progress with the matrix on the console. WARNING: The pulse sensor is turned on, the manual program will show your total distance. HOW TO USE A RESISTANCE PROGRAM 1 Turn on the power To turn off automatically. Note: If batteries were just installed, the power will already be selected, as an exercise aid in determining heart rate trends in the display...
English Manual
Page 11
... your heart rate is turned on, the manual program will keep your heart rate near 50% of your maximum heart rate while you have entered your pedaling speed, the number of time. Programs 7 and 8 are not pressed for a sustained period of Calories you exercise; First, press the age set button. Press the resistance + or Ð button to the matrix, the display will appear at the proper level. WARNING: The pulse sensor may give readings lower...
... your heart rate is turned on, the manual program will keep your heart rate near 50% of your maximum heart rate while you have entered your pedaling speed, the number of time. Programs 7 and 8 are not pressed for a sustained period of Calories you exercise; First, press the age set button. Press the resistance + or Ð button to the matrix, the display will appear at the proper level. WARNING: The pulse sensor may give readings lower...
English Manual
Page 12
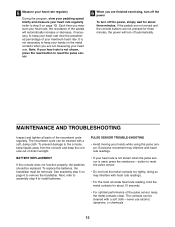
... heart rate is not shown when the pulse sensor is used, press the resistance Ð button to reset the pulse sensor. ¥ Do not hold the metal contacts for about three minutes. If the pedals are not moved and the console buttons are not measuring your maximum heart rate. See assembly step 5 on page 10). 5 Measure your heart rate regularly During the program, slow your pedaling speed briefly and measure your hands while using the pulse sensor...
... heart rate is not shown when the pulse sensor is used, press the resistance Ð button to reset the pulse sensor. ¥ Do not hold the metal contacts for about three minutes. If the pedals are not moved and the console buttons are not measuring your maximum heart rate. See assembly step 5 on page 10). 5 Measure your heart rate regularly During the program, slow your pedaling speed briefly and measure your hands while using the pulse sensor...
English Manual
Page 13
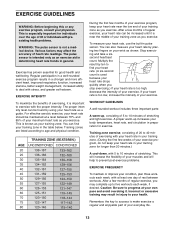
... five workouts each week, with 5 to find your health. EXERCISE GUIDELINES WARNING: Before beginning this or any exercise program, consult your training zone as you exercise. For effective aerobic exercise, your heart rate should be increased until it . Training zones are listed according to deal with preexisting health problems. WARNING: The pulse sensor is make exercise a regular and enjoyable part of your training zone as an exercise aid in determining heart rate...
... five workouts each week, with 5 to find your health. EXERCISE GUIDELINES WARNING: Before beginning this or any exercise program, consult your training zone as you exercise. For effective aerobic exercise, your heart rate should be increased until it . Training zones are listed according to deal with preexisting health problems. WARNING: The pulse sensor is make exercise a regular and enjoyable part of your training zone as an exercise aid in determining heart rate...
English Manual
Page 14
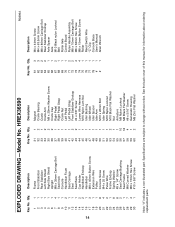
... Screw M4 x 63.5mm Screw M8 x 80mm Carriage Bolt Rear Stabilizer Endcap Axle Spacer Axle M10 Black nylon Locknut Belt Roller Axle Control Board Pulse Handle Assembly M8 x 70mm Carriage Bolt M6 x 38mm Hex Screw M8 x 15mm Button Screw Roller Reed Switch Wire ÒCÓ Clip Console Base UserÕs Manual Allen Wrench 14 Note: Ò#Ó indicates a non-illustrated part. Specifications are subject to change without notice. EXPLODED DRAWINGÑModel No. HREX36590 Key...
... Screw M4 x 63.5mm Screw M8 x 80mm Carriage Bolt Rear Stabilizer Endcap Axle Spacer Axle M10 Black nylon Locknut Belt Roller Axle Control Board Pulse Handle Assembly M8 x 70mm Carriage Bolt M6 x 38mm Hex Screw M8 x 15mm Button Screw Roller Reed Switch Wire ÒCÓ Clip Console Base UserÕs Manual Allen Wrench 14 Note: Ò#Ó indicates a non-illustrated part. Specifications are subject to change without notice. EXPLODED DRAWINGÑModel No. HREX36590 Key...
English Manual
Page 16
... apply to you specific legal rights. This warranty gives you . LIMITED WARRANTY ICON Health & Fitness, Inc. (ICON), warrants this product to be prepared to give the following information when calling: ¥ The MODEL NUMBER of the product (HREX36590). ¥ The NAME of the product (HEALTHRIDER¨ RC250 Recumbent Cycle). ¥ The SERIAL NUMBER of the product (see the front cover of this manual). ¥ The KEY NUMBER and DESCRIPTION of...
... apply to you specific legal rights. This warranty gives you . LIMITED WARRANTY ICON Health & Fitness, Inc. (ICON), warrants this product to be prepared to give the following information when calling: ¥ The MODEL NUMBER of the product (HREX36590). ¥ The NAME of the product (HEALTHRIDER¨ RC250 Recumbent Cycle). ¥ The SERIAL NUMBER of the product (see the front cover of this manual). ¥ The KEY NUMBER and DESCRIPTION of...


