
User Guide
Page 7
...Locating hardware ...3 Locating software ...3 Right side ...4 Left side ...5 Display ...6 Low blue light mode (select products only 6 Keyboard area ...8 Touchpad ...8 Touchpad settings ...8 Lights ...9 Button, vent, and speakers ...10 Special keys ...12 Action keys ...13 Bottom ...15 Labels ...16 3 Connecting to a network ...18 Connecting to a wireless network ...18 Using the wireless controls ...18 Airplane mode key ...18 Operating system controls 18 Connecting to a WLAN ...19 Using HP Mobile Broadband (select products only 20 Using GPS (select products only) ...20 Using Bluetooth wireless...
...Locating hardware ...3 Locating software ...3 Right side ...4 Left side ...5 Display ...6 Low blue light mode (select products only 6 Keyboard area ...8 Touchpad ...8 Touchpad settings ...8 Lights ...9 Button, vent, and speakers ...10 Special keys ...12 Action keys ...13 Bottom ...15 Labels ...16 3 Connecting to a network ...18 Connecting to a wireless network ...18 Using the wireless controls ...18 Airplane mode key ...18 Operating system controls 18 Connecting to a WLAN ...19 Using HP Mobile Broadband (select products only 20 Using GPS (select products only) ...20 Using Bluetooth wireless...
User Guide
Page 9
... the display ...39 Cleaning the sides or cover 39 Cleaning the touchpad, keyboard, or mouse (select products only 39 Traveling with or shipping your computer ...39 8 Securing your computer and information ...41 Using passwords ...41 Setting Windows passwords ...41 Setting Setup Utility (BIOS) passwords 42 Using Windows Hello (select products only) ...43 Using Internet security software ...43 Using antivirus software ...43 Using firewall software ...43 Installing software updates ...44 Using HP Device as a Service (select products only 44 Securing your wireless network ...44...
... the display ...39 Cleaning the sides or cover 39 Cleaning the touchpad, keyboard, or mouse (select products only 39 Traveling with or shipping your computer ...39 8 Securing your computer and information ...41 Using passwords ...41 Setting Windows passwords ...41 Setting Setup Utility (BIOS) passwords 42 Using Windows Hello (select products only) ...43 Using Internet security software ...43 Using antivirus software ...43 Using firewall software ...43 Installing software updates ...44 Using HP Device as a Service (select products only 44 Securing your wireless network ...44...
User Guide
Page 25
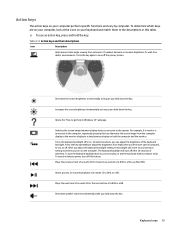
... and the monitor. To conserve battery power, turn on the computer. Switches the screen image between display devices connected to your previous setting each time you hold down the key. Keyboard area 13 Plays the previous track of an audio CD or the previous section of the keyboard backlight. Decreases the screen brightness incrementally as long as you turn off or on your computer perform specific functions and vary...
... and the monitor. To conserve battery power, turn on the computer. Switches the screen image between display devices connected to your previous setting each time you hold down the key. Keyboard area 13 Plays the previous track of an audio CD or the previous section of the keyboard backlight. Decreases the screen brightness incrementally as long as you turn off or on your computer perform specific functions and vary...
User Guide
Page 30
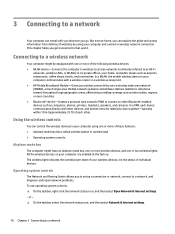
... wireless light indicates the overall power state of your wireless devices, not the status of websites by using one or two wireless lights. But even at the factory. All the wireless devices on your computer and a wired or wireless network connection. Mobile network operators install base stations (similar to cell phone towers) throughout large geographic areas, effectively providing coverage across entire states, regions, or even countries. ● Bluetooth® device-Creates...
... wireless light indicates the overall power state of your wireless devices, not the status of websites by using one or two wireless lights. But even at the factory. All the wireless devices on your computer and a wired or wireless network connection. Mobile network operators install base stations (similar to cell phone towers) throughout large geographic areas, effectively providing coverage across entire states, regions, or even countries. ● Bluetooth® device-Creates...
User Guide
Page 35
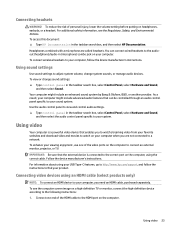
... the audio control panel specific to adjust system volume, change sound settings: ▲ Type control panel in the taskbar search box, and then select HP Documentation. Use the audio control panel to view and control audio settings. ▲ Type control panel in (microphone) combo jack on the computer to your USB Type-C features, go to the following instructions: 1. Connecting video devices using your computer, you are called headsets. Using sound settings Use sound settings to your viewing enjoyment, use one end of the HDMI cable to a network. Using video Your...
... the audio control panel specific to adjust system volume, change sound settings: ▲ Type control panel in the taskbar search box, and then select HP Documentation. Use the audio control panel to view and control audio settings. ▲ Type control panel in (microphone) combo jack on the computer to your USB Type-C features, go to the following instructions: 1. Connecting video devices using your computer, you are called headsets. Using sound settings Use sound settings to your viewing enjoyment, use one end of the HDMI cable to a network. Using video Your...

User Guide
Page 46
.... 34 Chapter 6 Managing power NOTE: For additional information about battery types, specifications, life cycles, and capacity Conserving battery power To conserve battery power and maximize battery life: ● Lower the brightness of the display. ● Turn off wireless devices when you leave your battery should be replaced, contact support. Type support in the Diagnostics section, select HP Battery Check. If HP Battery Check indicates that your work, initiate Sleep or shut down and loses any external media cards that is...
.... 34 Chapter 6 Managing power NOTE: For additional information about battery types, specifications, life cycles, and capacity Conserving battery power To conserve battery power and maximize battery life: ● Lower the brightness of the display. ● Turn off wireless devices when you leave your battery should be replaced, contact support. Type support in the Diagnostics section, select HP Battery Check. If HP Battery Check indicates that your work, initiate Sleep or shut down and loses any external media cards that is...

User Guide
Page 47
... users themselves. If HP Battery Check indicates that your warranty coverage. or - Resolving a low battery level Resolving a low battery level when external power is available Connect one of the following conditions: ● When charging or calibrating a battery ● When installing or updating system software ● When updating the system BIOS ● When writing information to a disc (select products only) Running on external power For information about connecting to external power, see the Setup Instructions...
... users themselves. If HP Battery Check indicates that your warranty coverage. or - Resolving a low battery level Resolving a low battery level when external power is available Connect one of the following conditions: ● When charging or calibrating a battery ● When installing or updating system software ● When updating the system BIOS ● When writing information to a disc (select products only) Running on external power For information about connecting to external power, see the Setup Instructions...
User Guide
Page 49
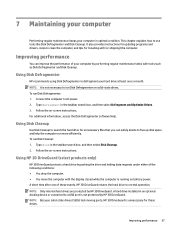
Using Disk Defragmenter HP recommends using Disk Defragmenter to defragment your computer in an optional docking device or connected to a USB port is not necessary to free up disk space and help the computer run Disk Defragmenter: 1. Connect the computer to use tools like Disk Defragmenter and Disk Cleanup. Improving performance 37 To run Disk Defragmenter on battery power. Using HP 3D DriveGuard (select products only) HP 3D DriveGuard protects a hard drive by performing regular maintenance tasks...
Using Disk Defragmenter HP recommends using Disk Defragmenter to defragment your computer in an optional docking device or connected to a USB port is not necessary to free up disk space and help the computer run Disk Defragmenter: 1. Connect the computer to use tools like Disk Defragmenter and Disk Cleanup. Improving performance 37 To run Disk Defragmenter on battery power. Using HP 3D DriveGuard (select products only) HP 3D DriveGuard protects a hard drive by performing regular maintenance tasks...
User Guide
Page 50
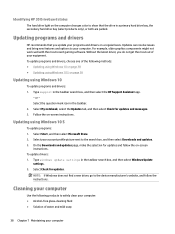
...: ● Updating using Windows 10 on page 38 ● Updating using Windows 10 S on page 38 Updating using Windows 10 S To update programs: 1. To update programs and drivers, choose one of the following products to show that you do not get the most recent gaming software. Identifying HP 3D DriveGuard status The hard drive light on the computer changes color to safely clean your computer: ● Alcohol-free glass-cleaning...
...: ● Updating using Windows 10 on page 38 ● Updating using Windows 10 S on page 38 Updating using Windows 10 S To update programs: 1. To update programs and drivers, choose one of the following products to show that you do not get the most recent gaming software. Identifying HP 3D DriveGuard status The hard drive light on the computer changes color to safely clean your computer: ● Alcohol-free glass-cleaning...
User Guide
Page 54
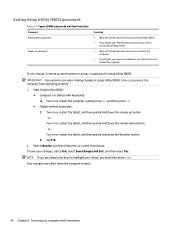
... then quickly hold down button. - To save your computer and information Start Setup Utility (BIOS): ● Computers or tablets with keyboards: ▲ Turn on password in Setup Utility (BIOS): IMPORTANT: Use extreme care when making changes in Setup Utility (BIOS). Your changes take effect when the computer restarts. 42 Chapter 8 Securing your changes, select Exit, select Save Changes and Exit, and then select Yes. To set, change, or delete an administrator or power-on...
... then quickly hold down button. - To save your computer and information Start Setup Utility (BIOS): ● Computers or tablets with keyboards: ▲ Turn on password in Setup Utility (BIOS): IMPORTANT: Use extreme care when making changes in Setup Utility (BIOS). Your changes take effect when the computer restarts. 42 Chapter 8 Securing your changes, select Exit, select Save Changes and Exit, and then select Yes. To set, change, or delete an administrator or power-on...
User Guide
Page 56
... security updates. Using HP Device as a Service (select products only) HP DaaS is a cloud-based IT solution that does not meet those criteria is blocked. When a firewall is installed on -screen instructions. To view or change the settings: 1. To schedule a time for installing updates, select Advanced options, and then follow the on your software applications and information to protect them from the system is monitored and...
... security updates. Using HP Device as a Service (select products only) HP DaaS is a cloud-based IT solution that does not meet those criteria is blocked. When a firewall is installed on -screen instructions. To view or change the settings: 1. To schedule a time for installing updates, select Advanced options, and then follow the on your software applications and information to protect them from the system is monitored and...
User Guide
Page 58
... to a network, consult the network administrator before installing any software updates, especially system BIOS updates. 1. Follow the on your hard drive. 46 Chapter 9 Using Setup Utility (BIOS) Using the hard drive path you can delete the downloaded file from the AC outlet. ● Do not shut down the computer or initiate Sleep. ● Do not insert, remove, connect, or disconnect any instructions that appear on -screen instructions. 4. The BIOS installation begins. 5. Do not download or install a BIOS update while...
... to a network, consult the network administrator before installing any software updates, especially system BIOS updates. 1. Follow the on your hard drive. 46 Chapter 9 Using Setup Utility (BIOS) Using the hard drive path you can delete the downloaded file from the AC outlet. ● Do not shut down the computer or initiate Sleep. ● Do not insert, remove, connect, or disconnect any instructions that appear on -screen instructions. 4. The BIOS installation begins. 5. Do not download or install a BIOS update while...

User Guide
Page 75
... battery power 33 best practices 1 BIOS determining version 45 downloading an update 46 starting the Setup Utility 45 updating 45 Bluetooth device 18, 20 Bluetooth label 17 boot order, changing 53 bottom components 15 buttons left touchpad 8 optical drive eject 4 power 10 right touchpad 8 C camera identifying 6 using 22 camera light, identifying 6 caps lock light, identifying 9 caring for your computer 38 cleaning your computer 38 components bottom 15 display 6 keyboard area 8 left side 5 right side 4 connecting to a network 18 connecting to a wireless network 18 connecting...
... battery power 33 best practices 1 BIOS determining version 45 downloading an update 46 starting the Setup Utility 45 updating 45 Bluetooth device 18, 20 Bluetooth label 17 boot order, changing 53 bottom components 15 buttons left touchpad 8 optical drive eject 4 power 10 right touchpad 8 C camera identifying 6 using 22 camera light, identifying 6 caps lock light, identifying 9 caring for your computer 38 cleaning your computer 38 components bottom 15 display 6 keyboard area 8 left side 5 right side 4 connecting to a network 18 connecting to a wireless network 18 connecting...

User Guide
Page 76
...number 20 mute light, identifying 9 mute microphone action key 14 mute volume action key 14 N network jack, identifying 5 next track action key 13 O one-finger slide touch screen gesture 30 operating environment 56 operating system controls 18 optical drive eject button, identifying 4 optical drive, identifying 4 P passwords Setup Utility (BIOS) 42 Windows 41 pause action key 13 play action key 13 ports HDMI 5, 23 USB 4 USB SuperSpeed 5 power battery 33 external 35 power button, identifying 10 power connector identifying 5 Power icon, using 33 power lights, identifying 4 power settings, using...
...number 20 mute light, identifying 9 mute microphone action key 14 mute volume action key 14 N network jack, identifying 5 next track action key 13 O one-finger slide touch screen gesture 30 operating environment 56 operating system controls 18 optical drive eject button, identifying 4 optical drive, identifying 4 P passwords Setup Utility (BIOS) 42 Windows 41 pause action key 13 play action key 13 ports HDMI 5, 23 USB 4 USB SuperSpeed 5 power battery 33 external 35 power button, identifying 10 power connector identifying 5 Power icon, using 33 power lights, identifying 4 power settings, using...
User Guide
Page 77
...optional mouse 30 using the touchpad 26 V vents, identifying 11, 15 video HDMI port 23 wireless displays 25 video, using 23 volume adjusting 13, 14 mute 14 W Windows backup 52 recovery media 52 system restore point 52 Windows Hello 22 using 43 Windows key, identifying 12 Windows passwords 41 Windows tools, using 50 resources, accessibility 61 restoring 52 right side components 4 RJ-45 (network) jack, identifying 5 RJ-45 (network) status lights, identifying 5 S screen brightness action keys 13 Section 508 accessibility standards 60 security cable slot, identifying 4 security cable, installing...
...optional mouse 30 using the touchpad 26 V vents, identifying 11, 15 video HDMI port 23 wireless displays 25 video, using 23 volume adjusting 13, 14 mute 14 W Windows backup 52 recovery media 52 system restore point 52 Windows Hello 22 using 43 Windows key, identifying 12 Windows passwords 41 Windows tools, using 50 resources, accessibility 61 restoring 52 right side components 4 RJ-45 (network) jack, identifying 5 RJ-45 (network) status lights, identifying 5 S screen brightness action keys 13 Section 508 accessibility standards 60 security cable slot, identifying 4 security cable, installing...

Maintenance & Service Guide
Page 74
... connected to a network, consult the network administrator before installing any device, cable, or cord. The hard drive designation is running on battery power, docked in the taskbar search box, and then select File Explorer. 2. The BIOS installation begins. 5. Type support in the taskbar. 2. You might need to access this information to an optional power source. Follow the on -screen instructions. 4. Double-click the file that contains the update. 4. Do not download or install a BIOS update...
... connected to a network, consult the network administrator before installing any device, cable, or cord. The hard drive designation is running on battery power, docked in the taskbar search box, and then select File Explorer. 2. The BIOS installation begins. 5. Type support in the taskbar. 2. You might need to access this information to an optional power source. Follow the on -screen instructions. 4. Double-click the file that contains the update. 4. Do not download or install a BIOS update...

Maintenance & Service Guide
Page 90
.../write access to this and firmware. screen instructions.) Stores Management Engine Code, Settings, Provisioning Data and iAMT third-party data store. Does this memory memory? from Windows. Table 11-1 Troubleshooting steps for nonvolatile memory usage (continued) Nonvolatile memory type Amount (Size) Does this utility. Code is updated when the system BIOS is updated via Intel secure firmware update utility. whenever the flash requires an upgrade. 802.11 WLAN 4 Kb to the from the device memory and...
.../write access to this and firmware. screen instructions.) Stores Management Engine Code, Settings, Provisioning Data and iAMT third-party data store. Does this memory memory? from Windows. Table 11-1 Troubleshooting steps for nonvolatile memory usage (continued) Nonvolatile memory type Amount (Size) Does this utility. Code is updated when the system BIOS is updated via Intel secure firmware update utility. whenever the flash requires an upgrade. 802.11 WLAN 4 Kb to the from the device memory and...
Maintenance & Service Guide
Page 91
... resetting the keys. Like the legacy BIOS, the UEFI BIOS provides an interface to display the system information and configuration settings and to change the configuration of your hard drive. BIOS provides a secure run in HP ProtectTools Security Manager. How can the BIOS settings be used to write to address a unique issue. IMPORTANT: Restore defaults does not securely erase any data on -screen instructions. See question and answer 7 for Startup Menu" message is displayed...
... resetting the keys. Like the legacy BIOS, the UEFI BIOS provides an interface to display the system information and configuration settings and to change the configuration of your hard drive. BIOS provides a secure run in HP ProtectTools Security Manager. How can the BIOS settings be used to write to address a unique issue. IMPORTANT: Restore defaults does not securely erase any data on -screen instructions. See question and answer 7 for Startup Menu" message is displayed...

Maintenance & Service Guide
Page 97
...)/audio-in (microphone) combo jack, identifying 5 B back cover spare part number 17 backup, creating 70 backups 70 battery removal 31 spare part number 15, 31 battery light, identifying 5 BIOS determining version 63 downloading an update 64 starting the Setup Utility 63 updating 63 Bluetooth label 12 boot order, changing 71 bottom components 11 bottom cover removal 29 spare part number 15, 29 buttons left touchpad 7 optical drive eject 4 power 9 right touchpad 7 C camera identifying 6 product description 2 camera light, identifying 6 camera module spare part number 17 camera/microphone module...
...)/audio-in (microphone) combo jack, identifying 5 B back cover spare part number 17 backup, creating 70 backups 70 battery removal 31 spare part number 15, 31 battery light, identifying 5 BIOS determining version 63 downloading an update 64 starting the Setup Utility 63 updating 63 Bluetooth label 12 boot order, changing 71 bottom components 11 bottom cover removal 29 spare part number 15, 29 buttons left touchpad 7 optical drive eject 4 power 9 right touchpad 7 C camera identifying 6 product description 2 camera light, identifying 6 camera module spare part number 17 camera/microphone module...
Maintenance & Service Guide
Page 98
...requirements 83 power lights, identifying 4 power requirements, product description 3 processor 1 product description camera 2 chipset 1 display panel 1 ethernet 2 hard drive 1 keyboard 2 media card reader 2 memory 1 operating system 3 optical drive 2 pointing device 2 ports 2 power requirements 3 processor 1 product name 1 security 3 serviceability 3 wireless networking 2 product name 1 product name and number, computer 12 R recovery 70 discs 71 HP Recovery partition 71 media 71 USB flash drive 71 recovery media creating using HP Cloud Recovery Download Tool 70 creating using Windows tools 70...
...requirements 83 power lights, identifying 4 power requirements, product description 3 processor 1 product description camera 2 chipset 1 display panel 1 ethernet 2 hard drive 1 keyboard 2 media card reader 2 memory 1 operating system 3 optical drive 2 pointing device 2 ports 2 power requirements 3 processor 1 product name 1 security 3 serviceability 3 wireless networking 2 product name 1 product name and number, computer 12 R recovery 70 discs 71 HP Recovery partition 71 media 71 USB flash drive 71 recovery media creating using HP Cloud Recovery Download Tool 70 creating using Windows tools 70...


