
Parts Locator
Page 1
Interactive Part Locator HP Chromebook x360 14a-ca0000 Convertible PC Welcome to the interactive part locator for this product. To view a specific view in the list. On every page there is a link that view. External Views (Click the link to navigate to the views) On this page, you wish to use it ! To view a specific part and its location in the product, click the part name in greater...
Interactive Part Locator HP Chromebook x360 14a-ca0000 Convertible PC Welcome to the interactive part locator for this product. To view a specific view in the list. On every page there is a link that view. External Views (Click the link to navigate to the views) On this page, you wish to use it ! To view a specific part and its location in the product, click the part name in greater...

Parts Locator
Page 5
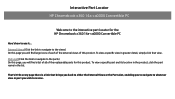
Back to External Views USB-C 3.2 Gen 1 charging port Charging LED Headphone/microphone combo port MicroSD card reader slot Power button and LED Go to Parts List Left View
Back to External Views USB-C 3.2 Gen 1 charging port Charging LED Headphone/microphone combo port MicroSD card reader slot Power button and LED Go to Parts List Left View
User Guide
Page 7
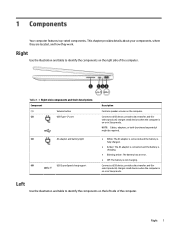
... (1) Volume button (2) USB Type-C® port (3) AC adapter and battery light (4) USB SuperSpeed charging port Description Controls speaker volume on the right side of the computer. NOTE: Cables, adapters, or both (purchased separately) might be required. ● White: The AC adapter is connected and the battery is fully charged. ● Amber: The AC adapter is connected and the battery is charging. ● Blinking amber: The battery has an error. ● Off: The battery is on or in Sleep mode...
... (1) Volume button (2) USB Type-C® port (3) AC adapter and battery light (4) USB SuperSpeed charging port Description Controls speaker volume on the right side of the computer. NOTE: Cables, adapters, or both (purchased separately) might be required. ● White: The AC adapter is connected and the battery is fully charged. ● Amber: The AC adapter is connected and the battery is charging. ● Blinking amber: The battery has an error. ● Off: The battery is on or in Sleep mode...
User Guide
Page 8
... their descriptions Component Description (1) Audio-out (headphone)/Audio-in Sleep mode. WARNING! NOTE: When a device is connected to the jack, the computer speakers are disabled. (2) AC adapter and battery light ● White: The AC adapter is connected and the battery is fully charged. ● Amber: The AC adapter is connected and the battery is charging. ● Blinking amber: The battery has an error. ● Off: The battery is not charging. (3) USB Type-C port Connects a USB device, provides data transfer, and...
... their descriptions Component Description (1) Audio-out (headphone)/Audio-in Sleep mode. WARNING! NOTE: When a device is connected to the jack, the computer speakers are disabled. (2) AC adapter and battery light ● White: The AC adapter is connected and the battery is fully charged. ● Amber: The AC adapter is connected and the battery is charging. ● Blinking amber: The battery has an error. ● Off: The battery is not charging. (3) USB Type-C port Connects a USB device, provides data transfer, and...
User Guide
Page 12
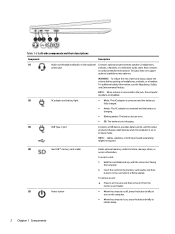
... down Volume up Mute Displays open apps. Mutes speaker sound. Locks the keys to https://support.google.com/ chromebook/answer/183101. Full screen Opens your browser history. Labels The labels affixed to the descriptions in full-screen mode. Labels can be in conjunction with the computer. NOTE: Pressing this table. ▲ To use an action key, press and hold down the key. Increases the screen brightness incrementally...
... down Volume up Mute Displays open apps. Mutes speaker sound. Locks the keys to https://support.google.com/ chromebook/answer/183101. Full screen Opens your browser history. Labels The labels affixed to the descriptions in full-screen mode. Labels can be in conjunction with the computer. NOTE: Pressing this table. ▲ To use an action key, press and hold down the key. Increases the screen brightness incrementally...

User Guide
Page 19
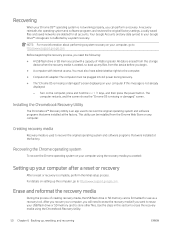
... see the message "Reset this Chrome device." ● You are having problems with your user profile or settings. ● You restarted your computer, and it still doesn't work properly, you recover your files to an optional USB flash drive, to an SD memory card, or through Google DriveTM. The factory reset will not delete your downloaded files. IMPORTANT: Recovery permanently erases everything on your computer hard drive, including your...
... see the message "Reset this Chrome device." ● You are having problems with your user profile or settings. ● You restarted your computer, and it still doesn't work properly, you recover your files to an optional USB flash drive, to an SD memory card, or through Google DriveTM. The factory reset will not delete your downloaded files. IMPORTANT: Recovery permanently erases everything on your computer hard drive, including your...
User Guide
Page 20
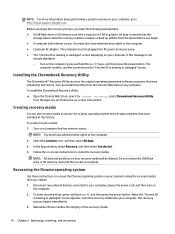
... recovery media is missing or damaged" screen displaying on any external devices connected to recover the original operating system and software programs that has internet access. To enter recovery mode, press and hold the esc+f3 keys, and then press the power button. Turn on -screen instructions. In the Apps window, select Recovery, and then select Get started. 4. The computer restarts, and the screen shows the "Chrome OS is complete. Before you created. 1. To install the Chromebook Recovery Utility: ▲ Open...
... recovery media is missing or damaged" screen displaying on any external devices connected to recover the original operating system and software programs that has internet access. To enter recovery mode, press and hold the esc+f3 keys, and then press the power button. Turn on -screen instructions. In the Apps window, select Recovery, and then select Get started. 4. The computer restarts, and the screen shows the "Chrome OS is complete. Before you created. 1. To install the Chromebook Recovery Utility: ▲ Open...
User Guide
Page 21
... Chromebook Recovery Utility, and then remove the USB flash drive or SD memory card. Setting up your operating system. In the apps window, select Recovery. 3. The computer restarts with Chrome OS reinstalled. For details about setting up your storage device. The media is ready to be formatted using a formatting tool provided by your computer after a reset or recovery After a reset or recovery is displayed, you might need to http://www.support.google.com. NOTE: If an error...
... Chromebook Recovery Utility, and then remove the USB flash drive or SD memory card. Setting up your operating system. In the apps window, select Recovery. 3. The computer restarts with Chrome OS reinstalled. For details about setting up your storage device. The media is ready to be formatted using a formatting tool provided by your computer after a reset or recovery After a reset or recovery is displayed, you might need to http://www.support.google.com. NOTE: If an error...
User Guide
Page 31
... 5 H HP Assistive Policy 20 I input power 17 International Association of Accessibility Professionals 21 K keys esc 5 L labels Bluetooth 6 regulatory 6 serial number 6 service 6 wireless certification 6 WLAN 6 O operating environment 18 P printing 12 product name and number, computer 6 R recovery media creating 14 erase 15 recovery, performing 13 regulatory information regulatory label 6 wireless certification labels 6 resetting 13 resources, accessibility 23 T tap gestures 8 touch screen gestures one-finger scrolling 9 one-finger swipe 9 two-finger pinch zoom 10 touchpad and touch screen...
... 5 H HP Assistive Policy 20 I input power 17 International Association of Accessibility Professionals 21 K keys esc 5 L labels Bluetooth 6 regulatory 6 serial number 6 service 6 wireless certification 6 WLAN 6 O operating environment 18 P printing 12 product name and number, computer 6 R recovery media creating 14 erase 15 recovery, performing 13 regulatory information regulatory label 6 wireless certification labels 6 resetting 13 resources, accessibility 23 T tap gestures 8 touch screen gestures one-finger scrolling 9 one-finger swipe 9 two-finger pinch zoom 10 touchpad and touch screen...
Diagnostics Code
Page 1
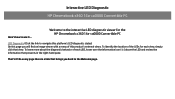
... learn more about the diagnostic behavior of this product's external views. Interactive LED Diagnostic HP Chromebook x360 14a-ca0000 Convertible PC Here's how to use it ! Welcome to the Welcome page. To identify the location of the LEDs for the HP Chromebook x360 14a-ca0000 Convertible PC LED Diagnostic (Click the link to navigate this platform's LED diagnostic states) On this page you back to the interactive...
... learn more about the diagnostic behavior of this product's external views. Interactive LED Diagnostic HP Chromebook x360 14a-ca0000 Convertible PC Here's how to use it ! Welcome to the Welcome page. To identify the location of the LEDs for the HP Chromebook x360 14a-ca0000 Convertible PC LED Diagnostic (Click the link to navigate this platform's LED diagnostic states) On this page you back to the interactive...
Maintenance and Service Guide
Page 2
... HP products and services are trademarks of USB Implementers Forum. To access the latest user guides, go to http://www.hp.com/support, and follow the instructions to the refund policy of your computer. The only warranties for technical or editorial errors or omissions contained herein. HP shall not be construed as constituting an additional warranty. Software terms By installing, copying, downloading, or otherwise using...
... HP products and services are trademarks of USB Implementers Forum. To access the latest user guides, go to http://www.hp.com/support, and follow the instructions to the refund policy of your computer. The only warranties for technical or editorial errors or omissions contained herein. HP shall not be construed as constituting an additional warranty. Software terms By installing, copying, downloading, or otherwise using...
Maintenance and Service Guide
Page 6
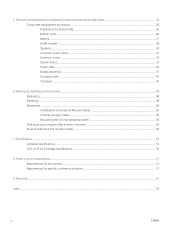
5 Removal and replacement procedures for authorized service provider parts 25 Component replacement procedures ...26 Preparation for disassembly ...26 Bottom cover ...26 Battery ...27 WLAN module ...29 Speakers ...30 Connector board cables ...31 Connector board ...32 System board ...33 Power cable ...36 Display assembly ...37 Touchpad cable ...47 Touchpad ...47 6 Backing up, resetting, and recovering ...49 Backing up ...49 Resetting ...49 Recovering ...50 Installing the Chromebook Recovery Utility 50 Creating recovery media ...50 Recovering the Chrome operating system ...50 Setting up your ...
5 Removal and replacement procedures for authorized service provider parts 25 Component replacement procedures ...26 Preparation for disassembly ...26 Bottom cover ...26 Battery ...27 WLAN module ...29 Speakers ...30 Connector board cables ...31 Connector board ...32 System board ...33 Power cable ...36 Display assembly ...37 Touchpad cable ...47 Touchpad ...47 6 Backing up, resetting, and recovering ...49 Backing up ...49 Resetting ...49 Recovering ...50 Installing the Chromebook Recovery Utility 50 Creating recovery media ...50 Recovering the Chrome operating system ...50 Setting up your ...
Maintenance and Service Guide
Page 7
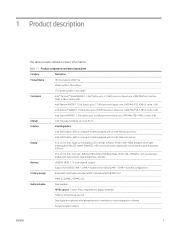
...) configurations Primary storage Embedded multimedia controller (eMMC) 128 GB and 64 GB MMC v5.0 eMMC 32 GB MO-276 MMC v5.0 Audio and video Dual speakers HP HD camera: 1-piece, fixed, integrated into display assembly 720p by 30 frames per second Dual digital microphones with narrow bezel; Table 1-1 Product components and their descriptions Category Description Product Name HP Chromebook x360 14a Model number: 14a-ca0xxx CTO model number...
...) configurations Primary storage Embedded multimedia controller (eMMC) 128 GB and 64 GB MMC v5.0 eMMC 32 GB MO-276 MMC v5.0 Audio and video Dual speakers HP HD camera: 1-piece, fixed, integrated into display assembly 720p by 30 frames per second Dual digital microphones with narrow bezel; Table 1-1 Product components and their descriptions Category Description Product Name HP Chromebook x360 14a Model number: 14a-ca0xxx CTO model number...
Maintenance and Service Guide
Page 8
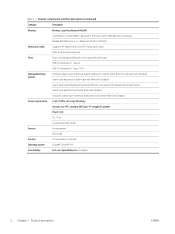
... descriptions (continued) Category Description Wireless Wireless Local Area Network (WLAN) Intel 9560 ac 2×2 MU-MIMO + Bluetooth® 5 M.2 non-vPro® CNVi WW with 2 antennas Realtek RTL8822CE ac 2×2 + Bluetooth 5.0 M.2 2230 WW Media card reader Supports HP MultiFormat microSD™ media card reader Push-push insertion/removal Ports Audio-out (headphone)/audio-in (microphone) combo jack USB 3.2 Generation 1 Type-A USB 3.2 Generation 1 Type-C® (2) Keyboard/pointing devices Standard, island-style, notebook, backlit keyboard in ceramic white finish (3-coat...
... descriptions (continued) Category Description Wireless Wireless Local Area Network (WLAN) Intel 9560 ac 2×2 MU-MIMO + Bluetooth® 5 M.2 non-vPro® CNVi WW with 2 antennas Realtek RTL8822CE ac 2×2 + Bluetooth 5.0 M.2 2230 WW Media card reader Supports HP MultiFormat microSD™ media card reader Push-push insertion/removal Ports Audio-out (headphone)/audio-in (microphone) combo jack USB 3.2 Generation 1 Type-A USB 3.2 Generation 1 Type-C® (2) Keyboard/pointing devices Standard, island-style, notebook, backlit keyboard in ceramic white finish (3-coat...
Maintenance and Service Guide
Page 32
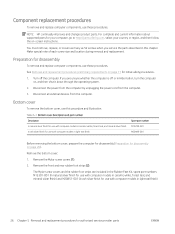
NOTE: HP continually improves and changes product parts. Preparation for disassembly To remove and replace computer components, use these procedures. If you service the parts described in Hibernation, turn the computer on page 26). Disconnect all external devices from the computer. 3. Component replacement procedures To remove and replace computer components, use these procedures. You must remove, replace, or loosen as many as 52 screws when you are included in...
NOTE: HP continually improves and changes product parts. Preparation for disassembly To remove and replace computer components, use these procedures. If you service the parts described in Hibernation, turn the computer on page 26). Disconnect all external devices from the computer. 3. Component replacement procedures To remove and replace computer components, use these procedures. You must remove, replace, or loosen as many as 52 screws when you are included in...
Maintenance and Service Guide
Page 35
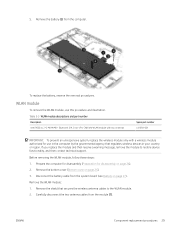
... replace the battery, reverse the removal procedures. If you replace the module and then receive a warning message, remove the module to the WLAN module. 2. Remove the WLAN module: 1. Disconnect the battery cable from the module (1). Remove the battery (5) from the computer. WLAN module To remove the WLAN module, use in the computer by the governmental agency that secures the wireless antenna cables to restore device functionality, and then contact technical support. Remove the shield that regulates wireless devices...
... replace the battery, reverse the removal procedures. If you replace the module and then receive a warning message, remove the module to the WLAN module. 2. Remove the WLAN module: 1. Disconnect the battery cable from the module (1). Remove the battery (5) from the computer. WLAN module To remove the WLAN module, use in the computer by the governmental agency that secures the wireless antenna cables to restore device functionality, and then contact technical support. Remove the shield that regulates wireless devices...
Maintenance and Service Guide
Page 40
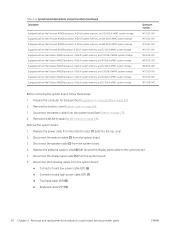
... for disassembly (Preparation for authorized service provider parts ENWW Disconnect the webcam cable (2) from the retention clips (1) built into the top cover. 2. Disconnect the following cables from the system board. 6. Release the power cable from the system board. 3. Disconnect the display panel cable (5) from the system board: ● Connector board low-power cable (ZIF) (6) ● Connector board high-power cable (ZIF) (7) ● Touchpad cable (ZIF) (8) ● Keyboard cable (ZIF) (9) 34 Chapter 5 Removal and replacement procedures for disassembly on...
... for disassembly (Preparation for authorized service provider parts ENWW Disconnect the webcam cable (2) from the retention clips (1) built into the top cover. 2. Disconnect the following cables from the system board. 6. Release the power cable from the system board. 3. Disconnect the display panel cable (5) from the system board: ● Connector board low-power cable (ZIF) (6) ● Connector board high-power cable (ZIF) (7) ● Touchpad cable (ZIF) (8) ● Keyboard cable (ZIF) (9) 34 Chapter 5 Removal and replacement procedures for disassembly on...
Maintenance and Service Guide
Page 42
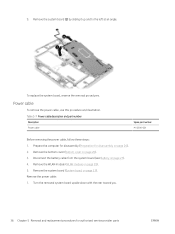
... 33). Remove the power cable: 1. Remove the WLAN module (WLAN module on page 27). 4. Prepare the computer for disassembly (Preparation for authorized service provider parts ENWW Turn the removed system board upside down with the rear toward you. 36 Chapter 5 Removal and replacement procedures for disassembly on page 26). 2. Power cable To remove the power cable, use this procedure and illustration. Table 5-7 Power cable description and part number Description Power cable Spare part number M15300-001 Before removing the power cable, follow...
... 33). Remove the power cable: 1. Remove the WLAN module (WLAN module on page 27). 4. Prepare the computer for disassembly (Preparation for authorized service provider parts ENWW Turn the removed system board upside down with the rear toward you. 36 Chapter 5 Removal and replacement procedures for disassembly on page 26). 2. Power cable To remove the power cable, use this procedure and illustration. Table 5-7 Power cable description and part number Description Power cable Spare part number M15300-001 Before removing the power cable, follow...
Maintenance and Service Guide
Page 56
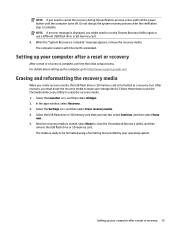
... and hold the esc + f3 keys, and then press the power button. After you recover your computer after a reset or recovery After a reset or recovery is missing or damaged" screen. Turn on setting up your computer, you will need the following: ● A USB flash drive or SD memory card with internet access. A recovery reinstalls the operating system and software programs and restores the original factory settings. Erase and reformat the recovery media During the process of 4 GB...
... and hold the esc + f3 keys, and then press the power button. After you recover your computer after a reset or recovery After a reset or recovery is missing or damaged" screen. Turn on setting up your computer, you will need the following: ● A USB flash drive or SD memory card with internet access. A recovery reinstalls the operating system and software programs and restores the original factory settings. Erase and reformat the recovery media During the process of 4 GB...
Maintenance and Service Guide
Page 70
...power cord, spare part numbers 15 product description keyboard 2 pointing device 2 ports 2 R recovering 50 recovering Chrome operating system 50 Recovery Utility 50 removal and replacement procedures 26 resetting 49 right-side components 3 rubber foot strip removal 26 spare part numbers 26 system board removal 33 spare part numbers 33 T touchpad components 7 removal 47 spare part numbers 47 touchpad cable removal 47 spare part number 15, 47 transporting guidelines 17, 22 U USB board cable spare part number 15 W webcam/microphone module illustrated 14 spare part number 14, 44 webcam/microphone...
...power cord, spare part numbers 15 product description keyboard 2 pointing device 2 ports 2 R recovering 50 recovering Chrome operating system 50 Recovery Utility 50 removal and replacement procedures 26 resetting 49 right-side components 3 rubber foot strip removal 26 spare part numbers 26 system board removal 33 spare part numbers 33 T touchpad components 7 removal 47 spare part numbers 47 touchpad cable removal 47 spare part number 15, 47 transporting guidelines 17, 22 U USB board cable spare part number 15 W webcam/microphone module illustrated 14 spare part number 14, 44 webcam/microphone...


