
User Guide
Page 2
... latest user guide, go to http://www.hp.com/support, and follow the instructions to change without notice. The only warranties for technical or editorial errors or omissions contained herein. HP shall not be construed as constituting an additional warranty. Then select Manuals. HDMI, the HDMI Logo and High-Definition Multimedia Interface are trademarks or registered trademarks owned by the Video Electronics...
... latest user guide, go to http://www.hp.com/support, and follow the instructions to change without notice. The only warranties for technical or editorial errors or omissions contained herein. HP shall not be construed as constituting an additional warranty. Then select Manuals. HDMI, the HDMI Logo and High-Definition Multimedia Interface are trademarks or registered trademarks owned by the Video Electronics...
User Guide
Page 5
... the serial number and product number 7 Setting up the monitor ...7 Attaching the monitor stand ...8 Routing the cables ...8 Connecting the cables ...9 Connecting USB devices (select products only 12 Adjusting the monitor ...12 Installing a security cable ...13 Turning on the monitor ...13 HP watermark and image retention policy 14 2 Using the monitor ...15 Downloading software and utilities ...15 The Information file ...15 The Image Color Matching file ...15 Using the OSD menu ...15 Using the OSD function buttons ...16 Reassigning the function buttons ...17 Changing the Power Mode setting...
... the serial number and product number 7 Setting up the monitor ...7 Attaching the monitor stand ...8 Routing the cables ...8 Connecting the cables ...9 Connecting USB devices (select products only 12 Adjusting the monitor ...12 Installing a security cable ...13 Turning on the monitor ...13 HP watermark and image retention policy 14 2 Using the monitor ...15 Downloading software and utilities ...15 The Information file ...15 The Image Color Matching file ...15 Using the OSD menu ...15 Using the OSD function buttons ...16 Reassigning the function buttons ...17 Changing the Power Mode setting...
User Guide
Page 6
Button lockouts ...20 Using the auto-adjustment function (analog input 20 Optimizing image performance (analog input 21 4 Maintaining the monitor ...23 Maintenance guidelines ...23 Cleaning the monitor ...23 Shipping the monitor ...24 Appendix A Technical specifications ...25 Technical specifications 54.6 cm (21.5 in) model 25 Technical specifications 60.5 cm (23.8 in) model 25 Technical specifications 68.6 cm (27 in) model 26 Technical specifications 80.0 cm (31.5 in) model 27 Preset display resolutions ...27 FHD Preset display and timing...
Button lockouts ...20 Using the auto-adjustment function (analog input 20 Optimizing image performance (analog input 21 4 Maintaining the monitor ...23 Maintenance guidelines ...23 Cleaning the monitor ...23 Shipping the monitor ...24 Appendix A Technical specifications ...25 Technical specifications 54.6 cm (21.5 in) model 25 Technical specifications 60.5 cm (23.8 in) model 25 Technical specifications 68.6 cm (27 in) model 26 Technical specifications 80.0 cm (31.5 in) model 27 Preset display resolutions ...27 FHD Preset display and timing...
User Guide
Page 9
... equipment is suitable for use with the installation instructions. 1 Getting started Read this monitor. IMPORTANT: For the protection of serious injury, read the Safety & Comfort Guide provided with the monitor. Use the appropriate and correctly sized furniture designed to the monitor so that might be stepped on power cords or cables. Not all cords and cables connected to properly support your user guides. Consider placing the monitor in locations where...
... equipment is suitable for use with the installation instructions. 1 Getting started Read this monitor. IMPORTANT: For the protection of serious injury, read the Safety & Comfort Guide provided with the monitor. Use the appropriate and correctly sized furniture designed to the monitor so that might be stepped on power cords or cables. Not all cords and cables connected to properly support your user guides. Consider placing the monitor in locations where...
User Guide
Page 10
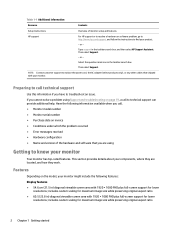
... version of monitor setup and features HP support For HP support or to resolve a hardware or software problem, go to http://www.hp.com/support, and follow the instructions to replace the power cord, the AC adapter (select products only), or any other cables that you are located, and how they are using Support and troubleshooting on page 19, a call technical support Use this information if you call. ● Monitor model number ● Monitor serial number ●...
... version of monitor setup and features HP support For HP support or to resolve a hardware or software problem, go to http://www.hp.com/support, and follow the instructions to replace the power cord, the AC adapter (select products only), or any other cables that you are located, and how they are using Support and troubleshooting on page 19, a call technical support Use this information if you call. ● Monitor model number ● Monitor serial number ●...

User Guide
Page 11
...; (HDMI) video input ● Video Graphics Array (VGA) video input (select models) ● USB Type-C® port (select models) ● USB ports that you can reconfigure to quickly allow selection of the most commonly used operations ● On-screen display (OSD) adjustments in ) diagonal viewable screen area with an LED backlight ● Wide viewing angle to allow viewing from a sitting or standing position, or moving from side to side ● Tilt adjustment capability ● Four on-screen display (OSD) buttons, three that connect to...
...; (HDMI) video input ● Video Graphics Array (VGA) video input (select models) ● USB Type-C® port (select models) ● USB ports that you can reconfigure to quickly allow selection of the most commonly used operations ● On-screen display (OSD) adjustments in ) diagonal viewable screen area with an LED backlight ● Wide viewing angle to allow viewing from a sitting or standing position, or moving from side to side ● Tilt adjustment capability ● Four on-screen display (OSD) buttons, three that connect to...
User Guide
Page 15
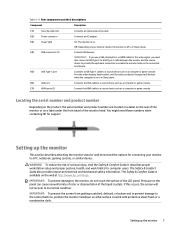
... of the LCD panel. Provides video display, data transfer, and (for connecting your monitor model, the monitor is available on a flat surface covered with protective sheet foam or a nonabrasive cloth. IMPORTANT: To prevent the screen from getting scratched, defaced, or broken and to prevent damage to its normal condition. The Safety & Comfort Guide is off or in Sleep state. (6) VGA port Connects the VGA cable to a source device such...
... of the LCD panel. Provides video display, data transfer, and (for connecting your monitor model, the monitor is available on a flat surface covered with protective sheet foam or a nonabrasive cloth. IMPORTANT: To prevent the screen from getting scratched, defaced, or broken and to prevent damage to its normal condition. The Safety & Comfort Guide is off or in Sleep state. (6) VGA port Connects the VGA cable to a source device such...
User Guide
Page 17
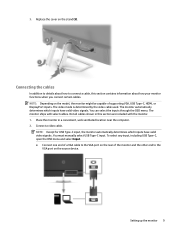
... the stand (3). Connect a video cable. The video mode is determined by the video cable used. You can select the inputs through the OSD menu. Place the monitor in this section contains information about how your monitor functions when you connect certain cables. To select any input, including USB Type-C, open the OSD menu and select Input. ● Connect one end of supporting VGA, USB Type-C, HDMI, or DisplayPort inputs. The monitor ships with the monitor. 1. You must manually select USB Type-C input. 3. Replace the cover...
... the stand (3). Connect a video cable. The video mode is determined by the video cable used. You can select the inputs through the OSD menu. Place the monitor in this section contains information about how your monitor functions when you connect certain cables. To select any input, including USB Type-C, open the OSD menu and select Input. ● Connect one end of supporting VGA, USB Type-C, HDMI, or DisplayPort inputs. The monitor ships with the monitor. 1. You must manually select USB Type-C input. 3. Replace the cover...

User Guide
Page 19
... connect the AC adapter to the power connector on a cord or cable. Plug the power cord into a grounded (earthed) AC outlet that no one can accidentally step on the source device. (Use only the HP-approved USB Type-C cable provided with the monitor.) IMPORTANT: The monitor's USB Type-C port provides network, data, video, and power delivery (up the monitor 11 Do not pull on the monitor (3). Connect one end of a USB Type-C cable to the USB...
... connect the AC adapter to the power connector on a cord or cable. Plug the power cord into a grounded (earthed) AC outlet that no one can accidentally step on the source device. (Use only the HP-approved USB Type-C cable provided with the monitor.) IMPORTANT: The monitor's USB Type-C port provides network, data, video, and power delivery (up the monitor 11 Do not pull on the monitor (3). Connect one end of a USB Type-C cable to the USB...

User Guide
Page 21
... HP monitors, you can disable the power light in image damage might be in damage on all LCD screens. Use the key that display the same static image on the screen for 12 or more hours. Press the Menu button to open the OSD, select Power, select Power LED, and then select Off. ▲ Press the power button on . To disable this feature, press and hold the monitor power button for a prolonged period of time. Setting...
... HP monitors, you can disable the power light in image damage might be in damage on all LCD screens. Use the key that display the same static image on the screen for 12 or more hours. Press the Menu button to open the OSD, select Power, select Power LED, and then select Off. ▲ Press the power button on . To disable this feature, press and hold the monitor power button for a prolonged period of time. Setting...
User Guide
Page 22
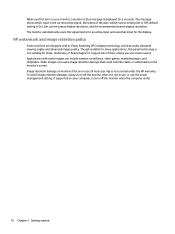
..., video games, marketing logos, and templates. HP watermark and image retention policy Some monitors are in use, or use screen savers. default setting is idle. 14 Chapter 1 Getting started Though suitable for many applications, this panel technology is not covered under the HP warranty. Applications with In-Plane Switching (IPS) display technology, which input is the current active signal, the status of time, unless you first turn on...
..., video games, marketing logos, and templates. HP watermark and image retention policy Some monitors are in use, or use screen savers. default setting is idle. 14 Chapter 1 Getting started Though suitable for many applications, this panel technology is not covered under the HP warranty. Applications with In-Plane Switching (IPS) display technology, which input is the current active signal, the status of time, unless you first turn on...
User Guide
Page 23
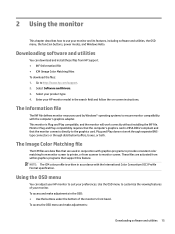
... monitor connects directly to monitor screen. The Image Color Matching file The ICM files are data files that are activated from scanner to the graphics card. To access and make adjustments: Downloading software and utilities 15 Use the OSD menu to suit your monitor. 2 Using the monitor This chapter describes how to http://www.hp.com/support. 2. Go to use your monitor and its features, including software and utilities, the OSD menu, the function buttons, power modes...
... monitor connects directly to monitor screen. The Image Color Matching file The ICM files are data files that are activated from scanner to the graphics card. To access and make adjustments: Downloading software and utilities 15 Use the OSD menu to suit your monitor. 2 Using the monitor This chapter describes how to http://www.hp.com/support. 2. Go to use your monitor and its features, including software and utilities, the OSD menu, the function buttons, power modes...
User Guide
Page 24
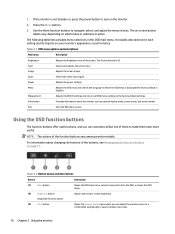
...the OSD, or closes the OSD menu. (2) Brightness button Assignable function button Adjusts the monitor screen brightness. (3) Color button Opens the Viewing Modes menu where you can adjust the monitor screen to turn on page 17. NOTE: The actions of the screen. Input Selects the video input signal. The on-screen button labels vary, depending on your monitor's appearance or performance. The factory default is not already on, press the power button to a comfortable viewing light or select a preset view mode. 16 Chapter 2 Using the monitor Management Adjusts the...
...the OSD, or closes the OSD menu. (2) Brightness button Assignable function button Adjusts the monitor screen brightness. (3) Color button Opens the Viewing Modes menu where you can adjust the monitor screen to turn on page 17. NOTE: The actions of the screen. Input Selects the video input signal. The on-screen button labels vary, depending on your monitor's appearance or performance. The factory default is not already on, press the power button to a comfortable viewing light or select a preset view mode. 16 Chapter 2 Using the monitor Management Adjusts the...
User Guide
Page 25
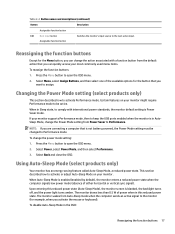
...blanked, the backlight turns off, and the power light turns amber. Select Menu, select Assign Buttons, and then select one of either horizontal or vertical sync signal). Certain features on your monitor supports Performance mode, then to open the OSD menu. 2. Using Auto-Sleep Mode (select products only) Your monitor has an energy-saving feature called Auto-Sleep Mode, a reduced power state. Table 2-2 Button names and descriptions (continued) Button Description Assignable function button (4) Next input button Assignable function button Switches the monitor's input source to...
...blanked, the backlight turns off, and the power light turns amber. Select Menu, select Assign Buttons, and then select one of either horizontal or vertical sync signal). Certain features on your monitor supports Performance mode, then to open the OSD menu. 2. Using Auto-Sleep Mode (select products only) Your monitor has an energy-saving feature called Auto-Sleep Mode, a reduced power state. Table 2-2 Button names and descriptions (continued) Button Description Assignable function button (4) Next input button Assignable function button Switches the monitor's input source to...
User Guide
Page 27
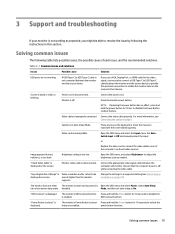
... 9. Open the OSD menu and select the Input menu. Image appears blurred, indistinct, or too dark. Brightness setting is displayed on screen. "Check Video Cable" is too low. Monitor video cable is Video resolution and/or refresh rate displayed on the screen. "Input Signal Out of each issue, and the recommended solutions. are not working as needed. The monitor does not enter The monitor's power saving control is incompatible. Connect the video cable properly. System is in this section. Video card is Open the OSD menu and select Power, select Auto-Sleep...
... 9. Open the OSD menu and select the Input menu. Image appears blurred, indistinct, or too dark. Brightness setting is displayed on screen. "Check Video Cable" is too low. Monitor video cable is Video resolution and/or refresh rate displayed on the screen. "Input Signal Out of each issue, and the recommended solutions. are not working as needed. The monitor does not enter The monitor's power saving control is incompatible. Connect the video cable properly. System is in this section. Video card is Open the OSD menu and select Power, select Auto-Sleep...
User Guide
Page 28
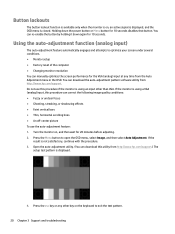
... the OSD menu is using an input other than VGA. Using the auto-adjustment function (analog input) The auto-adjustment feature automatically engages and attempts to optimize your screen under several conditions. ● Monitor setup ● Factory reset of the computer ● Changing monitor resolution You can download the auto-adjustment pattern software utility from http://www.hp.com/support. If the monitor is closed. Open the auto-adjustment utility. (You can re-enable the button by holding it down the power button or Menu button...
... the OSD menu is using an input other than VGA. Using the auto-adjustment function (analog input) The auto-adjustment feature automatically engages and attempts to optimize your screen under several conditions. ● Monitor setup ● Factory reset of the computer ● Changing monitor resolution You can download the auto-adjustment pattern software utility from http://www.hp.com/support. If the monitor is closed. Open the auto-adjustment utility. (You can re-enable the button by holding it down the power button or Menu button...
User Guide
Page 29
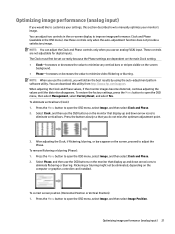
... graphics controller card installed. Press the Menu button to open the OSD menu, select Image, and then select Clock and Phase. 2. Press the Menu button to open the OSD menu, select Image, and then select Image Position. Optimizing image performance (analog input) 21 Flickering or blurring might not be set correctly because the Phase settings are not adjustable for digital inputs. Optimizing image performance (analog input) If you will obtain the best results by using the auto-adjustment pattern software utility. Use these controls only when the auto-adjustment function...
... graphics controller card installed. Press the Menu button to open the OSD menu, select Image, and then select Clock and Phase. 2. Press the Menu button to open the OSD menu, select Image, and then select Image Position. Optimizing image performance (analog input) 21 Flickering or blurring might not be set correctly because the Phase settings are not adjustable for digital inputs. Optimizing image performance (analog input) If you will obtain the best results by using the auto-adjustment pattern software utility. Use these controls only when the auto-adjustment function...
User Guide
Page 31
... current rating of the AC outlet and that are covered in the best condition. Never disconnect the monitor by pulling the cord. ● Turn the monitor off the monitor and unplug the power cord from excessive light, heat, or moisture. Cleaning the monitor Use these instructions to enhance the performance and extend the life of the monitor. ● Do not open the monitor cabinet or attempt to clean your monitor...
... current rating of the AC outlet and that are covered in the best condition. Never disconnect the monitor by pulling the cord. ● Turn the monitor off the monitor and unplug the power cord from excessive light, heat, or moisture. Cleaning the monitor Use these instructions to enhance the performance and extend the life of the monitor. ● Do not open the monitor cabinet or attempt to clean your monitor...
User Guide
Page 35
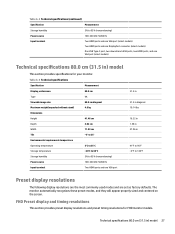
...;F to 95% (noncondensing) 100-240 VAC 50/60 Hz Two HDMI ports and one VGA port (select models) Technical specifications 80.0 cm (31.5 in ) model 27 Table A-4 Technical specifications Specification Measurement Display, widescreen Type Viewable image size Maximum weight (unpacked without stand) Dimensions Height Depth Width Tilt Environmental requirements temperature Operating temperature Storage temperature Storage humidity Power source Input terminal 80.0 cm VA 80.0 cm diagonal 4.6 kg 41...
...;F to 95% (noncondensing) 100-240 VAC 50/60 Hz Two HDMI ports and one VGA port (select models) Technical specifications 80.0 cm (31.5 in ) model 27 Table A-4 Technical specifications Specification Measurement Display, widescreen Type Viewable image size Maximum weight (unpacked without stand) Dimensions Height Depth Width Tilt Environmental requirements temperature Operating temperature Storage temperature Storage humidity Power source Input terminal 80.0 cm VA 80.0 cm diagonal 4.6 kg 41...
User Guide
Page 38
... of power. NOTE: This power saver feature works only when the monitor is a brief warm-up period before the monitor returns to a computer that has energysaver features. The reduced power state is turned off, and the power light turns amber. In the reduced power state, the monitor uses < 0.5 W of either the horizontal sync signal or the vertical sync signal. See the computer manual for instructions on setting the energy saver mode (sometimes called "power...
... of power. NOTE: This power saver feature works only when the monitor is a brief warm-up period before the monitor returns to a computer that has energysaver features. The reduced power state is turned off, and the power light turns amber. In the reduced power state, the monitor uses < 0.5 W of either the horizontal sync signal or the vertical sync signal. See the computer manual for instructions on setting the energy saver mode (sometimes called "power...


