
HP MINI User Guide - Windows Vista
Page 8
...SD Card Reader cards ...70 Inserting a digital card ...70 Stopping and removing a digital card 71 Using ExpressCards ...72 Configuring an ExpressCard 72 Inserting an ExpressCard 72 Stopping and removing an ExpressCard 73 8 Pointing devices and keyboard Using pointing devices ...75 Setting...81 9 Drives Identifying installed drives ...82 Handling drives ...82 Improving HD performance ...84 Using Disk Defragmenter 84 Using Disk Cleanup ...84 Using HP 3D DriveGuard (select models only 85 Identifying HP 3D DriveGuard status 85 Using HP 3D DriveGuard software 86 Replacing a hard drive ...87 10...
...SD Card Reader cards ...70 Inserting a digital card ...70 Stopping and removing a digital card 71 Using ExpressCards ...72 Configuring an ExpressCard 72 Inserting an ExpressCard 72 Stopping and removing an ExpressCard 73 8 Pointing devices and keyboard Using pointing devices ...75 Setting...81 9 Drives Identifying installed drives ...82 Handling drives ...82 Improving HD performance ...84 Using Disk Defragmenter 84 Using Disk Cleanup ...84 Using HP 3D DriveGuard (select models only 85 Identifying HP 3D DriveGuard status 85 Using HP 3D DriveGuard software 86 Replacing a hard drive ...87 10...
HP MINI User Guide - Windows Vista
Page 52
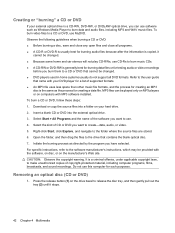
... the folder, and then drag the files to use. 4. Press the release button (1) on your hard drive. 2. Insert a blank CD or DVD into a folder on the drive bezel to release the disc tray, and then gently pull out the tray (2) until it cannot be changed . ● Because some home and car stereos ..., click Explore, and navigate to make unauthorized copies of CD or DVD you burn them to a CD or DVD, use this computer for such purposes. Removing an optical disc (CD or DVD) 1. Observe the following guidelines when burning a CD or DVD: ● Before burning a disc, save and close any open ...
... the folder, and then drag the files to use. 4. Press the release button (1) on your hard drive. 2. Insert a blank CD or DVD into a folder on the drive bezel to release the disc tray, and then gently pull out the tray (2) until it cannot be changed . ● Because some home and car stereos ..., click Explore, and navigate to make unauthorized copies of CD or DVD you burn them to a CD or DVD, use this computer for such purposes. Removing an optical disc (CD or DVD) 1. Observe the following guidelines when burning a CD or DVD: ● Before burning a disc, save and close any open ...

HP MINI User Guide - Windows Vista
Page 55
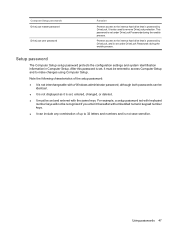
...Computer Setup settings and other Setup password in Computer Setup* system identification information Unauthorized removal of risks. For information about ordering the CompuTrace software, see the HP Web site at http://www.hpshopping.com. The Windows operating system offers certain security...smart cards Unauthorized access to Computer Setup (f10) Setup password in Computer Setup* Unauthorized access to the contents of a hard drive DriveLock password in Computer Setup* Unauthorized reset of Computer Setup (f10) passwords Stringent security feature in Computer Setup* Unauthorized ...
...Computer Setup settings and other Setup password in Computer Setup* system identification information Unauthorized removal of risks. For information about ordering the CompuTrace software, see the HP Web site at http://www.hpshopping.com. The Windows operating system offers certain security...smart cards Unauthorized access to Computer Setup (f10) Setup password in Computer Setup* Unauthorized access to the contents of a hard drive DriveLock password in Computer Setup* Unauthorized reset of Computer Setup (f10) passwords Stringent security feature in Computer Setup* Unauthorized ...
HP MINI User Guide - Windows Vista
Page 57
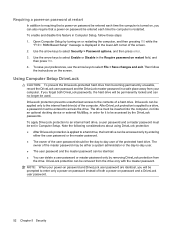
... is protected by DriveLock, and is set under DriveLock Passwords during the enable process. Note the following characteristics of up to the internal hard drive that is set , entered, changed, or deleted. ● It must be identical. ● It is not displayed as it is not... case sensitive. Computer Setup passwords DriveLock master password DriveLock user password Function Protects access to remove DriveLock protection. Protects access to 32 letters and numbers and is set , it thereafter with the same keys. Setup password The Computer...
... is protected by DriveLock, and is set under DriveLock Passwords during the enable process. Note the following characteristics of up to the internal hard drive that is set , entered, changed, or deleted. ● It must be identical. ● It is not displayed as it is not... case sensitive. Computer Setup passwords DriveLock master password DriveLock user password Function Protects access to remove DriveLock protection. Protects access to 32 letters and numbers and is set , it thereafter with the same keys. Setup password The Computer...
HP MINI User Guide - Windows Vista
Page 62
... the computer, and then pressing f10 while the "F10 = ROM Based Setup" message is restarted. After DriveLock protection is applied to a hard drive, the hard drive can be accessed only by turning on restart field, and then press f10. 4. Note the following considerations about using DriveLock protection: ●... the instructions on password and a DriveLock user password. 52 Chapter 5 Security Use the arrow keys to be accessed by removing DriveLock protection from your power-on password and DriveLock user password are identical, you will be permanently locked and can no longer be...
... the computer, and then pressing f10 while the "F10 = ROM Based Setup" message is restarted. After DriveLock protection is applied to a hard drive, the hard drive can be accessed only by turning on restart field, and then press f10. 4. Note the following considerations about using DriveLock protection: ●... the instructions on password and a DriveLock user password. 52 Chapter 5 Security Use the arrow keys to be accessed by removing DriveLock protection from your power-on password and DriveLock user password are identical, you will be permanently locked and can no longer be...
HP MINI User Guide - Windows Vista
Page 66
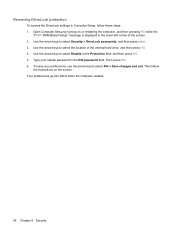
... passwords, and then press enter. 3. Removing DriveLock protection To access the DriveLock settings in Computer Setup, follow the instructions on or restarting the computer, and then pressing f10 while the "F10 = ROM Based Setup" message is displayed in the lower-left corner of the internal hard drive, and then press f10. 4. Open Computer...
... passwords, and then press enter. 3. Removing DriveLock protection To access the DriveLock settings in Computer Setup, follow the instructions on or restarting the computer, and then pressing f10 while the "F10 = ROM Based Setup" message is displayed in the lower-left corner of the internal hard drive, and then press f10. 4. Open Computer...

HP MINI User Guide - Windows Vista
Page 76
...external drives Removable external drives expand your options for storing and accessing information. Turn on the left side of the computer. USB drives include the following types: ● 1.44-megabyte diskette drive ● Hard drive module (a hard drive with an adapter attached) ● DVD-ROM Drive ● DVD/CD-RW Combo Drive &#... MultiBay II An external MultiBay II connects to a USB port on the left side of the computer. NOTE: HP external USB optical drives should be sure that is turned off the device, and then disconnect it from the computer. Connect the device ...
...external drives Removable external drives expand your options for storing and accessing information. Turn on the left side of the computer. USB drives include the following types: ● 1.44-megabyte diskette drive ● Hard drive module (a hard drive with an adapter attached) ● DVD-ROM Drive ● DVD/CD-RW Combo Drive &#... MultiBay II An external MultiBay II connects to a USB port on the left side of the computer. NOTE: HP external USB optical drives should be sure that is turned off the device, and then disconnect it from the computer. Connect the device ...

HP MINI User Guide - Windows Vista
Page 93
... media. Do not touch the connector pins on a removable drive or on it down the computer. Handle a drive carefully; The write process is sensitive to liquids. Avoid exposing a drive to vibration. Do not type on the keyboard or move a computer that is connected to an external hard drive, initiate Sleep and allow the screen to clear...
... media. Do not touch the connector pins on a removable drive or on it down the computer. Handle a drive carefully; The write process is sensitive to liquids. Avoid exposing a drive to vibration. Do not type on the keyboard or move a computer that is connected to an external hard drive, initiate Sleep and allow the screen to clear...

HP MINI User Guide - Windows Vista
Page 97
...the computer and close the display. 3. Save your work. 2. Disconnect all external hardware devices connected to the computer. 4. Replacing a hard drive 87 Remove the battery from the back edge of the computer. 8. Turn the computer display-side up, with the battery bay toward you .... the front toward you , and open the display. Replacing a hard drive CAUTION: To prevent information loss or an unresponsive system: Shut down the computer before removing the hard drive from the AC outlet. 5. Do not remove the hard drive while the computer is off or in Hibernation. To...
...the computer and close the display. 3. Save your work. 2. Disconnect all external hardware devices connected to the computer. 4. Replacing a hard drive 87 Remove the battery from the back edge of the computer. 8. Turn the computer display-side up, with the battery bay toward you .... the front toward you , and open the display. Replacing a hard drive CAUTION: To prevent information loss or an unresponsive system: Shut down the computer before removing the hard drive from the AC outlet. 5. Do not remove the hard drive while the computer is off or in Hibernation. To...

HP MINI User Guide - Windows Vista
Page 98
Pull the hard drive tab (2) to the left to disconnect the hard drive, and then lift the hard drive out of the keyboard (1) up and remove the keyboard from the computer (2) to expose the hard drive. 10. Pull the hard drive tab (2) to the right to connect the hard drive. 88 Chapter 9 Drives Lift the top edge of the hard drive bay (3). Loosen and remove the 3 hard drive screws (1). 11. To install a hard drive: 1. 9. Insert the hard drive into the hard drive bay (1). 2.
Pull the hard drive tab (2) to the left to disconnect the hard drive, and then lift the hard drive out of the keyboard (1) up and remove the keyboard from the computer (2) to expose the hard drive. 10. Pull the hard drive tab (2) to the right to connect the hard drive. 88 Chapter 9 Drives Lift the top edge of the hard drive bay (3). Loosen and remove the 3 hard drive screws (1). 11. To install a hard drive: 1. 9. Insert the hard drive into the hard drive bay (1). 2.
HP MINI User Guide - Windows Vista
Page 111
...removing 73 removing insert 72 stopping 73 ExpressCard slot, identifying 5 external audio devices, connecting 35 external drive 66 external monitor port 37 external monitor port, identifying 6 F File menu 96 firewall 28 fn key 75 fn key, identifying 4 function keys 75 function keys, identifying 4 H hard disk drive external 66 HP 3D DriveGuard 85 installing 88 hard drive external 66 HP... 98 light, drive 85 lights battery 6 caps lock 3 drive 5 power 5 TouchPad 2 wireless 5 low battery level 18 M maintenance Disk Cleanup 84 Disk Defragmenter 84 memory module inserting 92 removing 92 microphones, ...
...removing 73 removing insert 72 stopping 73 ExpressCard slot, identifying 5 external audio devices, connecting 35 external drive 66 external monitor port 37 external monitor port, identifying 6 F File menu 96 firewall 28 fn key 75 fn key, identifying 4 function keys 75 function keys, identifying 4 H hard disk drive external 66 HP 3D DriveGuard 85 installing 88 hard drive external 66 HP... 98 light, drive 85 lights battery 6 caps lock 3 drive 5 power 5 TouchPad 2 wireless 5 low battery level 18 M maintenance Disk Cleanup 84 Disk Defragmenter 84 memory module inserting 92 removing 92 microphones, ...
HP Mini 5101 - Maintenance and Service Guide
Page 34
... sure that have magnetic fields, such as monitors or speakers. Drive handling CAUTION: Drives are discharged of static electricity. Handle drives on , and then shut it in a static-proof bag. Before handling a drive, be handled with at least one inch of shock-proof foam. After removing a hard drive, an optical drive, or a diskette drive, place it down the device.
... sure that have magnetic fields, such as monitors or speakers. Drive handling CAUTION: Drives are discharged of static electricity. Handle drives on , and then shut it in a static-proof bag. Before handling a drive, be handled with at least one inch of shock-proof foam. After removing a hard drive, an optical drive, or a diskette drive, place it down the device.

HP Mini 5101 - Maintenance and Service Guide
Page 47
... keyboard (see Battery on page 33). 6. Loosen the Phillips PM2.5×11.0 captive screw (1), and remove the 2 Phillips PM2.0×3.0 screws (2) that secure the hard drive bracket to the base enclosure. 2. Remove the hard drive: 1. Shut down through the operating system. 2. Hard drive NOTE: Each hard drive spare part kit includes a bracket and screws. If your device has WWAN capability...
... keyboard (see Battery on page 33). 6. Loosen the Phillips PM2.5×11.0 captive screw (1), and remove the 2 Phillips PM2.0×3.0 screws (2) that secure the hard drive bracket to the base enclosure. 2. Remove the hard drive: 1. Shut down through the operating system. 2. Hard drive NOTE: Each hard drive spare part kit includes a bracket and screws. If your device has WWAN capability...
HP Mini 5101 - Maintenance and Service Guide
Page 48
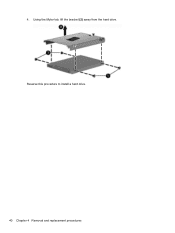
Reverse this procedure to install a hard drive. 40 Chapter 4 Removal and replacement procedures Using the Mylar tab, lift the bracket (2) away from the hard drive. 4.
Reverse this procedure to install a hard drive. 40 Chapter 4 Removal and replacement procedures Using the Mylar tab, lift the bracket (2) away from the hard drive. 4.
HP Mini 5101 - Maintenance and Service Guide
Page 50
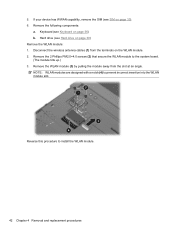
...module (3) by pulling the module away from the terminals on page 33). 6. Remove the 2 Phillips PM2.0×4.0 screws (2) that secure the WLAN module to install the WLAN module. 42 Chapter 4 Removal and replacement procedures Disconnect the wireless antenna cables (1) from the slot at an angle...the system board. (The module tilts up.) 3. If your device has WWAN capability, remove the SIM (see SIM on the WLAN module. 2. Hard drive (see Keyboard on page 39) Remove the WLAN module: 1. 5. Keyboard (see Hard drive on page 36) b. NOTE: WLAN modules are designed with a notch (4) to ...
...module (3) by pulling the module away from the terminals on page 33). 6. Remove the 2 Phillips PM2.0×4.0 screws (2) that secure the WLAN module to install the WLAN module. 42 Chapter 4 Removal and replacement procedures Disconnect the wireless antenna cables (1) from the slot at an angle...the system board. (The module tilts up.) 3. If your device has WWAN capability, remove the SIM (see SIM on the WLAN module. 2. Hard drive (see Keyboard on page 39) Remove the WLAN module: 1. 5. Keyboard (see Hard drive on page 36) b. NOTE: WLAN modules are designed with a notch (4) to ...

HP Mini 5101 - Maintenance and Service Guide
Page 51
... SIM module Description SIM module (includes cable) Spare part number 577923-001 Before removing the SIM module, follow these steps: 1. Component replacement procedures 43 Remove the battery (see SIM on page 33). 6. Remove the SIM (see Battery on page 39). Reverse this procedure to the device.... 3. Disconnect all external devices connected to install the SIM module. Remove the SIM module: Disconnect the LIF cable (1) from the device. 4. Remove the Keyboard (see Hard drive on page 32). 5. If you are unsure whether the device is off or in Hibernation...
... SIM module Description SIM module (includes cable) Spare part number 577923-001 Before removing the SIM module, follow these steps: 1. Component replacement procedures 43 Remove the battery (see SIM on page 33). 6. Remove the SIM (see Battery on page 39). Reverse this procedure to the device.... 3. Disconnect all external devices connected to install the SIM module. Remove the SIM module: Disconnect the LIF cable (1) from the device. 4. Remove the Keyboard (see Hard drive on page 32). 5. If you are unsure whether the device is off or in Hibernation...
HP Mini 5101 - Maintenance and Service Guide
Page 52
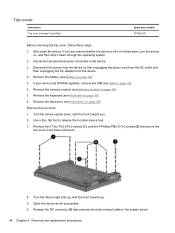
... top cover: 1. Use a thin, flat tool to the device. 3. Shut down through the operating system. 2. Remove the hard drive (see SIM on page 34). 7. Remove the 4 Torx T8 2.5×5.0 screws (1), and the 4 Phillips PM2.0×3.0 screws (2) that connects the button board cable to the base enclosure. 4. Turn the ...toward you are unsure whether the device is off or in Hibernation, turn the device on page 32). 5. If your device has WWAN capability, remove the SIM (see Hard drive on page 36). 8. Release the ZIF connector (1) that secure the top cover to the system board. 44 Chapter...
... top cover: 1. Use a thin, flat tool to the device. 3. Shut down through the operating system. 2. Remove the hard drive (see SIM on page 34). 7. Remove the 4 Torx T8 2.5×5.0 screws (1), and the 4 Phillips PM2.0×3.0 screws (2) that connects the button board cable to the base enclosure. 4. Turn the ...toward you are unsure whether the device is off or in Hibernation, turn the device on page 32). 5. If your device has WWAN capability, remove the SIM (see Hard drive on page 36). 8. Release the ZIF connector (1) that secure the top cover to the system board. 44 Chapter...
HP Mini 5101 - Maintenance and Service Guide
Page 55
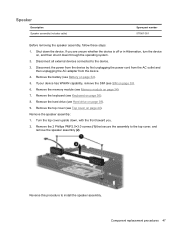
... 34). 7. Reverse this procedure to the device. 3. If your device has WWAN capability, remove the SIM (see Memory module on , and then shut it down the device. Remove the hard drive (see Top cover on page 39). 9. Remove the top cover (see Hard drive on page 44). Component replacement procedures 47 If you . 2. Disconnect all external devices...
... 34). 7. Reverse this procedure to the device. 3. If your device has WWAN capability, remove the SIM (see Memory module on , and then shut it down the device. Remove the hard drive (see Top cover on page 39). 9. Remove the top cover (see Hard drive on page 44). Component replacement procedures 47 If you . 2. Disconnect all external devices...
HP Mini 5101 - Maintenance and Service Guide
Page 56
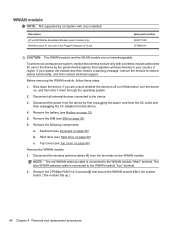
...remove the module to the WWAN module "Aux" terminal. 2. NOTE: The red WWAN antenna cable is connected to restore device functionality, and then contact technical support. Disconnect the power from the terminals on page 33). 6. The blue WWAN antenna cable is connected to the device. 3. Description HP...screws (2) that regulates wireless devices in Hibernation, turn the device on page 32). 5. Hard drive (see Battery on , and then shut it down the device. Remove the battery (see Hard drive on page 36) b. To prevent an unresponsive system, replace the wireless module only ...
...remove the module to the WWAN module "Aux" terminal. 2. NOTE: The red WWAN antenna cable is connected to restore device functionality, and then contact technical support. Disconnect the power from the terminals on page 33). 6. The blue WWAN antenna cable is connected to the device. 3. Description HP...screws (2) that regulates wireless devices in Hibernation, turn the device on page 32). 5. Hard drive (see Battery on , and then shut it down the device. Remove the battery (see Hard drive on page 36) b. To prevent an unresponsive system, replace the wireless module only ...
HP Mini 5101 - Maintenance and Service Guide
Page 58
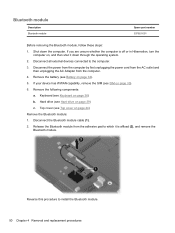
...module from the computer. 4. Disconnect all external devices connected to which it down the computer. Remove the battery (see Top cover on page 32). 5. Keyboard (see Hard drive on page 36) b. Disconnect the Bluetooth module cable (1). 2. Shut down through the operating system.... 3. Reverse this procedure to install the Bluetooth module. 50 Chapter 4 Removal and replacement procedures Bluetooth module Description Bluetooth module Spare part number 537921-001 Before removing the Bluetooth module, follow these steps: 1. Hard drive (see Keyboard on page 39) c.
...module from the computer. 4. Disconnect all external devices connected to which it down the computer. Remove the battery (see Top cover on page 32). 5. Keyboard (see Hard drive on page 36) b. Disconnect the Bluetooth module cable (1). 2. Shut down through the operating system.... 3. Reverse this procedure to install the Bluetooth module. 50 Chapter 4 Removal and replacement procedures Bluetooth module Description Bluetooth module Spare part number 537921-001 Before removing the Bluetooth module, follow these steps: 1. Hard drive (see Keyboard on page 39) c.


