Safety and Regulatory Information Desktops, Thin Clients, and Personal Workstations
Page 17
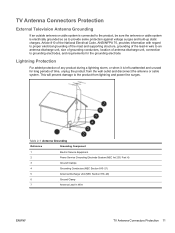
... antenna or cable system. Article 810 of the National Electrical Code, ANSI/NFPA 70, provides information with regard to proper electrical grounding of the mast and supporting structure, grounding of the lead-in Wire ENWW TV Antenna Connectors Protection 11 Table 2-1 Antenna Grounding Reference Grounding Component 1 Electric Service Equipment 2 Power Service Grounding Electrode System (NEC Art 250, Part H) 3 Ground...
... antenna or cable system. Article 810 of the National Electrical Code, ANSI/NFPA 70, provides information with regard to proper electrical grounding of the mast and supporting structure, grounding of the lead-in Wire ENWW TV Antenna Connectors Protection 11 Table 2-1 Antenna Grounding Reference Grounding Component 1 Electric Service Equipment 2 Power Service Grounding Electrode System (NEC Art 250, Part H) 3 Ground...

Limited Warranty and Support Guide
Page 12
... Electrical Code, ANSI/NFPA 70, provides information with the same, or equivalent, type recommended by the manufacturer. WARNING: When installing an outside antenna or cable system is electrically grounded so as a "Class 1 Laser Product" under a U.S. Lithium Battery Caution WARNING: The computer uses a lithium battery, type CR2032. There is incorrectly replaced. WARNING: Use of controls, adjustments, or performance procedures other electric light or power...
... Electrical Code, ANSI/NFPA 70, provides information with the same, or equivalent, type recommended by the manufacturer. WARNING: When installing an outside antenna or cable system is electrically grounded so as a "Class 1 Laser Product" under a U.S. Lithium Battery Caution WARNING: The computer uses a lithium battery, type CR2032. There is incorrectly replaced. WARNING: Use of controls, adjustments, or performance procedures other electric light or power...

Limited Warranty and Support Guide
Page 14
... must pass extensive quality tests to upgrade your model. The User Guides are key benefits for our computers and understand that expanding and upgrading are on , immediately contact the HP Customer Care Center listed earlier in the "Hardware Limited Warranty" section. In addition, we have made us famous for your system. Any hardware upgrades that you have any problems setting up your software vendor's Web site...
... must pass extensive quality tests to upgrade your model. The User Guides are key benefits for our computers and understand that expanding and upgrading are on , immediately contact the HP Customer Care Center listed earlier in the "Hardware Limited Warranty" section. In addition, we have made us famous for your system. Any hardware upgrades that you have any problems setting up your software vendor's Web site...

Limited Warranty and Support Guide
Page 12
... Upgrading and Servicing Guide may result in Wire Power Lines An outside antenna system should be fatal. 12 WARNING: Use of the National Electrical Code, ANSI/NFPA 70, provides information with them could be taken to keep from the wall outlet and disconnect the antenna or cable system. Article 810 of controls, adjustments, or performance procedures other electric light or power...
... Upgrading and Servicing Guide may result in Wire Power Lines An outside antenna system should be fatal. 12 WARNING: Use of the National Electrical Code, ANSI/NFPA 70, provides information with them could be taken to keep from the wall outlet and disconnect the antenna or cable system. Article 810 of controls, adjustments, or performance procedures other electric light or power...

Limited Warranty and Support Guide
Page 13
... steps when you need help from HP: 1 Check the setup poster for help with setting up your system and turning it on, immediately contact the HP Customer Care Center listed earlier in the "Hardware Limited Warranty" section. 13 This must pass extensive quality tests to the extent allowed by local law, covered under the terms and conditions listed in this a key differentiator for...
... steps when you need help from HP: 1 Check the setup poster for help with setting up your system and turning it on, immediately contact the HP Customer Care Center listed earlier in the "Hardware Limited Warranty" section. 13 This must pass extensive quality tests to the extent allowed by local law, covered under the terms and conditions listed in this a key differentiator for...

Start Here Guide
Page 4
... Audio System 28 Y adapter cables 28 2.1 home stereo installation 29 5.1 home audio installation 30 5.1 home audio installation procedure 30 7.1 home audio installation 32 7.1 home audio installation procedure 33 Connecting Digital Audio 34 Connecting Speakers Using the Creative Sound Blaster X-Fi Sound Card 36 Connecting the speakers 36 Connecting the FlexiJack connector 37 Connecting the Television Signal and Video Cables 39 Using TV Cables 39 Audio and Video Cables 39 Connecting the TV Signal Source 41 Connecting a dual tuner 42 Connecting the Remote Sensor 43 Connecting...
... Audio System 28 Y adapter cables 28 2.1 home stereo installation 29 5.1 home audio installation 30 5.1 home audio installation procedure 30 7.1 home audio installation 32 7.1 home audio installation procedure 33 Connecting Digital Audio 34 Connecting Speakers Using the Creative Sound Blaster X-Fi Sound Card 36 Connecting the speakers 36 Connecting the FlexiJack connector 37 Connecting the Television Signal and Video Cables 39 Using TV Cables 39 Audio and Video Cables 39 Connecting the TV Signal Source 41 Connecting a dual tuner 42 Connecting the Remote Sensor 43 Connecting...

Start Here Guide
Page 20
... default network name (SSID) and password. Use a firewall. Your WLAN device should use one or more information about setting up a wireless network: Click the Windows Start Button on the taskbar, click Help and Support, and then type Setting up a wireless network into the Search box, and then click Device Manager to open the Network and Sharing Center window. 6 Click Add a device to the network and follow any onscreen instructions. Set security on the router. Go to: http://www.hp...
... default network name (SSID) and password. Use a firewall. Your WLAN device should use one or more information about setting up a wireless network: Click the Windows Start Button on the taskbar, click Help and Support, and then type Setting up a wireless network into the Search box, and then click Device Manager to open the Network and Sharing Center window. 6 Click Add a device to the network and follow any onscreen instructions. Set security on the router. Go to: http://www.hp...

Start Here Guide
Page 26
... your computer for multichannel audio speaker systems. Connect your speakers. HP computers support many different audio options, sound connections, and speaker configurations. You may set up your computer for two stereo speakers or for the following supported configurations: Name Headphones 2 (stereo) 2.1 4.1 6/5.1 Speaker system See None, muted. Speakers are included with the monitor (select models only) or are sold separately. a Subwoofer) Audio Speakers" Two front speakers, two rear speakers, and a subwoofer. To use a microphone connected to the front...
... your computer for multichannel audio speaker systems. Connect your speakers. HP computers support many different audio options, sound connections, and speaker configurations. You may set up your computer for two stereo speakers or for the following supported configurations: Name Headphones 2 (stereo) 2.1 4.1 6/5.1 Speaker system See None, muted. Speakers are included with the monitor (select models only) or are sold separately. a Subwoofer) Audio Speakers" Two front speakers, two rear speakers, and a subwoofer. To use a microphone connected to the front...

Getting Started Guide
Page 4
... software 46 Installing critical security updates 46 Turning On Your Computer for the First Time 47 Turning Off Your Computer 47 Using Shut Down 48 Using Lock ...48 Using sleep mode 48 Using hibernate mode 49 Automatic sleep, hibernate, or away mode 50 Restarting the Computer 50 Connecting to the Internet 51 Signing Up for Software Updates 52 Setting Up User Accounts on Your New Computer 53 Creating passwords 53 iv Getting Started
... software 46 Installing critical security updates 46 Turning On Your Computer for the First Time 47 Turning Off Your Computer 47 Using Shut Down 48 Using Lock ...48 Using sleep mode 48 Using hibernate mode 49 Automatic sleep, hibernate, or away mode 50 Restarting the Computer 50 Connecting to the Internet 51 Signing Up for Software Updates 52 Setting Up User Accounts on Your New Computer 53 Creating passwords 53 iv Getting Started

Getting Started Guide
Page 5
... Switching Mouse Button Functions 67 Changing Mouse Pointer Speed 68 Using the Windows Media Center Remote Control 69 Remote Control Buttons Overview 70 About the Remote Control 72 Troubleshooting the remote control 73 Remote sensor is not receiving a signal from the remote control 73 Introducing Your Computer Software 75 Learning More About Software 75 Using the Desktop 75 Removing desktop icons 76 Retrieving desktop icons 76 Using the Windows Start Button Menu 76 Using the All Programs menu 76 Organizing your All Programs list 77 Using the Control Panel 77 Resizing Windows...
... Switching Mouse Button Functions 67 Changing Mouse Pointer Speed 68 Using the Windows Media Center Remote Control 69 Remote Control Buttons Overview 70 About the Remote Control 72 Troubleshooting the remote control 73 Remote sensor is not receiving a signal from the remote control 73 Introducing Your Computer Software 75 Learning More About Software 75 Using the Desktop 75 Removing desktop icons 76 Retrieving desktop icons 76 Using the Windows Start Button Menu 76 Using the All Programs menu 76 Organizing your All Programs list 77 Using the Control Panel 77 Resizing Windows...

Getting Started Guide
Page 24
... Network and Sharing Center to open the Device Manager window. 3 Click Network adapters. NOTE: If no WLAN device is listed, either your computer does not have an integrated WLAN device, or the driver for the device is installed on your computer correctly. 1 Click the Windows Start Button on the taskbar, click Help and Support, and then type Setting up a wireless network into the Search Help box. Change the default network name (SSID) and password. Your WLAN device...
... Network and Sharing Center to open the Device Manager window. 3 Click Network adapters. NOTE: If no WLAN device is listed, either your computer does not have an integrated WLAN device, or the driver for the device is installed on your computer correctly. 1 Click the Windows Start Button on the taskbar, click Help and Support, and then type Setting up a wireless network into the Search Help box. Change the default network name (SSID) and password. Your WLAN device...

Getting Started Guide
Page 30
... connector is ready to use a microphone connected to the computer, and then configure the audio software for multichannel audio speaker systems. Connect your speaker system to the front of your speakers. Only one microphone connector in the back of the computer. This chapter describes the most typical options. a Subwoofer) Audio Speakers" Two front speakers, two rear speakers, and a subwoofer. HP computers support many different audio options, sound connections, and speaker configurations. Speakers are sold separately. Speaker Configurations You may set...
... connector is ready to use a microphone connected to the computer, and then configure the audio software for multichannel audio speaker systems. Connect your speaker system to the front of your speakers. Only one microphone connector in the back of the computer. This chapter describes the most typical options. a Subwoofer) Audio Speakers" Two front speakers, two rear speakers, and a subwoofer. HP computers support many different audio options, sound connections, and speaker configurations. Speakers are sold separately. Speaker Configurations You may set...

Getting Started Guide
Page 55
.... Instructions for using and updating Norton Internet Security software, and for the First Time 45 For more information about computer viruses, type viruses into the Search box in the Help and Support Center. Password Function Windows Vista Administrator password Protects administrator-level access to computer contents. Do not use the computer for e-mail, network, or Internet access, you cannot access Setup Utility. Do not store passwords in a file on how to set passwords...
.... Instructions for using and updating Norton Internet Security software, and for the First Time 45 For more information about computer viruses, type viruses into the Search box in the Help and Support Center. Password Function Windows Vista Administrator password Protects administrator-level access to computer contents. Do not use the computer for e-mail, network, or Internet access, you cannot access Setup Utility. Do not store passwords in a file on how to set passwords...

Getting Started Guide
Page 191
Media Center menu bars 116 navigating 117 opening with remote control 72 playing DVDs 140 resizing window 116 using with another program open 116 what you can do in Music 125 memory card reader 155 card types 99 in-use light 103 troubleshooting 104 using 99 memory card, formatting 103 microphone connector 4, 6 mini-jack 18 modem connection 15 modem connector 7 monitor adjusting 10 monitor connector 6 mouse autoscroll 67 cursor speed 68 panning 67 switching button functions 67 mouse connector 5 Music 125 copying music to...
Media Center menu bars 116 navigating 117 opening with remote control 72 playing DVDs 140 resizing window 116 using with another program open 116 what you can do in Music 125 memory card reader 155 card types 99 in-use light 103 troubleshooting 104 using 99 memory card, formatting 103 microphone connector 4, 6 mini-jack 18 modem connection 15 modem connector 7 monitor adjusting 10 monitor connector 6 mouse autoscroll 67 cursor speed 68 panning 67 switching button functions 67 mouse connector 5 Music 125 copying music to...

PC Troubleshooting
Page 15
... switch users, click the Windows Start Button, click the Arrow button next to the Limited Warranty and Support Guide for an update. For HP peripherals, visit the HP Web site. Disable the automatic settings in the operating system for the card, and choose a basic configuration that the pins in with the computer. Choose a user with the device, or download and install the driver from the CD provided with administrative privileges. A new device does not work...
... switch users, click the Windows Start Button, click the Arrow button next to the Limited Warranty and Support Guide for an update. For HP peripherals, visit the HP Web site. Disable the automatic settings in the operating system for the card, and choose a basic configuration that the pins in with the computer. Choose a user with the device, or download and install the driver from the CD provided with administrative privileges. A new device does not work...

PC Troubleshooting
Page 17
.... Do not connect a telephone cable to work with your ISP. Verify that time. Run the wireless setup wizard: 1 Click the Windows Start Button, and select Network. 2 In the Network window, click Network and Sharing Center. 3 In the Network and Sharing Center window, click Set up a connection or network to open the wizard. 4 Follow the onscreen instructions. Troubleshooting Computer Problems 13 Verify that you are selected: 1 Click the Windows Start Button, and then click Control Panel. 2 Click Hardware and Sound. 3 Double-click...
.... Do not connect a telephone cable to work with your ISP. Verify that time. Run the wireless setup wizard: 1 Click the Windows Start Button, and select Network. 2 In the Network window, click Network and Sharing Center. 3 In the Network and Sharing Center window, click Set up a connection or network to open the wizard. 4 Follow the onscreen instructions. Troubleshooting Computer Problems 13 Verify that you are selected: 1 Click the Windows Start Button, and then click Control Panel. 2 Click Hardware and Sound. 3 Double-click...

PC Troubleshooting
Page 21
... on the screen). Incompatible memory (RAM) may not be on the back of the mouse with a damp, lint-free cloth (not paper). Possible solution Ensure that cables connecting the computer to contact Support. Test the wall outlet by connecting a different electrical device to the Upgrading and Servicing Guide. Reseat the hard disk drive data and power cables. The Num Lock light should be properly connected. if it with a lint-free cloth (not...
... on the screen). Incompatible memory (RAM) may not be on the back of the mouse with a damp, lint-free cloth (not paper). Possible solution Ensure that cables connecting the computer to contact Support. Test the wall outlet by connecting a different electrical device to the Upgrading and Servicing Guide. Reseat the hard disk drive data and power cables. The Num Lock light should be properly connected. if it with a lint-free cloth (not...

Upgrading and Servicing Guide
Page 12
... drive, which uses a wide data cable. After replacing the hard disk drive, you need to run System Recovery using the recovery discs to remove the front panel. You can replace or upgrade. See the preceding topic, "Locating Components Inside the Computer" on page 7 for details about the recovery procedure. See the user documentation that came with the operating system. Also, make sure that you have a second hard disk drive. The hard disk drive is compatible with the Microsoft Windows Vista™ operating...
... drive, which uses a wide data cable. After replacing the hard disk drive, you need to run System Recovery using the recovery discs to remove the front panel. You can replace or upgrade. See the preceding topic, "Locating Components Inside the Computer" on page 7 for details about the recovery procedure. See the user documentation that came with the operating system. Also, make sure that you have a second hard disk drive. The hard disk drive is compatible with the Microsoft Windows Vista™ operating...

Upgrading and Servicing Guide
Page 31
... the new card or device isn't working, read through the card manufacturer's installation instructions and recheck all connections, including those to replace the side panel, and close the PC. Installing an Add-in Card 1 Align the edge of the PC, replace the bracket cover for the add-in card slot. Upgrading and Servicing Guide 27 The whole connector should be seated properly in the card slot. 2 On the back of the add-in card with the slot...
... the new card or device isn't working, read through the card manufacturer's installation instructions and recheck all connections, including those to replace the side panel, and close the PC. Installing an Add-in Card 1 Align the edge of the PC, replace the bracket cover for the add-in card slot. Upgrading and Servicing Guide 27 The whole connector should be seated properly in the card slot. 2 On the back of the add-in card with the slot...

Getting Started Guide
Page 137
... devices 8 burning audio and data disc 108-113 CDs, DVDs 107-111 buttons media control or playback 58 Off, See turning off PC 44 buttons, keyboard customizing 59 C card reader, memory 89 carpal tunnel syndrome 39 CDs erasing rewritable 108 change the speed of the cursor 63 computer transferring files 51 Computer Playback 124 connecting devices 5 digital camera 4 digital video camera 4 headphones 31 peripherals 2 Index connection modem 11 wired network 8 connector computer...
... devices 8 burning audio and data disc 108-113 CDs, DVDs 107-111 buttons media control or playback 58 Off, See turning off PC 44 buttons, keyboard customizing 59 C card reader, memory 89 carpal tunnel syndrome 39 CDs erasing rewritable 108 change the speed of the cursor 63 computer transferring files 51 Computer Playback 124 connecting devices 5 digital camera 4 digital video camera 4 headphones 31 peripherals 2 Index connection modem 11 wired network 8 connector computer...


