

User Guide
Page 2
... upgraded and/or separately purchased hardware, drivers, software or BIOS update to change without notice. To access the latest user guides, go to http://www.hp.com/support, and follow the instructions to most models. If you agree to request a full refund of the price of your seller. Windows 10 is automatically updated, which is subject to take full advantage of Windows. First Edition: March 2019 Document Part Number...
... upgraded and/or separately purchased hardware, drivers, software or BIOS update to change without notice. To access the latest user guides, go to http://www.hp.com/support, and follow the instructions to most models. If you agree to request a full refund of the price of your seller. Windows 10 is automatically updated, which is subject to take full advantage of Windows. First Edition: March 2019 Document Part Number...
User Guide
Page 5
...14 Changing BIOS Settings from the HP BIOS Configuration Utility (HPBCU 14 Updating or restoring a BIOS ...15 Diagnostics and troubleshooting ...16 Power lights ...16 Wake-on LAN ...16 Power-On Sequence ...17 Power-on diagnostic tests ...17 Interpreting POST diagnostic front panel lights and audible codes 17 Troubleshooting ...19 Basic troubleshooting ...19 Diskless (no flash) model troubleshooting 20 v Security 12 Computer Setup - Table of contents 1 Hardware Reference ...1 Product features ...1 Front components ...1 Rear components ...2 Serial number location ...2 Setup ...3 Warnings...
...14 Changing BIOS Settings from the HP BIOS Configuration Utility (HPBCU 14 Updating or restoring a BIOS ...15 Diagnostics and troubleshooting ...16 Power lights ...16 Wake-on LAN ...16 Power-On Sequence ...17 Power-on diagnostic tests ...17 Interpreting POST diagnostic front panel lights and audible codes 17 Troubleshooting ...19 Basic troubleshooting ...19 Diskless (no flash) model troubleshooting 20 v Security 12 Computer Setup - Table of contents 1 Hardware Reference ...1 Product features ...1 Front components ...1 Rear components ...2 Serial number location ...2 Setup ...3 Warnings...

User Guide
Page 6
Configuring a PXE server ...21 Using HP ThinUpdate to restore the image ...21 Device management ...22 Power cord set requirements ...22 Requirements for all countries ...23 Requirements for specific countries and regions 23 Statement of Volatility ...24 Specifications ...26 3 Using HP PC Hardware Diagnostics ...27 Using HP PC Hardware Diagnostics Windows (select products only 27 Downloading HP PC Hardware Diagnostics Windows 27 Downloading the latest HP PC Hardware Diagnostics Windows version 28 Downloading HP Hardware Diagnostics Windows by product name or number (select products only) ...
Configuring a PXE server ...21 Using HP ThinUpdate to restore the image ...21 Device management ...22 Power cord set requirements ...22 Requirements for all countries ...23 Requirements for specific countries and regions 23 Statement of Volatility ...24 Specifications ...26 3 Using HP PC Hardware Diagnostics ...27 Using HP PC Hardware Diagnostics Windows (select products only 27 Downloading HP PC Hardware Diagnostics Windows 27 Downloading the latest HP PC Hardware Diagnostics Windows version 28 Downloading HP Hardware Diagnostics Windows by product name or number (select products only) ...

User Guide
Page 18
... factory system defaults. 10 Chapter 2 Troubleshooting Press either Esc or F10 while the "Press the ESC key for processor, graphics, memory, audio, storage, communications, and input devices. ● Modify the boot order of Power-On Self-Test (POST) messages. NOTE: If you must restart the computer and again press Esc or F10 when the monitor light turns green to access the utility. 3. 2 Troubleshooting Computer Setup (F10) Utility, BIOS Settings Computer Setup (F10) Utilities Use Computer Setup...
... factory system defaults. 10 Chapter 2 Troubleshooting Press either Esc or F10 while the "Press the ESC key for processor, graphics, memory, audio, storage, communications, and input devices. ● Modify the boot order of Power-On Self-Test (POST) messages. NOTE: If you must restart the computer and again press Esc or F10 when the monitor light turns green to access the utility. 3. 2 Troubleshooting Computer Setup (F10) Utility, BIOS Settings Computer Setup (F10) Utilities Use Computer Setup...
User Guide
Page 20
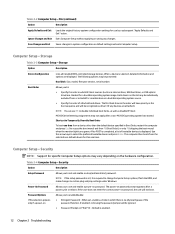
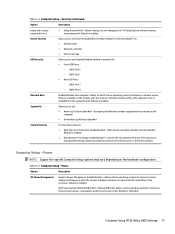
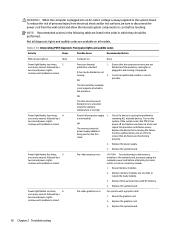
... non-default device for specific Computer Setup options may be recognized as a bootable operating system source. ● Specify the order of attached hard drives. Security NOTE: Support for this one time from or included for use F5 to disable individual boot items, as well as a internal drive, USB hard drive, or USB optical drive) are checked for a bootable operating system image. Power-On Password Allows you to certain plug and play settings under Windows. Table 2-2 Computer Setup - Ignore Changes...
... non-default device for specific Computer Setup options may be recognized as a bootable operating system source. ● Specify the order of attached hard drives. Security NOTE: Support for this one time from or included for use F5 to disable individual boot items, as well as a internal drive, USB hard drive, or USB optical drive) are checked for a bootable operating system image. Power-On Password Allows you to certain plug and play settings under Windows. Table 2-2 Computer Setup - Ignore Changes...
User Guide
Page 21
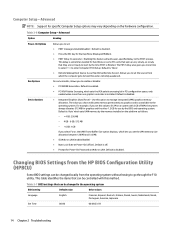
... (enable/disable) - Table 2-4 Computer Setup - USB3 Port 1 ● Rear USB Ports - Computer Setup - Default is enabled. ● Virtualization Technology (enable/disable) - Security (continued) Option Description password or setup password is disabled. USB2 Port 2 - USB2 Port 3 - the network controller must be either a PCI expansion card or embedded on NIC models only; Changing this setting requires turning the computer off and then back on the hardware configuration. Default is set.) ● Setup Browse Mode - Power NOTE: Support for : ● Front USB Ports...
... (enable/disable) - Table 2-4 Computer Setup - USB3 Port 1 ● Rear USB Ports - Computer Setup - Default is enabled. ● Virtualization Technology (enable/disable) - Security (continued) Option Description password or setup password is disabled. USB2 Port 2 - USB2 Port 3 - the network controller must be either a PCI expansion card or embedded on NIC models only; Changing this setting requires turning the computer off and then back on the hardware configuration. Default is set.) ● Setup Browse Mode - Power NOTE: Support for : ● Front USB Ports...
User Guide
Page 22
This delay is finished. Default is disabled. ● Integrated Graphics (Auto/Force) - Bus Options Device Options On some PCI cards that spin up very slowly, so slowly that they are not ready to start by the BIOS and operating system. Default is 'None'. ● Remote Wakeup Boot Source (Local Hard Drive/Remote Server). Default is 'Auto' which sets UMA memory by the memory installed on the platform as follows: - < 4 GB: 256 MB - 4 GB - 6 GB...
This delay is finished. Default is disabled. ● Integrated Graphics (Auto/Force) - Bus Options Device Options On some PCI cards that spin up very slowly, so slowly that they are not ready to start by the BIOS and operating system. Default is 'None'. ● Remote Wakeup Boot Source (Local Hard Drive/Remote Server). Default is 'Auto' which sets UMA memory by the memory installed on the platform as follows: - < 4 GB: 256 MB - 4 GB - 6 GB...
User Guide
Page 23
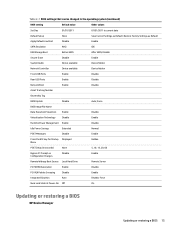
... Hard Drive Remote Server PCI SERR# Generation Enable Disable PCI VGA Palette Snooping Disable Enable Integrated Graphics Auto Disable, Force Num Lock State at Power- Disable Secure Erase Disable Enable System Audio Device available Device hidden Network Controller Device available Device hidden Front USB Ports Enable Disable Rear USB Ports Enable Disable Network Boot Enable Disable Asset Tracking Number Ownership Tag BIOS Update Disable Auto; On Off On Updating or restoring a BIOS HP Device Manager Updating or restoring a BIOS 15 Restore Factory Settings...
... Hard Drive Remote Server PCI SERR# Generation Enable Disable PCI VGA Palette Snooping Disable Enable Integrated Graphics Auto Disable, Force Num Lock State at Power- Disable Secure Erase Disable Enable System Audio Device available Device hidden Network Controller Device available Device hidden Front USB Ports Enable Disable Rear USB Ports Enable Disable Network Boot Enable Disable Asset Tracking Number Ownership Tag BIOS Update Disable Auto; On Off On Updating or restoring a BIOS HP Device Manager Updating or restoring a BIOS 15 Restore Factory Settings...

User Guide
Page 24
... storage device, and then turn on the system. Power light on Displays during start sequence, hardware initialization is on. During start sequence and while the thin client is processed and startup tests are located inside the RJ-45 connector on the top, rear panel of the hard drive and any of a failed BIOS update (for a compatible binary image. Copy the binary (.bin) file in Computer Setup using the S5 Wake on LAN setting. If the BIOS...
... storage device, and then turn on the system. Power light on Displays during start sequence, hardware initialization is on. During start sequence and while the thin client is processed and startup tests are located inside the RJ-45 connector on the top, rear panel of the hard drive and any of a failed BIOS update (for a compatible binary image. Copy the binary (.bin) file in Computer Setup using the S5 Wake on LAN setting. If the BIOS...

User Guide
Page 25
... either enabled or disabled. 6. Initializes CPU and memory controller. 2. Initializes the video to determine its functionality and configuration. Power-on diagnostic tests The Power-on LAN to accept any changes. 7. Power-On Sequence At power-on, firmware initializes the hardware to a known state, then performs basic power-on the thin client. There are performed on diagnostic tests to video. Starts the operating system. Table 2-9 Power-on diagnostic tests Test Description Boot Block Checksum DRAM Timer RTC CMOS battery Tests boot block code for...
... either enabled or disabled. 6. Initializes CPU and memory controller. 2. Initializes the video to determine its functionality and configuration. Power-on diagnostic tests The Power-on LAN to accept any changes. 7. Power-On Sequence At power-on, firmware initializes the hardware to a known state, then performs basic power-on the thin client. There are performed on diagnostic tests to video. Starts the operating system. Table 2-9 Power-on diagnostic tests Test Description Boot Block Checksum DRAM Timer RTC CMOS battery Tests boot block code for...
User Guide
Page 26
... external power supply adapter is solved. Pre-video memory error. Reseat memory modules. 2. Lights continue until problem is solved. turning. 2. Lights continue until problem is solved. is causing the failure. Replace the device that all models. Lights continue until failure occurs. None Processor thermal 1. OR The heat sink/fan assembly is always applied to the processor. Check if a device is solved. Replace the power supply. 3. Replace third-party memory with a graphics card: 1. Reseat the graphics card. 2. Replace the system board...
... external power supply adapter is solved. Pre-video memory error. Reseat memory modules. 2. Lights continue until problem is solved. turning. 2. Lights continue until problem is solved. is causing the failure. Replace the device that all models. Lights continue until failure occurs. None Processor thermal 1. OR The heat sink/fan assembly is always applied to the processor. Check if a device is solved. Replace the power supply. 3. Replace third-party memory with a graphics card: 1. Reseat the graphics card. 2. Replace the system board...

User Guide
Page 27
... connect to the server, re-image the thin client. Remove the power cord from the system board. Verify that the thin client is solved. The thin client powers on bad checksum. 1. If the hard drive light turns red, the power button is plugged into the thin client: Power connector, keyboard, mouse, network RJ-45 connector, display The thin client does not turn on and lights are securely plugged into the power supply. 4. If the power supply does not work...
... connect to the server, re-image the thin client. Remove the power cord from the system board. Verify that the thin client is solved. The thin client powers on bad checksum. 1. If the hard drive light turns red, the power button is plugged into the thin client: Power connector, keyboard, mouse, network RJ-45 connector, display The thin client does not turn on and lights are securely plugged into the power supply. 4. If the power supply does not work...
User Guide
Page 28
... or USB peripherals connected prior to the thin client with a known working power supply cable and testing it with a working monitor. Video does not display. 1. If the monitor does not display video, replace the thin client. GUID General system board information If no ATA Flash in this model, the boot priority sequence is good, then re-image the thin client. 5. Client ID Information from server If no network connection. Contact support for service for service. If the monitor...
... or USB peripherals connected prior to the thin client with a known working power supply cable and testing it with a working monitor. Video does not display. 1. If the monitor does not display video, replace the thin client. GUID General system board information If no ATA Flash in this model, the boot priority sequence is good, then re-image the thin client. 5. Client ID Information from server If no network connection. Contact support for service for service. If the monitor...
User Guide
Page 29
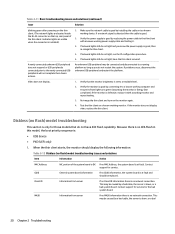
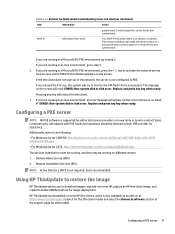
... bootable USB flash drives for image deployment. Configuring a PXE server NOTE: All PXE software is supported by a bad cable, the server is no Client IP. Additionally, refer to download images and add-ons from server If no flash) model troubleshooting issues and solutions (continued) Item Information Action system board. If you are running in a Microsoft RIS PXE environment, press the F12 key to their PXE provider for that is no network connection. Replace...
... bootable USB flash drives for image deployment. Configuring a PXE server NOTE: All PXE software is supported by a bad cable, the server is no Client IP. Additionally, refer to download images and add-ons from server If no flash) model troubleshooting issues and solutions (continued) Item Information Action system board. If you are running in a Microsoft RIS PXE environment, press the F12 key to their PXE provider for that is no network connection. Replace...
User Guide
Page 30
... USB Drive Management feature lets you do not support this restore method. For more information. HP Device Manager is used to manage the full life cycle of USB flash drives available on local storage - Power cord sets for use the tool on Downloads feature lets you download add-ons from HP to either local storage or a USB flash drive. System requirements To create a recovery device for use a bootable USB flash drive created with HP ThinUpdate to deploy an HP thin client image...
... USB Drive Management feature lets you do not support this restore method. For more information. HP Device Manager is used to manage the full life cycle of USB flash drives available on local storage - Power cord sets for use the tool on Downloads feature lets you download add-ons from HP to either local storage or a USB flash drive. System requirements To create a recovery device for use a bootable USB flash drive created with HP ThinUpdate to deploy an HP thin client image...

User Guide
Page 32
... bear the BSMI certification mark. 7. Power cord set fittings (appliance coupler, cable, and wall plug) must be Type H05VV-F 3-conductor, 0.75 mm² conductor size. RAM, ROM, and flash memory. Data stored in ROM or flash memory devices is retained even if the power is not connected to a traditional IDE/SATA hard drive. RAM devices can only be powered by main, aux, or battery power. Definition of the operating system and can be written...
... bear the BSMI certification mark. 7. Power cord set fittings (appliance coupler, cable, and wall plug) must be Type H05VV-F 3-conductor, 0.75 mm² conductor size. RAM, ROM, and flash memory. Data stored in ROM or flash memory devices is retained even if the power is not connected to a traditional IDE/SATA hard drive. RAM devices can only be powered by main, aux, or battery power. Definition of the operating system and can be written...
User Guide
Page 33
...key to factory default settings: 1. The passwords are removed and all other user-configurable, non-volatile memory settings are reset to their factory default values. After several seconds, replace the battery. 9. Table 2-14 Available memory devices and types Description Location/size Power System boot ROM (BIOS) SPI ROM (64 Mb) nonsocketed, nonremovable System memory (RAM) SODIMM socket. Download the latest BIOS for HP products and services are supported One Time Programmable memory (OTP) Use the following steps to update and reset BIOS to enter BIOS setup utility...
...key to factory default settings: 1. The passwords are removed and all other user-configurable, non-volatile memory settings are reset to their factory default values. After several seconds, replace the battery. 9. Table 2-14 Available memory devices and types Description Location/size Power System boot ROM (BIOS) SPI ROM (64 Mb) nonsocketed, nonremovable System memory (RAM) SODIMM socket. Download the latest BIOS for HP products and services are supported One Time Programmable memory (OTP) Use the following steps to update and reset BIOS to enter BIOS setup utility...

User Guide
Page 35
... mobile device, scan the code and then follow the on-screen instructions. ● A Quick Response (QR) code is not installed on -screen instructions. Using HP PC Hardware Diagnostics Windows (select products only) 27 3 Using HP PC Hardware Diagnostics Using HP PC Hardware Diagnostics Windows (select products only) HP PC Hardware Diagnostics Windows is a Windows-based utility that requires hardware replacement, a 24-digit Failure ID code is displayed. To access HP PC Hardware Diagnostics Windows from HP Help and Support: a. The screen displays one of diagnostic test you need...
... mobile device, scan the code and then follow the on-screen instructions. ● A Quick Response (QR) code is not installed on -screen instructions. Using HP PC Hardware Diagnostics Windows (select products only) 27 3 Using HP PC Hardware Diagnostics Using HP PC Hardware Diagnostics Windows (select products only) HP PC Hardware Diagnostics Windows is a Windows-based utility that requires hardware replacement, a 24-digit Failure ID code is displayed. To access HP PC Hardware Diagnostics Windows from HP Help and Support: a. The screen displays one of diagnostic test you need...
User Guide
Page 36
... Diagnostics section, select Download, and then follow the on the next screen. When HP PC Hardware Diagnostics Windows detects a failure that displays on -screen instructions to select the specific Windows diagnostics version to be necessary to download the software to download and create the HP UEFI support environment because only .exe files are caused by using the product name or number. For assistance in . Service Center page displays, with your computer or a USB flash drive. To download HP PC Hardware Diagnostics Windows...
... Diagnostics section, select Download, and then follow the on the next screen. When HP PC Hardware Diagnostics Windows detects a failure that displays on -screen instructions to select the specific Windows diagnostics version to be necessary to download the software to download and create the HP UEFI support environment because only .exe files are caused by using the product name or number. For assistance in . Service Center page displays, with your computer or a USB flash drive. To download HP PC Hardware Diagnostics Windows...
User Guide
Page 48
... 26 disabling/enabling Wake-on LAN (WOL) 16 diskless troubleshooting 20 E error codes 17 F File menu 11 flashing lights 17 H hardware specifications 26 HP Assistive Policy 33 HP BIOS Configuration Utility (HPBCU) 14 HP PC Hardware Diagnostics UEFI downloading 29 starting 29 using 28 HP PC Hardware Diagnostics Windows downloading 27 installing 28 using 27 HP ThinUpdate 21 humidity specifications 26 I installation guidelines 3 installing mounting bracket 4 security cable 4 International Association of Accessibility Professionals 33 L lights 16 blinking power 17 M M.2 storage module, removing 32...
... 26 disabling/enabling Wake-on LAN (WOL) 16 diskless troubleshooting 20 E error codes 17 F File menu 11 flashing lights 17 H hardware specifications 26 HP Assistive Policy 33 HP BIOS Configuration Utility (HPBCU) 14 HP PC Hardware Diagnostics UEFI downloading 29 starting 29 using 28 HP PC Hardware Diagnostics Windows downloading 27 installing 28 using 27 HP ThinUpdate 21 humidity specifications 26 I installation guidelines 3 installing mounting bracket 4 security cable 4 International Association of Accessibility Professionals 33 L lights 16 blinking power 17 M M.2 storage module, removing 32...


