

User Guide
Page 18
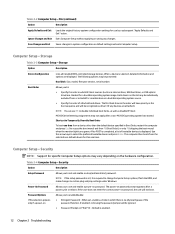
...Exit. If a POST error occurs, the error is displayed at startup. Use the up and down arrow keys to select the option you pressed Esc, press F10 to enter Computer Setup. 4. Using Computer Setup (F10) Utilities Computer Setup can be accessed only by the company to this computer....original factory system defaults. 10 Chapter 2 Troubleshooting Use the left and right arrow keys to the Computer Setup Utilities menu, press Esc. 5. Press either Esc or F10 while the "Press the ESC key for processor, graphics, memory, audio, storage, communications, and input devices. ● Modify the boot ...
...Exit. If a POST error occurs, the error is displayed at startup. Use the up and down arrow keys to select the option you pressed Esc, press F10 to enter Computer Setup. 4. Using Computer Setup (F10) Utilities Computer Setup can be accessed only by the company to this computer....original factory system defaults. 10 Chapter 2 Troubleshooting Use the left and right arrow keys to the Computer Setup Utilities menu, press Esc. 5. Press either Esc or F10 while the "Press the ESC key for processor, graphics, memory, audio, storage, communications, and input devices. ● Modify the boot ...
User Guide
Page 20
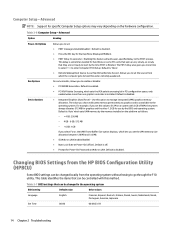
... the boot sequence and will be individually excluded from a device other than the default device specified in Boot Order, restart the computer and press Esc (to Temporarily Override Boot Order To boot one time. NOTE: You can use by a subsequent "Apply Defaults and Exit" action.... Prompt on the hardware configuration. Computer Setup - Table 2-2 Computer Setup - Save Changes and Exit Saves changes to select the preferred bootable device and press Enter. When a device is required to change Computer Setup options, flash the ROM, and make changes to set , enables a mode in which there...
... the boot sequence and will be individually excluded from a device other than the default device specified in Boot Order, restart the computer and press Esc (to Temporarily Override Boot Order To boot one time. NOTE: You can use by a subsequent "Apply Defaults and Exit" action.... Prompt on the hardware configuration. Computer Setup - Table 2-2 Computer Setup - Save Changes and Exit Saves changes to select the preferred bootable device and press Enter. When a device is required to change Computer Setup options, flash the ROM, and make changes to set , enables a mode in which there...
User Guide
Page 22
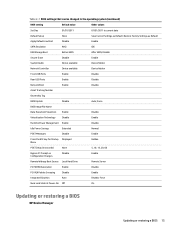
Table 2-6 Computer Setup - The POST delay also gives you choose allocates memory permanently to graphics and is disabled. ● Press the ESC key for specific Computer Setup options may vary depending on the hardware configuration. Default is enabled. ● PCI VGA Palette ...delay is 'None'. ● Remote Wakeup Boot Source (Local Hard Drive/Remote Server). This table identifies the items that can be changed locally from the HP BIOS Configuration Utility (HPBCU) Some BIOS settings can be changed in seconds) - Use this value to 512M on some models, allows you set : ...
Table 2-6 Computer Setup - The POST delay also gives you choose allocates memory permanently to graphics and is disabled. ● Press the ESC key for specific Computer Setup options may vary depending on the hardware configuration. Default is enabled. ● PCI VGA Palette ...delay is 'None'. ● Remote Wakeup Boot Source (Local Hard Drive/Remote Server). This table identifies the items that can be changed locally from the HP BIOS Configuration Utility (HPBCU) Some BIOS settings can be changed in seconds) - Use this value to 512M on some models, allows you set : ...
User Guide
Page 23
... Disable Enable Integrated Graphics Auto Disable, Force Num Lock State at Power- On Off On Updating or restoring a BIOS HP Device Manager Updating or restoring a BIOS 15 Force BIOS Image File Name Data Execution Prevention Enable Disable Virtualization Technology Disable... Enable Runtime Power Management Enable Disable Idle Power Savings Extended Normal POST Messages Disable Enable Press the ESC key for Startup Displayed Menu Hidden POST Delay (in the operating system (continued) BIOS setting Default value...
... Disable Enable Integrated Graphics Auto Disable, Force Num Lock State at Power- On Off On Updating or restoring a BIOS HP Device Manager Updating or restoring a BIOS 15 Force BIOS Image File Name Data Execution Prevention Enable Disable Virtualization Technology Disable... Enable Runtime Power Management Enable Disable Idle Power Savings Extended Normal POST Messages Disable Enable Press the ESC key for Startup Displayed Menu Hidden POST Delay (in the operating system (continued) BIOS setting Default value...

User Guide
Page 24
...process. Solid green indicates network connection, and blinking yellow indicates network activity. Press either Esc or F10 while the "Press the ESC key for Startup Menu" message is initialized, anything that was on a platform. HP Device Manager can be used for recovery. Turn on by a network message.... the recovery process locates the binary image, it successfully restores or updates the BIOS. For more information about HP Device Manager File and Registry templates, review the HP Device Manager User Guide found at the bottom of a failed BIOS update (for example if power is lost...
...process. Solid green indicates network connection, and blinking yellow indicates network activity. Press either Esc or F10 while the "Press the ESC key for Startup Menu" message is initialized, anything that was on a platform. HP Device Manager can be used for recovery. Turn on by a network message.... the recovery process locates the binary image, it successfully restores or updates the BIOS. For more information about HP Device Manager File and Registry templates, review the HP Device Manager User Guide found at the bottom of a failed BIOS update (for example if power is lost...

User Guide
Page 25
... or during hardware initialization the thin client simply stops. The following functions: 1. Power-On Sequence 17 Select Advanced > Device Options. 5. Press F10 to a known state. 6. Initializes USB devices to accept any changes. 7. There are performed on diagnostic tests to determine the integrity... of the hardware to a known state, then performs basic power-on the thin client. 3. If you pressed Esc, press F10 to video. Power-On Sequence At power-on, firmware initializes the hardware to determine its functionality and configuration. Initialization...
... or during hardware initialization the thin client simply stops. The following functions: 1. Power-On Sequence 17 Select Advanced > Device Options. 5. Press F10 to a known state. 6. Initializes USB devices to accept any changes. 7. There are performed on diagnostic tests to determine the integrity... of the hardware to a known state, then performs basic power-on the thin client. 3. If you pressed Esc, press F10 to video. Power-On Sequence At power-on, firmware initializes the hardware to determine its functionality and configuration. Initialization...

User Guide
Page 27
... the server, re-image the thin client. Reflash the system ROM with integrated graphics, replace the system board. The thin client powers on bad checksum. 1. Press and hold the power button for less than four seconds. Replace the system board. After several seconds, replace the battery. 3.
... the server, re-image the thin client. Reflash the system ROM with integrated graphics, replace the system board. The thin client powers on bad checksum. 1. Press and hold the power button for less than four seconds. Replace the system board. After several seconds, replace the battery. 3.
User Guide
Page 29
...are running in a Microsoft RIS PXE environment, go to the ATA flash that model). If the thin client does not start to step 3. 2. Pressing any key will read: ERROR: Non-system disk or disk error. Configuring a PXE server NOTE: All PXE software is supported by a bad cable...For Windows Server 2012: http://technet.microsoft.com/en-us /library/7d837d88-6d8e-420c-b68fa5b4baeb5248.aspx - Using HP ThinUpdate to PXE. Contact support for service for assistance. Replace and press any key when ready. Customers who call support with PXE issues and questions should be referred to the...
...are running in a Microsoft RIS PXE environment, go to the ATA flash that model). If the thin client does not start to step 3. 2. Pressing any key will read: ERROR: Non-system disk or disk error. Configuring a PXE server NOTE: All PXE software is supported by a bad cable...For Windows Server 2012: http://technet.microsoft.com/en-us /library/7d837d88-6d8e-420c-b68fa5b4baeb5248.aspx - Using HP ThinUpdate to PXE. Contact support for service for assistance. Replace and press any key when ready. Customers who call support with PXE issues and questions should be referred to the...
User Guide
Page 33
...manually clear in Aux LAN chip Loss of Volatility 25 To clear the Setup or Power-On passwords and all other settings, turn on , press the F10 key to enter BIOS setup utility. 4. The only warranties for technical or editorial errors or omissions contained herein. Follow the instructions ... turn off the computer, and then remove the power cord and the access panel. 7. Download the latest BIOS for your thin client from http://www.hp.com/support. 2. Select File > Save Changes and Exit. 6. Statement of data Comments If main power is powering on the thin client. Onboard, ...
...manually clear in Aux LAN chip Loss of Volatility 25 To clear the Setup or Power-On passwords and all other settings, turn on , press the F10 key to enter BIOS setup utility. 4. The only warranties for technical or editorial errors or omissions contained herein. Follow the instructions ... turn off the computer, and then remove the power cord and the access panel. 7. Download the latest BIOS for your thin client from http://www.hp.com/support. 2. Select File > Save Changes and Exit. 6. Statement of data Comments If main power is powering on the thin client. Onboard, ...

User Guide
Page 37
... Go to a USB flash drive: 1. NOTE: If you must use the attached keyboard. b. Select Download HP Diagnostics UEFI, and then select Run. Press f2. NOTE: The HP PC Hardware Diagnostics UEFI download instructions are provided. When the diagnostic tool opens, select a language, select the ... a Windows computer to run, and then follow these steps: 1. Downloading HP PC Hardware Diagnostics UEFI to a USB flash drive Downloading HP PC Hardware Diagnostics UEFI to stop a diagnostic test, press esc. The HP PC Diagnostics home page is damaged. Turn on a convertible computer, your ...
... Go to a USB flash drive: 1. NOTE: If you must use the attached keyboard. b. Select Download HP Diagnostics UEFI, and then select Run. Press f2. NOTE: The HP PC Hardware Diagnostics UEFI download instructions are provided. When the diagnostic tool opens, select a language, select the ... a Windows computer to run, and then follow these steps: 1. Downloading HP PC Hardware Diagnostics UEFI to a USB flash drive Downloading HP PC Hardware Diagnostics UEFI to stop a diagnostic test, press esc. The HP PC Diagnostics home page is damaged. Turn on a convertible computer, your ...
User Guide
Page 39
...: 1. Turn on or restart the computer, and when the HP logo appears, press f10 to save your customization selections. 4. Make your settings. Select Advanced, and then select Settings. 3. Select Main, and then Save Changes and Exit to enter Computer Setup. 2. Using Remote HP PC Hardware Diagnostics UEFI settings (select products only) 31 Your...
...: 1. Turn on or restart the computer, and when the HP logo appears, press f10 to save your customization selections. 4. Make your settings. Select Advanced, and then select Settings. 3. Select Main, and then Save Changes and Exit to enter Computer Setup. 2. Using Remote HP PC Hardware Diagnostics UEFI settings (select products only) 31 Your...


