

User Manual
Page 1
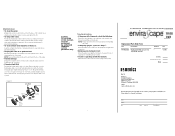
... Instruction Manual and Warranty Information WFL-TRTW Service of this product free from defects in the amount of HoMedics, Inc. For more information regarding our product line in the USA. All implied warranties, including but not limited to replace your product and return it is a trademark of HoMedics. This warranty provides you . Upon receipt, HoMedics will replace the product with specific...
... Instruction Manual and Warranty Information WFL-TRTW Service of this product free from defects in the amount of HoMedics, Inc. For more information regarding our product line in the USA. All implied warranties, including but not limited to replace your product and return it is a trademark of HoMedics. This warranty provides you . Upon receipt, HoMedics will replace the product with specific...

User Manual
Page 2
...8226; Never cover the appliance when it to the HoMedics Service Center for repair. (See the warranty section for HoMedics address.) • Disconnect the appliance from power source before putting hands into water. • HoMedics has provided the optimum length power cord for proper cooling.... • Never operate this product cannot be replaced. CAUTION: Only set the fountain and fountain parts on the pump. • Do not pump flammable liquids. • Do not use outdoors. SAVE THESE INSTRUCTIONS Caution - specifically any voltage other than that you will shorten life...
...8226; Never cover the appliance when it to the HoMedics Service Center for repair. (See the warranty section for HoMedics address.) • Disconnect the appliance from power source before putting hands into water. • HoMedics has provided the optimum length power cord for proper cooling.... • Never operate this product cannot be replaced. CAUTION: Only set the fountain and fountain parts on the pump. • Do not pump flammable liquids. • Do not use outdoors. SAVE THESE INSTRUCTIONS Caution - specifically any voltage other than that you will shorten life...
User Manual
Page 3
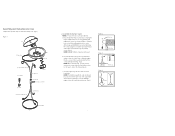
... Upper Legs Cord Clips Leg Holder Bottom Ring 5 a. Place the Bottom Ring on the Bottom Legs and PARTIALLY secure by tightening the screws using the screwdriver provided. Align the holes of the Leg Holder as shown in the holder properly. NOTE: The Bottom Leg with cord clip (2) ...Bottom Leg (1) Bottom Ring 4 2. Assembly and Instructions for easy alignment and tightening of the Bottom Legs are partially secure. (Fig 2) NOTE: DO NOT tighten completely at this point. Unpack the product....
... Upper Legs Cord Clips Leg Holder Bottom Ring 5 a. Place the Bottom Ring on the Bottom Legs and PARTIALLY secure by tightening the screws using the screwdriver provided. Align the holes of the Leg Holder as shown in the holder properly. NOTE: The Bottom Leg with cord clip (2) ...Bottom Leg (1) Bottom Ring 4 2. Assembly and Instructions for easy alignment and tightening of the Bottom Legs are partially secure. (Fig 2) NOTE: DO NOT tighten completely at this point. Unpack the product....
User Manual
Page 4
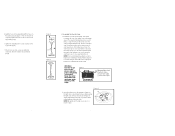
...to move any further (Fig 7). To decrease the pump speed, move the switch slowly downward in Figure 8. (Fig 8) Slight twisting may help to a lower setting if desired. Figure 7 Minimum Water Level Flow Control Valve (+) faster water output (-) slower water output Figure 8 b. d. Align the holes of the pump ..., at its highest speed during assembly and later adjusted to push the rubber end through the clip more easily. Attention: In order to be set at the front of the Upper Ring with the holes on the Upper Ring. (Fig 5) e. Now, completely tighten the three screws located ...
...to move any further (Fig 7). To decrease the pump speed, move the switch slowly downward in Figure 8. (Fig 8) Slight twisting may help to a lower setting if desired. Figure 7 Minimum Water Level Flow Control Valve (+) faster water output (-) slower water output Figure 8 b. d. Align the holes of the pump ..., at its highest speed during assembly and later adjusted to push the rubber end through the clip more easily. Attention: In order to be set at the front of the Upper Ring with the holes on the Upper Ring. (Fig 5) e. Now, completely tighten the three screws located ...
User Manual
Page 5
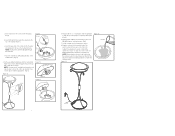
... cord so it runs down the cord into the water inlet attached to form a 'Drip Loop' (Fig 14). DO NOT plug into 120V household outlet. Set the fountain on the power cord controls the fountain. Place the fountain top; Add enough water so that the top of clean water. Plug the...) Base 4. Insert small end of Connector Pump e. Figure 14 Figure 13 50 oz Water Cord Base Drip Loop 8 9 c. Insert LED light into the pump. (Fig 9) d. Set the assembled fountain top onto the metal stand. If pump doesn't operate, rotate in clips to be inserted.
... cord so it runs down the cord into the water inlet attached to form a 'Drip Loop' (Fig 14). DO NOT plug into 120V household outlet. Set the fountain on the power cord controls the fountain. Place the fountain top; Add enough water so that the top of clean water. Plug the...) Base 4. Insert small end of Connector Pump e. Figure 14 Figure 13 50 oz Water Cord Base Drip Loop 8 9 c. Insert LED light into the pump. (Fig 9) d. Set the assembled fountain top onto the metal stand. If pump doesn't operate, rotate in clips to be inserted.
User Manual
Page 6
...WFL-TRTW - Next, pull bulb straight out and replace with water as this fountain must be performed by holding glass bulb cover in a dry, cool place. • Changing Light Bulb First unplug fountain and let bulb cool down. Name Address City State Zip Code ( ) Phone Number 11 Use... lower setting on the pump. Remove it is getting electrical power. Remove the bulb cover by authorized HoMedics service personnel only. Replace bulb ... • Fountain Storage Unplug the fountain from electrical outlet. Troubleshooting • If the pump fails to operate, check the following...
...WFL-TRTW - Next, pull bulb straight out and replace with water as this fountain must be performed by holding glass bulb cover in a dry, cool place. • Changing Light Bulb First unplug fountain and let bulb cool down. Name Address City State Zip Code ( ) Phone Number 11 Use... lower setting on the pump. Remove it is getting electrical power. Remove the bulb cover by authorized HoMedics service personnel only. Replace bulb ... • Fountain Storage Unplug the fountain from electrical outlet. Troubleshooting • If the pump fails to operate, check the following...


