User Manual
Page 3
...." All rights reserved. HOVEROUND® and Teknique™ are registered trademarks of the HOVEROUND® CORPORATION. Hoveround® disclaims any means, electronic, mechanical, photocopying, recording or otherwise, without notice. No part of this product. Notes usually contain information regarding troubleshooting the power wheelchair when an indicator or fault light appears. Using the Hoveround® product safely...
...." All rights reserved. HOVEROUND® and Teknique™ are registered trademarks of the HOVEROUND® CORPORATION. Hoveround® disclaims any means, electronic, mechanical, photocopying, recording or otherwise, without notice. No part of this product. Notes usually contain information regarding troubleshooting the power wheelchair when an indicator or fault light appears. Using the Hoveround® product safely...
User Manual
Page 5
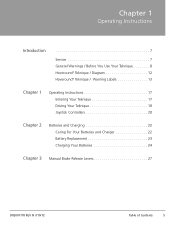
Chapter 1 Operating Instructions Introduction 7 Service 7 General Warnings / Before You Use Your Teknique 8 Hoveround® Teknique / Diagram 12 Hoveround® Teknique / Warning Labels 13 Chapter 1 Operating Instructions 17 Entering Your Teknique 17 Driving Your Teknique 18 Joystick Controllers 20 Chapter 2 Batteries and Charging 22 Caring For Your Batteries and Charger 22 Battery Replacement 23 Charging Your Batteries 24 Chapter 3 Manual Brake Release Levers 27 D82007778 REV N 7/10/12 Table of Contents 5
Chapter 1 Operating Instructions Introduction 7 Service 7 General Warnings / Before You Use Your Teknique 8 Hoveround® Teknique / Diagram 12 Hoveround® Teknique / Warning Labels 13 Chapter 1 Operating Instructions 17 Entering Your Teknique 17 Driving Your Teknique 18 Joystick Controllers 20 Chapter 2 Batteries and Charging 22 Caring For Your Batteries and Charger 22 Battery Replacement 23 Charging Your Batteries 24 Chapter 3 Manual Brake Release Levers 27 D82007778 REV N 7/10/12 Table of Contents 5
User Manual
Page 8
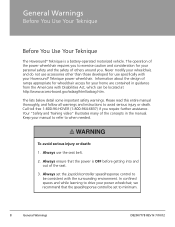
... and while learning to minimum. 8 General Warnings D82007778 REV N 7/10/12 General Warnings Before You Use Your Teknique Before You Use Your Teknique The Hoveround® Teknique is OFF before getting into and out of ramps appropriate for wheelchair access for use the seat belt. 2. Information about the design of the seat. 3. To avoid serious injury or...
... and while learning to minimum. 8 General Warnings D82007778 REV N 7/10/12 General Warnings Before You Use Your Teknique Before You Use Your Teknique The Hoveround® Teknique is OFF before getting into and out of ramps appropriate for wheelchair access for use the seat belt. 2. Information about the design of the seat. 3. To avoid serious injury or...
User Manual
Page 9
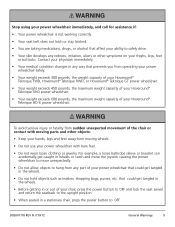
... Keep your hands, legs and feet away from moving wheels. • Do not use your Hoveround® Teknique HD-6 power wheelchair. D82007778 REV N 7/10/12 General Warnings 9 Stop using your power wheelchair immediately, and call for assistance if: • Your power wheelchair is...weight exceeds 300 pounds, the weight capacity of your Hoveround® Teknique FWD, Hoveround® Teknique RWD, or Hoveround® Teknique GT power wheelchair. • Your weight exceeds 450 pounds, the maximum weight capacity of your Hoveround® Teknique XHD power wheelchair. • Your weight exceeds ...
... Keep your hands, legs and feet away from moving wheels. • Do not use your Hoveround® Teknique HD-6 power wheelchair. D82007778 REV N 7/10/12 General Warnings 9 Stop using your power wheelchair immediately, and call for assistance if: • Your power wheelchair is...weight exceeds 300 pounds, the weight capacity of your Hoveround® Teknique FWD, Hoveround® Teknique RWD, or Hoveround® Teknique GT power wheelchair. • Your weight exceeds 450 pounds, the maximum weight capacity of your Hoveround® Teknique XHD power wheelchair. • Your weight exceeds ...

User Manual
Page 10
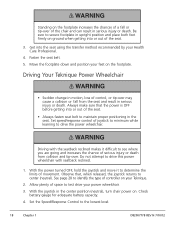
..., standing water, sleet, slush or snow. • Do not sit in your power wheelchair while riding in reverse. • Avoid ramps and slopes that are using the chair's restraint. 10 General Warnings D82007778 REV N 7/10/12
..., standing water, sleet, slush or snow. • Do not sit in your power wheelchair while riding in reverse. • Avoid ramps and slopes that are using the chair's restraint. 10 General Warnings D82007778 REV N 7/10/12
User Manual
Page 18
... to minimum while learning to secure footplate in upright position and place both feet firmly on ground when getting into the seat using the transfer method recommended by your Teknique. 2. Observe that the power is OFF before getting into or out of the seat. 3. See page 20 to center (...neutral). With the joystick in serious injury or death. Set the Speed/Response Control to maintain proper positioning in serious injury or death. Driving Your Teknique Power Wheelchair • Sudden change in motion, loss of control, or tip-over may cause a collision or fall or tip-over of the...
... to minimum while learning to secure footplate in upright position and place both feet firmly on ground when getting into the seat using the transfer method recommended by your Teknique. 2. Observe that the power is OFF before getting into or out of the seat. 3. See page 20 to center (...neutral). With the joystick in serious injury or death. Set the Speed/Response Control to maintain proper positioning in serious injury or death. Driving Your Teknique Power Wheelchair • Sudden change in motion, loss of control, or tip-over may cause a collision or fall or tip-over of the...
User Manual
Page 20
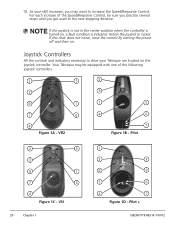
...the power off and then on , a fault condition is turned on . 10. Return the joystick to drive your skill increases, you get used to increase the Speed/Response Control. Pilot 2 5 3 9 1 7 6 4 Figure 1C - Pilot + D82007778 REV N 7/10/...Figure 1D - VR2 7 Figure 1B - For each increase of the following joystick controllers. 2 5 2 3 3 9 1 1 5 7 6 4 6 4 Figure 1A - As your Teknique are located on the joystick controller. Your Teknique may be equipped with one of the Speed/Response Control, be sure you practice several stops until you may want to the...
...the power off and then on , a fault condition is turned on . 10. Return the joystick to drive your skill increases, you get used to increase the Speed/Response Control. Pilot 2 5 3 9 1 7 6 4 Figure 1C - Pilot + D82007778 REV N 7/10/...Figure 1D - VR2 7 Figure 1B - For each increase of the following joystick controllers. 2 5 2 3 3 9 1 1 5 7 6 4 6 4 Figure 1A - As your Teknique are located on the joystick controller. Your Teknique may be equipped with one of the Speed/Response Control, be sure you practice several stops until you may want to the...
User Manual
Page 22
... protective gear such as it can cause explosive sparks or fire. • ALWAYS store batteries in an upright position. • NEVER use a battery that has been frozen or might have open a sealed battery. • Battery posts contain lead. ALWAYS wash your power wheelchair. • Batteries ... REV N 7/10/12 Chapter 2 Batteries And Charging Caring For Your Batteries • Completely read and follow all battery connections and screws are tight before using your hands after handling any labels applied to open flame around batteries. The battery contains corrosive chemicals and gases...
... protective gear such as it can cause explosive sparks or fire. • ALWAYS store batteries in an upright position. • NEVER use a battery that has been frozen or might have open a sealed battery. • Battery posts contain lead. ALWAYS wash your power wheelchair. • Batteries ... REV N 7/10/12 Chapter 2 Batteries And Charging Caring For Your Batteries • Completely read and follow all battery connections and screws are tight before using your hands after handling any labels applied to open flame around batteries. The battery contains corrosive chemicals and gases...
User Manual
Page 23
...REV N 7/10/12 Chapter 2 23 These batteries are of the sealed-type that require no maintenance. The batteries supplied by Hoveround®. • ALWAYS use batteries of the same type and capacity for this power wheelchair. • NEVER connect life support systems or auxiliary devices to your... power wheelchair when installing the batteries. • ALWAYS install and use the correct fuse as "wet - The electrical system may be transported by air, land or sea. • ALWAYS refer to the supplied...
...REV N 7/10/12 Chapter 2 23 These batteries are of the sealed-type that require no maintenance. The batteries supplied by Hoveround®. • ALWAYS use batteries of the same type and capacity for this power wheelchair. • NEVER connect life support systems or auxiliary devices to your... power wheelchair when installing the batteries. • ALWAYS install and use the correct fuse as "wet - The electrical system may be transported by air, land or sea. • ALWAYS refer to the supplied...

User Manual
Page 24
...in areas unsheltered from the weather. • DO NOT expose the charger to 8 hours for a full recharge. We recommend an overnight charge after the day's use of use a grounded,120-volt household power outlet. • NEVER connect the charger to the battery. 24 Chapter 2 D82007778 REV N 7/10/12 Cables and connectors .... • DO NOT attempt to repair or open flame. Please follow the operating instructions for the appropriate charger. Explosive gas is equipped with your Hoveround® power wheelchair. • DO NOT use the charger if the cables or connectors are damaged.
...in areas unsheltered from the weather. • DO NOT expose the charger to 8 hours for a full recharge. We recommend an overnight charge after the day's use of use a grounded,120-volt household power outlet. • NEVER connect the charger to the battery. 24 Chapter 2 D82007778 REV N 7/10/12 Cables and connectors .... • DO NOT attempt to repair or open flame. Please follow the operating instructions for the appropriate charger. Explosive gas is equipped with your Hoveround® power wheelchair. • DO NOT use the charger if the cables or connectors are damaged.

User Manual
Page 25
• ONLY USE to Figure 2A below. If your charger is equipped with an on/off button, ensure that the charger is in the OFF position,... output cord into the charger port located on the plug with the joystick controller in place. Select a clean, dry, cool, well ventilated area to use the charger as a DC power source for any electrical or other type of battery or any other equipment. • DO NOT attempt to charge a...10/12 Chapter 2 25 Refer to charge AGM sealed lead acid batteries. If it is fully seated in the charger port. Do not attempt to use the charger. 2.
• ONLY USE to Figure 2A below. If your charger is equipped with an on/off button, ensure that the charger is in the OFF position,... output cord into the charger port located on the plug with the joystick controller in place. Select a clean, dry, cool, well ventilated area to use the charger as a DC power source for any electrical or other type of battery or any other equipment. • DO NOT attempt to charge a...10/12 Chapter 2 25 Refer to charge AGM sealed lead acid batteries. If it is fully seated in the charger port. Do not attempt to use the charger. 2.

User Manual
Page 26
... on the output side of the charger, indicating power is equipped with an on/off button, turn OFF the power switch on , please check to use the chair: A. Unplug the charger from the joystick controller. Unplug the charger from the household power outlet. If you are charged. 4. C. Switch the power on...
... on the output side of the charger, indicating power is equipped with an on/off button, turn OFF the power switch on , please check to use the chair: A. Unplug the charger from the joystick controller. Unplug the charger from the household power outlet. If you are charged. 4. C. Switch the power on...

User Manual
Page 28
... Driving with the seatback reclined makes it difficult to see where you are at signs of skin irritation or discomfort. • Do not use and contact physician at increased chance of injury due to the joystick and speed/response control. • Inspect all areas of the skin in... serious injury or death. Discontinue use power wheelchair until evaluated and instructed to do so by a qualified clinician. • Improper seating position can result in contact with seatback reclined...
... Driving with the seatback reclined makes it difficult to see where you are at signs of skin irritation or discomfort. • Do not use and contact physician at increased chance of injury due to the joystick and speed/response control. • Inspect all areas of the skin in... serious injury or death. Discontinue use power wheelchair until evaluated and instructed to do so by a qualified clinician. • Improper seating position can result in contact with seatback reclined...

User Manual
Page 30
... the position of the removal key opening (see Figure 9A, page 46) in the bracket before tightening. Slide the controller bracket to make the adjustment. Use the supplied 1/4 inch hex wrench to a comfortable position and secure the screw. T-Wrench 3" Max Figure 4E 30 Chapter 4 D82007778 REV N 7/10/12 Turn the screw...
... the position of the removal key opening (see Figure 9A, page 46) in the bracket before tightening. Slide the controller bracket to make the adjustment. Use the supplied 1/4 inch hex wrench to a comfortable position and secure the screw. T-Wrench 3" Max Figure 4E 30 Chapter 4 D82007778 REV N 7/10/12 Turn the screw...

User Manual
Page 32
... securely. Remove the screw and nut and place the back in the outer hinge and inner hinge brackets line up for the desired angle. 3. Always use caution when pushing the chair from the front. To change the back angle position: 1. Seat Back Angle Adjustment The seat back has fixed positions to...
... securely. Remove the screw and nut and place the back in the outer hinge and inner hinge brackets line up for the desired angle. 3. Always use caution when pushing the chair from the front. To change the back angle position: 1. Seat Back Angle Adjustment The seat back has fixed positions to...
User Manual
Page 38
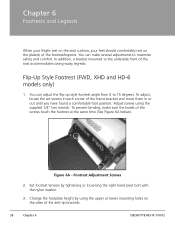
Flip-Up Style Footrest (FWD, XHD and HD-6 models only) 1. To prevent binding, make several adjustments to maximize safety and comfort. Figure 6A - In addition, a bracket mounted to 15 degrees. Set footrest tension by using the supplied 1/4" hex wrench. Change the footplate height by tightening or...make sure the heads of the frame bracket and move them in or out until you have found a comfortable foot position. Adjust screws using the upper or lower mounting holes on the plate(s) of the seat accommodates swing-away legrests. Footrest Adjustment Screws 2. You can adjust...
Flip-Up Style Footrest (FWD, XHD and HD-6 models only) 1. To prevent binding, make several adjustments to maximize safety and comfort. Figure 6A - In addition, a bracket mounted to 15 degrees. Set footrest tension by using the supplied 1/4" hex wrench. Change the footplate height by tightening or...make sure the heads of the frame bracket and move them in or out until you have found a comfortable foot position. Adjust screws using the upper or lower mounting holes on the plate(s) of the seat accommodates swing-away legrests. Footrest Adjustment Screws 2. You can adjust...

User Manual
Page 40
Optional tie-down kit is secured to secure the rider. Optional Tie-Down Brackets When transporting the Teknique in a motor vehicle, your power wheelchair while riding in your wheelchair must be adequately secured within the motor vehicle. To reduce chance... intended for additional information. Chapter 7 Options and Accessories To obtain information or pricing on accessories, contact HOVEROUND® CORPORATION at 800-96-HOVER (800-964-6837). Optional tie-down kit is not intended to the vehicle and you are using the chair's restraint. 40 Chapter 7 D82007778 REV N 7/10/12
Optional tie-down kit is secured to secure the rider. Optional Tie-Down Brackets When transporting the Teknique in a motor vehicle, your power wheelchair while riding in your wheelchair must be adequately secured within the motor vehicle. To reduce chance... intended for additional information. Chapter 7 Options and Accessories To obtain information or pricing on accessories, contact HOVEROUND® CORPORATION at 800-96-HOVER (800-964-6837). Optional tie-down kit is not intended to the vehicle and you are using the chair's restraint. 40 Chapter 7 D82007778 REV N 7/10/12
User Manual
Page 43
... are very important to physical harm. Chapter 8 Routine Maintenance Service and maintenance are detailed in any service or maintenance needs. Service Please contact Hoveround® Technical Support at 1-800-96-HOVER (1-800-964-6837) for assistance if: • Your power wheelchair is not working correctly. ...• Your seat belt does not latch or stay latched. • Safe and effective use of this manual. • Do not perform any maintenance without first disconnecting the batteries. • Do not modify your power wheelchair. Stop...
... are very important to physical harm. Chapter 8 Routine Maintenance Service and maintenance are detailed in any service or maintenance needs. Service Please contact Hoveround® Technical Support at 1-800-96-HOVER (1-800-964-6837) for assistance if: • Your power wheelchair is not working correctly. ...• Your seat belt does not latch or stay latched. • Safe and effective use of this manual. • Do not perform any maintenance without first disconnecting the batteries. • Do not modify your power wheelchair. Stop...

User Manual
Page 45
...Doing so may damage it. The controller body can be wiped with a damp cloth or towel, using a mild detergent or window cleaner. Never spray the chair with a damp cloth or towel, using a mild detergent. Food-type contaminants can be removed from around the joystick boot by carefully cleaning... and outside the home. Vacuum or brush off dirt, then wipe with a damp cloth or towel, using a mild detergent. To keep the vehicle clean: Seat - Top Cover - Cleaning your Teknique The Teknique is off loose material with a dry bristle brush and wipe with a damp cloth or towel.
...Doing so may damage it. The controller body can be wiped with a damp cloth or towel, using a mild detergent or window cleaner. Never spray the chair with a damp cloth or towel, using a mild detergent. Food-type contaminants can be removed from around the joystick boot by carefully cleaning... and outside the home. Vacuum or brush off dirt, then wipe with a damp cloth or towel, using a mild detergent. To keep the vehicle clean: Seat - Top Cover - Cleaning your Teknique The Teknique is off loose material with a dry bristle brush and wipe with a damp cloth or towel.

User Manual
Page 46
... the sockethead cap screw closest to the controller. Refasten controller cable (if so equipped). 46 Chapter 9 D82007778 REV N 7/10/12 Chapter 9 Disassembling and Reassembling Your Teknique Controller Removal/Replacement Removal 1. Use the 1/4 inch hex wrench supplied with your chair (See Figure 9A below ).
... the sockethead cap screw closest to the controller. Refasten controller cable (if so equipped). 46 Chapter 9 D82007778 REV N 7/10/12 Chapter 9 Disassembling and Reassembling Your Teknique Controller Removal/Replacement Removal 1. Use the 1/4 inch hex wrench supplied with your chair (See Figure 9A below ).


