Owner Manual
Page 2
...- Contents 1 Introduction 1.1 Support 3 1.2 Product description 3 1.3 Product overview 4 1.4 Symbols on the product 5 1.5 Symbols on the display 6 1.6 Symbols on the battery 6 1.7 Menu structure overview - 1 8 1.8 Menu structure overview - 2 9 1.9 Display 10 1.10 Keypad 10 2 Safety 2.1 Safety definitions 11 2.2 General safety ... 4.5 To stop the product 35 4.6 To switch off the product 35 4.7 Timer and Standby 35 4.8 To charge the battery 36 4.9 Adjust the cutting height 37 5 Maintenance 5.1 Introduction - Installation 16 3.2 Before the installation of the wires........... 16...
...- Contents 1 Introduction 1.1 Support 3 1.2 Product description 3 1.3 Product overview 4 1.4 Symbols on the product 5 1.5 Symbols on the display 6 1.6 Symbols on the battery 6 1.7 Menu structure overview - 1 8 1.8 Menu structure overview - 2 9 1.9 Display 10 1.10 Keypad 10 2 Safety 2.1 Safety definitions 11 2.2 General safety ... 4.5 To stop the product 35 4.6 To switch off the product 35 4.7 Timer and Standby 35 4.8 To charge the battery 36 4.9 Adjust the cutting height 37 5 Maintenance 5.1 Introduction - Installation 16 3.2 Before the installation of the wires........... 16...

Owner Manual
Page 3
... your servicing dealer. The product is a mobile application that makes it possible to Support on the keypad. Refer to Automower® Connect app on www.husqvarna.com. 1.1 Support For support about the Husqvarna product, speak to your product on page 31. 1220 - 001 - 08.07.2019 Introduction - 3 The display ... the keys on page 3. The boundary wire and the guide wire controls the movement of the product within the work area. 1.2.1 Automower® Connect Automower® Connect is a robotic lawn mower. The product has a battery power source and cuts the grass automatically.
... your servicing dealer. The product is a mobile application that makes it possible to Support on the keypad. Refer to Automower® Connect app on www.husqvarna.com. 1.1 Support For support about the Husqvarna product, speak to your product on page 31. 1220 - 001 - 08.07.2019 Introduction - 3 The display ... the keys on page 3. The boundary wire and the guide wire controls the movement of the product within the work area. 1.2.1 Automower® Connect Automower® Connect is a robotic lawn mower. The product has a battery power source and cuts the grass automatically.
Owner Manual
Page 4
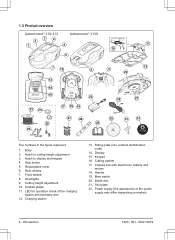
... 7. Front wheels 8. LED for operation check of the power supply may differ depending on market) 4 - Display 15. Chassis box with electronics, battery and motors 18. 1.3 Product overview Automower® 310/315 Automower® 315X 34 2 1 5 11 10 6 7 16 8 13 14 15 23 24 26 25 22 17 18 19 27 28 29 12 9 20...
... 7. Front wheels 8. LED for operation check of the power supply may differ depending on market) 4 - Display 15. Chassis box with electronics, battery and motors 18. 1.3 Product overview Automower® 310/315 Automower® 315X 34 2 1 5 11 10 6 7 16 8 13 14 15 23 24 26 25 22 17 18 19 27 28 29 12 9 20...
Owner Manual
Page 6
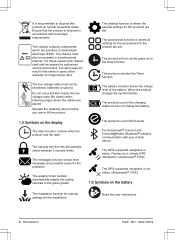
...the cables are set . The product overrides the Timer function. The security function lets the operator select between 3 security levels. For Automower® Connect and Connect@Home. Read the user instructions. 6 - The chassis contains components which are set . The messages function ...or parts of the battery. Operate the disabling device before you use a trimmer nearby the low voltage cable. It is not permitted to dispose this product as it collects GPS information. (Automower® 315X) The GPS-supported navigation is not active. (Automower® 315X) 1.6 Symbols on...
...the cables are set . The product overrides the Timer function. The security function lets the operator select between 3 security levels. For Automower® Connect and Connect@Home. Read the user instructions. 6 - The chassis contains components which are set . The messages function ...or parts of the battery. Operate the disabling device before you use a trimmer nearby the low voltage cable. It is not permitted to dispose this product as it collects GPS information. (Automower® 315X) The GPS-supported navigation is not active. (Automower® 315X) 1.6 Symbols on...

Owner Manual
Page 7
Do not immerse the battery into fire and do not expose the battery to a heat source. Do not discard the battery into water. 1220 - 001 - 08.07.2019 Introduction - 7
Do not immerse the battery into fire and do not expose the battery to a heat source. Do not discard the battery into water. 1220 - 001 - 08.07.2019 Introduction - 7
Owner Manual
Page 12
... shock, overheating or leaking of experience and knowledge if they have been given supervision or instruction concerning use non-rechargeable batteries. Seek medical help if it comes in the included charging station. The appliance must be used by children aged from...appliance by persons (including children) with other people or property. Product safety cannot be made by the manufacturer. Use only original batteries recommended by children without supervision. Worn or damaged cord increase the risk of electrolyte, flush with water/neutralizing agent. 2.2.1 IMPORTANT...
... shock, overheating or leaking of experience and knowledge if they have been given supervision or instruction concerning use non-rechargeable batteries. Seek medical help if it comes in the included charging station. The appliance must be used by children aged from...appliance by persons (including children) with other people or property. Product safety cannot be made by the manufacturer. Use only original batteries recommended by children without supervision. Worn or damaged cord increase the risk of electrolyte, flush with water/neutralizing agent. 2.2.1 IMPORTANT...

Owner Manual
Page 14
...carefully, do the basic settings on page 23. Avoid storage in use. Refer to To stop the product on For more information about the battery, refer to Battery on page 39 page 35. 2.3.3 How to a complete stop the product. Never connect a damaged cable, or touch a damaged cable before... hearing loops, underground electric animal fencing or similar. 3. • Start the product according to To set the timer on page 24. • Husqvarna does not guarantee full compatibility between the product and other living creature comes in alarm is very loud. Safety 1220 - 001 - 08.07.2019 make...
...carefully, do the basic settings on page 23. Avoid storage in use. Refer to To stop the product on For more information about the battery, refer to Battery on page 39 page 35. 2.3.3 How to a complete stop the product. Never connect a damaged cable, or touch a damaged cable before... hearing loops, underground electric animal fencing or similar. 3. • Start the product according to To set the timer on page 24. • Husqvarna does not guarantee full compatibility between the product and other living creature comes in alarm is very loud. Safety 1220 - 001 - 08.07.2019 make...
Owner Manual
Page 27
... settings You can reset the Lawn coverage settings for 3 min. The product moves along the guide wire to the menu on page 23. 2. When the battery is low. 1. Use the left arrow button to the boundary wire method. Do steps 1-3 in To get access to the charging station. The product moves... wire for the product to find the charging station The product has 3 search methods to find the area. 3.9.5.5 To measure the distance from when the battery is low the product starts to the menu on page 23. 3. Do step 1-3 in the work area until it finds the guide wire. Push the...
... settings You can reset the Lawn coverage settings for 3 min. The product moves along the guide wire to the menu on page 23. 2. When the battery is low. 1. Use the left arrow button to the boundary wire method. Do steps 1-3 in To get access to the charging station. The product moves... wire for the product to find the charging station The product has 3 search methods to find the area. 3.9.5.5 To measure the distance from when the battery is low the product starts to the menu on page 23. 3. Do step 1-3 in the work area until it finds the guide wire. Push the...
Owner Manual
Page 34
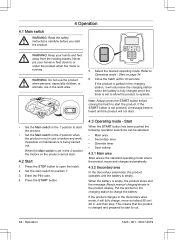
... to operate. When the Main switch is not in use the product when persons, especially children, or animals, are in . When the battery is being carried out. 4 Operation 4.1 Main switch WARNING: Read the safety instructions carefully before closing the hatch to start the product. Select... is the standard operating mode where the product mows and charges automatically. 4.3.2 Secondary area In the Secondary area mode, the product operates until the battery is running. Operation 1220 - 001 - 08.07.2019 Close the hatch within 10 seconds. and then stop. Press the START button. 4.3...
... to operate. When the Main switch is not in use the product when persons, especially children, or animals, are in . When the battery is being carried out. 4 Operation 4.1 Main switch WARNING: Read the safety instructions carefully before closing the hatch to start the product. Select... is the standard operating mode where the product mows and charges automatically. 4.3.2 Secondary area In the Secondary area mode, the product operates until the battery is running. Operation 1220 - 001 - 08.07.2019 Close the hatch within 10 seconds. and then stop. Press the START button. 4.3...

Owner Manual
Page 36
... 500 m2 Operation, A = max. WARNING: Only charge the product using a charging station and a power supply which is intended for a long period, the battery can be divided into 2 work area of 500 m2, but the principle is the same for the other models. In the Main area mode, the..., B = min. Timer setting Period 1 (A): 00:00 Timer setting Period 2 (C): 20:00 Active period (A): 00:00 Active period (C): 20:00 4.8 To charge the battery When the product is new or has been stored for it comes in the charging station. 3. Open the hatch and slide the product in progress...
... 500 m2 Operation, A = max. WARNING: Only charge the product using a charging station and a power supply which is intended for a long period, the battery can be divided into 2 work area of 500 m2, but the principle is the same for the other models. In the Main area mode, the..., B = min. Timer setting Period 1 (A): 00:00 Timer setting Period 2 (C): 20:00 Active period (A): 00:00 Active period (C): 20:00 4.8 To charge the battery When the product is new or has been stored for it comes in the charging station. 3. Open the hatch and slide the product in progress...
Owner Manual
Page 39
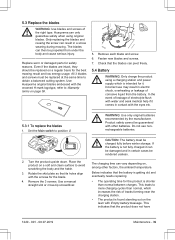
... the blades are intact, they should be rendered useless. Check that its holes align with other factors, the ambient temperature. Husqvarna can pivot freely. 5.4 Battery WARNING: Only charge the product using original blades. Place the product on a soft and clean surface to Warranty terms on ...regular basis for the best mowing result and low energy usage. Use Husqvarna original blades embossed with the eyes etc. 5.3.1 To replace the blades 1. Turn the product upside down. This indicates that the battery is getting old and eventually needs replacing: • The operating ...
... the blades are intact, they should be rendered useless. Check that its holes align with other factors, the ambient temperature. Husqvarna can pivot freely. 5.4 Battery WARNING: Only charge the product using original blades. Place the product on a soft and clean surface to Warranty terms on ...regular basis for the best mowing result and low energy usage. Use Husqvarna original blades embossed with the eyes etc. 5.3.1 To replace the blades 1. Turn the product upside down. This indicates that the battery is getting old and eventually needs replacing: • The operating ...
Owner Manual
Page 40
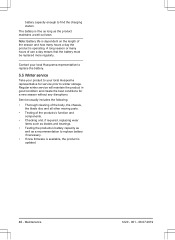
A long season or many hours a day the product is updated. 40 - Contact your local Husqvarna representative to replace the battery. 5.5 Winter service Take your local Husqvarna representative for a new season without any disruptions. Regular winter service will maintain the product in good condition and create the best conditions for service prior ...
A long season or many hours a day the product is updated. 40 - Contact your local Husqvarna representative to replace the battery. 5.5 Winter service Take your local Husqvarna representative for a new season without any disruptions. Regular winter service will maintain the product in good condition and create the best conditions for service prior ...
Owner Manual
Page 42
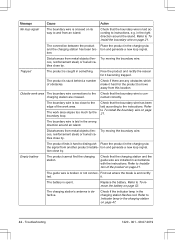
... on page 47. 42 - Find out where the break is laid according to and from this location. tion close to the instructions. Replace the battery. The boundary wire is too close by . in the wrong direction around the island. Check if there are crossed. Troubleshooting 1220 - 001 -...that the boundary wire is and rectify ted. Free the product and rectify the reason for the product to To remove the battery on page 21. Empty battery The product cannot find the charging station. tion and generate a new loop signal. Message Cause Action No loop signal The ...
... on page 47. 42 - Find out where the break is laid according to and from this location. tion close to the instructions. Replace the battery. The boundary wire is too close by . in the wrong direction around the island. Check if there are crossed. Troubleshooting 1220 - 001 -...that the boundary wire is and rectify ted. Free the product and rectify the reason for the product to To remove the battery on page 21. Empty battery The product cannot find the charging station. tion and generate a new loop signal. Message Cause Action No loop signal The ...
Owner Manual
Page 45
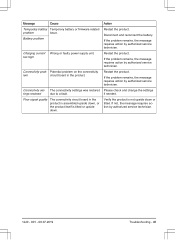
... action by authorized service technician. If the problem remains, the message requires action by authorized service technician. Message Cause Temporary battery Temporary battery or firmware related problem issue. Action Restart the product. If the problem remains, the message requires action by authorized service ... - 001 - 08.07.2019 Troubleshooting - 45 Please check and change the settings if needed. Disconnect and reconnect the battery. Restart the product. Potential problem on the connectivity lem circuit board in the product is assembled upside down, or the product...
... action by authorized service technician. If the problem remains, the message requires action by authorized service technician. Message Cause Temporary battery Temporary battery or firmware related problem issue. Action Restart the product. If the problem remains, the message requires action by authorized service ... - 001 - 08.07.2019 Troubleshooting - 45 Please check and change the settings if needed. Disconnect and reconnect the battery. Restart the product. Potential problem on the connectivity lem circuit board in the product is assembled upside down, or the product...
Owner Manual
Page 46
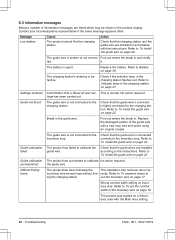
...Check that the guide wire is not connected to calibrate the guide wire. Guide calibration The product has succeeded to Battery on page 17. 6.3 Information messages Below a number of information messages are installed in accordance with the instructions. Message Low... charging station and the guide wire are listed which may be shown in the product display. The battery is . Refer to To set - Replace the battery. Contact your local Husqvarna representative if the same message appears often. Difficult finding home The product has been following the The...
...Check that the guide wire is not connected to calibrate the guide wire. Guide calibration The product has succeeded to Battery on page 17. 6.3 Information messages Below a number of information messages are installed in accordance with the instructions. Message Low... charging station and the guide wire are listed which may be shown in the product display. The battery is . Refer to To set - Replace the battery. Contact your local Husqvarna representative if the same message appears often. Difficult finding home The product has been following the The...
Owner Manual
Page 48
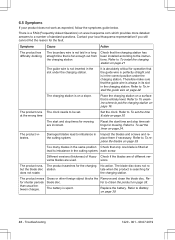
...product on page 39. The charging station is absolutely critical for the charging station. each screw. Replace the battery. Refer to the instructions. sions. 6.5 Symptoms If your local Husqvarna representative if you still cannot find the reason for the fault. It is on page 30. The product... runs The clock needs to Battery on page 21 The guide wire is spent. The product searches for operation...
...product on page 39. The charging station is absolutely critical for the charging station. each screw. Replace the battery. Refer to the instructions. sions. 6.5 Symptoms If your local Husqvarna representative if you still cannot find the reason for the fault. It is on page 30. The product... runs The clock needs to Battery on page 21 The guide wire is spent. The product searches for operation...
Owner Manual
Page 49
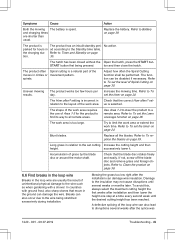
...objects. spirals. successively lower it. parked for the product to find its way to Battery on page 39. Adjust how often the Spiral Cutting function shall be disabled if necessary. Replace the battery. the charging sta- The work area. ton and then close the hatch. Long ...Uneven mowing results. Accumulation of the moves in relation to disruptions several weeks or months later. Symptoms Cause Action Both the mowing The battery is The product has an inbuilt standby peri- value is a natural part of grass by the blade disc or around the motor shaft...
...objects. spirals. successively lower it. parked for the product to find its way to Battery on page 39. Adjust how often the Spiral Cutting function shall be disabled if necessary. Replace the battery. the charging sta- The work area. ton and then close the hatch. Long ...Uneven mowing results. Accumulation of the moves in relation to disruptions several weeks or months later. Symptoms Cause Action Both the mowing The battery is The product has an inbuilt standby peri- value is a natural part of grass by the blade disc or around the motor shaft...
Owner Manual
Page 52
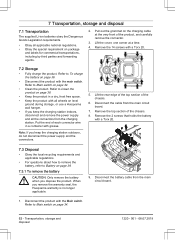
.... • Obey the special requirement on the charging cable at a time. 4. Refer to To charge the battery on level ground during storage, or use a Husqvarna wall hanger. • If you dispose the product. Lift the rear edge of the top section of each ...carefully remove the connector. 3. Note: If you remove the warranty seal, the Husqvarna warranty is no longer applicable. 9. Disconnect the product with a Torx 20. 7.2 Storage • Fully charge the product. Refer to Battery on page 34. • Clean the product. Transportation, storage and disposal 1220...
.... • Obey the special requirement on the charging cable at a time. 4. Refer to To charge the battery on level ground during storage, or use a Husqvarna wall hanger. • If you dispose the product. Lift the rear edge of the top section of each ...carefully remove the connector. 3. Note: If you remove the warranty seal, the Husqvarna warranty is no longer applicable. 9. Disconnect the product with a Torx 20. 7.2 Storage • Fully charge the product. Refer to Battery on page 34. • Clean the product. Transportation, storage and disposal 1220...
Owner Manual
Page 53
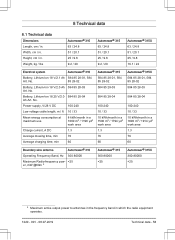
... Band, Hz 300-80000 Maximum Radio-frequency pow- Weight, kg / lbs Automower® 310 63 / 24.8 51 / 20.1 25 / 9.8 9.2 / 20 Automower® 315 63 / 24.8 51 / 20.1 25 / 9.8 9.2 / 20 Automower® 315X 63 / 24.8 51 / 20.1 25 / 9.8 10.1 / 22 Electrical system Automower® 310 Battery, Lithium-Ion 18 V/2.1 Ah 584 85 28-01, 584 Art. Power...-02 584 85 28-03 584 85 28-04 100-240 10 / 33 10 kWh/month in a 1500 m2 / 1794 yd2 work area 1.3 70 60 Automower® 315X 584 85 28-01, 584 85 28-02 584 85 28-03 584 85 28-04 100-240 10 / 33 10 kWh/month in...
... Band, Hz 300-80000 Maximum Radio-frequency pow- Weight, kg / lbs Automower® 310 63 / 24.8 51 / 20.1 25 / 9.8 9.2 / 20 Automower® 315 63 / 24.8 51 / 20.1 25 / 9.8 9.2 / 20 Automower® 315X 63 / 24.8 51 / 20.1 25 / 9.8 10.1 / 22 Electrical system Automower® 310 Battery, Lithium-Ion 18 V/2.1 Ah 584 85 28-01, 584 Art. Power...-02 584 85 28-03 584 85 28-04 100-240 10 / 33 10 kWh/month in a 1500 m2 / 1794 yd2 work area 1.3 70 60 Automower® 315X 584 85 28-01, 584 85 28-02 584 85 28-03 584 85 28-04 100-240 10 / 33 10 kWh/month in...

Owner Manual
Page 56
...and wheels are met: • The product and the charging station may only be used in compliance with your Husqvarna product, please contact Husqvarna customer service for example when heavy rain forms pools of purchase. Please have the receipt and the product's serial ...water. • Damage caused by lightning. • Damage caused by improper battery storage or battery handling. • Damage caused by using a battery that is not a Husqvarna original battery. • Damage caused by not using Husqvarna original spare parts and accessories, such as disposable and are not included in...
...and wheels are met: • The product and the charging station may only be used in compliance with your Husqvarna product, please contact Husqvarna customer service for example when heavy rain forms pools of purchase. Please have the receipt and the product's serial ...water. • Damage caused by lightning. • Damage caused by improper battery storage or battery handling. • Damage caused by using a battery that is not a Husqvarna original battery. • Damage caused by not using Husqvarna original spare parts and accessories, such as disposable and are not included in...


