
Owner Manual
Page 1
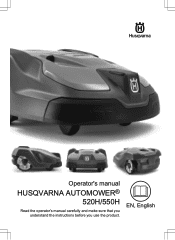
EN, English Operator's manual HUSQVARNA AUTOMOWER® 520H/550H Read the operator's manual carefully and make sure that you understand the instructions before you use the product.
EN, English Operator's manual HUSQVARNA AUTOMOWER® 520H/550H Read the operator's manual carefully and make sure that you understand the instructions before you use the product.

Owner Manual
Page 2
... lamp on the charging station........ 42 6.5 LED indicator lamp on the battery 6 1.7 General manual instructions 6 1.8 Overview of the settings structure in Automower® Connect 24 4 Operation 4.1 Main switch 30 4.2 Start 30 4.3 Operating mode - Start 30 4.4 Operating mode - Park 31 4.5 To stop the product 31 4.6 To switch off the product 31 4.7 To adjust the cutting height with stakes 21 3.7 To bury the boundary wire or the guide wire.......21 3.8 To extend...
... lamp on the charging station........ 42 6.5 LED indicator lamp on the battery 6 1.7 General manual instructions 6 1.8 Overview of the settings structure in Automower® Connect 24 4 Operation 4.1 Main switch 30 4.2 Start 30 4.3 Operating mode - Start 30 4.4 Operating mode - Park 31 4.5 To stop the product 31 4.6 To switch off the product 31 4.7 To adjust the cutting height with stakes 21 3.7 To bury the boundary wire or the guide wire.......21 3.8 To extend...

Owner Manual
Page 3
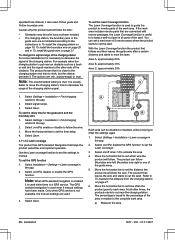
... product has a battery power source and cuts the grass automatically. The app shows the selected and possible operation settings, and the operation mode of fertilizers. The boundary wire and the guide wire controls the movement of the product always passes the boundary wire by a specific distance before the product turns around. Refer to Automower® Connect (Bluetooth® only) on www.husqvarna.com. 1.1 Support For support about the...
... product has a battery power source and cuts the grass automatically. The app shows the selected and possible operation settings, and the operation mode of fertilizers. The boundary wire and the guide wire controls the movement of the product always passes the boundary wire by a specific distance before the product turns around. Refer to Automower® Connect (Bluetooth® only) on www.husqvarna.com. 1.1 Support For support about the...

Owner Manual
Page 4
... 2 Is a part of the Installation kit which is purchased separately. 4 - Couplers for securing the charging station 25. Handle 14. Power supply 1 23. Operator's manual and Quick Guide 26. Park button 10. Rating plate (including product identification code) 16. Cable markers 22. Measurement gauge 19. Ultrasonic sensors 5. Skid plate 18. Body 2. Rear wheels 7. Cutting system 12. LED indicator lamp of the charging station 8. 1.3 Product overview Automower® 520H Automower®...
... 2 Is a part of the Installation kit which is purchased separately. 4 - Couplers for securing the charging station 25. Handle 14. Power supply 1 23. Operator's manual and Quick Guide 26. Park button 10. Rating plate (including product identification code) 16. Cable markers 22. Measurement gauge 19. Ultrasonic sensors 5. Skid plate 18. Body 2. Rear wheels 7. Cutting system 12. LED indicator lamp of the charging station 8. 1.3 Product overview Automower® 520H Automower®...
Owner Manual
Page 5
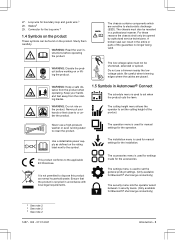
... low voltage cable. The accessories menu is used for settings made for the operation. Keep your hands or feet close to dispose this product as defined on the product. The installation menu is used for manual settings for boundary loop and guide wire 3 28. Loop wire for the installation. WARNING: Keep a safe distance from the rotating blades. The settings menu is used to set the cutting height of the...
... low voltage cable. The accessories menu is used for settings made for the operation. Keep your hands or feet close to dispose this product as defined on the product. The installation menu is used for manual settings for boundary loop and guide wire 3 28. Loop wire for the installation. WARNING: Keep a safe distance from the rotating blades. The settings menu is used to set the cutting height of the...

Owner Manual
Page 12
... install the power supply unit in direct sunlight. • Switch on . In case of malfunction, heating of the charging station and the power supply may occur and create a potential risk of the product, it . Use the Schedule function so the product and sprinkler never run simultaneously. Always switch off before clearing a blockage. Push STOP and pull the product out of electrical...
... install the power supply unit in direct sunlight. • Switch on . In case of malfunction, heating of the charging station and the power supply may occur and create a potential risk of the product, it . Use the Schedule function so the product and sprinkler never run simultaneously. Always switch off before clearing a blockage. Push STOP and pull the product out of electrical...

Owner Manual
Page 19
... about electrical safety. It requires special configuration in water. D A A A A B C 3.4.6 Automower® Club Solution Automower® Club Solution makes it can harm the power supply and increase the risk of electrical shock. 1457 - 006 - 07.01.2021 Installation - 19 To use Automower® Club Solution, speak to use the Park button. • The blade disc speed and noise level increases. 3.5 Installation of the boundary wire and charging stations...
... about electrical safety. It requires special configuration in water. D A A A A B C 3.4.6 Automower® Club Solution Automower® Club Solution makes it can harm the power supply and increase the risk of electrical shock. 1457 - 006 - 07.01.2021 Installation - 19 To use Automower® Club Solution, speak to use the Park button. • The blade disc speed and noise level increases. 3.5 Installation of the boundary wire and charging stations...

Owner Manual
Page 22
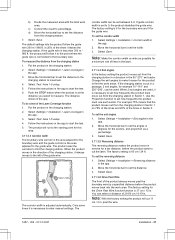
... product. 22 - start to be fully closed down the cover on the coupler with stakes. 8. You must be able to change the settings and operate the product. Select model. If the indicator LED lamp does not have the Automower® Connect app installed. 3.8 To extend the boundary wire or the guide wire Note: Extend the boundary wire or the guide wire if it is...
... product. 22 - start to be fully closed down the cover on the coupler with stakes. 8. You must be able to change the settings and operate the product. Select model. If the indicator LED lamp does not have the Automower® Connect app installed. 3.8 To extend the boundary wire or the guide wire Note: Extend the boundary wire or the guide wire if it is...
Owner Manual
Page 23
... settings and you have the product PIN code. 1457 - 006 - 07.01.2021 Installation - 23 Follow the instructions in the e-mail in the charging station without a Husqvarna account as long as Current mower. A flash is only temporary. Select model. 3. Automower® Direct is also useful if the connection with the product through Bluetooth® if you can use Husqvarna Fleet Services™. For users...
... settings and you have the product PIN code. 1457 - 006 - 07.01.2021 Installation - 23 Follow the instructions in the e-mail in the charging station without a Husqvarna account as long as Current mower. A flash is only temporary. Select model. 3. Automower® Direct is also useful if the connection with the product through Bluetooth® if you can use Husqvarna Fleet Services™. For users...
Owner Manual
Page 25
....01.2021 Installation - 25 High / Very high intensity means that Spiral cutting begins more than the schedule settings. Select Settings > Operation in the app. 2. Select Settings > Spiral Cutting > Use > Intensity to enable or disable the ECO mode function. 3. Select on the lawn to start the product manually in 3 methods: • Charging station signal • Follow boundary wire • Follow guide wire The factory setting is set the Weather timer...
....01.2021 Installation - 25 High / Very high intensity means that Spiral cutting begins more than the schedule settings. Select Settings > Operation in the app. 2. Select Settings > Spiral Cutting > Use > Intensity to enable or disable the ECO mode function. 3. Select on the lawn to start the product manually in 3 methods: • Charging station signal • Follow boundary wire • Follow guide wire The factory setting is set the Weather timer...
Owner Manual
Page 26
... and then leaves the guide wire after a certain distance and starts to set the Lawn Coverage function The Lawn Coverage function is used even if manual settings have not been isolated. • The charging station, the boundary wire or the guide wire are used while there is a GPS service. Select Settings > Installation > Find charging station in the app. 2. Move the horizontal bar to mow the lawn. Select Installation > Settings > Lawn coverage in the app...
... and then leaves the guide wire after a certain distance and starts to set the Lawn Coverage function The Lawn Coverage function is used even if manual settings have not been isolated. • The charging station, the boundary wire or the guide wire are used while there is a GPS service. Select Settings > Installation > Find charging station in the app. 2. Move the horizontal bar to mow the lawn. Select Installation > Settings > Lawn coverage in the app...
Owner Manual
Page 27
... distance you select to the guide wire. For example 75% means that the product moves out from the charging station 1. Select Save. 3.11.3.6 Drive Past Wire The front of the product always moves past the wire. 1457 - 006 - 07.01.2021 Installation - 27 Note: With the factory setting the product will run to the starting point for this area. 3.11.3.3 Corridor...
... distance you select to the guide wire. For example 75% means that the product moves out from the charging station 1. Select Save. 3.11.3.6 Drive Past Wire The front of the product always moves past the wire. 1457 - 006 - 07.01.2021 Installation - 27 Note: With the factory setting the product will run to the starting point for this area. 3.11.3.3 Corridor...
Owner Manual
Page 29
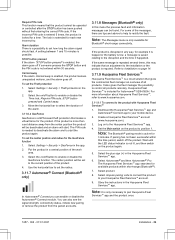
... code to connect the product to start . Note: It is needed to deactivate the alarm and to your mobile device. 2. The lock is included for each new incorrect try. Move the horizontal bar to select the duration of the messages, there are tips and advice to help to position 1. Husqvarna Fleet Services™ is extended for Automower® 520H...
... code to connect the product to start . Note: It is needed to deactivate the alarm and to your mobile device. 2. The lock is included for each new incorrect try. Move the horizontal bar to select the duration of the messages, there are tips and advice to help to position 1. Husqvarna Fleet Services™ is extended for Automower® 520H...
Owner Manual
Page 33
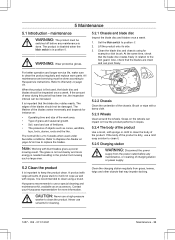
... blades gives a poorer mowing result. Husqvarna recommends to Warranty on the wheels can be inspected once a week. Grass on page 51. The product is disabled when the Main switch is important that the blade disc rotates freely in slopes. 5.2.4 The body of the chassis. The edges of the product. Never use a special cleaning and maintenance kit, available as an accessory. Set the Main switch...
... blades gives a poorer mowing result. Husqvarna recommends to Warranty on the wheels can be inspected once a week. Grass on page 51. The product is disabled when the Main switch is important that the blade disc rotates freely in slopes. 5.2.4 The body of the chassis. The edges of the product. Never use a special cleaning and maintenance kit, available as an accessory. Set the Main switch...
Owner Manual
Page 38
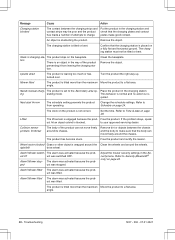
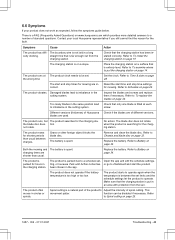
... servicing dealer. Collision sensor problem, front/rear The body of attempts to make good contact. Free the product and rectify the reason. Mower switch- Adjust the mower security settings in the charging station. This behavior is normal and no action is not correct. Free the product. Troubleshooting 1457 - 006 - 07.01.2021 Confirm that the body can not move freely around the wheels. Remove...
... servicing dealer. Collision sensor problem, front/rear The body of attempts to make good contact. Free the product and rectify the reason. Mower switch- Adjust the mower security settings in the charging station. This behavior is normal and no action is not correct. Free the product. Troubleshooting 1457 - 006 - 07.01.2021 Confirm that the body can not move freely around the wheels. Remove...
Owner Manual
Page 40
... is too steep. Check that may be found The guide wire is correct. Limited cutting height The cutting height adjustment cannot move. Change the installation of the boundary wire to not include this steep part of the guide wire with a new loop wire and splice using an original coupler. Troubleshooting 1457 - 006 - 07.01.2021 This problem requires action by authorized service technician. Verify that the installation settings about how to the...
... is too steep. Check that may be found The guide wire is correct. Limited cutting height The cutting height adjustment cannot move. Change the installation of the boundary wire to not include this steep part of the guide wire with a new loop wire and splice using an original coupler. Troubleshooting 1457 - 006 - 07.01.2021 This problem requires action by authorized service technician. Verify that the installation settings about how to the...
Owner Manual
Page 43
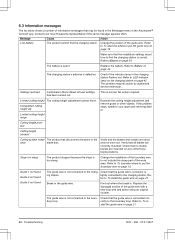
... charging station. Both the mowing and The battery is parked due to a schedule set limits and the schedule settings let the product to Battery on page 33. charging times are of spiral cutting. The product is parked for the fault. The product is spent. The product vibrates. Remove and clean the blade disc. Replace the battery. Refer to operate. The product does not operate if the battery...
... charging station. Both the mowing and The battery is parked due to a schedule set limits and the schedule settings let the product to Battery on page 33. charging times are of spiral cutting. The product is parked for the fault. The product is spent. The product vibrates. Remove and clean the blade disc. Replace the battery. Refer to operate. The product does not operate if the battery...

Owner Manual
Page 44
... on the charging station on page 34. Increase the cutting height and then successively lower it actually has. Check that ECO mode is too large. Mowing the grass too low right after the installation can damage the wire. Increase the mowing time. Increase the intensity level in the boundary loop. The settings for the Lawn coverage function Do a check of the settings for the...
... on the charging station on page 34. Increase the cutting height and then successively lower it actually has. Check that ECO mode is too large. Mowing the grass too low right after the installation can damage the wire. Increase the mowing time. Increase the intensity level in the boundary loop. The settings for the Lawn coverage function Do a check of the settings for the...
Owner Manual
Page 45
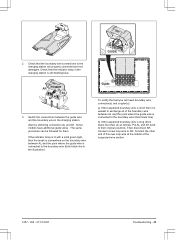
...models have additional guide wires . Connect the other end of this new loop wire at the middle of the boundary wire between the guide wire and the boundary wire in the charging station is still flashing blue. AR POWER AL G1 3. b) If the suspected boundary wire is connected to exchange all of the suspected wire section. 1457 - 006 - 07.01.2021 Troubleshooting - 45 Connect a new.... Start by switching connection AL and G1. If the indicator lamp is lit with a solid green light, then the break is somewhere on the boundary wire between AL and the point where the guide wire is...
...models have additional guide wires . Connect the other end of this new loop wire at the middle of the boundary wire between the guide wire and the boundary wire in the charging station is still flashing blue. AR POWER AL G1 3. b) If the suspected boundary wire is connected to exchange all of the suspected wire section. 1457 - 006 - 07.01.2021 Troubleshooting - 45 Connect a new.... Start by switching connection AL and G1. If the indicator lamp is lit with a solid green light, then the break is somewhere on the boundary wire between AL and the point where the guide wire is...

Owner Manual
Page 49
... power noise level, dB (A) 63 Sound pressure noise level at the operator's ear10, dB 51 (A) Automower® 550H 62 1 63 51 Mowing Cutting system Maximum cutting motor speed, rpm Power consumption during cutting, W +/- 20 % Cutting height, cm / in . Maximum slope for cutting area, % Maximum slope for boundary wire, % Maximum length boundary wire, m / ft Maximum length guide loop11, m / ft Maximum distance to boundary wire, m / ft Working capacity, m2 / acre(s) +/- 20% Automower® 520H 3 pivoted cutting blades...
... power noise level, dB (A) 63 Sound pressure noise level at the operator's ear10, dB 51 (A) Automower® 550H 62 1 63 51 Mowing Cutting system Maximum cutting motor speed, rpm Power consumption during cutting, W +/- 20 % Cutting height, cm / in . Maximum slope for cutting area, % Maximum slope for boundary wire, % Maximum length boundary wire, m / ft Maximum length guide loop11, m / ft Maximum distance to boundary wire, m / ft Working capacity, m2 / acre(s) +/- 20% Automower® 520H 3 pivoted cutting blades...

