Instruction Manual
Page 1
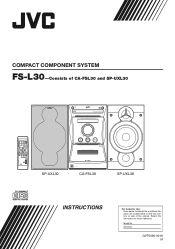
.../AM AUX/MD AUTO 0CD REV.MODE FM MODE PRESET PRGM RANDOM REPEAT AHB PRO DIMMER VOLUME RM - Retain this information for future reference. Model No. GVT0080-001A [J] CD BASS DOWN TAPE + FM/AM UP TREBLE 0 PUSH OPEN AUTO REVERSE PHONES CA-FSL30 SP-UXL30 INSTRUCTIONS For Customer Use: Enter below the Model No. SFSL30J REMOTE CONTROL SP-UXL30 STANDBY / ON COMPACT DIGITAL AUDIO CD-R/RW PLAYBACK REC REV. Serial No. MODE AHB PRO CLOCK/TIMER AUX/MD COMPACT COMPONENT SYSTEM FS-L30 VOLUME - COMPACT COMPONENT SYSTEM FS-L30...
.../AM AUX/MD AUTO 0CD REV.MODE FM MODE PRESET PRGM RANDOM REPEAT AHB PRO DIMMER VOLUME RM - Retain this information for future reference. Model No. GVT0080-001A [J] CD BASS DOWN TAPE + FM/AM UP TREBLE 0 PUSH OPEN AUTO REVERSE PHONES CA-FSL30 SP-UXL30 INSTRUCTIONS For Customer Use: Enter below the Model No. SFSL30J REMOTE CONTROL SP-UXL30 STANDBY / ON COMPACT DIGITAL AUDIO CD-R/RW PLAYBACK REC REV. Serial No. MODE AHB PRO CLOCK/TIMER AUX/MD COMPACT COMPONENT SYSTEM FS-L30 VOLUME - COMPACT COMPONENT SYSTEM FS-L30...
Instruction Manual
Page 2
..., which the receiver is encouraged to try to constitute a risk of electrical shocks, fire, etc.: 1. Note to CATV system installer: This reminder is intended to alert the user to part 15 of important operating and maintenance (servicing) instructions in any position does not disconnect the mains line. • When the unit is on standby, the STANDBY/ON lamp lights red. • When...
..., which the receiver is encouraged to try to constitute a risk of electrical shocks, fire, etc.: 1. Note to CATV system installer: This reminder is intended to alert the user to part 15 of important operating and maintenance (servicing) instructions in any position does not disconnect the mains line. • When the unit is on standby, the STANDBY/ON lamp lights red. • When...
Instruction Manual
Page 4
... organized as follows: Power sources • When unplugging from the wall outlet, always pull the plug, not the AC power cord. • The manual mainly explains operations using the buttons on pages 9 and 10. • The following cases: • After starting heating in again. In this manual for future reference. Also gives you information which are no user serviceable parts inside the unit in...
... organized as follows: Power sources • When unplugging from the wall outlet, always pull the plug, not the AC power cord. • The manual mainly explains operations using the buttons on pages 9 and 10. • The following cases: • After starting heating in again. In this manual for future reference. Also gives you information which are no user serviceable parts inside the unit in...
Instruction Manual
Page 5
...6 Connecting Antennas 6 Connecting Speakers 7 Connecting Other Equipment 8 Playing Back CDs (CD/CD-R/CD-RW 13 Playing Back the Entire CD-Normal Play 13 Basic CD Operations 13 Programming the Playing Order of the Tracks -Program Play 14 Playing at Random-Random Play 15 Repeating Tracks-Repeat Play 15 Prohibiting Disc Ejection-Tray Lock 15 Playing Back Tapes 16 Playing Back a Tape 16 Common Operations 9 Setting the Clock 9 Turning On the Power 9 Selecting the Sources and Starting Play 9 Adjusting the Volume 10 Adjusting the Tone (Bass/Treble 10 Reinforcing the Bass Sound 10...
...6 Connecting Antennas 6 Connecting Speakers 7 Connecting Other Equipment 8 Playing Back CDs (CD/CD-R/CD-RW 13 Playing Back the Entire CD-Normal Play 13 Basic CD Operations 13 Programming the Playing Order of the Tracks -Program Play 14 Playing at Random-Random Play 15 Repeating Tracks-Repeat Play 15 Prohibiting Disc Ejection-Tray Lock 15 Playing Back Tapes 16 Playing Back a Tape 16 Common Operations 9 Setting the Clock 9 Turning On the Power 9 Selecting the Sources and Starting Play 9 Adjusting the Volume 10 Adjusting the Tone (Bass/Treble 10 Reinforcing the Bass Sound 10...
Instruction Manual
Page 6
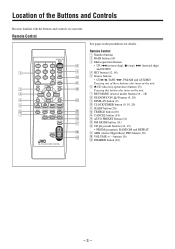
... button (14) r AUTO PRESET button (11) t FM MODE button (11) y CD play mode buttons (14, 15) • PRGM (program), RANDOM and REPEAT u AHB (Active Hyper Bass) PRO button (10) i VOLUME + / - Location of these buttons also turns on the unit. 6 0 CD (disc tray open/close) button (13) Pressing this button also turns on your unit. Remote Control 1 2 3 4 5 6 7 STANDBY/ON 1 2 3 4 7 10 BASS 5 6 DISPLAY 8 9 CLOCK /TIMER +10 SLEEP UP TREBLE 4 7 ¢ SET DOWN CANCEL 3/8 23 CD TAPE FM/AM AUX/MD AUTO 0CD REV.MODE FM MODE PRESET PRGM RANDOM REPEAT SURROUND AHB...
... button (14) r AUTO PRESET button (11) t FM MODE button (11) y CD play mode buttons (14, 15) • PRGM (program), RANDOM and REPEAT u AHB (Active Hyper Bass) PRO button (10) i VOLUME + / - Location of these buttons also turns on the unit. 6 0 CD (disc tray open/close) button (13) Pressing this button also turns on your unit. Remote Control 1 2 3 4 5 6 7 STANDBY/ON 1 2 3 4 7 10 BASS 5 6 DISPLAY 8 9 CLOCK /TIMER +10 SLEEP UP TREBLE 4 7 ¢ SET DOWN CANCEL 3/8 23 CD TAPE FM/AM AUX/MD AUTO 0CD REV.MODE FM MODE PRESET PRGM RANDOM REPEAT SURROUND AHB...

Instruction Manual
Page 7
p PHONES - 4 - Front Panel Front Panel 1 2 3 4 5 6 7 8 9 Continued STANDBY / ON COMPACT DIGITAL AUDIO CD-R/RW PLAYBACK REC REV. MODE AHB PRO CLOCK/TIMER AUX/MD COMPACT COMPONENT SYSTEM FS-L30 VOLUME q w e r t - + y CD TAPE FM/AM u BASS DOWN UP TREBLE 0 PUSH OPEN AUTO REVERSE i o ;
p PHONES - 4 - Front Panel Front Panel 1 2 3 4 5 6 7 8 9 Continued STANDBY / ON COMPACT DIGITAL AUDIO CD-R/RW PLAYBACK REC REV. MODE AHB PRO CLOCK/TIMER AUX/MD COMPACT COMPONENT SYSTEM FS-L30 VOLUME q w e r t - + y CD TAPE FM/AM u BASS DOWN UP TREBLE 0 PUSH OPEN AUTO REVERSE i o ;

Instruction Manual
Page 8
...) 7 CD 3/8 (play mode indicators • PRGM (program), RANDOM and / ALL (repeat one/repeat all) STANDBY / ON COMPACT DIGITAL AUDIO CD-R / RW PLAYBACK REC REV.MODE AHB PRO CLOCK/TIMER AUX/MD COMPACT COMPONENT SYSTEM FS-L30 VOLUME When using the remote control, point it at the remote sensor on the unit. e AHB (Active Hyper Bass) PRO button (10) r CLOCK/TIMER button (9, 19, 20) t AUX/MD button (9) Pressing this button also turns on the front panel. - 5 - Front Panel 1 STANDBY/ON button and STANDBY/ON lamp (9, 15, 20) 2 Disc tray 3 REV.MODE (reverse mode) button...
...) 7 CD 3/8 (play mode indicators • PRGM (program), RANDOM and / ALL (repeat one/repeat all) STANDBY / ON COMPACT DIGITAL AUDIO CD-R / RW PLAYBACK REC REV.MODE AHB PRO CLOCK/TIMER AUX/MD COMPACT COMPONENT SYSTEM FS-L30 VOLUME When using the remote control, point it at the remote sensor on the unit. e AHB (Active Hyper Bass) PRO button (10) r CLOCK/TIMER button (9, 19, 20) t AUX/MD button (9) Pressing this button also turns on the front panel. - 5 - Front Panel 1 STANDBY/ON button and STANDBY/ON lamp (9, 15, 20) 2 Disc tray 3 REV.MODE (reverse mode) button...
Instruction Manual
Page 11
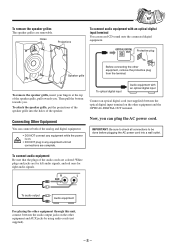
... connect audio equipment with an optical digital input Connect an optical digital cord (not supplied) between the audio output jacks on the other equipment, remove the protective plug from the terminal. To remove the speaker grille, insert your fingers at the top of the speaker grille into a wall outlet. R L AUX R L To audio output L Audio equipment R For playing the other equipment through this unit, connect between the optical digital input terminal on the other equipment and AUX jacks by using audio cords (not supplied...
... connect audio equipment with an optical digital input Connect an optical digital cord (not supplied) between the audio output jacks on the other equipment, remove the protective plug from the terminal. To remove the speaker grille, insert your fingers at the top of the speaker grille into a wall outlet. R L AUX R L To audio output L Audio equipment R For playing the other equipment through this unit, connect between the optical digital input terminal on the other equipment and AUX jacks by using audio cords (not supplied...
Instruction Manual
Page 12
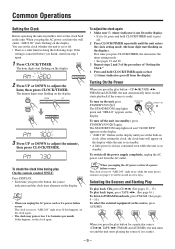
... the clock setting mode (the hour digit start from the display. DISPLAY • Each time you press the button, the source indication and the clock time alternate on the display. • When you plug the AC power cord into the wall outlet, "AM12:00" starts flashing on the display). You can set the clock whether the unit is reset to 2 minutes per month If this unit. CLOCK/TIMER 2 Press UP or DOWN to adjust the...
... the clock setting mode (the hour digit start from the display. DISPLAY • Each time you press the button, the source indication and the clock time alternate on the display. • When you plug the AC power cord into the wall outlet, "AM12:00" starts flashing on the display). You can set the clock whether the unit is reset to 2 minutes per month If this unit. CLOCK/TIMER 2 Press UP or DOWN to adjust the...
Instruction Manual
Page 13
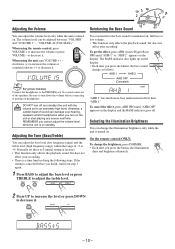
... VOLUME - When using the unit, turn on the display. Be sure to an extremely high level; DIMMER • Each time you finish, start playing any source next time. When using the remote control, press VOLUME + to adjust the treble level. Adjusting the Volume You can be adjusted between "VOL MIN" and "VOLUME 1" - VOLUME VOLUME For private listening - + Connect the headphones to 0 (initial setting at low volume. • This function only affects the playback sound...
... VOLUME - When using the unit, turn on the display. Be sure to an extremely high level; DIMMER • Each time you finish, start playing any source next time. When using the remote control, press VOLUME + to adjust the treble level. Adjusting the Volume You can be adjusted between "VOL MIN" and "VOLUME 1" - VOLUME VOLUME For private listening - + Connect the headphones to 0 (initial setting at low volume. • This function only affects the playback sound...
Instruction Manual
Page 14
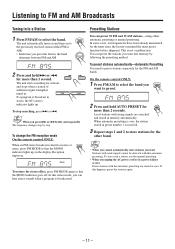
... this automatic presetting. If a program is broadcast in memory automatically. Reception improves. On the remote control ONLY: 1 Press FM/AM to select the band you can preset 30 FM and 15 AM stations-using either FM or AM). • Each time you press ¢ or 4 briefly and repeatedly The frequency changes step by following the presetting method. If this stereo mode, you...
... this automatic presetting. If a program is broadcast in memory automatically. Reception improves. On the remote control ONLY: 1 Press FM/AM to select the band you can preset 30 FM and 15 AM stations-using either FM or AM). • Each time you press ¢ or 4 briefly and repeatedly The frequency changes step by following the presetting method. If this stereo mode, you...

Instruction Manual
Page 15
... to a Station" on a used number erases the previously stored one. DOWN To tune a preset number directly using the number buttons On the remote control ONLY: Pressing the number button(s) allows you to select a preset number you want to preset. • See "Tuning in step 3. • Storing a new station on page 11. When you unplug the AC power cord or if a power failure occurs The tuner preset stations will be erased in to a Preset Station On the remote control ONLY...
... to a Station" on a used number erases the previously stored one. DOWN To tune a preset number directly using the number buttons On the remote control ONLY: Pressing the number button(s) allows you to select a preset number you want to preset. • See "Tuning in step 3. • Storing a new station on page 11. When you unplug the AC power cord or if a power failure occurs The tuner preset stations will be erased in to a Preset Station On the remote control ONLY...
Instruction Manual
Page 16
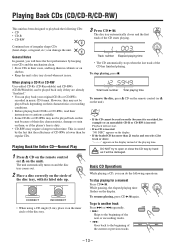
... following CDs: • CD 3 Press CD 3/8. 3/8 CD • CD-R The disc tray automatically closes and the first • CD-RW track of CD-RWs is dirty. • CD-RWs may not be damaged. BASS Total track number Total playing time To remove the disc, press 0 CD on the remote control (or 0 on the unit). • If the CD cannot be read their instructions or cautions carefully. • Some CD-Rs or CD-RWs...
... following CDs: • CD 3 Press CD 3/8. 3/8 CD • CD-R The disc tray automatically closes and the first • CD-RW track of CD-RWs is dirty. • CD-RWs may not be damaged. BASS Total track number Total playing time To remove the disc, press 0 CD on the remote control (or 0 on the unit). • If the CD cannot be read their instructions or cautions carefully. • Some CD-Rs or CD-RWs...

Instruction Manual
Page 19
... when playback in the 2 direction is inserted "NO TAPE" appears on and the tape starts playing. The tape direction indicator (3 or 2) starts flashing quickly on the unit. To remove the cassette, press 0 PUSH OPEN on the display. The use of the tape. When the tape plays to the end, the deck automatically stops if the reverse mode is set the deck to play both sides of the tape until 7 is pressed...
... when playback in the 2 direction is inserted "NO TAPE" appears on and the tape starts playing. The tape direction indicator (3 or 2) starts flashing quickly on the unit. To remove the cassette, press 0 PUSH OPEN on the display. The use of the tape. When the tape plays to the end, the deck automatically stops if the reverse mode is set the deck to play both sides of the tape until 7 is pressed...

Instruction Manual
Page 20
... unlawful to a TV. REV.MODE REV. MODE To demagnetize the heads Turn off the unit, and use type I tape for the tape. • If the tape direction is done only on the back to change the tape direction. • If you have made without the consent of the owner of copyright in the sound or video recording, broadcast or cable programme and in with the...
... unlawful to a TV. REV.MODE REV. MODE To demagnetize the heads Turn off the unit, and use type I tape for the tape. • If the tape direction is done only on the back to change the tape direction. • If you have made without the consent of the owner of copyright in the sound or video recording, broadcast or cable programme and in with the...

Instruction Manual
Page 21
... lit. • When using the Reverse Mode for CD Direct Recording, start recording on the unit. To remove the cassette, press 0 PUSH OPEN on the unit. 2 Play the track on the CD you do not want to record. 3 Press REC (recording). Otherwise, non-recorded pause will stop while recording, press 7. When making Sleep Timer settings while doing CD Direct recording Set enough time to allow for Program Play.
... lit. • When using the Reverse Mode for CD Direct Recording, start recording on the unit. To remove the cassette, press 0 PUSH OPEN on the unit. 2 Play the track on the CD you do not want to record. 3 Press REC (recording). Otherwise, non-recorded pause will stop while recording, press 7. When making Sleep Timer settings while doing CD Direct recording Set enough time to allow for Program Play.

Instruction Manual
Page 22
... . Then, when the off-time comes, the unit automatically turns off the power. • There is operating). Before you need to select the desired station before you want the unit to turn on the display. The unit enters source selecting mode. UP DOWN UP DOWN CLOCK /TIMER CLOCK/TIMER - 19 - Before using " TUNER" as the source to play , then press CLOCK/TIMER. The timer setting remains in the unit (see page...
... . Then, when the off-time comes, the unit automatically turns off the power. • There is operating). Before you need to select the desired station before you want the unit to turn on the display. The unit enters source selecting mode. UP DOWN UP DOWN CLOCK /TIMER CLOCK/TIMER - 19 - Before using " TUNER" as the source to play , then press CLOCK/TIMER. The timer setting remains in the unit (see page...

Instruction Manual
Page 23
... can select the volume level ("VOLUME - -" and "VOLUME 0" to "VOLUME 40"). How Sleep Timer actually works The unit automatically turns off the unit (on the unit, STANDBY / ON (timer) indicator and the selected timer mode indicator (DAILY or REC) start flashing. UP DOWN UP DOWN CLOCK /TIMER CLOCK/TIMER 6 Adjust the clock. • See "Setting the Clock" on page 9. 7 Press STANDBY/ON to STANDBY/ON turn off after specifying the time length. To change as follows...
... can select the volume level ("VOLUME - -" and "VOLUME 0" to "VOLUME 40"). How Sleep Timer actually works The unit automatically turns off the unit (on the unit, STANDBY / ON (timer) indicator and the selected timer mode indicator (DAILY or REC) start flashing. UP DOWN UP DOWN CLOCK /TIMER CLOCK/TIMER 6 Adjust the clock. • See "Setting the Clock" on page 9. 7 Press STANDBY/ON to STANDBY/ON turn off after specifying the time length. To change as follows...

Instruction Manual
Page 25
... while the tape was running. Unplug the AC power cord and then plug it back in . x 11 5/16 in . • Remove the obstruction. • Replace the batteries. x 7 3/8 in . The disc does not play. Audio input sensitivity/Impedance (at 1 kHz) AUX: 400 mV/48 kΩ Digital output-OPTICAL DIGITAL OUT Signal wave length: 660 nm Output level: -21 dBm to -15 dBm Speakers/Impedance: 6 Ω - 16 Ω Tuner FM tuning range...
... while the tape was running. Unplug the AC power cord and then plug it back in . x 11 5/16 in . • Remove the obstruction. • Replace the batteries. x 7 3/8 in . The disc does not play. Audio input sensitivity/Impedance (at 1 kHz) AUX: 400 mV/48 kΩ Digital output-OPTICAL DIGITAL OUT Signal wave length: 660 nm Output level: -21 dBm to -15 dBm Speakers/Impedance: 6 Ω - 16 Ω Tuner FM tuning range...

Instruction Manual
Page 27
... cosmetic damage; 5. Signal reception problems and failures due to the nearest JVC Factory Service Center, the name and location of dealer : Accessories 8. There are covered on the rear, bottom or side of the cabinet. This warranty gives you specific legal rights and you . which will repair or replace defective parts at JVC authorized service centers. Model No. : Purchase data : Serial No. : Name of which is...
... cosmetic damage; 5. Signal reception problems and failures due to the nearest JVC Factory Service Center, the name and location of dealer : Accessories 8. There are covered on the rear, bottom or side of the cabinet. This warranty gives you specific legal rights and you . which will repair or replace defective parts at JVC authorized service centers. Model No. : Purchase data : Serial No. : Name of which is...


