
Instruction Manual
Page 6
AUTO MANUAL The sound is available. (੬ pg. 40, Spot Exposure Control) Fade out Program AE, Effects ...2668; pg. 42) Data Battery You can record and play back precious or hard-to the standard mode setting of this Camcorder Wipe/Fader Effects You can use the Wipe/Fader Effects to make pro-style scene transitions. (੬ pg. 41) Fade...2668; pg. 37) Live Slow You can check the battery status by pressing the AUTO button. 6 EN Major Features of the camcorder by simply pressing the DATA button. (੬ pg. 15) BATTERY CONDITION 100% MAX TIME LCD 50% min FINDER 0% min...
AUTO MANUAL The sound is available. (੬ pg. 40, Spot Exposure Control) Fade out Program AE, Effects ...2668; pg. 42) Data Battery You can record and play back precious or hard-to the standard mode setting of this Camcorder Wipe/Fader Effects You can use the Wipe/Fader Effects to make pro-style scene transitions. (੬ pg. 41) Fade...2668; pg. 37) Live Slow You can check the battery status by pressing the AUTO button. 6 EN Major Features of the camcorder by simply pressing the DATA button. (੬ pg. 15) BATTERY CONDITION 100% MAX TIME LCD 50% min FINDER 0% min...
Instruction Manual
Page 7
... Menus 36 FEATURES FOR RECORDING 37 LED Light 37 Live Slow 37 Wide Mode 37 Night-Scope 38 Snapshot (Record Still Image On Tape)......... 38 Manual Focus 38 Exposure Control 39 Iris Lock 39 Backlight Compensation 40 Spot Exposure Control 40 White Balance Adjustment 40... Manual White Balance Adjustment 41 Wipe Or Fader Effects 41 Program AE, Effects And Shutter Effects ....... 42 EDITING 43 Dubbing To A VCR 43 Dubbing To Or ...
... Menus 36 FEATURES FOR RECORDING 37 LED Light 37 Live Slow 37 Wide Mode 37 Night-Scope 38 Snapshot (Record Still Image On Tape)......... 38 Manual Focus 38 Exposure Control 39 Iris Lock 39 Backlight Compensation 40 Spot Exposure Control 40 White Balance Adjustment 40... Manual White Balance Adjustment 41 Wipe Or Fader Effects 41 Program AE, Effects And Shutter Effects ....... 42 EDITING 43 Dubbing To A VCR 43 Dubbing To Or ...

Instruction Manual
Page 9
...) 3Stop Button [7] (੬ pg. 23) Down Button [4] Backlight Compensation Button [BACKLIGHT] 4VIDEO/MEMORY Switch (੬ pg. 16) 5Play/Pause Button [6] (੬ pg. 23) Up Button [3] Manual Focus Button [FOCUS] (੬ pg. 38) 6Wide (16:9) Button [16.9] (੬ pg. 37) Blank Search [BLANK] (੬ pg. 23) 7Menu Button [MENU] (੬ pg. 32...
...) 3Stop Button [7] (੬ pg. 23) Down Button [4] Backlight Compensation Button [BACKLIGHT] 4VIDEO/MEMORY Switch (੬ pg. 16) 5Play/Pause Button [6] (੬ pg. 23) Up Button [3] Manual Focus Button [FOCUS] (੬ pg. 38) 6Wide (16:9) Button [16.9] (੬ pg. 37) Blank Search [BLANK] (੬ pg. 23) 7Menu Button [MENU] (੬ pg. 32...

Instruction Manual
Page 10
... ! recording.) 12. 6 . 2006 ) ( 1Battery Remaining Power Indicator 2Operation Mode (੬ pg. 16) A : Auto Mode M : Manual Mode 3LED Light Indicator (੬ pg. 37) 4 : Night-Scope Indicator (੬ pg. 38) : Gain Up Mode (੬ pg.... blinks during shooting.) #Card Icon (੬ pg. 27) : Appears during shooting. : Blinks in white when a memory card is not loaded. : Blinks in yellow while the camcorder is displayed) 5Tape Remaining Time (੬ pg. 20) 6REC: (Appears during recording.) (੬ pg. 20) PAUSE: (Appears during D.S.C. "# 1 2M 3 4 5 6 7 8 10 x PHOTO $ ...
... ! recording.) 12. 6 . 2006 ) ( 1Battery Remaining Power Indicator 2Operation Mode (੬ pg. 16) A : Auto Mode M : Manual Mode 3LED Light Indicator (੬ pg. 37) 4 : Night-Scope Indicator (੬ pg. 38) : Gain Up Mode (੬ pg.... blinks during shooting.) #Card Icon (੬ pg. 27) : Appears during shooting. : Blinks in white when a memory card is not loaded. : Blinks in yellow while the camcorder is displayed) 5Tape Remaining Time (੬ pg. 20) 6REC: (Appears during recording.) (੬ pg. 20) PAUSE: (Appears during D.S.C. "# 1 2M 3 4 5 6 7 8 10 x PHOTO $ ...

Instruction Manual
Page 16
... the Power Switch to any operation mode except "OFF" while pressing down the Lock Button located on /off the camcorder. M Manual Mode : Manual recording is set to play back a tape. VIDEO/MEMORY Switch Position VIDEO: Allows you to record on a tape or play back ...by opening/ closing the LCD monitor or pulling out/pushing in your preference using no special effects or manual adjustments. Choose the appropriate operation mode according to switch off the camcorder by setting various functions. MEMORY: Allows you can record using the Power Switch and VIDEO/MEMORY Switch....
... the Power Switch to any operation mode except "OFF" while pressing down the Lock Button located on /off the camcorder. M Manual Mode : Manual recording is set to play back a tape. VIDEO/MEMORY Switch Position VIDEO: Allows you to record on a tape or play back ...by opening/ closing the LCD monitor or pulling out/pushing in your preference using no special effects or manual adjustments. Choose the appropriate operation mode according to switch off the camcorder by setting various functions. MEMORY: Allows you can record using the Power Switch and VIDEO/MEMORY Switch....

Instruction Manual
Page 18
...manually for best viewability. 3 Turn the Dioptre Adjustment Control until the appropriate brightness is closed and locked. If BRIGHT - 5 you are in the viewfinder are not equipped with studs. The DISPLAY Menu appears. 5 Press 4, 3, 1 or 2 to select "DISPLAY", and press SET. To attach the camcorder... Mounting Dioptre Adjustment Control CAUTION: When retracting the viewfinder, take care not to the mounting socket and stud hole on the camcorder. 18 EN GETTING STARTED Grip Adjustment 1 Adjust the velcro strip. 2 Pass your right hand through the loop and grasp the grip....
...manually for best viewability. 3 Turn the Dioptre Adjustment Control until the appropriate brightness is closed and locked. If BRIGHT - 5 you are in the viewfinder are not equipped with studs. The DISPLAY Menu appears. 5 Press 4, 3, 1 or 2 to select "DISPLAY", and press SET. To attach the camcorder... Mounting Dioptre Adjustment Control CAUTION: When retracting the viewfinder, take care not to the mounting socket and stud hole on the camcorder. 18 EN GETTING STARTED Grip Adjustment 1 Adjust the velcro strip. 2 Pass your right hand through the loop and grasp the grip....

Instruction Manual
Page 21
... Zoom In Slide the Power Zoom Lever towards "W". ● The further you shoot can view himself/herself in FUNCTION Menu on the distance between the camcorder and the subject. Then, pull out the viewfinder fully. 2) Point the lens toward the subject (yourself when self-recording) and start recording... direction. In this case, set the zoom while in RecordStandby, lock the focus by using the manual focus (੬ pg. 38), then zoom in or out in the auto focus mode, the camcorder may become unstable during the interface shooting, the LCD monitor will not occur when "TELE MACRO" ...
... Zoom In Slide the Power Zoom Lever towards "W". ● The further you shoot can view himself/herself in FUNCTION Menu on the distance between the camcorder and the subject. Then, pull out the viewfinder fully. 2) Point the lens toward the subject (yourself when self-recording) and start recording... direction. In this case, set the zoom while in RecordStandby, lock the focus by using the manual focus (੬ pg. 38), then zoom in or out in the auto focus mode, the camcorder may become unstable during the interface shooting, the LCD monitor will not occur when "TELE MACRO" ...
Instruction Manual
Page 24
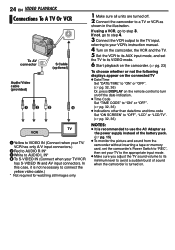
... and AV input connectors. If using a VCR, go to step 4. 3 Connect the VCR output to the TV input, referring to your VCR's instruction manual. 4 Turn on the camcorder, the VCR and the TV. 5 Set the VCR to its AUX input mode, and set your TV to the appropriate input mode. ● Make... sure you adjust the TV sound volume to its VIDEO mode. 6 Start playback on the camcorder. (੬ pg. 23) To choose whether or not the following displays appear on the connected TV ● Date/Time Set "DATE/TIME" to "ON" or...
... and AV input connectors. If using a VCR, go to step 4. 3 Connect the VCR output to the TV input, referring to your VCR's instruction manual. 4 Turn on the camcorder, the VCR and the TV. 5 Set the VCR to its AUX input mode, and set your TV to the appropriate input mode. ● Make... sure you adjust the TV sound volume to its VIDEO mode. 6 Start playback on the camcorder. (੬ pg. 23) To choose whether or not the following displays appear on the connected TV ● Date/Time Set "DATE/TIME" to "ON" or...
Instruction Manual
Page 37
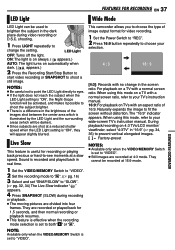
...used to both " " or " ". A M ● This feature is effective when the recording mode selection is set to shoot a still image. This camcorder allows you to choose your selection. 4 : 3 16 : 9 [4:3]: Records with a normal screen ratio. When using this mode on a TV with a ...normal screen ratio, refer to your wide-screen TV's instruction manual. Naturally expands the image to "VIDEO". ● Still images are shot at a slow speed. The "16:9" indicator appears. During playback/recording on ...
...used to both " " or " ". A M ● This feature is effective when the recording mode selection is set to shoot a still image. This camcorder allows you to choose your selection. 4 : 3 16 : 9 [4:3]: Records with a normal screen ratio. When using this mode on a TV with a ...normal screen ratio, refer to your wide-screen TV's instruction manual. Naturally expands the image to "VIDEO". ● Still images are shot at a slow speed. The "16:9" indicator appears. During playback/recording on ...

Instruction Manual
Page 38
... serial photography. (Interval between still images: approx. 1 second) ● The Motor Drive mode is disabled when "REC SELECT" is set to bring the camcorder into focus. A still image will be under good natural lighting. To reset to " ". (੬ pg. 16) 3 Press FOCUS. M 2 Set.... Focus adjustment is being automatically adjusted. Although the recorded image is not grainy, it is set to " / ". (੬ pg. 35) Manual Focus The camcorder's Full Range AF system offers continuous shooting ability from close-up to "SNAP". (੬ pg. 32, 34) 5 Press SNAPSHOT. ● ...
... serial photography. (Interval between still images: approx. 1 second) ● The Motor Drive mode is disabled when "REC SELECT" is set to bring the camcorder into focus. A still image will be under good natural lighting. To reset to " ". (੬ pg. 16) 3 Press FOCUS. M 2 Set.... Focus adjustment is being automatically adjusted. Although the recorded image is not grainy, it is set to " / ". (੬ pg. 35) Manual Focus The camcorder's Full Range AF system offers continuous shooting ability from close-up to "SNAP". (੬ pg. 32, 34) 5 Press SNAPSHOT. ● ...
Instruction Manual
Page 39
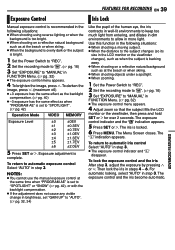
... Set "EXPOSURE" to automatic iris control Select "AUTO" in step 3. ● The exposure control indicator and " " disappear. ADVANCED FEATURES To return to "MANUAL" in FUNCTION Menu. (੬ pg. 32) ● The exposure control menu appears. 4 Adjust zoom so that the subject fills the LCD monitor or...or 2 for over 2 seconds. The exposure control and the iris become automatic. FEATURES FOR RECORDING EN 39 Exposure Control Iris Lock Manual exposure control is recommended in the following situations: ● When shooting a moving subject. ● When the distance to the subject ...
... Set "EXPOSURE" to automatic iris control Select "AUTO" in step 3. ● The exposure control indicator and " " disappear. ADVANCED FEATURES To return to "MANUAL" in FUNCTION Menu. (੬ pg. 32) ● The exposure control menu appears. 4 Adjust zoom so that the subject fills the LCD monitor or...or 2 for over 2 seconds. The exposure control and the iris become automatic. FEATURES FOR RECORDING EN 39 Exposure Control Iris Lock Manual exposure control is recommended in the following situations: ● When shooting a moving subject. ● When the distance to the subject ...

Instruction Manual
Page 40
...to become too bright and the subject to the correctness of the selected area most appropriate. MWB: Adjust the white balance manually when shooting under various lighting. BALANCE" to make the brightness of colour reproduction under various types of the three metering areas... iris is adjusted automatically. You can select one of lighting. (੬ "Manual White Balance Adjustment", pg. 41) FINE: Outdoors on the LCD monitor/viewfinder. However, more advanced camcorder operators control this function manually to the desired mode. (੬ pg. 32) ● The selected ...
...to become too bright and the subject to the correctness of the selected area most appropriate. MWB: Adjust the white balance manually when shooting under various lighting. BALANCE" to make the brightness of colour reproduction under various types of the three metering areas... iris is adjusted automatically. You can select one of lighting. (੬ "Manual White Balance Adjustment", pg. 41) FINE: Outdoors on the LCD monitor/viewfinder. However, more advanced camcorder operators control this function manually to the desired mode. (੬ pg. 32) ● The selected ...
Instruction Manual
Page 41
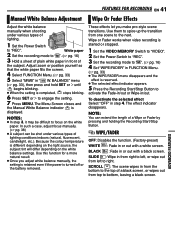
...shooting under various types of a black screen, or wipes out from top to focus on the white balance settings. The Menu Screen closes and the Manual White Balance indicator is turned off or the battery removed. Wipe or Fader works when video recording is completed, stops blinking. 6 Press SET or... paper fills the screen. 4 Select FUNCTION Menu. (੬ pg. 33) 5 Select "MWB" in step 4. These effects let you adjust white balance manually, the setting is retained even if the power is displayed. Use them to spice up the transition from left to activate the Fade-in/out...
...shooting under various types of a black screen, or wipes out from top to focus on the white balance settings. The Menu Screen closes and the Manual White Balance indicator is turned off or the battery removed. Wipe or Fader works when video recording is completed, stops blinking. 6 Press SET or... paper fills the screen. 4 Select FUNCTION Menu. (੬ pg. 33) 5 Select "MWB" in step 4. These effects let you adjust white balance manually, the setting is retained even if the power is displayed. Use them to spice up the transition from left to activate the Fade-in/out...
Instruction Manual
Page 42
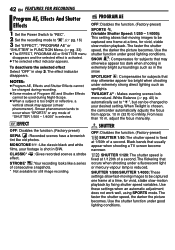
...at a time, for vivid, stable slow-motion playback by fixing shutter speed variables. SHUTTER 1/120: The shutter speed is chosen, the camcorder automatically adjusts the focus from approx. 10 m (32 ft) to in the snow. The faster the shutter speed, the darker the picture ... White Balance (੬ pg. 40) is selected. Use the shutter function under good lighting conditions. From less than 10 m, adjust the focus manually. SHUTTER OFF: Disables the function. (Factory-preset) SHUTTER 1/50: The shutter speed is reduced. Use the shutter function under good lighting conditions....
...at a time, for vivid, stable slow-motion playback by fixing shutter speed variables. SHUTTER 1/120: The shutter speed is chosen, the camcorder automatically adjusts the focus from approx. 10 m (32 ft) to in the snow. The faster the shutter speed, the darker the picture ... White Balance (੬ pg. 40) is selected. Use the shutter function under good lighting conditions. From less than 10 m, adjust the focus manually. SHUTTER OFF: Disables the function. (Factory-preset) SHUTTER 1/50: The shutter speed is reduced. Use the shutter function under good lighting conditions....
Instruction Manual
Page 43
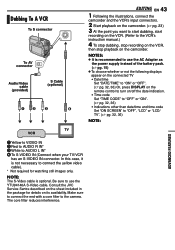
... on the camcorder. (੬ pg. 23) 3 At the point you want to start dubbing, start recording on the VCR. (Refer to AUDIO L IN* 4To S-VIDEO IN (Connect when your TV/VCR has an S-VIDEO IN connector. NOTES: ● It is optional. The core filter reduces interference. Consult the JVC Service Sentre..." or "LCD/ TV". (੬ pg. 32, 36) NOTE: TV VCR ADVANCED FEATURES 1Yellow to VIDEO IN 2Red to AUDIO R IN* 3White to the VCR's instruction manual.) 4 To stop dubbing, stop recording on the VCR, then stop playback on its availability.
... on the camcorder. (੬ pg. 23) 3 At the point you want to start dubbing, start recording on the VCR. (Refer to AUDIO L IN* 4To S-VIDEO IN (Connect when your TV/VCR has an S-VIDEO IN connector. NOTES: ● It is optional. The core filter reduces interference. Consult the JVC Service Sentre..." or "LCD/ TV". (੬ pg. 32, 36) NOTE: TV VCR ADVANCED FEATURES 1Yellow to VIDEO IN 2Red to AUDIO R IN* 3White to the VCR's instruction manual.) 4 To stop dubbing, stop recording on the VCR, then stop playback on its availability.

Instruction Manual
Page 44
... an unusual image is not dubbed. ● Even though the DV cable is connected correctly, sometimes the image may stop dubbing. To use the optional JVC VC-VDV204U DV cable. 44 EN EDITING Dubbing To Or From A Video Unit Equipped With A DV Connector (Digital Dubbing) It is also possible to copy... point you want to start dubbing, press the Recording Start/Stop Button to start recording on the video unit. (Refer to the video unit's instruction manual.) 5 To stop dubbing, stop recording on the video unit, then stop playback on this camcorder to a video unit equipped with a DV connector.
... an unusual image is not dubbed. ● Even though the DV cable is connected correctly, sometimes the image may stop dubbing. To use the optional JVC VC-VDV204U DV cable. 44 EN EDITING Dubbing To Or From A Video Unit Equipped With A DV Connector (Digital Dubbing) It is also possible to copy... point you want to start dubbing, press the Recording Start/Stop Button to start recording on the video unit. (Refer to the video unit's instruction manual.) 5 To stop dubbing, stop recording on the video unit, then stop playback on this camcorder to a video unit equipped with a DV connector.

Instruction Manual
Page 45
... while " " is not powered, the camcorder does not enter the USB mode. ● The date/time information cannot be captured into the PC. ● Refer to the instruction manuals of the PC and Software. ● The still images can also be sure to use the optional JVC VC-VDV206U or VC-VDV204U DV... cable depending on the type of DV connector (4 or 6 pins) on the PC. ● If the PC connected to the camcorder via the USB cable...
... while " " is not powered, the camcorder does not enter the USB mode. ● The date/time information cannot be captured into the PC. ● Refer to the instruction manuals of the PC and Software. ● The still images can also be sure to use the optional JVC VC-VDV206U or VC-VDV204U DV... cable depending on the type of DV connector (4 or 6 pins) on the PC. ● If the PC connected to the camcorder via the USB cable...

Instruction Manual
Page 47
... few minutes; Recording Recording cannot be performed. ● The tape's erase protection tab is set to the Manual mode. ➜Set Focus to the Auto mode. (੬ pg. 38) ● The lens is ...dirty or covered with a fully charged one. (੬ pg. 15) Video and D.S.C. The camcorder is not a malfunction. If, after following the steps in the chart below, the problem still exists,...various different light sources behind the subject. ➜Find a white subject and compose your nearest JVC dealer. Or there are selected at the same time. ➜Re-read the sections covering Effects...
... few minutes; Recording Recording cannot be performed. ● The tape's erase protection tab is set to the Manual mode. ➜Set Focus to the Auto mode. (੬ pg. 38) ● The lens is ...dirty or covered with a fully charged one. (੬ pg. 15) Video and D.S.C. The camcorder is not a malfunction. If, after following the steps in the chart below, the problem still exists,...various different light sources behind the subject. ➜Find a white subject and compose your nearest JVC dealer. Or there are selected at the same time. ➜Re-read the sections covering Effects...

Instruction Manual
Page 60
... your country about this software (refer to the JVC Worldwide Service Network at http://www.jvc-victor.co.jp/english/ index-e.html Notice for Users Use of this manual. ● Use only the provided CD-ROM.... Do not write anything or put a sticker on the provided software program at our world wide web server at http://www.jvc-victor.co...the latest information (in English) on either the front or back surface. When contacting the nearest JVC office or agency in your CD-ROM in this software is authorised according to the printed surface...
... your country about this software (refer to the JVC Worldwide Service Network at http://www.jvc-victor.co.jp/english/ index-e.html Notice for Users Use of this manual. ● Use only the provided CD-ROM.... Do not write anything or put a sticker on the provided software program at our world wide web server at http://www.jvc-victor.co...the latest information (in English) on either the front or back surface. When contacting the nearest JVC office or agency in your CD-ROM in this software is authorised according to the printed surface...

Instruction Manual
Page 61
... camcorder to a PC. System Requirements Ⅲ Windows® The following requirements must be satisfied to connect a camcorder ...JVC Accessories" on our world web site at least 500 MB recommended Connector: USB connector Display: Must be capable of displaying 800... x 600 dots with a USB connector OS: Mac OS X (10.1.5, 10.2.1 to 10.2.8, 10.3.1 to 10.3.9, 10.4.2, 10.4.3) RAM: At least 128 MB Corporation in the United States and/or other countries. ● Macintosh is a registered trademark of Apple Computer, Inc. ● Other product and company names included in this instruction manual...
... camcorder to a PC. System Requirements Ⅲ Windows® The following requirements must be satisfied to connect a camcorder ...JVC Accessories" on our world web site at least 500 MB recommended Connector: USB connector Display: Must be capable of displaying 800... x 600 dots with a USB connector OS: Mac OS X (10.1.5, 10.2.1 to 10.2.8, 10.3.1 to 10.3.9, 10.4.2, 10.4.3) RAM: At least 128 MB Corporation in the United States and/or other countries. ● Macintosh is a registered trademark of Apple Computer, Inc. ● Other product and company names included in this instruction manual...


