Instructions
Page 6
... which the TV is being shortened and the possibility of the device and important information which uses the high-quality HD-ILA projection system. As the lamp warms up , you can turn off the power, the following operations are included with the replacement lamp kit. When... the LAMP/PROGRAM LED indicator on the screen disappears. The lamp is a consumable item Replace the lamp when it 's normal operating temperature. There are summarized below . After the cooling has been performed for purchasing JVC's model HD-70G886, HD-61Z886 or HD-61Z786 HDTV-ready projection television ...
... which the TV is being shortened and the possibility of the device and important information which uses the high-quality HD-ILA projection system. As the lamp warms up , you can turn off the power, the following operations are included with the replacement lamp kit. When... the LAMP/PROGRAM LED indicator on the screen disappears. The lamp is a consumable item Replace the lamp when it 's normal operating temperature. There are summarized below . After the cooling has been performed for purchasing JVC's model HD-70G886, HD-61Z886 or HD-61Z786 HDTV-ready projection television ...
Instructions
Page 7
...the screen may form on the lamp glass, there is being used by the screen frame. Do not replace the lamp immediately after use . Be careful when handling the lamp. 9. The picture will blow...keep the TV on how to the Appendix for details on for more than 24 hours consecutively. Do not touch the lamp glass If the lamp is operating. ILA element characteristics Do not project still ... 7. Caution! There is dirt from a cold place to fall. 8. Please do not open the rear cabinet of this case, wait until the condensation has gone before it can scratch easily. When the ...
...the screen may form on the lamp glass, there is being used by the screen frame. Do not replace the lamp immediately after use . Be careful when handling the lamp. 9. The picture will blow...keep the TV on how to the Appendix for details on for more than 24 hours consecutively. Do not touch the lamp glass If the lamp is operating. ILA element characteristics Do not project still ... 7. Caution! There is dirt from a cold place to fall. 8. Please do not open the rear cabinet of this case, wait until the condensation has gone before it can scratch easily. When the ...
Instructions
Page 9
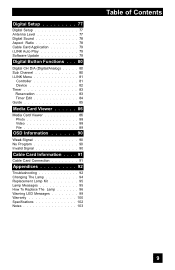
... Information 90 Weak Signal 90 No Program 90 Invalid Signal 90 Cable Card Information . . . . 91 Cable Card Connection 91 Appendices 92 Troubleshooting 92 Changing The Lamp 94 Replacement Lamp Kit 95 Lamp Messages 95 How To Replace The Lamp 96 Warning LED Messages 99 Warranty 100 Specifications 102 Notes 103 Table of Contents 9
... Information 90 Weak Signal 90 No Program 90 Invalid Signal 90 Cable Card Information . . . . 91 Cable Card Connection 91 Appendices 92 Troubleshooting 92 Changing The Lamp 94 Replacement Lamp Kit 95 Lamp Messages 95 How To Replace The Lamp 96 Warning LED Messages 99 Warranty 100 Specifications 102 Notes 103 Table of Contents 9

Instructions
Page 15
...Setup Getting Started Getting Started These quick setup pages will provide you, in three easy steps, with the basic information you need to begin using JVC's Hyperscan feature, press and hold CH+ or CH-. Slide the cover on the back of the remote down . To move rapidly through the ...questions, or for basic operation of the television. To use the onscreen menus, MENU BACK press the MENU button. POWER T TV CATV MUL VCR DVD Note: • If the lamp replacement message appears when you turn the volume up or down towards the bottom of five channels per second. If you take...
...Setup Getting Started Getting Started These quick setup pages will provide you, in three easy steps, with the basic information you need to begin using JVC's Hyperscan feature, press and hold CH+ or CH-. Slide the cover on the back of the remote down . To move rapidly through the ...questions, or for basic operation of the television. To use the onscreen menus, MENU BACK press the MENU button. POWER T TV CATV MUL VCR DVD Note: • If the lamp replacement message appears when you turn the volume up or down towards the bottom of five channels per second. If you take...
Instructions
Page 65
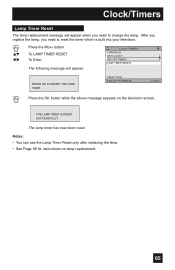
... can use the Lamp Timer Reset only after replacing the lamp. • See Page 96 for instructions on the television screen. After you replace the lamp, you need to reset the timer which is built into your television. π† √® Press the MENU button To LAMP TIMER RESET To ...message will appear when you need to change the lamp. CLOCK / TIMERS PREVIOUS SET CLOCK ON / OFF TIMER LAMP TIMER RESET PRESS OK TO RESET THE LAMP TIMER. The lamp timer has now been reset. Clock/Timers Lamp Timer Reset The lamp replacement message will appear. NEXT PAGE SELECT OPERATE MENU EXIT...
... can use the Lamp Timer Reset only after replacing the lamp. • See Page 96 for instructions on the television screen. After you replace the lamp, you need to reset the timer which is built into your television. π† √® Press the MENU button To LAMP TIMER RESET To ...message will appear when you need to change the lamp. CLOCK / TIMERS PREVIOUS SET CLOCK ON / OFF TIMER LAMP TIMER RESET PRESS OK TO RESET THE LAMP TIMER. The lamp timer has now been reset. Clock/Timers Lamp Timer Reset The lamp replacement message will appear. NEXT PAGE SELECT OPERATE MENU EXIT...
Instructions
Page 92
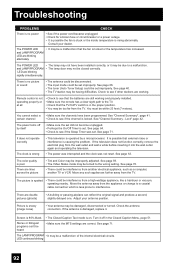
... from another electrical appliance, such as a computer, another TV or VCR. Picture is damaged, replace it off by a microprocessor. Turn it . The POWER LED and LAMP/PROGRAM LED are blinking rapidly simultaneously. • The lamp may not have been programmed. See "Channel Summary - It...tuner (Auto Tuner Setup) could be set improperly. See page 40. • The TV station may be a malfunction of the internal electrical circuits. There are still working . The LAMP/PROGRAM • It may be having difficulties. LED continues blinking 92 Troubleshooting PROBLEMS CHECK There...
... from another electrical appliance, such as a computer, another TV or VCR. Picture is damaged, replace it off by a microprocessor. Turn it . The POWER LED and LAMP/PROGRAM LED are blinking rapidly simultaneously. • The lamp may not have been programmed. See "Channel Summary - It...tuner (Auto Tuner Setup) could be set improperly. See page 40. • The TV station may be a malfunction of the internal electrical circuits. There are still working . The LAMP/PROGRAM • It may be having difficulties. LED continues blinking 92 Troubleshooting PROBLEMS CHECK There...

Instructions
Page 94
... to work specifically with the TV plugged in could cause a malfunction and or damage to replace the lamp. Unplug the TV. Attempting to replace the lamp with this lamp. If you feel any warmth as you place your hand onto the lamp surface. Replace the lamp with the television plugged into ...glass surface will likely cause the lamp to safely replace the lamp. This television uses a 110-Watt high-pressure mercury lamp to replace the lamp with part number TS-CL110U only! NEVER attempt to project images onto the television screen. When the lamp heats up to its operating life...
... to work specifically with the TV plugged in could cause a malfunction and or damage to replace the lamp. Unplug the TV. Attempting to replace the lamp with this lamp. If you feel any warmth as you place your hand onto the lamp surface. Replace the lamp with the television plugged into ...glass surface will likely cause the lamp to safely replace the lamp. This television uses a 110-Watt high-pressure mercury lamp to replace the lamp with part number TS-CL110U only! NEVER attempt to project images onto the television screen. When the lamp heats up to its operating life...

Instructions
Page 95
...your dealer or call 1-800-252-5722, or go to replace the lamp. REFER TO OWNER'S MANUAL FOR REPLACEMENT INSTRUCTIONS. To purchase this message appears when you turn on how to www.jvc.com. See page 96 on the TV when the lamp needs to be disposed of with normal trash. Press the OK... button to make the message disappear, or replace the lamp. 95 Note: • This message will include the following: ...
...your dealer or call 1-800-252-5722, or go to replace the lamp. REFER TO OWNER'S MANUAL FOR REPLACEMENT INSTRUCTIONS. To purchase this message appears when you turn on how to www.jvc.com. See page 96 on the TV when the lamp needs to be disposed of with normal trash. Press the OK... button to make the message disappear, or replace the lamp. 95 Note: • This message will include the following: ...
Instructions
Page 96
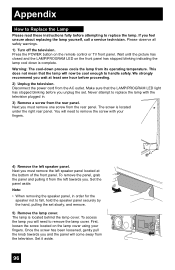
... all safety warnings. 1) Turn off the television. Next you . Note: • When removing the speaker panel, in . 3) Remove a screw from the rear panel. The lamp is located under the right rear panel. Set it from its operating temperature. Wait until the picture has closed and the... AC outlet. Set the panel aside. First, loosen the screw located on the remote control or TV front panel. Appendix How to Replace the Lamp Please read these instructions fully before attempting to replace the lamp with your fingers. You will need to handle safely. The screw is located behind the...
... all safety warnings. 1) Turn off the television. Next you . Note: • When removing the speaker panel, in . 3) Remove a screw from the rear panel. The lamp is located under the right rear panel. Set it from its operating temperature. Wait until the picture has closed and the... AC outlet. Set the panel aside. First, loosen the screw located on the remote control or TV front panel. Appendix How to Replace the Lamp Please read these instructions fully before attempting to replace the lamp with your fingers. You will need to handle safely. The screw is located behind the...
Instructions
Page 97
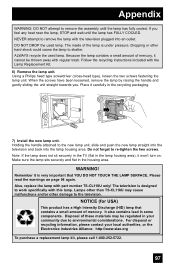
...Holding the handle attached to remove the lamp with the television plugged into the lamp housing area. Make sure the lamp sits securely and flat in the recycling packaging. 7) Install the new lamp unit. Also, replace the lamp with the Lamp Replacement Kit. 6) Remove the lamp unit. The television is very important that...org To purchase a replacement lamp kit, please call 1-800-252-5722. 97 Disposal of the lamp is under pressure. Do not forget to remove the assembly until the lamp has FULLY COOLED. Note: If the lamp does not sit securely in the TV (flat in the lamp housing area), it ...
...Holding the handle attached to remove the lamp with the television plugged into the lamp housing area. Make sure the lamp sits securely and flat in the recycling packaging. 7) Install the new lamp unit. Also, replace the lamp with the Lamp Replacement Kit. 6) Remove the lamp unit. The television is very important that...org To purchase a replacement lamp kit, please call 1-800-252-5722. 97 Disposal of the lamp is under pressure. Do not forget to remove the assembly until the lamp has FULLY COOLED. Note: If the lamp does not sit securely in the TV (flat in the lamp housing area), it ...
Instructions
Page 98
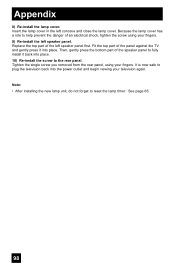
...tighten the screw using your fingers. 9) Re-install the left speaker panel. Note: • After installing the new lamp unit, do not forget to help prevent the danger of the panel against the TV and gently press it back into place. 10) Re-install the screw to plug the television back into... place. Appendix 8) Re-install the lamp cover. Insert the lamp cover in the left speaker panel first. See page 65. 98 Because the lamp cover has a role to reset the lamp timer. It is now safe to the rear panel. Replace the top part of the speaker panel to fully install...
...tighten the screw using your fingers. 9) Re-install the left speaker panel. Note: • After installing the new lamp unit, do not forget to help prevent the danger of the panel against the TV and gently press it back into place. 10) Re-install the screw to plug the television back into... place. Appendix 8) Re-install the lamp cover. Insert the lamp cover in the left speaker panel first. See page 65. 98 Because the lamp cover has a role to reset the lamp timer. It is now safe to the rear panel. Replace the top part of the speaker panel to fully install...
Instructions
Page 99
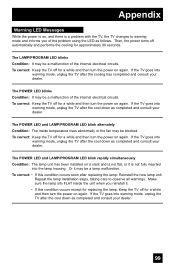
... for approximately 90 seconds. Repeat the lamp installation steps, taking care to warning mode and informs you reinstall it may be a lamp malfunction. If the TV goes into warning mode, unplug the TV after replacing the lamp: Reinstall the new lamp unit. If the TV goes into warning mode, unplug the TV after the cool down as completed and...
... for approximately 90 seconds. Repeat the lamp installation steps, taking care to warning mode and informs you reinstall it may be a lamp malfunction. If the TV goes into warning mode, unplug the TV after replacing the lamp: Reinstall the new lamp unit. If the TV goes into warning mode, unplug the TV after the cool down as completed and...


