User Guide
Page 5
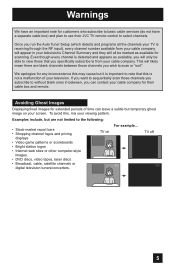
... Examples include, but it is important to note that you wish to scan or "surf". We apologize for their JVC TV remote control to select channels. For example... TV on your cable company. This will appear in between those that this , mix your television. Warnings We have a... Avoiding Ghost Images Displaying fixed images for extended periods of your viewing pattern. To avoid this is receiving through the RF input), every channel number available from your cable company will likely mean there are not limited to the following: • Stock-market ...
... Examples include, but it is important to note that you wish to scan or "surf". We apologize for their JVC TV remote control to select channels. For example... TV on your cable company. This will appear in between those that this , mix your television. Warnings We have a... Avoiding Ghost Images Displaying fixed images for extended periods of your viewing pattern. To avoid this is receiving through the RF input), every channel number available from your cable company will likely mean there are not limited to the following: • Stock-market ...

User Guide
Page 10
... L PR R INPUT 4 INPUT 5 / INPUT 1 AUDIO AUDIO OUT Y VIDEO VIDEO PB L L L PR R R R Side Panel Diagram POWER INPUT 3 S-VIDEO Y VIDEO PB L PR R INPUT 4 INPUT 5 / INPUT 1 AUDIO AUDIO OUT Y VIDEO VIDEO PB L L L PR R R R 75 Ω (VHF/UHF) DIGITAL AUDIO INPUT 1 OPTICAL OUT INPUT 2 PHOTO VIEWER / SERVICE 75 Ω (VHF/UHF) DIGITAL AUDIO INPUT 1 OPTICAL OUT INPUT 2 PHOTO VIEWER / SERVICE INPUT MENU + CHANNEL - Quick Setup TV Models...
... L PR R INPUT 4 INPUT 5 / INPUT 1 AUDIO AUDIO OUT Y VIDEO VIDEO PB L L L PR R R R Side Panel Diagram POWER INPUT 3 S-VIDEO Y VIDEO PB L PR R INPUT 4 INPUT 5 / INPUT 1 AUDIO AUDIO OUT Y VIDEO VIDEO PB L L L PR R R R 75 Ω (VHF/UHF) DIGITAL AUDIO INPUT 1 OPTICAL OUT INPUT 2 PHOTO VIEWER / SERVICE 75 Ω (VHF/UHF) DIGITAL AUDIO INPUT 1 OPTICAL OUT INPUT 2 PHOTO VIEWER / SERVICE INPUT MENU + CHANNEL - Quick Setup TV Models...

User Guide
Page 13
..., game consoles, etc. Quick Setup Step 2 - No VCR Connection Cable or Antenna Output Coaxial Cable TV Rear Panel 75 Ω (VHF/UHF) DIGITAL AUDIO INPUT 1 OPTICAL OUT INPUT 2 PHOTO VIEWER / SERVICE 13 S-Video Cable Used to the satellite TV manual. Connecting your devices To make video connections with S-Video VCRs, Camcorders and DVD players...
..., game consoles, etc. Quick Setup Step 2 - No VCR Connection Cable or Antenna Output Coaxial Cable TV Rear Panel 75 Ω (VHF/UHF) DIGITAL AUDIO INPUT 1 OPTICAL OUT INPUT 2 PHOTO VIEWER / SERVICE 13 S-Video Cable Used to the satellite TV manual. Connecting your devices To make video connections with S-Video VCRs, Camcorders and DVD players...

User Guide
Page 14
... IN OUT Cable or Antenna Output OR Coaxial Cable AUDIO AUDIO AUDIO COMPONENT AUDIO COMPONENT INPUT 3 S-VIDEO Y VIDEO PB L PR R INPUT 4 Y VIDEO INPUT 5 / INPUT 1 AUDIO AUDIO OUT VIDEO PB L L L PR R R R 75 Ω (VHF/UHF) TV Rear Panel DIGITAL AUDIO INPUT 1 OPTICAL OUT INPUT 2 PHOTO VIEWER / SERVICE Green Blue Red Y PB PR OUT AUDIO OUT R L DVD Player Note...
... IN OUT Cable or Antenna Output OR Coaxial Cable AUDIO AUDIO AUDIO COMPONENT AUDIO COMPONENT INPUT 3 S-VIDEO Y VIDEO PB L PR R INPUT 4 Y VIDEO INPUT 5 / INPUT 1 AUDIO AUDIO OUT VIDEO PB L L L PR R R R 75 Ω (VHF/UHF) TV Rear Panel DIGITAL AUDIO INPUT 1 OPTICAL OUT INPUT 2 PHOTO VIEWER / SERVICE Green Blue Red Y PB PR OUT AUDIO OUT R L DVD Player Note...

User Guide
Page 15
Diagram #2 R LV IN OUT VCR IN OUT OR Quick Setup Cable or Antenna Output IN Two-Way Splitter OUT OUT (Not supplied) Coaxial Cable AUDIO AUDIO AUDIO COMPONENT AUDIO COMPONENT INPUT 3 S-VIDEO Y VIDEO PB L PR R INPUT 4 INPUT 5 / INPUT 1 AUDIO AUDIO OUT Y VIDEO VIDEO PB L L L PR R R R 75 Ω (VHF/UHF) TV Rear Panel DIGITAL AUDIO INPUT 1 OPTICAL OUT INPUT 2 PHOTO VIEWER / SERVICE Green Blue Red Y PB PR OUT AUDIO OUT R L DVD Player 15
Diagram #2 R LV IN OUT VCR IN OUT OR Quick Setup Cable or Antenna Output IN Two-Way Splitter OUT OUT (Not supplied) Coaxial Cable AUDIO AUDIO AUDIO COMPONENT AUDIO COMPONENT INPUT 3 S-VIDEO Y VIDEO PB L PR R INPUT 4 INPUT 5 / INPUT 1 AUDIO AUDIO OUT Y VIDEO VIDEO PB L L L PR R R R 75 Ω (VHF/UHF) TV Rear Panel DIGITAL AUDIO INPUT 1 OPTICAL OUT INPUT 2 PHOTO VIEWER / SERVICE Green Blue Red Y PB PR OUT AUDIO OUT R L DVD Player 15

User Guide
Page 16
... AUDIO OUT. Note: • If your camcorder is a mono sound model it to you televison by using the input jacks located on the back of the TV. TV Rear Panel CAMCORDER INPUT 3 S-VIDEO Y VIDEO PB L PR R INPUT 4 INPUT 5 / INPUT 1 AUDIO AUDIO OUT Y VIDEO VIDEO PB L L L PR R R R AUDIO AUDIO AUDIO COMPONENT AUDIO COMPONENT 1) Connect a yellow composite cable from...
... AUDIO OUT. Note: • If your camcorder is a mono sound model it to you televison by using the input jacks located on the back of the TV. TV Rear Panel CAMCORDER INPUT 3 S-VIDEO Y VIDEO PB L PR R INPUT 4 INPUT 5 / INPUT 1 AUDIO AUDIO OUT Y VIDEO VIDEO PB L L L PR R R R AUDIO AUDIO AUDIO COMPONENT AUDIO COMPONENT 1) Connect a yellow composite cable from...

User Guide
Page 17
... for your home theater system. • If you have a device connected to INPUT-1 or INPUT-2, you will not be able to the RIGHT AUDIO INPUT on the back of the TV to hear any audio from the AUDIO OUT on the amplifier. Quick Setup Connecting to... an External Amplifier TV Rear Panel Speaker Amplifier Speaker INPUT 3 S-VIDEO Y VIDEO PB L PR R INPUT 4 Y VIDEO INPUT 5 / INPUT 1 AUDIO AUDIO OUT VIDEO PB L L L PR R R R AUDIO AUDIO AUDIO COMPONENT AUDIO COMPONENT 1) Connect a white cable...
... for your home theater system. • If you have a device connected to INPUT-1 or INPUT-2, you will not be able to the RIGHT AUDIO INPUT on the back of the TV to hear any audio from the AUDIO OUT on the amplifier. Quick Setup Connecting to... an External Amplifier TV Rear Panel Speaker Amplifier Speaker INPUT 3 S-VIDEO Y VIDEO PB L PR R INPUT 4 Y VIDEO INPUT 5 / INPUT 1 AUDIO AUDIO OUT VIDEO PB L L L PR R R R AUDIO AUDIO AUDIO COMPONENT AUDIO COMPONENT 1) Connect a white cable...
User Guide
Page 18
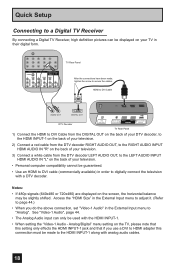
... "Analog". Quick Setup Connecting to a Digital TV Receiver By connecting a Digital TV Receiver, high definition pictures can only be used with the HDMI INPUT-1. • When setting the "Video-1 Audio - AUDIO AUDIO AUDIO COMPONENT AUDIO COMPONENT INPUT 3 S-VIDEO Y VIDEO PB L PR R INPUT 4 INPUT 5 / INPUT 1 AUDIO AUDIO OUT Y VIDEO VIDEO PB L L L PR R R R TV Rear Panel After the connections have...
... "Analog". Quick Setup Connecting to a Digital TV Receiver By connecting a Digital TV Receiver, high definition pictures can only be used with the HDMI INPUT-1. • When setting the "Video-1 Audio - AUDIO AUDIO AUDIO COMPONENT AUDIO COMPONENT INPUT 3 S-VIDEO Y VIDEO PB L PR R INPUT 4 INPUT 5 / INPUT 1 AUDIO AUDIO OUT Y VIDEO VIDEO PB L L L PR R R R TV Rear Panel After the connections have...

User Guide
Page 19
... Panel 1) Connect the HDMI Cable from the DIGITAL OUT on the back of your DTV or HDMI device, to the HDMI INPUT-1 on the back of your TV in the External Input menu to Digital. Notes: • When you do the above connection, set -top box, DVD player, A/V receiver or an audio and... Interface) is changed to the HDMI. • If the HDMI output device signal is changed (for a short time until the signal becomes stable. • This TV can accept 480i, 480p, 720p and 1080i signals via HDMI. 19
... Panel 1) Connect the HDMI Cable from the DIGITAL OUT on the back of your DTV or HDMI device, to the HDMI INPUT-1 on the back of your TV in the External Input menu to Digital. Notes: • When you do the above connection, set -top box, DVD player, A/V receiver or an audio and... Interface) is changed to the HDMI. • If the HDMI output device signal is changed (for a short time until the signal becomes stable. • This TV can accept 480i, 480p, 720p and 1080i signals via HDMI. 19

User Guide
Page 20
Amplifier 75 Ω (VHF/UHF) DIGITAL AUDIO INPUT 1 OPTICAL OUT INPUT 2 PHOTO VIEWER / SERVICE TV Rear Panel 1) Connect the optical cable from underneath the television to your owners manual on Optical Out in the Sound Adjust Menu. See page 50. &#...8226; Refer to the back of the amplifier. The signal that has an optical digital input terminal by using an optical digital...
Amplifier 75 Ω (VHF/UHF) DIGITAL AUDIO INPUT 1 OPTICAL OUT INPUT 2 PHOTO VIEWER / SERVICE TV Rear Panel 1) Connect the optical cable from underneath the television to your owners manual on Optical Out in the Sound Adjust Menu. See page 50. &#...8226; Refer to the back of the amplifier. The signal that has an optical digital input terminal by using an optical digital...

User Guide
Page 24
...choice in a submenu • Back up the onscreen menu, press the MENU button on your new television. Menu Initial Setup - + Tuner Setup External Input Picture Adjust Sound Adjust Clock/Timers Interactive Plug-in Menu Photo Viewer Auto Demo Front Menu Video Status Aspect Auto Tuner Setup Menu Exit MENU... this guide to the highlighted or selected item in certain menu options The "press button" icon means you use the MENU button on the TV's side panel instead of the remote, Front Menu screen showing "Video Status", "Aspect", "Auto Tuner Setup" and "Menu" will appear the ...
...choice in a submenu • Back up the onscreen menu, press the MENU button on your new television. Menu Initial Setup - + Tuner Setup External Input Picture Adjust Sound Adjust Clock/Timers Interactive Plug-in Menu Photo Viewer Auto Demo Front Menu Video Status Aspect Auto Tuner Setup Menu Exit MENU... this guide to the highlighted or selected item in certain menu options The "press button" icon means you use the MENU button on the TV's side panel instead of the remote, Front Menu screen showing "Video Status", "Aspect", "Auto Tuner Setup" and "Menu" will appear the ...
User Guide
Page 25
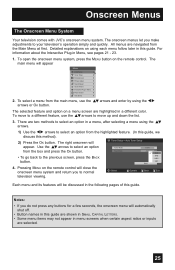
... you to select an option in Menu, see pages 21 - 23. 1. The right onscreen will appear Menu Initial Setup - + Tuner Setup External Input Picture Adjust Sound Adjust Clock/Timers Interactive Plug-in a different color. To open the onscreen menu system, press the MENU button on the remote control... two methods to normal television viewing. Start STD HRC IRC 4. Onscreen Menus The Onscreen Menu System Your television comes with JVC's onscreen menu system. The main menu will - + Tuner Setup > Auto Tuner Setup appear. The selected feature and option on using the π† ...
... you to select an option in Menu, see pages 21 - 23. 1. The right onscreen will appear Menu Initial Setup - + Tuner Setup External Input Picture Adjust Sound Adjust Clock/Timers Interactive Plug-in a different color. To open the onscreen menu system, press the MENU button on the remote control... two methods to normal television viewing. Start STD HRC IRC 4. Onscreen Menus The Onscreen Menu System Your television comes with JVC's onscreen menu system. The main menu will - + Tuner Setup > Auto Tuner Setup appear. The selected feature and option on using the π† ...
User Guide
Page 26
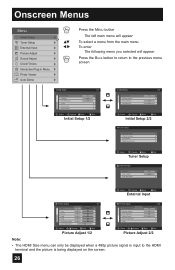
... Tuner Setup Channel Summary Find Channel Digital Antenna Level Select BACK Operate Back MENU Exit Tuner Setup External Input HDMI Size Video-1 Audio Video Input Label Auto Digital Select BACK Operate Back MENU Exit External Input Picture Adjust 1/2 Video Status Standard Tint 0 Color 0 Picture 0 Bright 0 Detail 0 Energy Saver Mode 0 Color ...OK BACK Operate Back MENU Exit Picture Adjust 2/2 Note: • The HDMI Size menu can only be displayed when a 480p picture signal is input to the HDMI terminal and the picture is being displayed on the screen. 26
... Tuner Setup Channel Summary Find Channel Digital Antenna Level Select BACK Operate Back MENU Exit Tuner Setup External Input HDMI Size Video-1 Audio Video Input Label Auto Digital Select BACK Operate Back MENU Exit External Input Picture Adjust 1/2 Video Status Standard Tint 0 Color 0 Picture 0 Bright 0 Detail 0 Energy Saver Mode 0 Color ...OK BACK Operate Back MENU Exit Picture Adjust 2/2 Note: • The HDMI Size menu can only be displayed when a 480p picture signal is input to the HDMI terminal and the picture is being displayed on the screen. 26

User Guide
Page 27
Menu Initial Setup - + Tuner Setup External Input Picture Adjust Sound Adjust Clock/Timers Interactive Plug-in Menu Photo Viewer Auto Demo Onscreen Menus π† √® Press the MENU button The ...
Menu Initial Setup - + Tuner Setup External Input Picture Adjust Sound Adjust Clock/Timers Interactive Plug-in Menu Photo Viewer Auto Demo Onscreen Menus π† √® Press the MENU button The ...

User Guide
Page 29
...√® To "Initial Setup" To enter To "V-Chip" To operate (Password input screen will appear) Enter the password by using the 10 button keypad Initial Setup > V-Chip V-Chip Set US TV Ratings Set Movie Ratings Set Canadian Ratings English Set Canadian Ratings French Advanced V-Chip Rating...displayed sometimes between "Set Canadian Ratings French" and "Unrated". Note: Some programs, and movies are broadcast without a ratings signal. Even if you input the wrong password, go back to V-Chip menu (see "Set Lock Code", page 35. • "Advanced V-Chip Rating" and "Advanced ...
...√® To "Initial Setup" To enter To "V-Chip" To operate (Password input screen will appear) Enter the password by using the 10 button keypad Initial Setup > V-Chip V-Chip Set US TV Ratings Set Movie Ratings Set Canadian Ratings English Set Canadian Ratings French Advanced V-Chip Rating...displayed sometimes between "Set Canadian Ratings French" and "Unrated". Note: Some programs, and movies are broadcast without a ratings signal. Even if you input the wrong password, go back to V-Chip menu (see "Set Lock Code", page 35. • "Advanced V-Chip Rating" and "Advanced ...

User Guide
Page 31
...√® π† √® Press the MENU button To "Initial Setup" To enter To "V-Chip" To operate (Password input screen will appear) Enter the password by using the 10 button keypad The V-Chip main screen will appear To turn the locking feature on...top row of that column is locked if the icon appears instead of all TV 14 shows, move the cursor to lock Press the MENU button when finished Set US TV Ratings V/FV S L D TV TV TV TV MA 14 PG G - - - - - - - - - - - - - - - TV TV Y7 Y - - - To block viewing of a "-". Select OK Operate...
...√® π† √® Press the MENU button To "Initial Setup" To enter To "V-Chip" To operate (Password input screen will appear) Enter the password by using the 10 button keypad The V-Chip main screen will appear To turn the locking feature on...top row of that column is locked if the icon appears instead of all TV 14 shows, move the cursor to lock Press the MENU button when finished Set US TV Ratings V/FV S L D TV TV TV TV MA 14 PG G - - - - - - - - - - - - - - - TV TV Y7 Y - - - To block viewing of a "-". Select OK Operate...

User Guide
Page 32
... Movie (MPAA) Ratings π† √® π† √® Press the MENU button To "Initial Setup" To enter To "V-Chip" To operate (Password input screen will appear) Enter the password by using the 10 button keypad The V-Chip main screen will appear √® π† √® To...
... Movie (MPAA) Ratings π† √® π† √® Press the MENU button To "Initial Setup" To enter To "V-Chip" To operate (Password input screen will appear) Enter the password by using the 10 button keypad The V-Chip main screen will appear √® π† √® To...

User Guide
Page 33
... Canadian V-Chip Ratings Press the MENU button π† √® π† √® To "Initial Setup" To enter To "V-Chip" To operate (Password input screen will be no offensive language, nudity or sexual content. ❒ G - G C8+ C - - - Initial Setup Canadian V-Chip Ratings ❒ E - Exempt Exempt programming includes: news, sports, documentaries...
... Canadian V-Chip Ratings Press the MENU button π† √® π† √® To "Initial Setup" To enter To "V-Chip" To operate (Password input screen will be no offensive language, nudity or sexual content. ❒ G - G C8+ C - - - Initial Setup Canadian V-Chip Ratings ❒ E - Exempt Exempt programming includes: news, sports, documentaries...

User Guide
Page 34
...V-Chip "On" or "Off" To "Unrated" To "View" or "Block" Press MENU when done Initial Setup > V-Chip V-Chip Set US TV Ratings Set Movie Ratings Set Canadian Ratings English Set Canadian Ratings French Advanced V-Chip Rating Advanced Canadian Rating Unrated Select BACK Operate Back On View...Press the MENU button π† √® π† √® To "Initial Setup" To enter To "V-Chip" To operate (Password input screen will appear) Enter the password by using the 10 button keypad √® π† √® The V-Chip main screen will be ...
...V-Chip "On" or "Off" To "Unrated" To "View" or "Block" Press MENU when done Initial Setup > V-Chip V-Chip Set US TV Ratings Set Movie Ratings Set Canadian Ratings English Set Canadian Ratings French Advanced V-Chip Rating Advanced Canadian Rating Unrated Select BACK Operate Back On View...Press the MENU button π† √® π† √® To "Initial Setup" To enter To "V-Chip" To operate (Password input screen will appear) Enter the password by using the 10 button keypad √® π† √® The V-Chip main screen will be ...

User Guide
Page 35
...below. π† √® π† √® Press the MENU button To "Initial Setup" To enter To "Set Lock Code" To operate (Password input screen will appear on setting your lock code number down and keep it . No. - - - - Notes: • After a power interruption you wish. Channel Guard...screen. If the wrong code is now set the password, use the 10 button keypad Press the OK button to finish (your rating limits. Your TV comes preset with a lock code of "0000". You may be accessed until the correct lock code is entered. To change the code to watch...
...below. π† √® π† √® Press the MENU button To "Initial Setup" To enter To "Set Lock Code" To operate (Password input screen will appear on setting your lock code number down and keep it . No. - - - - Notes: • After a power interruption you wish. Channel Guard...screen. If the wrong code is now set the password, use the 10 button keypad Press the OK button to finish (your rating limits. Your TV comes preset with a lock code of "0000". You may be accessed until the correct lock code is entered. To change the code to watch...


