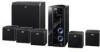

Instructions
Page 7
..., 44.1 kHz, or 48 kHz. • If the track information (album name, artist, and track title, etc.) is recorded, it appears in the file control display on the TV screen. (See page 24.) • It is recommended that you record a file at 640 x 480 resolution. (If a file has been recorded at...@ML (Main Profile at Main Level)/SP@ML (Simple Profile at Main Level)/MP@LL (Main Profile at Low Level). • Audio streams should be displayed.) • This system can only recognize and play baseline JPEG files. picture size: 352 x 288 (CIF) Max. bit rate: 384 kbps 3 For ASF files •...
..., 44.1 kHz, or 48 kHz. • If the track information (album name, artist, and track title, etc.) is recorded, it appears in the file control display on the TV screen. (See page 24.) • It is recommended that you record a file at 640 x 480 resolution. (If a file has been recorded at...@ML (Main Profile at Main Level)/SP@ML (Simple Profile at Main Level)/MP@LL (Main Profile at Low Level). • Audio streams should be displayed.) • This system can only recognize and play baseline JPEG files. picture size: 352 x 288 (CIF) Max. bit rate: 384 kbps 3 For ASF files •...

Instructions
Page 8
Front panel (center unit) Display window 28 27 17 19 26 18 22 12 12 12 12 13 13 17 4 16 16 16 17 16, 20, 22, 25 20, 23 22 20, 23 Remote sensor: 6 16 Index of parts and controls The numbers in the figures indicate the pages where the details of the parts are described.
Front panel (center unit) Display window 28 27 17 19 26 18 22 12 12 12 12 13 13 17 4 16 16 16 17 16, 20, 22, 25 20, 23 22 20, 23 Remote sensor: 6 16 Index of parts and controls The numbers in the figures indicate the pages where the details of the parts are described.

Instructions
Page 17
... This system may not recognize some files even though their formats are listed above. • The battery of both the system and the device. • JVC bears no responsibility for iPod (supplied) CAUTION • Be sure to the component video output. Do not use an AC plug adapter (not supplied). 13... any loss of files in the USB mass storage class device while using this system and selecting USB MEMORY as the source, the file control display appears on the TV screen. (See page 24.) Center unit (on the power cord to damage the cord. Connecting a USB mass storage class device ...
... This system may not recognize some files even though their formats are listed above. • The battery of both the system and the device. • JVC bears no responsibility for iPod (supplied) CAUTION • Be sure to the component video output. Do not use an AC plug adapter (not supplied). 13... any loss of files in the USB mass storage class device while using this system and selecting USB MEMORY as the source, the file control display appears on the TV screen. (See page 24.) Center unit (on the power cord to damage the cord. Connecting a USB mass storage class device ...

Instructions
Page 19
... To release it, press DVD 3. Select the subtitle language. NOTE • The operating buttons may differ depending on the DVD player. JVC 01* PIONEER 11 KENWOOD 03, 04 PROSCAN 12 MAGNAVOX 05 RCA 12 MARANTZ 06 SAMSUNG 13 MITSUBISHI 07 SONY 14 ONKYO 08, 09 ... DVD 3 DVD 8 1 - 9, 0 while pressing SHIFT TOP MENU MENU 2 / 3 / 5 / K ENTER 4 / x 1 / y 7 AUDIO SUBTITLE ZOOM Turn on or off the DVD player. Display a DVD menu. Examples: For a MAGNAVOX DVD player: Press 0, then 5. For a PANASONIC DVD player: Press 1, then 0. * 01 is the initial setting.
... To release it, press DVD 3. Select the subtitle language. NOTE • The operating buttons may differ depending on the DVD player. JVC 01* PIONEER 11 KENWOOD 03, 04 PROSCAN 12 MAGNAVOX 05 RCA 12 MARANTZ 06 SAMSUNG 13 MITSUBISHI 07 SONY 14 ONKYO 08, 09 ... DVD 3 DVD 8 1 - 9, 0 while pressing SHIFT TOP MENU MENU 2 / 3 / 5 / K ENTER 4 / x 1 / y 7 AUDIO SUBTITLE ZOOM Turn on or off the DVD player. Display a DVD menu. Examples: For a MAGNAVOX DVD player: Press 0, then 5. For a PANASONIC DVD player: Press 1, then 0. * 01 is the initial setting.

Instructions
Page 20
... lamp lights in this mode. NOTE • A small amount of the source selecting buttons (VIDEO1 - 3, USB MEMORY 6, or iPod 6). Basic operations The buttons on the display window. Turning the system on by pressing the following buttons; - iPod/USB MEMORY CONTROL ‹/8 on the center unit. (Turning on /off . This is turned...
... lamp lights in this mode. NOTE • A small amount of the source selecting buttons (VIDEO1 - 3, USB MEMORY 6, or iPod 6). Basic operations The buttons on the display window. Turning the system on by pressing the following buttons; - iPod/USB MEMORY CONTROL ‹/8 on the center unit. (Turning on /off . This is turned...

Instructions
Page 21
...Be sure to the PHONES jack on the center unit, the system automatically cancels the surround mode (see page 27) currently selected, deactivates the speakers, and activates the headphone mode. Headphone mode When using the headphones, the following : • Press MUTING again. • Press AUDIO VOLUME ...also cancels the Sleep Timer. 17 Basic operations See page 16 for button locations. On the remote control: Press AUDIO VOLUME +/-. on the display window. To cancel Press SLEEP repeatedly, until "SLEEP - -" appears. • The SLEEP indicator goes off. • Turning off time...
...Be sure to the PHONES jack on the center unit, the system automatically cancels the surround mode (see page 27) currently selected, deactivates the speakers, and activates the headphone mode. Headphone mode When using the headphones, the following : • Press MUTING again. • Press AUDIO VOLUME ...also cancels the Sleep Timer. 17 Basic operations See page 16 for button locations. On the remote control: Press AUDIO VOLUME +/-. on the display window. To cancel Press SLEEP repeatedly, until "SLEEP - -" appears. • The SLEEP indicator goes off. • Turning off time...

Instructions
Page 22
...TVs and HighDefinition TVs that the center unit is displayed. NOTE • You can be distorted when you press the button, the indication of the speakers and subwoofer 1 Press SPK LEVEL to "INT-LACE." • All JVC progressive TVs and High-Definition TVs are not fully...TV by using component video cord (not supplied). (See page 9.) 7While USB MEMORY playback is displayed. When "PROGRESS" is selected, the PROGRESSIVE indicator lights on the display window. 2 Press 2/3 to +6 while speaker indication is stopped 1 Press and hold SCAN MODE for 2 seconds. to adjust the output ...
...TVs and HighDefinition TVs that the center unit is displayed. NOTE • You can be distorted when you press the button, the indication of the speakers and subwoofer 1 Press SPK LEVEL to "INT-LACE." • All JVC progressive TVs and High-Definition TVs are not fully...TV by using component video cord (not supplied). (See page 9.) 7While USB MEMORY playback is displayed. When "PROGRESS" is selected, the PROGRESSIVE indicator lights on the display window. 2 Press 2/3 to +6 while speaker indication is stopped 1 Press and hold SCAN MODE for 2 seconds. to adjust the output ...

Instructions
Page 24
On the remote control: Press 7 repeatedly. If an iPod is selected as a source 1 Display the current charge mode. Press above button again if iPod does not start playback. Skip to "CHARGE ON" for 2 seconds. Turning off the iPod. 20 ... ON/OFF the charge mode 7While "iPod" is not connected firmly, "iPod NO CONNECT" appears. •The iPod indicator lights up on the display. 4 Start playing on the display. On the center unit: Press and hold iPod 6. To pause playback On the remote control: Press iPod 6 during playback. Fast-forward/fast-reverse...
On the remote control: Press 7 repeatedly. If an iPod is selected as a source 1 Display the current charge mode. Press above button again if iPod does not start playback. Skip to "CHARGE ON" for 2 seconds. Turning off the iPod. 20 ... ON/OFF the charge mode 7While "iPod" is not connected firmly, "iPod NO CONNECT" appears. •The iPod indicator lights up on the display. 4 Start playing on the display. On the center unit: Press and hold iPod 6. To pause playback On the remote control: Press iPod 6 during playback. Fast-forward/fast-reverse...

Instructions
Page 26
... center unit: Press iPod/USB MEMORY CONTROL ‹/8. For MPEG-1/MPEG-2/ASF files Pressing TOP MENU or MENU shows the file control display (see page 28) File number Group number Elapsed playing time (hour:minute:second) (during playback. To prevent this, the system automatically... dims the screen if a static picture is displayed for about 3 seconds (slide-show). For JPEG files Each file (still pictures) is played back Signal and speaker indicators (see page 24) on the TV screen for over 5 minutes (the screen saver...
... center unit: Press iPod/USB MEMORY CONTROL ‹/8. For MPEG-1/MPEG-2/ASF files Pressing TOP MENU or MENU shows the file control display (see page 28) File number Group number Elapsed playing time (hour:minute:second) (during playback. To prevent this, the system automatically... dims the screen if a static picture is displayed for about 3 seconds (slide-show). For JPEG files Each file (still pictures) is played back Signal and speaker indicators (see page 24) on the TV screen for over 5 minutes (the screen saver...

Instructions
Page 27
...Press h 10, 4, then 0. The system starts playback from the first file of the selected group. • For details on using the file control display. (See page 24.) • This feature may not work for some files. • For MP3/WMA/WAV file, the search speed is shown in... Press 4 or x. NOTE • You can also make this operations using the number buttons, see "How to use the number buttons" on the display window. 2 While the display window shows "- -", use the number buttons To select 3: Press 3. Fast-forward/fast-reverse search Press 1 or y during playback. NOTE • ...
...Press h 10, 4, then 0. The system starts playback from the first file of the selected group. • For details on using the file control display. (See page 24.) • This feature may not work for some files. • For MP3/WMA/WAV file, the search speed is shown in... Press 4 or x. NOTE • You can also make this operations using the number buttons, see "How to use the number buttons" on the display window. 2 While the display window shows "- -", use the number buttons To select 3: Press 3. Fast-forward/fast-reverse search Press 1 or y during playback. NOTE • ...

Instructions
Page 28
... : appears when stopped. Advanced operations for JPEG) OFF (The on-screen bar disappears) 7 Contents of groups, tracks, and files may not be displayed correctly depending on recording conditions. • The order of the on the TV screen. Current group Current track (file) Current track (file) / ...total track Total track (file) number (file) number on current group Playback status The file control display appears automatically during playback (for MP3/WMA/WAV only) or while stopped. 1 Press2/3/5/Y to select the desired group/track/file while playback is...
... : appears when stopped. Advanced operations for JPEG) OFF (The on-screen bar disappears) 7 Contents of groups, tracks, and files may not be displayed correctly depending on recording conditions. • The order of the on the TV screen. Current group Current track (file) Current track (file) / ...total track Total track (file) number (file) number on current group Playback status The file control display appears automatically during playback (for MP3/WMA/WAV only) or while stopped. 1 Press2/3/5/Y to select the desired group/track/file while playback is...

Instructions
Page 29
...2" in step 2. Example: 5 Press 5/Y to adjust other parameters. 8 Press VFP. Resuming playback When Resume Playback is stored. ("RESUME" appears on the display window.) • Turning off the power (see page 16) • Pressing 7 once • Changing the source (see page 16) To start playback ...The current VFP settings appear again. 7 Repeat steps 3 to 6 to change the setting. 6 Press ENTER. NOTE • If the setting display disappears in 7During playback or while paused 1 Press ZOOM. Zooming in the middle of the magnification steps varies depending on the TV screen. To...
...2" in step 2. Example: 5 Press 5/Y to adjust other parameters. 8 Press VFP. Resuming playback When Resume Playback is stored. ("RESUME" appears on the display window.) • Turning off the power (see page 16) • Pressing 7 once • Changing the source (see page 16) To start playback ...The current VFP settings appear again. 7 Repeat steps 3 to 6 to change the setting. 6 Press ENTER. NOTE • If the setting display disappears in 7During playback or while paused 1 Press ZOOM. Zooming in the middle of the magnification steps varies depending on the TV screen. To...

Instructions
Page 30
Operations for button locations. Repeats all tracks/files. Each time you press REPEAT, the Repeat mode changes. REPEAT ALL Repeat mode is off. Repeats the current REPEAT GROUP group. Example: Repeat mode indicator See page 21 for USB MEMORY Repeating playback When using the REPEAT button: Press REPEAT. Display window 1 ALL No indication TV screen Meanings Repeats the current REPEAT TRACK track/files. The system plays back the file normally. 26
Operations for button locations. Repeats all tracks/files. Each time you press REPEAT, the Repeat mode changes. REPEAT ALL Repeat mode is off. Repeats the current REPEAT GROUP group. Example: Repeat mode indicator See page 21 for USB MEMORY Repeating playback When using the REPEAT button: Press REPEAT. Display window 1 ALL No indication TV screen Meanings Repeats the current REPEAT TRACK track/files. The system plays back the file normally. 26

Instructions
Page 32
...power off the surround mode Press SURROUND repeatedly until "SURROUND OFF" appears on the display window. All Channel Stereo can reproduce a larger stereo sound field using all the connected (and activated) speakers. Dolby Surround mode indicator GPLII: Lights when Dolby Pro Logic II is automatically ...• STADIUM STADIUM mode adds clarity and spreads the sound, like in an outdoor stadium. • All Channel Stereo All Channel Stereo (ALL CH STEREO) mode can be used while reproducing 2 channel stereo source. GD: Lights when Dolby Digital signals come in. : Lights when DTS signals...
...power off the surround mode Press SURROUND repeatedly until "SURROUND OFF" appears on the display window. All Channel Stereo can reproduce a larger stereo sound field using all the connected (and activated) speakers. Dolby Surround mode indicator GPLII: Lights when Dolby Pro Logic II is automatically ...• STADIUM STADIUM mode adds clarity and spreads the sound, like in an outdoor stadium. • All Channel Stereo All Channel Stereo (ALL CH STEREO) mode can be used while reproducing 2 channel stereo source. GD: Lights when Dolby Digital signals come in. : Lights when DTS signals...
Instructions
Page 36
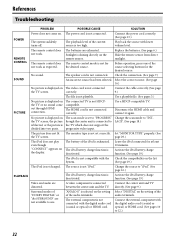
.... (See page 6.) Hide the remote sensor from direct sunlight. Before operation, press one of the current source is not charged. The speaker cord is not connected correctly. correctly. The HDMI cord is not connected. Set "MONITOR TYPE" properly. (See page 29.) The iPod... input. Activate the iPod battery charge function. (See page 19.) Video and audio are distorted. A video component is shining directly on the display. The power cord is not playable. Connect the cable correctly. (See page 9.) The file is not connected. The external component is connected ...
.... (See page 6.) Hide the remote sensor from direct sunlight. Before operation, press one of the current source is not charged. The speaker cord is not connected correctly. correctly. The HDMI cord is not connected. Set "MONITOR TYPE" properly. (See page 29.) The iPod... input. Activate the iPod battery charge function. (See page 19.) Video and audio are distorted. A video component is shining directly on the display. The power cord is not playable. Connect the cable correctly. (See page 9.) The file is not connected. The external component is connected ...