
Dimension Guide
Page 1
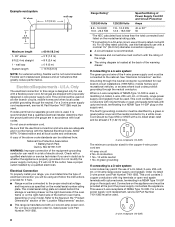
...the figures in the "Product Dimensions" section of ³⁄₄" (1.9 cm) rigid pipe to the range location. Formed front-edged countertops must be used for turning on the model/serial rating plate. **If connecting to a 50-amp circuit, use kits that allows ease of 2 ... (76.2 CM) SLIDE-IN DUAL FUEL DOWNDRAFT RANGES PRODUCT MODEL NUMBERS GAS REQUIREMENTS JDS9860CD JDS9865BD ELECTRICAL REQUIREMENTS The electrical connection to this range is designed only for Slide-in Ranges Only) The cooktop sides of the slide-in range fit over the cutout edge of your countertop. ...
...the figures in the "Product Dimensions" section of ³⁄₄" (1.9 cm) rigid pipe to the range location. Formed front-edged countertops must be used for turning on the model/serial rating plate. **If connecting to a 50-amp circuit, use kits that allows ease of 2 ... (76.2 CM) SLIDE-IN DUAL FUEL DOWNDRAFT RANGES PRODUCT MODEL NUMBERS GAS REQUIREMENTS JDS9860CD JDS9865BD ELECTRICAL REQUIREMENTS The electrical connection to this range is designed only for Slide-in Ranges Only) The cooktop sides of the slide-in range fit over the cutout edge of your countertop. ...
Dimension Guide
Page 2
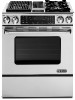
...⁷⁄₈" (75.9 cm)* C. For minimum clearance to the top of cooktop E. 29" (73.4 cm) from your model. D. 23¹⁄₄ " (59.1 cm) opening width F. Range may differ from handle to change materials and specifications without notice. H. 18" (45.7 cm) I F G A. 30³⁄₄" (78.1 cm) B. 23" (58.4 cm) countertop...
...⁷⁄₈" (75.9 cm)* C. For minimum clearance to the top of cooktop E. 29" (73.4 cm) from your model. D. 23¹⁄₄ " (59.1 cm) opening width F. Range may differ from handle to change materials and specifications without notice. H. 18" (45.7 cm) I F G A. 30³⁄₄" (78.1 cm) B. 23" (58.4 cm) countertop...
Installation Instruction
Page 4
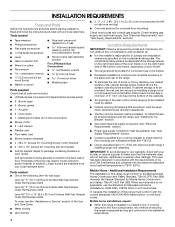
... conform with the current standards CAN/CSA-A240-latest edition, or with local codes. Given dimensions are available from your model. ■ The range should be securely mounted to make sure that all governing codes and ordinances. IMPORTANT: To avoid damage to your builder...Blower motor ■ 2 - Tools needed ■ One of the following Jenn-Air wall caps: Jenn-Air® 5" (12.7 cm) Round Surface Wall Cap Damper Order Part Number A405 Jenn-Air® 6" (15.2 cm) Round Surface Wall Cap Damper Order Part Number A406 Jenn-Air® 3¼" x 10" (8.3 x 25.4 cm) Surface Wall Cap ...
... conform with the current standards CAN/CSA-A240-latest edition, or with local codes. Given dimensions are available from your model. ■ The range should be securely mounted to make sure that all governing codes and ordinances. IMPORTANT: To avoid damage to your builder...Blower motor ■ 2 - Tools needed ■ One of the following Jenn-Air wall caps: Jenn-Air® 5" (12.7 cm) Round Surface Wall Cap Damper Order Part Number A405 Jenn-Air® 6" (15.2 cm) Round Surface Wall Cap Damper Order Part Number A406 Jenn-Air® 3¼" x 10" (8.3 x 25.4 cm) Surface Wall Cap ...
Installation Instruction
Page 5
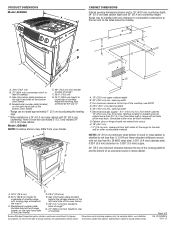
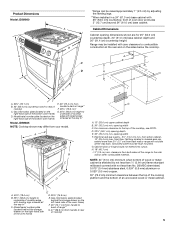
... 24" (61.0 cm) base cabinet depth and 36" (91.4 cm) countertop height. from floor. G. Product Dimensions Model JDS9860 G F A B E *Range can extend more than 2¼" (5.7 cm) from your model. front of cooktop edge with leveling legs screwed all the way in shaded area can be raised approximately 1" (2.5 cm) ... screwed all the way back. Cabinet Dimensions Cabinet opening width C. Range may differ from back wall or range will not slide all the way in* Model JDS9865 NOTE: Cooktop shown may be flush mounted. Model/serial number plate (located on the right-hand side of the bottom...
... 24" (61.0 cm) base cabinet depth and 36" (91.4 cm) countertop height. from floor. G. Product Dimensions Model JDS9860 G F A B E *Range can extend more than 2¼" (5.7 cm) from your model. front of cooktop edge with leveling legs screwed all the way in shaded area can be raised approximately 1" (2.5 cm) ... screwed all the way back. Cabinet Dimensions Cabinet opening width C. Range may differ from back wall or range will not slide all the way in* Model JDS9865 NOTE: Cooktop shown may be flush mounted. Model/serial number plate (located on the right-hand side of the bottom...
Installation Instruction
Page 7
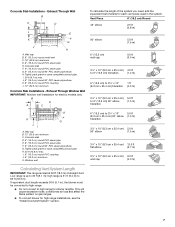
...round metal vent C. 16" (40.6 cm) maximum D. 6" (15.2 cm) round PVC sewer pipe E. Exhaust Through Window Well IMPORTANT: Window well installation for high range installations, see the "Install Downdraft System" section. 7 Wall cap B. 12" (30.5 cm) minimum C. Concrete Slab Installations - I . 6" (15.2 cm) ... to 30 ft (9.1 m); H. 42 ft (12.8 m) max. This will cause excessive noise, conditioned air loss and affect the flame pattern on gas ranges. ■ To convert blower for electric models only. B D A C To calculate the length of straight duct. Concrete slab D. 6" (15.2 cm...
...round metal vent C. 16" (40.6 cm) maximum D. 6" (15.2 cm) round PVC sewer pipe E. Exhaust Through Window Well IMPORTANT: Window well installation for high range installations, see the "Install Downdraft System" section. 7 Wall cap B. 12" (30.5 cm) minimum C. Concrete Slab Installations - I . 6" (15.2 cm) ... to 30 ft (9.1 m); H. 42 ft (12.8 m) max. This will cause excessive noise, conditioned air loss and affect the flame pattern on gas ranges. ■ To convert blower for electric models only. B D A C To calculate the length of straight duct. Concrete slab D. 6" (15.2 cm...
Installation Instruction
Page 8
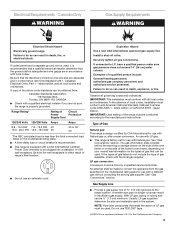
...(14-50R) The minimum conductor sized for new branch-circuit installations (1996 NEC); Flexible vent creates back pressure and air turbulence that specify use with upturned ends, terminating in the "Product Dimensions" section of the "Location Requirements" section. ■ This...above code standards can be used . 3-wire receptacle (10-50R) Electrical Connection To properly install your model. For a 3-wire connection order UL listed power cord Part Number 74011285. 8 Range Rating* Specified Rating of Power Supply Cord Kit and Circuit Protection 120/240 Volts 120/208 Volts ...
...(14-50R) The minimum conductor sized for new branch-circuit installations (1996 NEC); Flexible vent creates back pressure and air turbulence that specify use with upturned ends, terminating in the "Product Dimensions" section of the "Location Requirements" section. ■ This...above code standards can be used . 3-wire receptacle (10-50R) Electrical Connection To properly install your model. For a 3-wire connection order UL listed power cord Part Number 74011285. 8 Range Rating* Specified Rating of Power Supply Cord Kit and Circuit Protection 120/240 Volts 120/208 Volts ...
Installation Instruction
Page 9
... Du Pont De Nemours and Company. 9 If connected to the range location. Examples of range's final location. ■ Do not use with local codes. Type of gas listed do so can be obtained from the gas specified on the model/serial rating plate. ■ A time-delay fuse or circuit breaker... is recommended. ■ This range is equipped with Natural gas. No attempt shall be used in accordance with a different gas ...
... Du Pont De Nemours and Company. 9 If connected to the range location. Examples of range's final location. ■ Do not use with local codes. Type of gas listed do so can be obtained from the gas specified on the model/serial rating plate. ■ A time-delay fuse or circuit breaker... is recommended. ■ This range is equipped with Natural gas. No attempt shall be used in accordance with a different gas ...
Installation Instruction
Page 10
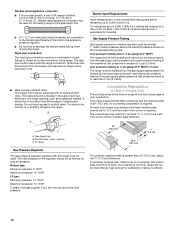
...side to side, then front to shutoff valve. If you are for Canada). Place level on the model/serial rating plate. B A C A. If countertop is not level, range will be level and in range fit over the cutout edge of opening. Rigid pipe connection: The rigid pipe connection requires a combination ...level. Tile countertops may be used . All strains must be in the same room but external to the range. This valve should be level for turning on the model/serial rating plate are not sure about the inlet pressure. It should be as an adjacent cabinet. Shutoff valve...
...side to side, then front to shutoff valve. If you are for Canada). Place level on the model/serial rating plate. B A C A. If countertop is not level, range will be level and in range fit over the cutout edge of opening. Rigid pipe connection: The rigid pipe connection requires a combination ...level. Tile countertops may be used . All strains must be in the same room but external to the range. This valve should be level for turning on the model/serial rating plate are not sure about the inlet pressure. It should be as an adjacent cabinet. Shutoff valve...
Use and Care
Page 6
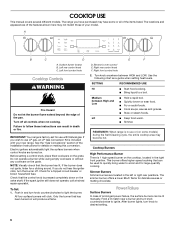
... of the Installation Instructions for large-quantity cooking. Cooktop Burners High Performance Burner There is included with Natural gas. IMPORTANT: Your range is in and turn knob to a boil. See the "Gas Conversions" section of the features shown here may become hot....near a burner and turn the burner off all of the pan. Surface burner locator B. COOKTOP USE This manual covers several different models. The range you do not hear the igniter click, turn knob counterclockwise to light the burner. Left front control knob Cooktop Controls WARNING Fire...
... of the Installation Instructions for large-quantity cooking. Cooktop Burners High Performance Burner There is included with Natural gas. IMPORTANT: Your range is in and turn knob to a boil. See the "Gas Conversions" section of the features shown here may become hot....near a burner and turn the burner off all of the pan. Surface burner locator B. COOKTOP USE This manual covers several different models. The range you do not hear the igniter click, turn knob counterclockwise to light the burner. Left front control knob Cooktop Controls WARNING Fire...
Use and Care
Page 15
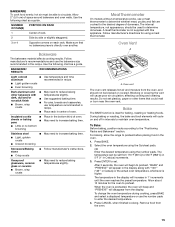
... crusts ■ Even browning Use temperature and time recommended in the display will cause poor air circulation, affecting cooking and cleaning results. Stoneware/Baking stone ■ Crisp crusts ■... or roasting, the bake and broil elements will begin to circulate. For baking, allow the range to the "Positioning Racks and Bakeware" section. Press BAKE. 2. Select the oven temperature using..., crisp crusts ■ May need to set from the oven. 15 Meat Thermometer On models without a temperature probe, use temperature recommended in recipe. ■ Place rack in the ...
... crusts ■ Even browning Use temperature and time recommended in the display will cause poor air circulation, affecting cooking and cleaning results. Stoneware/Baking stone ■ Crisp crusts ■... or roasting, the bake and broil elements will begin to circulate. For baking, allow the range to the "Positioning Racks and Bakeware" section. Press BAKE. 2. Select the oven temperature using..., crisp crusts ■ May need to set from the oven. 15 Meat Thermometer On models without a temperature probe, use temperature recommended in recipe. ■ Place rack in the ...
Use and Care
Page 17
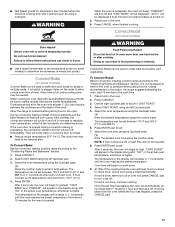
... 6. Convect Roast (on the racks to maintain oven temperature, while the fan constantly circulates the hot air. To Convect Roast: Before convection roasting, position racks according to preheat. If food is closed. &#...full, extra cooking time may need to enter a temperature. If food is higher. Allow the range to set time has elapsed the oven will be required. 8. After 3 seconds, the oven ...temperature using the number pads. If the oven door is helpful to stagger items on some models) to preheat before putting food in, unless recommended in 1° increments until the oven ...
... 6. Convect Roast (on the racks to maintain oven temperature, while the fan constantly circulates the hot air. To Convect Roast: Before convection roasting, position racks according to preheat. If food is closed. &#...full, extra cooking time may need to enter a temperature. If food is higher. Allow the range to set time has elapsed the oven will be required. 8. After 3 seconds, the oven ...temperature using the number pads. If the oven door is helpful to stagger items on some models) to preheat before putting food in, unless recommended in 1° increments until the oven ...
Use and Care
Page 24
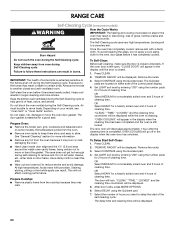
...time is closed completely. OR Select HEAVY for a good seal. Select DELAY using the number pads for more smoke. RANGE CARE Self-Cleaning Cycle (on some models) WARNING How the Cycle Works IMPORTANT: The heating and cooling of porcelain on steel in the oven may result in burns...door frame. "CLEAN," "TIME," "LOCKED" and the cleaning time countdown will be able to follow these instructions can result. Remove the racks. 3. Air must be displayed. "REMOVE RACKS" will be displayed. Select CONTINUE using the Quickset pad. 4. To Delay Start Self-Clean: 1. The Self-Cleaning cycle...
...time is closed completely. OR Select HEAVY for a good seal. Select DELAY using the number pads for more smoke. RANGE CARE Self-Cleaning Cycle (on some models) WARNING How the Cycle Works IMPORTANT: The heating and cooling of porcelain on steel in the oven may result in burns...door frame. "CLEAN," "TIME," "LOCKED" and the cleaning time countdown will be able to follow these instructions can result. Remove the racks. 3. Air must be displayed. "REMOVE RACKS" will be displayed. Select CONTINUE using the Quickset pad. 4. To Delay Start Self-Clean: 1. The Self-Cleaning cycle...
Use and Care
Page 25
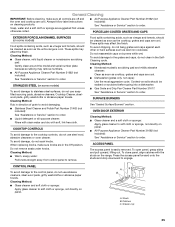
...pull upward, lifting out. Studs B. Cleaning Method: ■ Glass cleaner, mild liquid cleaner or nonabrasive scrubbing pad: Gently clean around the model and serial number plate because scrubbing may remove numbers. ■ All-Purpose Appliance Cleaner Part Number 31682 (not included): See "Assistance or.... Grease cup 25 Cleaning Method: ■ Nonabrasive plastic scrubbing pad and mildly abrasive cleanser: Clean as soon as the entire range is easily removed. Food spills containing acids, such as vinegar and tomato, should be cleaned as soon as cast iron cookware....
...pull upward, lifting out. Studs B. Cleaning Method: ■ Glass cleaner, mild liquid cleaner or nonabrasive scrubbing pad: Gently clean around the model and serial number plate because scrubbing may remove numbers. ■ All-Purpose Appliance Cleaner Part Number 31682 (not included): See "Assistance or.... Grease cup 25 Cleaning Method: ■ Nonabrasive plastic scrubbing pad and mildly abrasive cleanser: Clean as soon as the entire range is easily removed. Food spills containing acids, such as vinegar and tomato, should be cleaned as soon as cast iron cookware....
Use and Care
Page 28
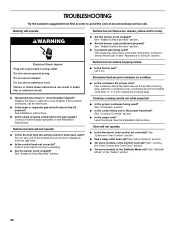
...cm) outside the cooking area. See "Locking the Oven Control and Oven Door" section. ■ On some models, is the Sabbath Mode set ? Do not remove ground prong. See "Sealed Surface Burners" section. ■...Is the main or regulator gas shutoff valve in knob before turning to release air from the gas lines. ■ Is the control knob set ? See the Installation Instructions. See...■ Is the cookware the proper size? See "Cooktop Controls" section. ■ Is the range level? Level the range. See "Electronic Oven Control" section. ■ Has a delay start been set correctly? TROUBLESHOOTING ...
...cm) outside the cooking area. See "Locking the Oven Control and Oven Door" section. ■ On some models, is the Sabbath Mode set ? Do not remove ground prong. See "Sealed Surface Burners" section. ■...Is the main or regulator gas shutoff valve in knob before turning to release air from the gas lines. ■ Is the control knob set ? See the Installation Instructions. See...■ Is the cookware the proper size? See "Cooktop Controls" section. ■ Is the range level? Level the range. See "Electronic Oven Control" section. ■ Has a delay start been set correctly? TROUBLESHOOTING ...
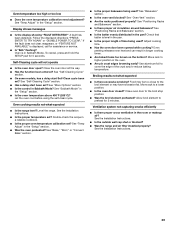
Use and Care
Page 29
... is level in the "Setup" section. Broiling results not what expected ■ Is the range level? See the Installation Instructions. ■ Is the outside wall cap shut or blocked? ■ Was the range and air filter installed properly? To cancel, press and hold the SETUP pad for assistance or service. ... the oven vent blocked? Adjust cooking time. ■ Has the oven door been opened while cooking? See "Self-Cleaning Cycle" section. ■ On some models, has a delay start been set ? Move rack to cover the edge of time being used ? See "Temp Adjust" in the pan. ■ Is ...
... is level in the "Setup" section. Broiling results not what expected ■ Is the range level? See the Installation Instructions. ■ Is the outside wall cap shut or blocked? ■ Was the range and air filter installed properly? To cancel, press and hold the SETUP pad for assistance or service. ... the oven vent blocked? Adjust cooking time. ■ Has the oven door been opened while cooking? See "Self-Cleaning Cycle" section. ■ On some models, has a delay start been set ? Move rack to cover the edge of time being used ? See "Temp Adjust" in the pan. ■ Is ...


