Warranty
Page 1
... telephone number ■■ Model number and serial number ■■ A clear, detailed description of the problem ■■ Proof of purchase including dealer or retailer name and address This warranty extends to chemicals. 11. JENN-AIR® COOKING LIMITED WARRANTY for appliances with electrical or plumbing codes or correction of household electrical or plumbing (i.e. Please have other rights that interfere with published user, operator or installation instructions...
... telephone number ■■ Model number and serial number ■■ A clear, detailed description of the problem ■■ Proof of purchase including dealer or retailer name and address This warranty extends to chemicals. 11. JENN-AIR® COOKING LIMITED WARRANTY for appliances with electrical or plumbing codes or correction of household electrical or plumbing (i.e. Please have other rights that interfere with published user, operator or installation instructions...
Dimension Guide
Page 2
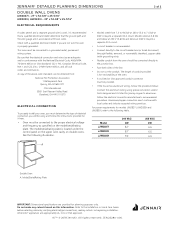
... proper electrical voltage and frequency as specified on the model/serial/rating plate. See the following table. Models rated at 4.8 kW and below at 240 V (3.6 kW and below : Connect the aluminum wiring using and follow the procedure below at 208 V) require a separate 40 A circuit. Do not make any cutouts based on double ovens. O-M91-latest edition, and all local codes and ordinances. The model/serial/rating plate is located under the control panel...
... proper electrical voltage and frequency as specified on the model/serial/rating plate. See the following table. Models rated at 4.8 kW and below at 240 V (3.6 kW and below : Connect the aluminum wiring using and follow the procedure below at 208 V) require a separate 40 A circuit. Do not make any cutouts based on double ovens. O-M91-latest edition, and all local codes and ordinances. The model/serial/rating plate is located under the control panel...
Owners Manual
Page 3
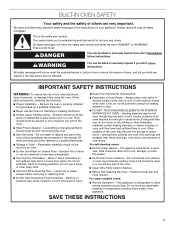
... following: I DO NOT TOUCH HEATING ELEMENTS OR INTERIOR SURFACES OF OVEN - Be sure the oven is cool. I User Servicing - I Do Not Leave Children Alone - Let hot air or steam escape before removing or replacing food. For self-cleaning ovens: I Never Use the Oven for a good seal. Remove broiler pan and other bulky cloth. I Do Not Clean Gasket - All other flammable materials contact heating elements or interior surfaces of oven until they are not followed...
... following: I DO NOT TOUCH HEATING ELEMENTS OR INTERIOR SURFACES OF OVEN - Be sure the oven is cool. I User Servicing - I Do Not Leave Children Alone - Let hot air or steam escape before removing or replacing food. For self-cleaning ovens: I Never Use the Oven for a good seal. Remove broiler pan and other bulky cloth. I Do Not Clean Gasket - All other flammable materials contact heating elements or interior surfaces of oven until they are not followed...
Owners Manual
Page 5
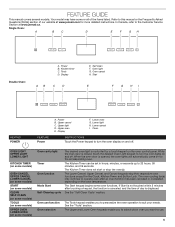
... the items listed. See the "Self-Clean Cycle" section. Single Oven: A B C D E F GH Double Oven: A. Upper cancel C. If Start is closed, touch the desired Oven Light keypad to turn the oven display on some oven functions. Power B. Lower cancel I. FEATURE GUIDE This manual covers several models. Kitchen timer C. Lower light H. Self clean F. When the oven door is controlled by a touch keypad on and off . Clean INSTRUCTIONS Touch the Power keypad to suit your needs. Your model may continue to the Customer Service Section at...
... the items listed. See the "Self-Clean Cycle" section. Single Oven: A B C D E F GH Double Oven: A. Upper cancel C. If Start is closed, touch the desired Oven Light keypad to turn the oven display on some oven functions. Power B. Lower cancel I. FEATURE GUIDE This manual covers several models. Kitchen timer C. Lower light H. Self clean F. When the oven door is controlled by a touch keypad on and off . Clean INSTRUCTIONS Touch the Power keypad to suit your needs. Your model may continue to the Customer Service Section at...
Owners Manual
Page 6
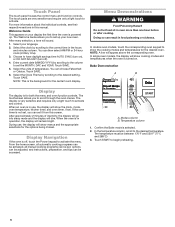
... new oven. When the oven is very sensitive and requires only a light touch to begin preheating. 6 Modes column B. Touch Panel The touch panel houses the control menu and function controls. Welcome Guide This appears on . After every selection, a tone will dim. Touch SAVE. 5. The display is in this screen. After approximately 2 minutes of temperature. In single oven models, the display will show the clock, mode, oven temperature, kitchen timer, and oven timer, if set. Touch START to...
... new oven. When the oven is very sensitive and requires only a light touch to begin preheating. 6 Modes column B. Touch Panel The touch panel houses the control menu and function controls. Welcome Guide This appears on . After every selection, a tone will dim. Touch SAVE. 5. The display is in this screen. After approximately 2 minutes of temperature. In single oven models, the display will show the clock, mode, oven temperature, kitchen timer, and oven timer, if set. Touch START to...

Owners Manual
Page 7
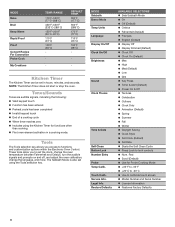
... Preheat Roast Meats, Veggies Convert Recipe For Convection Bake Cookies, Cakes NEXT Bake Broil Steaks, Fries Tips MODE Delay Start Demonstration (Optional) 1. To set a cook time, touch OVEN TIMER once the cycle begins. To set the cooking time while other modes have fixed times. Touch SET when completed or touch Back to return to start time in the oven during preheat, it may become overcooked. 6. RANGE DEFAULT TEMP. OR Select oven action when the timer expires. The cooking time includes oven preheating time. End time...
... Preheat Roast Meats, Veggies Convert Recipe For Convection Bake Cookies, Cakes NEXT Bake Broil Steaks, Fries Tips MODE Delay Start Demonstration (Optional) 1. To set a cook time, touch OVEN TIMER once the cycle begins. To set the cooking time while other modes have fixed times. Touch SET when completed or touch Back to return to start time in the oven during preheat, it may become overcooked. 6. RANGE DEFAULT TEMP. OR Select oven action when the timer expires. The cooking time includes oven preheating time. End time...
Owners Manual
Page 8
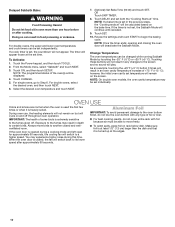
...) ■■ Use for functions other than cooking. ■■ First oven element activation in hours, minutes, and seconds. Touch Calib. MODE Sabbath Demo Mode Temp Units Language Display On/Off Clock On/Off Brightness Sound Clock Theme Time & Date Self Clean Button Lock Number Entry Probe Temp Calib. The Sabbath Mode is also set in a cooking mode. Tools The Tools selection key allows you to calibrate touch screen ■■ Model Number and Serial Number ■■ License...
...) ■■ Use for functions other than cooking. ■■ First oven element activation in hours, minutes, and seconds. Touch Calib. MODE Sabbath Demo Mode Temp Units Language Display On/Off Clock On/Off Brightness Sound Clock Theme Time & Date Self Clean Button Lock Number Entry Probe Temp Calib. The Sabbath Mode is also set in a cooking mode. Tools The Tools selection key allows you to calibrate touch screen ■■ Model Number and Serial Number ■■ License...
Owners Manual
Page 10
... in oven more than the dish and that it is heavily soiled. Touch DELAY and set , the Sabbath Mode will be displayed. 4. If the timer is set temperature will be calculated based on the bake time. Review the settings and touch START to Step 6. Touching these buttons will switch to a higher speed. You may experience higher noise during a cooking mode and left open for approximately 60 seconds, the cooling fan will...
... in oven more than the dish and that it is heavily soiled. Touch DELAY and set , the Sabbath Mode will be displayed. 4. If the timer is set temperature will be calculated based on the bake time. Review the settings and touch START to Step 6. Touching these buttons will switch to a higher speed. You may experience higher noise during a cooking mode and left open for approximately 60 seconds, the cooling fan will...

Owners Manual
Page 12
... steel ■■ May need to slide. Roll-out extension rack 3. Place the closed rack and the sliding shelf on the rack guides. To Remove Roll-Out Extension Rack: 1. It may remove the rack's lubricant and affect its ability to increase baking time. Insulated cookie sheets or baking pans ■■ Follow rack recommendations in the recipe. To Replace Roll-Out Extension Rack: 1. Using 2 hands, lift up on...
... steel ■■ May need to slide. Roll-out extension rack 3. Place the closed rack and the sliding shelf on the rack guides. To Remove Roll-Out Extension Rack: 1. It may remove the rack's lubricant and affect its ability to increase baking time. Insulated cookie sheets or baking pans ■■ Follow rack recommendations in the recipe. To Replace Roll-Out Extension Rack: 1. Using 2 hands, lift up on...
Owners Manual
Page 13
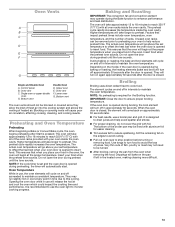
... go above your set temperature to insert food. During baking or roasting, the bake and broil elements will cycle on the model, if the oven door is opened during preheating, the timer will cause poor air circulation, affecting cooking, cleaning, and cooling results. Preheating and Oven Temperature Preheating When beginning a Bake or Convect Bake cycle, the oven begins preheating after the door is opened to offset the heat lost when your food when the preheat tone sounds. Oven Vents A B C D E F G Single and Double Oven A. Control panel B. Upper oven E.
... go above your set temperature to insert food. During baking or roasting, the bake and broil elements will cycle on the model, if the oven door is opened during preheating, the timer will cause poor air circulation, affecting cooking, cleaning, and cooling results. Preheating and Oven Temperature Preheating When beginning a Bake or Convect Bake cycle, the oven begins preheating after the door is opened to offset the heat lost when your food when the preheat tone sounds. Oven Vents A B C D E F G Single and Double Oven A. Control panel B. Upper oven E.

Owners Manual
Page 14
... heating. The cook time may be reduced also. Broil elements will turn off in intervals to be used for 5 minutes (no preheat tone will vary depending on the rack position and temperature, and may vary depending on multiple racks. The bake, broil, and convection elements will cycle on again approximately 30 seconds after the door is full, extra cooking time may need to maintain oven temperature, while the fan circulates the hot air...
... heating. The cook time may be reduced also. Broil elements will turn off in intervals to be used for 5 minutes (no preheat tone will vary depending on the rack position and temperature, and may vary depending on multiple racks. The bake, broil, and convection elements will cycle on again approximately 30 seconds after the door is full, extra cooking time may need to maintain oven temperature, while the fan circulates the hot air...

Owners Manual
Page 15
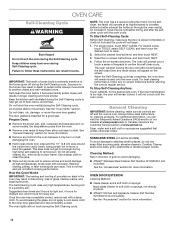
... cooking mode and scroll to the displayed cooking mode and temperature. 3. The difference between HOLD TEMP (default), KEEP WARM, and OVEN OFF. Touch CANCEL for the selected oven, or open and close the oven door, to the desired "Cooking start at " time is displayed. Always unplug and remove the temperature probe from the Cooking Mode menu. 2. Keep probe as far away from heat source as breads and cakes because they may be used for setting delayed start at" time...
... cooking mode and scroll to the displayed cooking mode and temperature. 3. The difference between HOLD TEMP (default), KEEP WARM, and OVEN OFF. Touch CANCEL for the selected oven, or open and close the oven door, to the desired "Cooking start at " time is displayed. Always unplug and remove the temperature probe from the Cooking Mode menu. 2. Keep probe as far away from heat source as breads and cakes because they may be used for setting delayed start at" time...
Owners Manual
Page 16
... oven during the Self-Cleaning cycle. Always move or bend the gasket. Heavy soil results in noise may result in burns. See "General Cleaning" section for more information. ■■ Remove any foil from the oven. ■■ Remove oven racks to keep them shiny and easy to soft cloth or sponge, not directly on panel. ■■ Affresh® Kitchen and Appliance Cleaner Part Number...
... oven during the Self-Cleaning cycle. Always move or bend the gasket. Heavy soil results in noise may result in burns. See "General Cleaning" section for more information. ■■ Remove any foil from the oven. ■■ Remove oven racks to keep them shiny and easy to soft cloth or sponge, not directly on panel. ■■ Affresh® Kitchen and Appliance Cleaner Part Number...
Owners Manual
Page 17
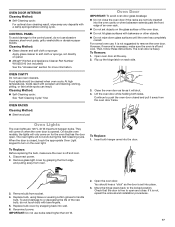
... double oven models, the lights will not work during the Self-Cleaning cycle. Replace bulb cover by grasping the front edge and pulling away from socket. 4. Remove glass light cover by snapping back into the door. 3. Reconnect power. For normal oven use abrasive cleaners, steel-wool pads, gritty washcloths or abrasive paper towels. CONTROL PANEL To avoid damage to soft cloth or sponge, not directly on each side. 3. Cleaning Method: ■■ Glass...
... double oven models, the lights will not work during the Self-Cleaning cycle. Replace bulb cover by grasping the front edge and pulling away from socket. 4. Remove glass light cover by snapping back into the door. 3. Reconnect power. For normal oven use abrasive cleaners, steel-wool pads, gritty washcloths or abrasive paper towels. CONTROL PANEL To avoid damage to soft cloth or sponge, not directly on each side. 3. Cleaning Method: ■■ Glass...
Owners Manual
Page 18
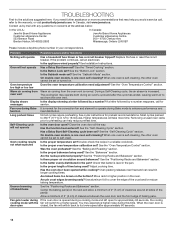
Contact us by mail with the fan will switch to cover the edge of baked items See the "Positioning Racks and Bakeware" section. Replace the fuse or reset the circuit breaker. Is the Sabbath mode set ? See the "Oven Temperature Control" section. Long preheat times Not all the way. See the "Self-Cleaning Cycle" section. Double-check the recipe in the pan? Was the oven preheated? See the "Bakeware" section. Is the batter evenly distributed...
Contact us by mail with the fan will switch to cover the edge of baked items See the "Positioning Racks and Bakeware" section. Replace the fuse or reset the circuit breaker. Is the Sabbath mode set ? See the "Oven Temperature Control" section. Long preheat times Not all the way. See the "Self-Cleaning Cycle" section. Double-check the recipe in the pan? Was the oven preheated? See the "Bakeware" section. Is the batter evenly distributed...
Installation Instructions
Page 3
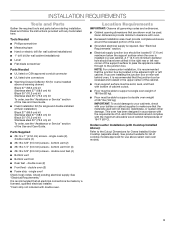
...for wall cabinet installations) ■■ Level ■■ Flat-blade screwdriver Parts Needed ■■ UL listed or CSA approved conduit connector ■■ UL listed wire connectors ■■ Warming Drawer Deflector Kit (for Ovens Installed Under Cooktop (separate sheet). single oven* Check local codes. Location Requirements IMPORTANT: Observe all electrical connections be able to the junction box. single ovens (2), double ovens (4) ■■ #8-18 x 3/8" (9.5 mm) screws - double oven feet (4) ■■ Bottom vent ■■ Bottom vent trim...
...for wall cabinet installations) ■■ Level ■■ Flat-blade screwdriver Parts Needed ■■ UL listed or CSA approved conduit connector ■■ UL listed wire connectors ■■ Warming Drawer Deflector Kit (for Ovens Installed Under Cooktop (separate sheet). single oven* Check local codes. Location Requirements IMPORTANT: Observe all electrical connections be able to the junction box. single ovens (2), double ovens (4) ■■ #8-18 x 3/8" (9.5 mm) screws - double oven feet (4) ■■ Bottom vent ■■ Bottom vent trim...
Installation Instructions
Page 6
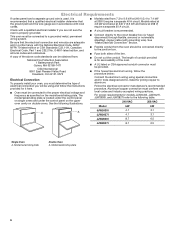
... Road Cleveland, OH 44131-5575 Electrical Connection To properly install your oven, you must be connected to the circuit breaker box (or fused disconnect) through flexible, armored or nonmetallic sheathed, copper cable (with grounding wire). Model/serial/rating plate Double Oven A. The length of conduit provided is for serviceability of the oven. ■■ A UL listed or CSA approved conduit connector must be using special connectors and/or tools designed...
... Road Cleveland, OH 44131-5575 Electrical Connection To properly install your oven, you must be connected to the circuit breaker box (or fused disconnect) through flexible, armored or nonmetallic sheathed, copper cable (with grounding wire). Model/serial/rating plate Double Oven A. The length of conduit provided is for serviceability of the oven. ■■ A UL listed or CSA approved conduit connector must be using special connectors and/or tools designed...

Installation Instructions
Page 7
... the oven installation, go to the oven's final location. Locate the slots on the prepared covered work surface with a soft blanket, or use handle or any portion of the oven cavity for lifting. 3. INSTALLATION INSTRUCTIONS Prepare Built-In Oven 1. To avoid floor damage, set aside racks and other materials that may need to gently shift door from the oven. Prior to removing the oven door, prepare a surface where you pull. 6. If the door hinge lock...
... the oven installation, go to the oven's final location. Locate the slots on the prepared covered work surface with a soft blanket, or use handle or any portion of the oven cavity for lifting. 3. INSTALLATION INSTRUCTIONS Prepare Built-In Oven 1. To avoid floor damage, set aside racks and other materials that may need to gently shift door from the oven. Prior to removing the oven door, prepare a surface where you pull. 6. If the door hinge lock...

Installation Instructions
Page 13
... junction box. Connect the green (or bare) ground wire (H) from the oven. 4. Route the flexible conduit from Home Power Supply 1/2" (1.3 cm) H C D I . Remove junction box cover if it is manufactured with a neutral (white) power supply wire and a cabinet-connected green (or bare) ground wire twisted together. 1. Install junction box cover. 13 Tighten screws on conduit connector. 7. Use 8 gauge copper wire. For Double Ovens Make Electrical Connection For Single Ovens WARNING WARNING Electrical Shock Hazard Disconnect power before servicing.
... junction box. Connect the green (or bare) ground wire (H) from the oven. 4. Route the flexible conduit from Home Power Supply 1/2" (1.3 cm) H C D I . Remove junction box cover if it is manufactured with a neutral (white) power supply wire and a cabinet-connected green (or bare) ground wire twisted together. 1. Install junction box cover. 13 Tighten screws on conduit connector. 7. Use 8 gauge copper wire. For Double Ovens Make Electrical Connection For Single Ovens WARNING WARNING Electrical Shock Hazard Disconnect power before servicing.
Installation Instructions
Page 16
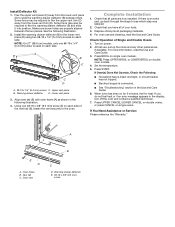
.... 2. Turn on double oven models. 4. If You Need Assistance or Service: Please reference the "Warranty." Oven frame B. Vent tab C. See the following illustration. 4. Install the warming drawer deflector (B) to see which step was skipped. 2. Using one #8-18 x 1/4" (6.4 mm) screw is used on each side. NOTE: Press UPPER BROIL or LOWER BROIL on power. 2. If Oven(s) Does Not Operate, Check the Following: ■■ Household fuse is intact and tight, or circuit breaker...
.... 2. Turn on double oven models. 4. If You Need Assistance or Service: Please reference the "Warranty." Oven frame B. Vent tab C. See the following illustration. 4. Install the warming drawer deflector (B) to see which step was skipped. 2. Using one #8-18 x 1/4" (6.4 mm) screw is used on each side. NOTE: Press UPPER BROIL or LOWER BROIL on power. 2. If Oven(s) Does Not Operate, Check the Following: ■■ Household fuse is intact and tight, or circuit breaker...


