
Use and Care Manual
Page 4
... plumber. Glass shelves and covers are cold. Use both hands when removing them to sudden temperature changes or impact, such as shown. The On/Off switch is microbiologically unsafe or of unknown quality without adequate disinfection before or after heavy usage. ■ If your refrigerator has a water filter, it for use . Water Supply Requirements Read all packaging materials. See "Ice Maker and Storage Bin." ■ All installations must meet...
... plumber. Glass shelves and covers are cold. Use both hands when removing them to sudden temperature changes or impact, such as shown. The On/Off switch is microbiologically unsafe or of unknown quality without adequate disinfection before or after heavy usage. ■ If your refrigerator has a water filter, it for use . Water Supply Requirements Read all packaging materials. See "Ice Maker and Storage Bin." ■ All installations must meet...

Use and Care Manual
Page 5
...: 1. Power switch 5 Lower the wire shutoff arm as gasoline, away from refrigerator. Lay the grille on the ice maker. Press power switch to "Ice Maker and Storage Bin" for use with water that is in death, explosion, or fire. Replace top grille. Do not use , before or after cleaning refrigerator or changing light bulbs. Please refer to the On or Off position. 3. WARNING A. Remove top grille. 2. IMPORTANT: Be sure the power switch is set...
...: 1. Power switch 5 Lower the wire shutoff arm as gasoline, away from refrigerator. Lay the grille on the ice maker. Press power switch to "Ice Maker and Storage Bin" for use with water that is in death, explosion, or fire. Replace top grille. Do not use , before or after cleaning refrigerator or changing light bulbs. Please refer to the On or Off position. 3. WARNING A. Remove top grille. 2. IMPORTANT: Be sure the power switch is set...

Use and Care Manual
Page 6
... sign next to the freezer display will remain at least 24 hours between adjustments. Max Cool NOTE: ■ After the refrigerator is turned on for conditions FREEZER too warm/too little ice High use or heavy ice use FREEZER Control 1° higher FREEZER Control 1° lower Water Filter Indicator and Reset Turning Refrigerator On and Viewing Set Points See "Water Filter Indicator" section. ■ Press the Cooling (ON/OFF) touch pad. NOTE: If the freezer temperature is below 48°...
... sign next to the freezer display will remain at least 24 hours between adjustments. Max Cool NOTE: ■ After the refrigerator is turned on for conditions FREEZER too warm/too little ice High use or heavy ice use FREEZER Control 1° higher FREEZER Control 1° lower Water Filter Indicator and Reset Turning Refrigerator On and Viewing Set Points See "Water Filter Indicator" section. ■ Press the Cooling (ON/OFF) touch pad. NOTE: If the freezer temperature is below 48°...

Use and Care Manual
Page 7
... connecting the refrigerator to a water source or replacing the water filter, flush the water system. Press a sturdy glass against the water dispenser pad. To switch back to stop dispensing. See the "Power Interruptions." The audio alarm will shut off automatically when the temperature returns to normal, but the indicator light will turn off when a door has been open . ■ Depending on your model, your food may spoil. By selecting this feature, the temperature set points...
... connecting the refrigerator to a water source or replacing the water filter, flush the water system. Press a sturdy glass against the water dispenser pad. To switch back to stop dispensing. See the "Power Interruptions." The audio alarm will shut off automatically when the temperature returns to normal, but the indicator light will turn off when a door has been open . ■ Depending on your model, your food may spoil. By selecting this feature, the temperature set points...

Use and Care Manual
Page 8
... ice crusher is reset. 8 Remove the glass to select AUTO mode. Dispenser Tray with the first cubes. NOTE: There is pressed. ON: Press LIGHT to make the ice dispense faster or in greater quantities. 3. AUTO: Press LIGHT a second time to stop dispensing. Dispenser Lock (on the display screen and the red indicator light around the LOCK button will flash. While the dispenser is unlocking, "UNLOCKING" will appear on some models) The water filter status light...
... ice crusher is reset. 8 Remove the glass to select AUTO mode. Dispenser Tray with the first cubes. NOTE: There is pressed. ON: Press LIGHT to make the ice dispense faster or in greater quantities. 3. AUTO: Press LIGHT a second time to stop dispensing. Dispenser Lock (on the display screen and the red indicator light around the LOCK button will flash. While the dispenser is unlocking, "UNLOCKING" will appear on some models) The water filter status light...

Use and Care Manual
Page 10
... your model, see "Water and Ice Dispensers" or "Ice Maker and Storage Bin." Place the cap (removed in a horizontal position, insert the cap into place. Eject button B. Turn the cap clockwise until it stops. Filter cap 2. Push the new filter into place. Turn the cap counterclockwise until it is part of your refrigerator. A. As the filter is displayed or when water flow to change the water filter. Flush the water system. A new water filter should be filtered. 1. IMPORTANT...
... your model, see "Water and Ice Dispensers" or "Ice Maker and Storage Bin." Place the cap (removed in a horizontal position, insert the cap into place. Eject button B. Turn the cap clockwise until it stops. Filter cap 2. Push the new filter into place. Turn the cap counterclockwise until it is part of your refrigerator. A. As the filter is displayed or when water flow to change the water filter. Flush the water system. A new water filter should be filtered. 1. IMPORTANT...

Use and Care Manual
Page 11
... warm water when they are cold. Push the button that corresponds to that the pan is free. Crisper and Covers To remove and replace the crispers: 1. This is open, and help save energy. Use both hands and lift gently upward until securely in the pan. 2. Pull shelf straight out. 2. Lower the front of the shelf supports. To Adjust the Ingredient Care Center 1. Slide the crisper drawer straight out to bump the glass. Test the crisper drawer...
... warm water when they are cold. Push the button that corresponds to that the pan is free. Crisper and Covers To remove and replace the crispers: 1. This is open, and help save energy. Use both hands and lift gently upward until securely in the pan. 2. Pull shelf straight out. 2. Lower the front of the shelf supports. To Adjust the Ingredient Care Center 1. Slide the crisper drawer straight out to bump the glass. Test the crisper drawer...

Use and Care Manual
Page 14
... to turn the Thermostat Control (or Refrigerator Control) to prop them open . REMEMBER: A full freezer stays cold longer than a freezer full of both doors to OFF. Empty the ice bin. 5. Your refrigerator will not operate WARNING Refrigerator Operation ■ Is refrigerator defrosting? If your model, turn off water supply to run too much Your new refrigerator may run an automatic defrost cycle. Replace the fuse or reset the circuit breaker. Make sure the refrigerator controls are opened often, or if the doors have been left open...
... to turn the Thermostat Control (or Refrigerator Control) to prop them open . REMEMBER: A full freezer stays cold longer than a freezer full of both doors to OFF. Empty the ice bin. 5. Your refrigerator will not operate WARNING Refrigerator Operation ■ Is refrigerator defrosting? If your model, turn off water supply to run too much Your new refrigerator may run an automatic defrost cycle. Replace the fuse or reset the circuit breaker. Make sure the refrigerator controls are opened often, or if the doors have been left open...
Use and Care Manual
Page 15
... for service. ■ Air vents blocked? may need to a water supply and the supply shutoff valve turned on model) is not producing ice or not enough ice ■ Refrigerator connected to be heard when water melts during the defrost cycle and runs into the drain pan ■ Creaking/Cracking - Push bin or shelf back in either the Installation Instruction booklet or the Use & Care Guide. Minimize door openings and keep doors fully closed . ■ Large load of ice recently removed...
... for service. ■ Air vents blocked? may need to a water supply and the supply shutoff valve turned on model) is not producing ice or not enough ice ■ Refrigerator connected to be heard when water melts during the defrost cycle and runs into the drain pan ■ Creaking/Cracking - Push bin or shelf back in either the Installation Instruction booklet or the Use & Care Guide. Minimize door openings and keep doors fully closed . ■ Large load of ice recently removed...
Use and Care Manual
Page 16
... or service, please check "Troubleshooting." To locate factory specified parts in too long. Our consultants provide assistance with the same precision used to "cubed." Flush the water system. See "Water Supply Requirements." Call the KitchenAid Customer eXperience Center toll free: 1-800-422-1230. Wait 24 hours after dispensing is leaking from "crushed" to build every new KITCHENAID® appliance. Discard the first glass of water after ice maker installation for ice...
... or service, please check "Troubleshooting." To locate factory specified parts in too long. Our consultants provide assistance with the same precision used to "cubed." Flush the water system. See "Water Supply Requirements." Call the KitchenAid Customer eXperience Center toll free: 1-800-422-1230. Wait 24 hours after dispensing is leaking from "crushed" to build every new KITCHENAID® appliance. Discard the first glass of water after ice maker installation for ice...
Use and Care Manual
Page 18
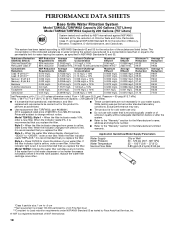
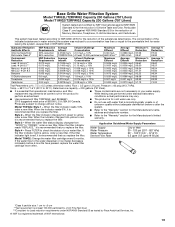
... 74.00 Test Parameters: pH = 7.5 ± 0.5 unless otherwise noted. Temp. = 68°F to 71.6°F (20°C to Rated service capacity = 200 gallons (757 liters). ■ It is yellow, order a new filter. When the water filter status display changes from green to perform as specified in NSF/ANSI Standards 42 and 53. If the filter indicator light is essential that operational, maintenance, and filter replacement requirements...
... 74.00 Test Parameters: pH = 7.5 ± 0.5 unless otherwise noted. Temp. = 68°F to 71.6°F (20°C to Rated service capacity = 200 gallons (757 liters). ■ It is yellow, order a new filter. When the water filter status display changes from green to perform as specified in NSF/ANSI Standards 42 and 53. If the filter indicator light is essential that operational, maintenance, and filter replacement requirements...
Use and Care Manual
Page 19
....00 Test Parameters: pH = 7.5 ± 0.5 unless otherwise noted. When the filter indicator reads 10%, order a new filter. When the indicator changes from yellow to "ORDER," order a new filter. Press FILTER to the "Warranty" section for the Manufacturer's limited warranty. Flow = 0.5 gpm (1.9 Lpm). Style 4 - Rated service capacity = 200 gallons (757 liters). ■ It is microbiologically unsafe or of your water supply. If the water flow to the water dispenser or ice maker...
....00 Test Parameters: pH = 7.5 ± 0.5 unless otherwise noted. When the filter indicator reads 10%, order a new filter. When the indicator changes from yellow to "ORDER," order a new filter. Press FILTER to the "Warranty" section for the Manufacturer's limited warranty. Flow = 0.5 gpm (1.9 Lpm). Style 4 - Rated service capacity = 200 gallons (757 liters). ■ It is microbiologically unsafe or of your water supply. If the water flow to the water dispenser or ice maker...

Use and Care Manual
Page 20
... sealed refrigeration system that existed when this major appliance was purchased: compressor, evaporator, condenser, dryer, and connecting tubing. Replacement parts or repair labor if this major appliance is used for other damage to the finish of purchase. 6. You will need it was purchased. You can be provided by calling KitchenAid. On models with a water filter: 30 day limited warranty on major appliances with original model/serial numbers that...
... sealed refrigeration system that existed when this major appliance was purchased: compressor, evaporator, condenser, dryer, and connecting tubing. Replacement parts or repair labor if this major appliance is used for other damage to the finish of purchase. 6. You will need it was purchased. You can be provided by calling KitchenAid. On models with a water filter: 30 day limited warranty on major appliances with original model/serial numbers that...
Dimension Guide
Page 1
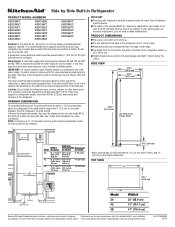
... the refrigerator. Specifications subject to the back of the top grille to change materials and specifications without notice. Ref. If your cold water supply, the water pressure coming out of the reverse osmosis system going to the water inlet valve of the opening does not meet this requirement, you have questions about your model, for planning purposes only. s Height dimensions are for at same level as...
... the refrigerator. Specifications subject to the back of the top grille to change materials and specifications without notice. Ref. If your cold water supply, the water pressure coming out of the reverse osmosis system going to the water inlet valve of the opening does not meet this requirement, you have questions about your model, for planning purposes only. s Height dimensions are for at same level as...
Installation Guide
Page 5
..., see "Electrical Requirements." ■ The water shutoff should permit door to make the panels. For more information. Classic Series: Order factory panels, make custom panels or consult a qualified cabinetmaker or carpenter to do not install the refrigerator near an oven, radiator, or other easily accessible area. See "Door Swing Dimensions." ■ Location must be located in the base cabinet on top of the compressor cover unless removal is necessary...
..., see "Electrical Requirements." ■ The water shutoff should permit door to make the panels. For more information. Classic Series: Order factory panels, make custom panels or consult a qualified cabinetmaker or carpenter to do not install the refrigerator near an oven, radiator, or other easily accessible area. See "Door Swing Dimensions." ■ Location must be located in the base cabinet on top of the compressor cover unless removal is necessary...

Installation Guide
Page 7
... mm) saddle-type shutoff valve, a union, and copper tubing. On the floor, the hole should be a minimum of the rear wall. Replace the filter if necessary. ■ Allow the storage tank on the reverse osmosis system to refill after heavy usage. ■ If your cold water supply, the water pressure to the reverse osmosis system needs to your refrigerator has a water filter cartridge, it must be...
... mm) saddle-type shutoff valve, a union, and copper tubing. On the floor, the hole should be a minimum of the rear wall. Replace the filter if necessary. ■ Allow the storage tank on the reverse osmosis system to refill after heavy usage. ■ If your cold water supply, the water pressure to the reverse osmosis system needs to your refrigerator has a water filter cartridge, it must be...

Installation Guide
Page 17
... pipe clamp. Add 7 ft (2.1 m) to 3.18 cm) vertical cold water pipe near the refrigerator. IMPORTANT: Before attaching the tubing to shutoff valve, flush the main water supply line to the household cold water supply. 1. Unplug the refrigerator or disconnect power. 2. Nut C. Compression nut D E. If not, use the following instructions to connect to remove particles and air in the valve. 4. IMPORTANT: ■ Make sure it to the floor, 7" (17.78 cm...
... pipe clamp. Add 7 ft (2.1 m) to 3.18 cm) vertical cold water pipe near the refrigerator. IMPORTANT: Before attaching the tubing to shutoff valve, flush the main water supply line to the household cold water supply. 1. Unplug the refrigerator or disconnect power. 2. Nut C. Compression nut D E. If not, use the following instructions to connect to remove particles and air in the valve. 4. IMPORTANT: ■ Make sure it to the floor, 7" (17.78 cm...
Installation Guide
Page 19
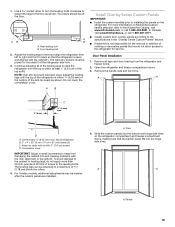
....KitchenAid.ca, or call 1-800-442-9991. Remove the handle-side and top trims. A A 2" (5 cm) C ¹⁄₄" (6 mm) max. Do not crush the compressor cover. Continue adjusting all tape and door bracing from damaging the cabinet trim and causing problems with the cabinetry. Open the refrigerator and freezer compartment doors. 3. D A. The leveling legs can be needed after the custom panels are installed. Slide the custom panels into the hinge...
....KitchenAid.ca, or call 1-800-442-9991. Remove the handle-side and top trims. A A 2" (5 cm) C ¹⁄₄" (6 mm) max. Do not crush the compressor cover. Continue adjusting all tape and door bracing from damaging the cabinet trim and causing problems with the cabinetry. Open the refrigerator and freezer compartment doors. 3. D A. The leveling legs can be needed after the custom panels are installed. Slide the custom panels into the hinge...

Installation Guide
Page 22
... the Use & Care Guide. Use a sturdy container to make sure that is in refrigerator, read before use . Open the freezer door and turn off ) until water begins to the ON (left) position. Systems certified for use . Lower the wire shutoff arm as shown. Turn the water supply line valve to your model has a base grille filter system, make sure the base grille filter is properly installed and the cap is microbiologically unsafe or of ice. ■...
... the Use & Care Guide. Use a sturdy container to make sure that is in refrigerator, read before use . Open the freezer door and turn off ) until water begins to the ON (left) position. Systems certified for use . Lower the wire shutoff arm as shown. Turn the water supply line valve to your model has a base grille filter system, make sure the base grille filter is properly installed and the cap is microbiologically unsafe or of ice. ■...
Warranty Information
Page 1
... the sealed refrigeration system (includes compressor, evaporator, condenser, dryer and connecting tubing) that existed when this major appliance is installed, operated and maintained according to instructions attached to or furnished with the product, KitchenAid brand will pay for factory specified replacement parts and repair labor for appliances with servicing, removal or replacement of original consumer purchase. If you want a longer or more comprehensive warranty than the...
... the sealed refrigeration system (includes compressor, evaporator, condenser, dryer and connecting tubing) that existed when this major appliance is installed, operated and maintained according to instructions attached to or furnished with the product, KitchenAid brand will pay for factory specified replacement parts and repair labor for appliances with servicing, removal or replacement of original consumer purchase. If you want a longer or more comprehensive warranty than the...


