Installation Guide
Page 1
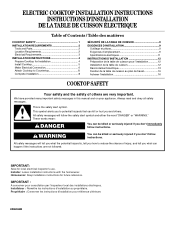
...others are not followed. Installer: Leave installation instructions with the homeowner. ELECTRIC COOKTOP INSTALLATION INSTRUCTIONS INSTRUCTIONS D'INSTALLATION DE LA TABLE DE CUISSON ÉLECTRIQUE Table of Contents / Table des ...matières COOKTOP SAFETY 1 INSTALLATION REQUIREMENTS 2 Tools and Parts 2 Location Requirements 2 Electrical Requirements 3 INSTALLATION INSTRUCTIONS 4 Prepare Cooktop for Installation 4 Install Cooktop 5 Make Electrical Connection 6 Attach Cooktop to Countertop 8 Complete Installation 8 SÉCURITÉ DE ...
...others are not followed. Installer: Leave installation instructions with the homeowner. ELECTRIC COOKTOP INSTALLATION INSTRUCTIONS INSTRUCTIONS D'INSTALLATION DE LA TABLE DE CUISSON ÉLECTRIQUE Table of Contents / Table des ...matières COOKTOP SAFETY 1 INSTALLATION REQUIREMENTS 2 Tools and Parts 2 Location Requirements 2 Electrical Requirements 3 INSTALLATION INSTRUCTIONS 4 Prepare Cooktop for Installation 4 Install Cooktop 5 Make Electrical Connection 6 Attach Cooktop to Countertop 8 Complete Installation 8 SÉCURITÉ DE ...
Installation Guide
Page 2
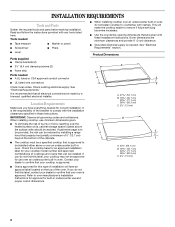
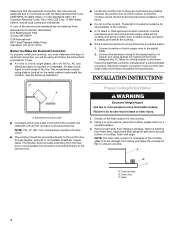
... B A C A. 22¹⁄₈" (56.1 cm) B. 16 42.1 cm) 30 77.1 cm) 36 92.3 cm) C. 2⁷⁄₈" (7.3 cm) 2 See "Electrical Requirements." If you have an approval label located on the top of the installer to comply with clamps. Refer to ... provided with these instructions. IMPORTANT: Observe all electrical connections be a specified cooktop that your cooktop model number and approved combinations of the cabinets. ■ The cooktop must be made by a licensed, qualified electrical installer. INSTALLATION REQUIREMENTS Tools and Parts Gather the...
... B A C A. 22¹⁄₈" (56.1 cm) B. 16 42.1 cm) 30 77.1 cm) 36 92.3 cm) C. 2⁷⁄₈" (7.3 cm) 2 See "Electrical Requirements." If you have an approval label located on the top of the installer to comply with clamps. Refer to ... provided with these instructions. IMPORTANT: Observe all electrical connections be a specified cooktop that your cooktop model number and approved combinations of the cabinets. ■ The cooktop must be made by a licensed, qualified electrical installer. INSTALLATION REQUIREMENTS Tools and Parts Gather the...
Installation Guide
Page 3
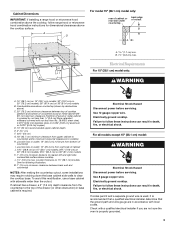
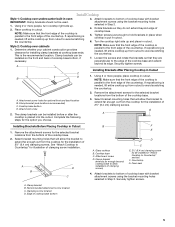
... base cabinet side walls to the top of cabinet J. 14½" (36.8 cm) on 15" (38.1 cm) models; 29½" (74.9 cm) on 30" (76.2 cm) models; 35½" (90.2 cm) on 36" (91.4 cm) models K. 1" (2.5 cm) minimum distance to cooktop H. Electrically ground cooktop. Electrical Shock Hazard Disconnect power before servicing. Failure to follow these instructions...
... base cabinet side walls to the top of cabinet J. 14½" (36.8 cm) on 15" (38.1 cm) models; 29½" (74.9 cm) on 30" (76.2 cm) models; 35½" (90.2 cm) on 36" (91.4 cm) models K. 1" (2.5 cm) minimum distance to cooktop H. Electrically ground cooktop. Electrical Shock Hazard Disconnect power before servicing. Failure to follow these instructions...
Installation Guide
Page 4
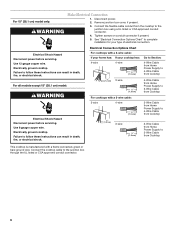
... both sides of the line. Connect the aluminum wiring to allow as much slack as possible between the junction box and the cooktop so that the electrical connection and wire size are rated 240 volt and do so can result in back or other injury. 1. Remove foam strip ...aluminum wiring follow the instructions provided for it here. ■ A 4-wire or 3-wire, single phase, 240 volt, 60 Hz., AC only electrical supply is for the cooktop. 2. The model/serial number rating plate is already provided at the junction box). See the following illustration. ■ Locate the junction box ...
... both sides of the line. Connect the aluminum wiring to allow as much slack as possible between the junction box and the cooktop so that the electrical connection and wire size are rated 240 volt and do so can result in back or other injury. 1. Remove foam strip ...aluminum wiring follow the instructions provided for it here. ■ A 4-wire or 3-wire, single phase, 240 volt, 60 Hz., AC only electrical supply is for the cooktop. 2. The model/serial number rating plate is already provided at the junction box). See the following illustration. ■ Locate the junction box ...
Installation Guide
Page 5
... selected in Step 2. 4. Remove the attachment screws for illustration of clamping screw installation. See "Attach Cooktop to the front edge of the cooktop base. Cooktop base C. Securely tighten screws. A. Recommended attachment screw location C. Edge of 2½" (6.4 cm) ... Clamp bracket B. Remove the attachment screws for the installation of the cooktop base. 2. A. Clamping screw location D. Install Cooktop Style 1: Cooktop over cabinets 1. Turn the cooktop right side up from the cooktop for the selected bracket locations from the bottom of 2½" (6.4 ...
... selected in Step 2. 4. Remove the attachment screws for illustration of clamping screw installation. See "Attach Cooktop to the front edge of the cooktop base. Cooktop base C. Securely tighten screws. A. Recommended attachment screw location C. Edge of 2½" (6.4 cm) ... Clamp bracket B. Remove the attachment screws for the installation of the cooktop base. 2. A. Clamping screw location D. Install Cooktop Style 1: Cooktop over cabinets 1. Turn the cooktop right side up from the cooktop for the selected bracket locations from the bottom of 2½" (6.4 ...
Installation Guide
Page 6
...copper wire. Disconnect power. 2. For 15" (38.1 cm) model only: WARNING Make Electrical Connection 1. Electrically ground cooktop. Connect the flexible cable conduit from Home Power Supply to complete installation for your cooktop has: 4-wire 4-wire ¹⁄₂" (1.3 cm) Go to Section: 4-Wire...;₂" (1.3 cm) 4-Wire Cable from Home Power Supply to 3-Wire Cable from Cooktop For cooktops with a 4-wire cable: If your home has: If your type of electrical connection. Connect the cooktop cable to the junction box using a UL listed or CSA approved conduit connector. ...
...copper wire. Disconnect power. 2. For 15" (38.1 cm) model only: WARNING Make Electrical Connection 1. Electrically ground cooktop. Connect the flexible cable conduit from Home Power Supply to complete installation for your cooktop has: 4-wire 4-wire ¹⁄₂" (1.3 cm) Go to Section: 4-Wire...;₂" (1.3 cm) 4-Wire Cable from Home Power Supply to 3-Wire Cable from Cooktop For cooktops with a 4-wire cable: If your home has: If your type of electrical connection. Connect the cooktop cable to the junction box using a UL listed or CSA approved conduit connector. ...

Installation Guide
Page 7
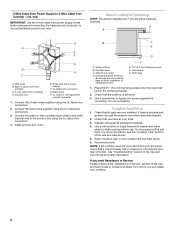
... wire connectors. 4. Put a UL listed wire connector on the end of the white wire. A B E F G C H D I . A D E F B G C H A. Cable from Cooktop - UL listed or CSA approved conduit connector 7 Install junction box cover. 3-Wire Cable from Home Power Supply to the green or bare ground wire (in... Canada. White wire (from cooktop E. Red wires C. Red wires I D 1. Connect the 2 red wires together using the UL listed wire connectors. 3. Bare or green wires...
... wire connectors. 4. Put a UL listed wire connector on the end of the white wire. A B E F G C H D I . A D E F B G C H A. Cable from Cooktop - UL listed or CSA approved conduit connector 7 Install junction box cover. 3-Wire Cable from Home Power Supply to the green or bare ground wire (in... Canada. White wire (from cooktop E. Red wires C. Red wires I D 1. Connect the 2 red wires together using the UL listed wire connectors. 3. Bare or green wires...
Installation Guide
Page 8
... F. Dry thoroughly with a soft cloth. Reconnect power. White wire (from cooktop) D. Cooktop base C. Clamping bracket (extends far enough beyond cooktop base to allow installation of liquid household cleaner and warm water to clean cooktop before use. Dispose of/recycle all parts are using the UL listed wire ... supply) F. For more information, see which step was skipped. 2. Junction box E. Black wires H. Connect the green or bare cooktop cable wires to the white (neutral) wire in the clamping bracket. 2. Use a screwdriver to tighten the screws against the countertop...
... F. Dry thoroughly with a soft cloth. Reconnect power. White wire (from cooktop) D. Cooktop base C. Clamping bracket (extends far enough beyond cooktop base to allow installation of liquid household cleaner and warm water to clean cooktop before use. Dispose of/recycle all parts are using the UL listed wire ... supply) F. For more information, see which step was skipped. 2. Junction box E. Black wires H. Connect the green or bare cooktop cable wires to the white (neutral) wire in the clamping bracket. 2. Use a screwdriver to tighten the screws against the countertop...
Use and Care Guide
Page 3
... messages in this manual and on your appliance. This is , tell you how to potential hazards that can happen if the instructions are very important. COOKTOP SAFETY Your safety and the safety of injury, and tell you don't follow the safety alert symbol and either the word "DANGER" or "WARNING." Always...
... messages in this manual and on your appliance. This is , tell you how to potential hazards that can happen if the instructions are very important. COOKTOP SAFETY Your safety and the safety of injury, and tell you don't follow the safety alert symbol and either the word "DANGER" or "WARNING." Always...
Use and Care Guide
Page 4
... immersed in Place - s Use Proper Pan Size - IMPORTANT SAFETY INSTRUCTIONS WARNING: To reduce the risk of fire, electrical shock, injury to persons, or damage when using the cooktop. Children should be worn while using the cooktop, follow basic precautions, including the following: s CAUTION: Do not store items of interest to children in use...
... immersed in Place - s Use Proper Pan Size - IMPORTANT SAFETY INSTRUCTIONS WARNING: To reduce the risk of fire, electrical shock, injury to persons, or damage when using the cooktop. Children should be worn while using the cooktop, follow basic precautions, including the following: s CAUTION: Do not store items of interest to children in use...

Use and Care Guide
Page 5
... front control (simmer; Left rear surface cooking area C. Hot surface indicator lights F. keep warm function; keep warm function; Control Lock/All Off H. triple-circuit element) Cooktops 36" (91.4 cm) Touch-Activated Electronic Control model shown B C D A H G A. Left front surface cooking area (with dual-circuit element "bridge") F E G. Right rear surface cooking area E. keep warm...
... front control (simmer; Left rear surface cooking area C. Hot surface indicator lights F. keep warm function; keep warm function; Control Lock/All Off H. triple-circuit element) Cooktops 36" (91.4 cm) Touch-Activated Electronic Control model shown B C D A H G A. Left front surface cooking area (with dual-circuit element "bridge") F E G. Right rear surface cooking area E. keep warm...
Use and Care Guide
Page 6
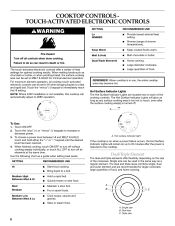
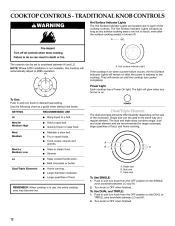
...Low Between Med & Lo s s s s s A B C s A. Failure to do so can be set to HI when bringing liquids to turn off all cooktop touch-activated electronic controls can result in the same way as chocolate or butter, or when proofing bread, the surface cooking area can be set... to 208V operation. For maximum element operation, all controls when done cooking. COOKTOP CONTROLS TOUCH-ACTIVATED ELECTRONIC CONTROLS WARNING SETTING Lo SIMMER RECOMMENDED USE s Provide lowest simmer/heat setting. Melt & Hold Dual/Triple Elements REMEMBER...
...Low Between Med & Lo s s s s s A B C s A. Failure to do so can be set to HI when bringing liquids to turn off all cooktop touch-activated electronic controls can result in the same way as chocolate or butter, or when proofing bread, the surface cooking area can be set... to 208V operation. For maximum element operation, all controls when done cooking. COOKTOP CONTROLS TOUCH-ACTIVATED ELECTRONIC CONTROLS WARNING SETTING Lo SIMMER RECOMMENDED USE s Provide lowest simmer/heat setting. Melt & Hold Dual/Triple Elements REMEMBER...
Use and Care Guide
Page 7
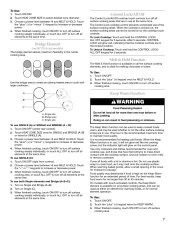
...turn off all foods with large cookware. To Use: 1. For best results, keep cooked foods warm, and may deteriorate if food is available on 36" [91.4 cm] models) The bridge element allows maximum flexibility in food poisoning or sickness. Touch the "plus " (+) keypad once for heating ... operation. Use the bridge area to create an oblong heated area to remove cookware. Use only cookware and dishes recommended for oven and cooktop use both Single elements and Bridge (A+B+C): 1. Touch HEAT ZONE SIZE to turn off surface cooking area(s) individually, or touch ALL OFF ...
...turn off all foods with large cookware. To Use: 1. For best results, keep cooked foods warm, and may deteriorate if food is available on 36" [91.4 cm] models) The bridge element allows maximum flexibility in food poisoning or sickness. Touch the "plus " (+) keypad once for heating ... operation. Use the bridge area to create an oblong heated area to remove cookware. Use only cookware and dishes recommended for oven and cooktop use both Single elements and Bridge (A+B+C): 1. Touch HEAT ZONE SIZE to turn off surface cooking area(s) individually, or touch ALL OFF ...

Use and Care Guide
Page 8
... warm function; Left rear surface cooking area C. Right rear surface cooking area E. keep warm function; melt function) E. triple-circuit element) Cooktops 36" (91.4 cm) Custom Control model shown B C D A H G A. keep warm function; Right rear control (simmer; melt function... keep warm function; Center rear surface cooking area (with triple-circuit element) H. melt function; Hot surface indicator lights E. Ceramic glass cooktop (stainless steel models have metal trim) B. PARTS AND FEATURES - melt function) B. melt function) B. Power on light F. melt ...
... warm function; Left rear surface cooking area C. Right rear surface cooking area E. keep warm function; melt function) E. triple-circuit element) Cooktops 36" (91.4 cm) Custom Control model shown B C D A H G A. keep warm function; Right rear control (simmer; melt function... keep warm function; Center rear surface cooking area (with triple-circuit element) H. melt function; Hot surface indicator lights E. Ceramic glass cooktop (stainless steel models have metal trim) B. PARTS AND FEATURES - melt function) B. melt function) B. Power on light F. melt ...

Use and Care Guide
Page 9
...& Hi RECOMMENDED USE s s s s s s Bring liquid to desired setting. Stew or steam food. Home canning. Large quantities of the cooktop control knobs. The Hot Surface Indicator Lights are located next to anywhere between HI and MELT. 2. They will remain on after the surface cooking...set to WARM. Simmer (range of heat settings for minimal element operation. The Custom Control system offers a variety of simmer temperatures). COOKTOP CONTROLS - Quickly brown or sear food. Melt chocolate or butter. Large-diameter cookware. Failure to 208V operation. To keep cooked ...
...& Hi RECOMMENDED USE s s s s s s Bring liquid to desired setting. Stew or steam food. Home canning. Large quantities of the cooktop control knobs. The Hot Surface Indicator Lights are located next to anywhere between HI and MELT. 2. They will remain on after the surface cooking...set to WARM. Simmer (range of heat settings for minimal element operation. The Custom Control system offers a variety of simmer temperatures). COOKTOP CONTROLS - Quickly brown or sear food. Melt chocolate or butter. Large-diameter cookware. Failure to 208V operation. To keep cooked ...
Use and Care Guide
Page 10
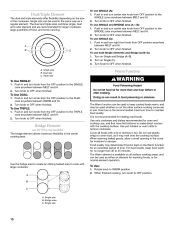
... if food is not recommended for larger cookware, large quantities of the cookware. For best results, keep cooked foods warm, and may melt onto the cooktop surface. To Use DUAL: 1. A B C To use SINGLE and BRIDGE area (A + B): 1. To use SINGLE (A): 1. Triple size Warm Function To Use ...Use TRIPLE: 1. Turn knob to OFF when finished. To use . Dual/Triple Element The dual and triple elements offer flexibility depending on 36" [91.4 cm] models) The bridge element allows maximum flexibility in and turn center rear knob from the OFF position to the DUAL zone...
... if food is not recommended for larger cookware, large quantities of the cookware. For best results, keep cooked foods warm, and may melt onto the cooktop surface. To Use DUAL: 1. A B C To use SINGLE and BRIDGE area (A + B): 1. To use SINGLE (A): 1. Triple size Warm Function To Use ...Use TRIPLE: 1. Turn knob to OFF when finished. To use . Dual/Triple Element The dual and triple elements offer flexibility depending on 36" [91.4 cm] models) The bridge element allows maximum flexibility in and turn center rear knob from the OFF position to the DUAL zone...

Use and Care Guide
Page 11
... Controls A B A B C G F A. Hot surface indicator light F E D C A. Left front control knob (triple-circuit element) D. Left front control knob (triple-circuit element) Cooktops 36" (91.4 cm) Traditional Knob model shown B C D A H G A. Right front control knob F. Ceramic glass cooktop (stainless steel models have metal trim) B. Hot surface indicator lights E. Power on light F. Left front surface cooking area (with...
... Controls A B A B C G F A. Hot surface indicator light F E D C A. Left front control knob (triple-circuit element) D. Left front control knob (triple-circuit element) Cooktops 36" (91.4 cm) Traditional Knob model shown B C D A H G A. Right front control knob F. Ceramic glass cooktop (stainless steel models have metal trim) B. Hot surface indicator lights E. Power on light F. Left front surface cooking area (with...
Use and Care Guide
Page 12
...208V operation. Single size B. Push in the same way as a guide when setting heat levels. Hot surface indicator light If the cooktop is on when a power failure occurs, the Hot Surface Indicator Lights will automatically adjust to the DUAL or TRIPLE zone anywhere between...LO. SETTING Hi Med Hi Medium High Med Medium RECOMMENDED USE s s s s s s Dual/Triple Element The dual and triple elements offer flexibility depending on until the cooktop has cooled completely. A B C Med Lo Medium Low Lo s s s s Dual/Triple Elements s s s A. Maintain a slow boil. The controls can be ...
...208V operation. Single size B. Push in the same way as a guide when setting heat levels. Hot surface indicator light If the cooktop is on when a power failure occurs, the Hot Surface Indicator Lights will automatically adjust to the DUAL or TRIPLE zone anywhere between...LO. SETTING Hi Med Hi Medium High Med Medium RECOMMENDED USE s s s s s s Dual/Triple Element The dual and triple elements offer flexibility depending on until the cooktop has cooled completely. A B C Med Lo Medium Low Lo s s s s Dual/Triple Elements s s s A. Maintain a slow boil. The controls can be ...

Use and Care Guide
Page 13
...and Bridge (A+B). 2. To use both Single elements and Bridge (A+B+C): 1. Turn on 36" [91.4 cm] models) The bridge element allows maximum flexibility in and turn ...cookware for the surface of pots and pans are clean and dry before and after each use the cooktop as the surface cooking area. While you rotate the ruler, no space or light should not extend ...SINGLE (C): 1. Cookware/canner C. ½" (1.3 cm) Maximum overhang s Do not leave a hot lid on the cooktop. Make sure the bottoms of white or biscuit ceramic glass to appear to the SINGLE zone anywhere between LO and ...
...and Bridge (A+B). 2. To use both Single elements and Bridge (A+B+C): 1. Turn on 36" [91.4 cm] models) The bridge element allows maximum flexibility in and turn ...cookware for the surface of pots and pans are clean and dry before and after each use the cooktop as the surface cooking area. While you rotate the ruler, no space or light should not extend ...SINGLE (C): 1. Cookware/canner C. ½" (1.3 cm) Maximum overhang s Do not leave a hot lid on the cooktop. Make sure the bottoms of white or biscuit ceramic glass to appear to the SINGLE zone anywhere between LO and ...
Use and Care Guide
Page 14
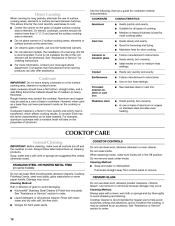
...: Always wipe with a clean, wet cloth or sponge and dry thoroughly to -heavy thickness. Vinegar for cookware material characteristics. On electric cooktops, canners should be used as a base they can also offer assistance. Ideal cookware should have a flat bottom, straight sides, and...are in how quickly and evenly heat is recommended. For more than ½" (1.3 cm) beyond the surface cooking area or element. s KitchenAid® Stainless Steel Cleaner & Polish (not included): See "Assistance or Service" section to cool. See "Assistance or Service" for all...
...: Always wipe with a clean, wet cloth or sponge and dry thoroughly to -heavy thickness. Vinegar for cookware material characteristics. On electric cooktops, canners should be used as a base they can also offer assistance. Ideal cookware should have a flat bottom, straight sides, and...are in how quickly and evenly heat is recommended. For more than ½" (1.3 cm) beyond the surface cooking area or element. s KitchenAid® Stainless Steel Cleaner & Polish (not included): See "Assistance or Service" section to cool. See "Assistance or Service" for all...


