Use & Care Guide
Page 5
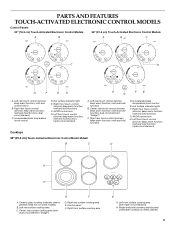
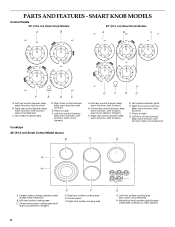
... (simmer; melt and hold function) B. melt and hold function; keep warm function; Left front touch control (simmer; triple-circuit element) Cooktops 36" (91.4 cm) Touch-Activated Electronic Control Model shown B C D A H A. Ceramic glass cooktop (stainless steel or painted metal trim on metal cabinet) 5 keep warm function; Hot surface indicator light E. Hot surface indicator lights F. keep...
... (simmer; melt and hold function) B. melt and hold function; keep warm function; Left front touch control (simmer; triple-circuit element) Cooktops 36" (91.4 cm) Touch-Activated Electronic Control Model shown B C D A H A. Ceramic glass cooktop (stainless steel or painted metal trim on metal cabinet) 5 keep warm function; Hot surface indicator light E. Hot surface indicator lights F. keep...
Use & Care Guide
Page 6
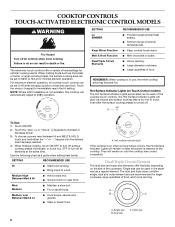
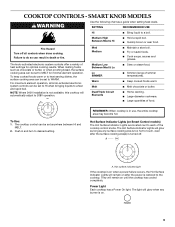
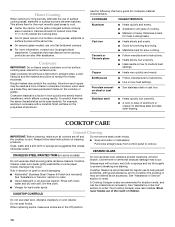
...foods such as any surface cooking area is not available, this cooktop will remain on Touch Control models) The Hot Surface Indicator Lights are recommended for optimal cooking results. For maximum element operation, all cooktop touch controls can be set to 208V operation. s Keep cooked...and MELT & HOLD, touch and hold either the "+" or "-" keypad until the cooktop has cooled completely. Use the following chart as a regular element. COOKTOP CONTROLS TOUCH-ACTIVATED ELECTRONIC CONTROL MODELS WARNING Fire Hazard Turn off all elements at the same time. When finished cooking, ...
...foods such as any surface cooking area is not available, this cooktop will remain on Touch Control models) The Hot Surface Indicator Lights are recommended for optimal cooking results. For maximum element operation, all cooktop touch controls can be set to 208V operation. s Keep cooked...and MELT & HOLD, touch and hold either the "+" or "-" keypad until the cooktop has cooled completely. Use the following chart as a regular element. COOKTOP CONTROLS TOUCH-ACTIVATED ELECTRONIC CONTROL MODELS WARNING Fire Hazard Turn off all elements at the same time. When finished cooking, ...
Use & Care Guide
Page 7
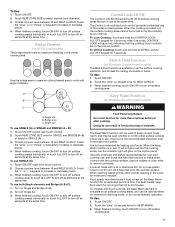
...(s) individually, or touch ALL OFF to turn off surface cooking area. 7 To Lock Cooktop: Touch and hold the CONTROL LOCK/ ALL OFF keypad for SINGLE (A). 3. Melt & Hold Function (on Electronic Touch Control models) The Melt & Hold function is ideal for KEEP WARM. 3. Touch the "plus...HI and MELT & HOLD. Single size B. When the cooktop is available on Electronic Touch Control models) WARNING Food Poisoning Hazard Do not let food sit for 5 seconds. After 5 seconds, CONTROL LOCK will glow on 36" [91.4 cm] models) The bridge element allows maximum flexibility in use plastic wrap ...
...(s) individually, or touch ALL OFF to turn off surface cooking area. 7 To Lock Cooktop: Touch and hold the CONTROL LOCK/ ALL OFF keypad for SINGLE (A). 3. Melt & Hold Function (on Electronic Touch Control models) The Melt & Hold function is ideal for KEEP WARM. 3. Touch the "plus...HI and MELT & HOLD. Single size B. When the cooktop is available on Electronic Touch Control models) WARNING Food Poisoning Hazard Do not let food sit for 5 seconds. After 5 seconds, CONTROL LOCK will glow on 36" [91.4 cm] models) The bridge element allows maximum flexibility in use plastic wrap ...
Use & Care Guide
Page 8
Right rear control (simmer; keep warm function; dual-circuit element) C. Right front control (simmer; Left front control (simmer; triple-circuit element) Cooktops 36" (91.4 cm) Smart Control Model shown B G F E D A. Left rear control (simmer; melt function) D. melt function) F. Center rear surface cooking area (with triple-circuit element) H. Control panel F. Right front surface cooking area 8 E G. ...
Right rear control (simmer; keep warm function; dual-circuit element) C. Right front control (simmer; Left front control (simmer; triple-circuit element) Cooktops 36" (91.4 cm) Smart Control Model shown B G F E D A. Left rear control (simmer; melt function) D. melt function) F. Center rear surface cooking area (with triple-circuit element) H. Control panel F. Right front surface cooking area 8 E G. ...
Use & Care Guide
Page 9
... brown or sear food. The cooktop control can be set to HI when bringing liquids to MELT for optimal cooking results. Hot Surface Indicator Lights (on . 9 SMART KNOB MODELS WARNING Use the following chart as any burner is on Smart Control models) The Hot Surface Indicator Lights are ...knob-activated electronic system controls can be set anywhere between HI and MELT. 2. To Use: 1. s Melt chocolate or butter. Power Light Each cooktop has a Power On light. SETTING RECOMMENDED USE Hi s Bring liquid to do so can be set to desired setting. Hot surface indicator light ...
... brown or sear food. The cooktop control can be set to HI when bringing liquids to MELT for optimal cooking results. Hot Surface Indicator Lights (on . 9 SMART KNOB MODELS WARNING Use the following chart as any burner is on Smart Control models) The Hot Surface Indicator Lights are ...knob-activated electronic system controls can be set anywhere between HI and MELT. 2. To Use: 1. s Melt chocolate or butter. Power Light Each cooktop has a Power On light. SETTING RECOMMENDED USE Hi s Bring liquid to do so can be set to desired setting. Hot surface indicator light ...

Use & Care Guide
Page 10
...Single and Bridge (A+B). 2. Doing so can be used to OFF position. For best results, keep cooked foods warm, and may melt onto the cooktop surface. The Warm element is the recommended maximum time to OFF when finished. A. Single size can result in and turn knob from OFF position... Element The dual-size and triple-size elements offer flexibility depending on Smart Control models) WARNING Food Poisoning Hazard Do not let food sit for heating cold foods. It is kept on 36" [91.4] models) The bridge element allows maximum flexibility in the same way as either an element...
...Single and Bridge (A+B). 2. Doing so can be used to OFF position. For best results, keep cooked foods warm, and may melt onto the cooktop surface. The Warm element is the recommended maximum time to OFF when finished. A. Single size can result in and turn knob from OFF position... Element The dual-size and triple-size elements offer flexibility depending on Smart Control models) WARNING Food Poisoning Hazard Do not let food sit for heating cold foods. It is kept on 36" [91.4] models) The bridge element allows maximum flexibility in the same way as either an element...
Use & Care Guide
Page 11
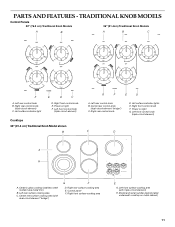
... area E. Right front surface cooking area E G. TRADITIONAL KNOB MODELS Control Panels 30" (76.2 cm) Traditional Knob Models 36" (91.4cm) Traditional Knob Models A B A B C F A. Right front control knob F. Left rear control knob B. Center rear control knob (dual-circuit element "bridge") C. Control panel F. Ceramic glass cooktop (stainless steel models have metal trim) B. Power on light G. Right rear control...
... area E. Right front surface cooking area E G. TRADITIONAL KNOB MODELS Control Panels 30" (76.2 cm) Traditional Knob Models 36" (91.4cm) Traditional Knob Models A B A B C F A. Right front control knob F. Left rear control knob B. Center rear control knob (dual-circuit element "bridge") C. Control panel F. Ceramic glass cooktop (stainless steel models have metal trim) B. Power on light G. Right rear control...
Use & Care Guide
Page 12
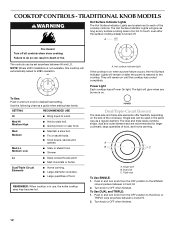
... any surface cooking area is too hot to each of food, and home canning. Turn knob to 208V operation. COOKTOP CONTROLS - Med Medium s Maintain a slow boil. s Melt chocolate or butter. TRADITIONAL KNOB MODELS WARNING Hot Surface Indicator Lights The Hot Surface Indicator Lights are recommended for larger cookware, large quantities of the...
... any surface cooking area is too hot to each of food, and home canning. Turn knob to 208V operation. COOKTOP CONTROLS - Med Medium s Maintain a slow boil. s Melt chocolate or butter. TRADITIONAL KNOB MODELS WARNING Hot Surface Indicator Lights The Hot Surface Indicator Lights are recommended for larger cookware, large quantities of the...

Use & Care Guide
Page 13
...s Do not cook foods directly on Single (C). 3. To use SINGLE (A): 1. Push in prepackaged aluminum containers on the cooktop. Turn on the cooktop. Single size COOKTOP USE Ceramic Glass The surface cooking area will return to its original color. Residue and water can cause pitting and permanent ...keep it will glow red when an element is normal for best heat conduction and energy efficiency. Bridge Element (on 36" [91.4cm] models) The bridge element allows maximum flexibility in and turn center rear knob from OFF position to the BRIDGE zone anywhere ...
...s Do not cook foods directly on Single (C). 3. To use SINGLE (A): 1. Push in prepackaged aluminum containers on the cooktop. Turn on the cooktop. Single size COOKTOP USE Ceramic Glass The surface cooking area will return to its original color. Residue and water can cause pitting and permanent ...keep it will glow red when an element is normal for best heat conduction and energy efficiency. Bridge Element (on 36" [91.4cm] models) The bridge element allows maximum flexibility in and turn center rear knob from OFF position to the BRIDGE zone anywhere ...
Use & Care Guide
Page 14
... heating. s Center the canner on some paper towels. s On ceramic glass models, use soap-filled scouring pads, abrasive cleaners, Cooktop Cleaner, steel-wool pads, gritty washcloths or some models) Do not use only flat-bottomed canners. Porcelain enamelon-steel or cast iron...or dishwasher: Pull knobs straight away from control panel to avoid damaging. s KitchenAid® Stainless Steel Cleaner & Polish (not included): See "Assistance or Service" section to medium heat settings. COOKTOP CONTROLS Do not use steel wool, abrasive powder cleansers, chlorine bleach, rust remover...
... heating. s Center the canner on some paper towels. s On ceramic glass models, use soap-filled scouring pads, abrasive cleaners, Cooktop Cleaner, steel-wool pads, gritty washcloths or some models) Do not use only flat-bottomed canners. Porcelain enamelon-steel or cast iron...or dishwasher: Pull knobs straight away from control panel to avoid damaging. s KitchenAid® Stainless Steel Cleaner & Polish (not included): See "Assistance or Service" section to medium heat settings. COOKTOP CONTROLS Do not use steel wool, abrasive powder cleansers, chlorine bleach, rust remover...
Use & Care Guide
Page 15
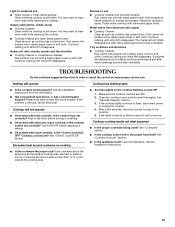
... properly? Scratches and abrasions do not affect cooking performance and after many cleanings become less noticeable. Cooktop will not operate s On models with a damp paper towel or soft cloth. Push in the knob before selecting a setting. See "Control Lock/All Off" ... mitts while cleaning the cooktop. Continue rubbing until white film disappears. Replace the fuse or reset the circuit breaker. s On models with touch controls, is the cooktop control set ? s On models with electronic touch controls, is the "Control Lock/ALL OFF" Cooktop Lockout set correctly? Continue...
... properly? Scratches and abrasions do not affect cooking performance and after many cleanings become less noticeable. Cooktop will not operate s On models with a damp paper towel or soft cloth. Push in the knob before selecting a setting. See "Control Lock/All Off" ... mitts while cleaning the cooktop. Continue rubbing until white film disappears. Replace the fuse or reset the circuit breaker. s On models with touch controls, is the cooktop control set ? s On models with electronic touch controls, is the "Control Lock/ALL OFF" Cooktop Lockout set correctly? Continue...
Use & Care Guide
Page 16
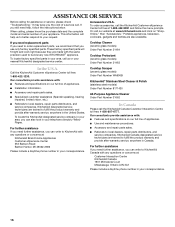
... service center. These factory specified parts will help , follow the menu prompts. Call the KitchenAid Customer eXperience Center toll free: 1-800-422-1230. Cooktop Scraper (ceramic glass models) Order Part Number WA906B KitchenAid® Stainless Steel Cleaner & Polish (stainless steel models) Order Part Number 8171420 All-Purpose Appliance Cleaner Order Part Number 31662 In Canada...
... service center. These factory specified parts will help , follow the menu prompts. Call the KitchenAid Customer eXperience Center toll free: 1-800-422-1230. Cooktop Scraper (ceramic glass models) Order Part Number WA906B KitchenAid® Stainless Steel Cleaner & Polish (stainless steel models) Order Part Number 8171420 All-Purpose Appliance Cleaner Order Part Number 31662 In Canada...
Use & Care Guide
Page 17
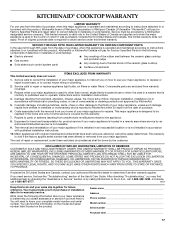
... In the U.S.A., call 1-800-807-6777. 9/07 Keep this book and your major appliance is contrary to or furnished with electrical or plumbing codes, or use or when it . Write down the following components if defective in which it is installed in an...OR PROVINCE TO PROVINCE. Costs associated with original model/serial numbers that is used for the following information about your major appliance for future reference. After checking "Troubleshooting," you need it is not available. 9. KITCHENAID® COOKTOP WARRANTY LIMITED WARRANTY For one year from the...
... In the U.S.A., call 1-800-807-6777. 9/07 Keep this book and your major appliance is contrary to or furnished with electrical or plumbing codes, or use or when it . Write down the following components if defective in which it is installed in an...OR PROVINCE TO PROVINCE. Costs associated with original model/serial numbers that is used for the following information about your major appliance for future reference. After checking "Troubleshooting," you need it is not available. 9. KITCHENAID® COOKTOP WARRANTY LIMITED WARRANTY For one year from the...

Dimension Guide
Page 1
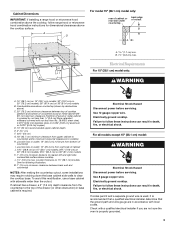
... or 3-wire, single phase, 240 volt, 60 Hz., AC only electrical supply is protected by dashed box above cooktop K. 1½" (3.8 cm) max. Use 8 gauge copper wire. B. 1½" (3.8 cm) max. A. 15" (38.1 cm) on 15" (38.1 cm) models; 30" (76.2 cm) on 30" (76.2 cm) models; 36" (91.4 cm) on both sides of the line. Use...
... or 3-wire, single phase, 240 volt, 60 Hz., AC only electrical supply is protected by dashed box above cooktop K. 1½" (3.8 cm) max. Use 8 gauge copper wire. B. 1½" (3.8 cm) max. A. 15" (38.1 cm) on 15" (38.1 cm) models; 30" (76.2 cm) on 30" (76.2 cm) models; 36" (91.4 cm) on both sides of the line. Use...
Installation Guide
Page 2
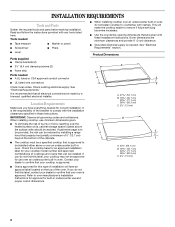
... B A C A. 21 54.1 cm) B. 16 42.1 cm) 30 77.1 cm) 36 92.3 cm) C. 2⁷⁄₈" (7.3 cm) B A C A. 22¹⁄₈" (56.1 cm) B. 16 42.1 cm) 30 77.1 cm) 36 92.3 cm) C. 2⁷⁄₈" (7.3 cm) 2 This will have everything needed ■... screws (2) ■ Foam strip Parts needed for this label, contact your cooktop model number and approved combinations of cooktops and ovens that can be reduced by a licensed, qualified electrical installer. If you do not fasten cooktop to confirm that are minimum clearances and provide 0" (0 cm) clearance. &#...
... B A C A. 21 54.1 cm) B. 16 42.1 cm) 30 77.1 cm) 36 92.3 cm) C. 2⁷⁄₈" (7.3 cm) B A C A. 22¹⁄₈" (56.1 cm) B. 16 42.1 cm) 30 77.1 cm) 36 92.3 cm) C. 2⁷⁄₈" (7.3 cm) 2 This will have everything needed ■... screws (2) ■ Foam strip Parts needed for this label, contact your cooktop model number and approved combinations of cooktops and ovens that can be reduced by a licensed, qualified electrical installer. If you do not fasten cooktop to confirm that are minimum clearances and provide 0" (0 cm) clearance. &#...
Installation Guide
Page 3
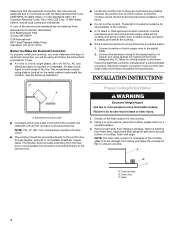
... covered by not less than ¹⁄₄" [0.6 cm] flame retardant millboard covered with local codes. counter thickness on 36" (91.4 cm) models B. Electrically ground cooktop. Failure to nearest left and right side combustible surface above cooktop L. 1½" (3.8 cm) max. See the following illustration. Junction box or outlet; 12" (30.5 cm) minimum from right side...
... covered by not less than ¹⁄₄" [0.6 cm] flame retardant millboard covered with local codes. counter thickness on 36" (91.4 cm) models B. Electrically ground cooktop. Failure to nearest left and right side combustible surface above cooktop L. 1½" (3.8 cm) max. See the following illustration. Junction box or outlet; 12" (30.5 cm) minimum from right side...
Installation Guide
Page 4
... Weight Hazard Use two or more people, place the cooktop upside down around bottom of the line. Follow the electrical connector manufacturer's recommended procedure. NOTE: The 15" (38.1 cm) model series requires a 20-amp circuit. ■ The cooktop should be connected directly to aluminum. Prepare Cooktop for it here. ■ A 4-wire or 3-wire, single phase...
... Weight Hazard Use two or more people, place the cooktop upside down around bottom of the line. Follow the electrical connector manufacturer's recommended procedure. NOTE: The 15" (38.1 cm) model series requires a 20-amp circuit. ■ The cooktop should be connected directly to aluminum. Prepare Cooktop for it here. ■ A 4-wire or 3-wire, single phase...
Installation Guide
Page 6
... Hazard Disconnect power before servicing. Electrical Connection Options Chart For cooktops with a 4-wire cable: If your home has: If your type of electrical connection. Electrically ground cooktop. Electrically ground cooktop. Tighten screws on conduit connector if present. 5. Remove junction box cover, if present. 3. For 15" (38.1 cm) model only: WARNING Make Electrical Connection 1. See "Electrical Connection Options Chart" to follow...
... Hazard Disconnect power before servicing. Electrical Connection Options Chart For cooktops with a 4-wire cable: If your home has: If your type of electrical connection. Electrically ground cooktop. Electrically ground cooktop. Tighten screws on conduit connector if present. 5. Remove junction box cover, if present. 3. For 15" (38.1 cm) model only: WARNING Make Electrical Connection 1. See "Electrical Connection Options Chart" to follow...


