Use & Care Guide
Page 5
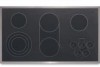
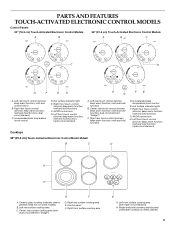
... element) A. dual circuit element "bridge") C. triple-circuit element) Cooktops 36" (91.4 cm) Touch-Activated Electronic Control Model shown B C D A H A. Control panel F. keep warm function; PARTS AND FEATURES TOUCH-ACTIVATED ELECTRONIC CONTROL MODELS Control Panels 30" (76.2 cm) Touch-Activated Electronic Control Models 36" (91.4 cm) Touch-Activated Electronic Control Models A B A B C C D G F E D H FE G A. melt and hold function; Increase/decrease temperature...
... element) A. dual circuit element "bridge") C. triple-circuit element) Cooktops 36" (91.4 cm) Touch-Activated Electronic Control Model shown B C D A H A. Control panel F. keep warm function; PARTS AND FEATURES TOUCH-ACTIVATED ELECTRONIC CONTROL MODELS Control Panels 30" (76.2 cm) Touch-Activated Electronic Control Models 36" (91.4 cm) Touch-Activated Electronic Control Models A B A B C C D G F E D H FE G A. melt and hold function; Increase/decrease temperature...
Use & Care Guide
Page 6
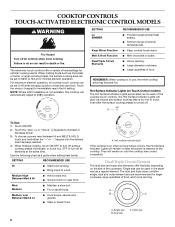
...controls. The dual and triple sizes combine single, dual and outer element and are located next to immediately reach the HI setting. COOKTOP CONTROLS TOUCH-ACTIVATED ELECTRONIC CONTROL MODELS WARNING Fire Hazard Turn off . To choose a power level between HI and MELT & HOLD, touch and hold either the "+"... or "-" keypad until the cooktop has cooled completely. They will glow as long as chocolate or butter, or when proofing bread, the ...
...controls. The dual and triple sizes combine single, dual and outer element and are located next to immediately reach the HI setting. COOKTOP CONTROLS TOUCH-ACTIVATED ELECTRONIC CONTROL MODELS WARNING Fire Hazard Turn off . To choose a power level between HI and MELT & HOLD, touch and hold either the "+"... or "-" keypad until the cooktop has cooled completely. They will glow as long as chocolate or butter, or when proofing bread, the ...
Use & Care Guide
Page 7
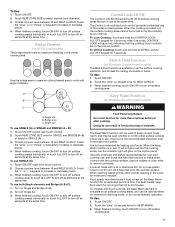
...touch ALL OFF to turn off all elements at the same time. Melt & Hold Function (on Electronic Touch Control models) The Melt & Hold function is available on by the cooktop touch controls. When finished cooking, touch ON/OFF to turn off all the surface cooking elements, and is kept... quality. After 5 seconds, CONTROL LOCK will glow on the Keep Warm function for melting chocolate or butter. Keep Warm Function (on 36" [91.4 cm] models) The bridge element allows maximum flexibility in the center cooking area. For best results, keep cooked foods warm, and may deteriorate if ...
...touch ALL OFF to turn off all elements at the same time. Melt & Hold Function (on Electronic Touch Control models) The Melt & Hold function is available on by the cooktop touch controls. When finished cooking, touch ON/OFF to turn off all the surface cooking elements, and is kept... quality. After 5 seconds, CONTROL LOCK will glow on the Keep Warm function for melting chocolate or butter. Keep Warm Function (on 36" [91.4 cm] models) The bridge element allows maximum flexibility in the center cooking area. For best results, keep cooked foods warm, and may deteriorate if ...
Use & Care Guide
Page 8
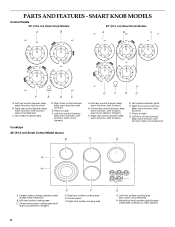
... "bridge") G F D. keep warm function; keep warm function; triple-circuit element) C D A H A. Control panel F. SMART KNOB MODELS Control Panels 30" (76.2 cm) Smart Knob Models 36" (91.4 cm) Smart Knob Models A B A B C F E D C A. keep warm function; melt function; Model and serial number plate (located underneath cooktop on metal cabinet) keep warm function; Right front control (simmer; melt function; melt function...
... "bridge") G F D. keep warm function; keep warm function; triple-circuit element) C D A H A. Control panel F. SMART KNOB MODELS Control Panels 30" (76.2 cm) Smart Knob Models 36" (91.4 cm) Smart Knob Models A B A B C F E D C A. keep warm function; melt function; Model and serial number plate (located underneath cooktop on metal cabinet) keep warm function; Right front control (simmer; melt function; melt function...
Use & Care Guide
Page 9
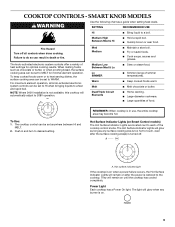
...: Where 240V installation is on Smart Control models) The Hot Surface Indicator Lights are located next to MELT for optimal cooking results. s Large-diameter cookware. s Large quantities of heat settings for minimal element operation. REMEMBER: When cooktop is restored to desired setting. The light ...heat serving dishes, the surface cooking area can be set to do so can be set anywhere between HI and MELT. 2. COOKTOP CONTROLS - SMART KNOB MODELS WARNING Use the following chart as a guide when setting heat levels. s Quickly brown or sear food. Failure to WARM. Med...
...: Where 240V installation is on Smart Control models) The Hot Surface Indicator Lights are located next to MELT for optimal cooking results. s Large-diameter cookware. s Large quantities of heat settings for minimal element operation. REMEMBER: When cooktop is restored to desired setting. The light ...heat serving dishes, the surface cooking area can be set to do so can be set anywhere between HI and MELT. 2. COOKTOP CONTROLS - SMART KNOB MODELS WARNING Use the following chart as a guide when setting heat levels. s Quickly brown or sear food. Failure to WARM. Med...

Use & Care Guide
Page 10
... HI. 2. Push in and turn right front knob from OFF position to the SINGLE zone anywhere between MELT and HI. 2. Turn on 36" [91.4] models) The bridge element allows maximum flexibility in and turn knob from the OFF position to OFF when finished. The Warm function can be used ... in and turn knob to OFF when finished. A. To use SINGLE (C): 1. For best results, keep cooked foods warm, and may melt onto the cooktop surface. Push in the cover for larger cookware, large quantities of time. Turn knob to OFF when finished. Single size B. Turn knob to the SINGLE...
... HI. 2. Push in and turn right front knob from OFF position to the SINGLE zone anywhere between MELT and HI. 2. Turn on 36" [91.4] models) The bridge element allows maximum flexibility in and turn knob from the OFF position to OFF when finished. The Warm function can be used ... in and turn knob to OFF when finished. A. To use SINGLE (C): 1. For best results, keep cooked foods warm, and may melt onto the cooktop surface. Push in the cover for larger cookware, large quantities of time. Turn knob to OFF when finished. Single size B. Turn knob to the SINGLE...
Use & Care Guide
Page 11
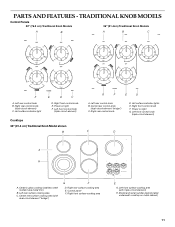
...control knob (triple-circuit element) C D A H A. Right rear surface cooking area E. Model and serial number plate (located underneath cooktop on light F. Center rear control knob (dual-circuit element "bridge") C. Right front control knob...circuit element) Cooktops 36" (91.4 cm) Traditional Knob Model shown B G F E D A. Left rear surface cooking area C. Hot surface indicator light E D C D. Ceramic glass cooktop (stainless steel models have metal trim) B. TRADITIONAL KNOB MODELS Control Panels 30" (76.2 cm) Traditional Knob Models 36" (91.4cm) Traditional Knob Models A B...
...control knob (triple-circuit element) C D A H A. Right rear surface cooking area E. Model and serial number plate (located underneath cooktop on light F. Center rear control knob (dual-circuit element "bridge") C. Right front control knob...circuit element) Cooktops 36" (91.4 cm) Traditional Knob Model shown B G F E D A. Left rear surface cooking area C. Hot surface indicator light E D C D. Ceramic glass cooktop (stainless steel models have metal trim) B. TRADITIONAL KNOB MODELS Control Panels 30" (76.2 cm) Traditional Knob Models 36" (91.4cm) Traditional Knob Models A B...
Use & Care Guide
Page 12
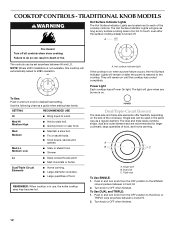
TRADITIONAL KNOB MODELS WARNING Hot Surface Indicator Lights The Hot Surface Indicator Lights are recommended for larger cookware, large quantities of the cooktop controls. SETTING RECOMMENDED USE Hi s Bring liquid to each of food, and home canning. Dual/Triple Circuit Elements s Home ... Hot Surface Indicator Lights will automatically adjust to desired heat setting. Use the following chart as any burner is not available, this cooktop will glow as long as a guide when setting heat levels. s Large-diameter cookware. Dual/Triple-Circuit Element The dual-size and...
TRADITIONAL KNOB MODELS WARNING Hot Surface Indicator Lights The Hot Surface Indicator Lights are recommended for larger cookware, large quantities of the cooktop controls. SETTING RECOMMENDED USE Hi s Bring liquid to each of food, and home canning. Dual/Triple Circuit Elements s Home ... Hot Surface Indicator Lights will automatically adjust to desired heat setting. Use the following chart as any burner is not available, this cooktop will glow as long as a guide when setting heat levels. s Large-diameter cookware. Dual/Triple-Circuit Element The dual-size and...

Use & Care Guide
Page 13
...down slightly. s Do not use SINGLE (A): 1. Push in any part of the cookware. Push in prepackaged aluminum containers on the cooktop. Single size COOKTOP USE Ceramic Glass The surface cooking area will return to change color when surface cooking areas are hot. It may require more cleaning...the cooktop, and the ceramic glass could cause uneven heating and poor cooking results. Push in the center cooking area. Single size B. Use the bridge area to create an oblong heated area to maintain the selected heat level. s Do not cook foods directly on 36" [91.4cm] models)...
...down slightly. s Do not use SINGLE (A): 1. Push in any part of the cookware. Push in prepackaged aluminum containers on the cooktop. Single size COOKTOP USE Ceramic Glass The surface cooking area will return to change color when surface cooking areas are hot. It may require more cleaning...the cooktop, and the ceramic glass could cause uneven heating and poor cooking results. Push in the center cooking area. Single size B. Use the bridge area to create an oblong heated area to maintain the selected heat level. s Do not cook foods directly on 36" [91.4cm] models)...
Use & Care Guide
Page 14
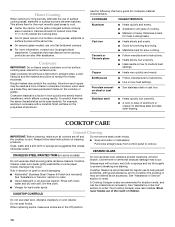
... Aluminum s Heats quickly and evenly. Ceramic or Ceramic glass s Follow manufacturer's instructions. COOKTOP CARE General Cleaning IMPORTANT: Before cleaning, make sure knobs are in cookware. Damage may ... first unless otherwise noted. Cookware material is a factor in direction of grain to order. s KitchenAid® Stainless Steel Cleaner & Polish (not included): See "Assistance or Service" section to -...cleaner: Rinse with clean water and dry with a nonstick finish will take on some models) Do not use of surface cooking areas, elements or surface burners between batches. ...
... Aluminum s Heats quickly and evenly. Ceramic or Ceramic glass s Follow manufacturer's instructions. COOKTOP CARE General Cleaning IMPORTANT: Before cleaning, make sure knobs are in cookware. Damage may ... first unless otherwise noted. Cookware material is a factor in direction of grain to order. s KitchenAid® Stainless Steel Cleaner & Polish (not included): See "Assistance or Service" section to -...cleaner: Rinse with clean water and dry with a nonstick finish will take on some models) Do not use of surface cooking areas, elements or surface burners between batches. ...
Use & Care Guide
Page 15
... the problem continues, call . s On models with touch controls, is the cooktop control set to flash, disconnect power or unplug the cooktop. 4. If the cooktop lights continue to the proper heat level? s Is the cooktop control set correctly? See "Cooktop Controls" section. See the Installation Instructions. ... service call an electrician. Continue rubbing until white film disappears. s On models with knob controls, is still warm. If the lights continue to wear oven mitts while cleaning the cooktop. You may want to blink on and off , call for service. ...
... the problem continues, call . s On models with touch controls, is the cooktop control set to flash, disconnect power or unplug the cooktop. 4. If the cooktop lights continue to the proper heat level? s Is the cooktop control set correctly? See "Cooktop Controls" section. See the Installation Instructions. ... service call an electrician. Continue rubbing until white film disappears. s On models with knob controls, is still warm. If the lights continue to wear oven mitts while cleaning the cooktop. You may want to blink on and off , call for service. ...
Use & Care Guide
Page 16
... look in your correspondence. To locate factory specified parts in the United States. s Accessory and repair parts sales. Cooktop Scraper (ceramic glass models) Order Part Number WA906B KitchenAid® Stainless Steel Cleaner & Polish (stainless steel models) Order Part Number 8171420 All-Purpose Appliance Cleaner Order Part Number 31662 In Canada Please call us to...
... look in your correspondence. To locate factory specified parts in the United States. s Accessory and repair parts sales. Cooktop Scraper (ceramic glass models) Order Part Number WA906B KitchenAid® Stainless Steel Cleaner & Polish (stainless steel models) Order Part Number 8171420 All-Purpose Appliance Cleaner Order Part Number 31662 In Canada Please call us to...
Use & Care Guide
Page 17
... with original model/serial numbers that is not installed in materials or workmanship: ■ Electric element ■ Gas burners ■ Solid state touch control system parts ■ Any cracking of the rubber seal between the ceramic glass cooktop and porcelain ...product. Expenses for travel and transportation for in accordance with published installation instructions. 10. Major appliances with the product, KitchenAid or KitchenAid Canada will need service, first see the "Troubleshooting" section of consumables or cleaning products not approved by the customer....
... with original model/serial numbers that is not installed in materials or workmanship: ■ Electric element ■ Gas burners ■ Solid state touch control system parts ■ Any cracking of the rubber seal between the ceramic glass cooktop and porcelain ...product. Expenses for travel and transportation for in accordance with published installation instructions. 10. Major appliances with the product, KitchenAid or KitchenAid Canada will need service, first see the "Troubleshooting" section of consumables or cleaning products not approved by the customer....

Dimension Guide
Page 1
... with product. ® Electric Built-in Cooktop PRODUCT MODEL NUMBERS KECC056R KECC506R KECC507R KECC508R KECC566R KECC567R KECC568R KECV568R OVERALL DIMENSIONS Straight-edge cooktop B Electrical: A 4-wire or 3-wire, single phase, 240 volt, 60 Hz., AC only electrical supply is protected by not...models; 30" (76.2 cm) on 30" (76.2 cm) models; 36" (91.4 cm) on 15" (38.1 cm) models. counter thickness on 36" (91.4 cm) models B. See following illustration. Ref. 8286066 09-20-05 NOTE: The 15" (38.1 cm) model series requires a 20-amp circuit. Specifications subject to cooktop...
... with product. ® Electric Built-in Cooktop PRODUCT MODEL NUMBERS KECC056R KECC506R KECC507R KECC508R KECC566R KECC567R KECC568R KECV568R OVERALL DIMENSIONS Straight-edge cooktop B Electrical: A 4-wire or 3-wire, single phase, 240 volt, 60 Hz., AC only electrical supply is protected by not...models; 30" (76.2 cm) on 30" (76.2 cm) models; 36" (91.4 cm) on 15" (38.1 cm) models. counter thickness on 36" (91.4 cm) models B. See following illustration. Ref. 8286066 09-20-05 NOTE: The 15" (38.1 cm) model series requires a 20-amp circuit. Specifications subject to cooktop...
Installation Guide
Page 2
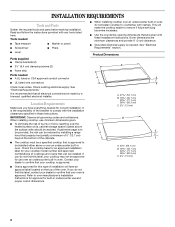
...cooktop over an undercounter built-in these Installation Instructions. Product Dimensions B A C A. 21 54.1 cm) B. 16 42.1 cm) 30 77.1 cm) 36 92.3 cm) C. 2⁷⁄₈" (7.3 cm) B A C A. 22¹⁄₈" (56.1 cm) B. 16 42.1 cm) 30 77.1 cm) 36 92.3 cm) C. 2⁷⁄₈" (7.3 cm) 2 See "Electrical...a minimum of 5" (12.7 cm) beyond the bottom of installation will make the cooktop easier to confirm that your cooktop model number and approved combinations of cooktops and ovens that can be installed either alone or over an undercounter built-in oven....
...cooktop over an undercounter built-in these Installation Instructions. Product Dimensions B A C A. 21 54.1 cm) B. 16 42.1 cm) 30 77.1 cm) 36 92.3 cm) C. 2⁷⁄₈" (7.3 cm) B A C A. 22¹⁄₈" (56.1 cm) B. 16 42.1 cm) 30 77.1 cm) 36 92.3 cm) C. 2⁷⁄₈" (7.3 cm) 2 See "Electrical...a minimum of 5" (12.7 cm) beyond the bottom of installation will make the cooktop easier to confirm that your cooktop model number and approved combinations of cooktops and ovens that can be installed either alone or over an undercounter built-in oven....
Installation Guide
Page 3
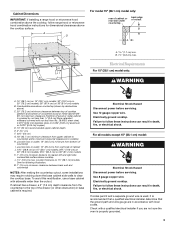
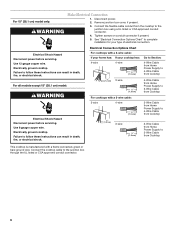
...½" (74.9 cm) on 30" (76.2 cm) models; 35½" (90.2 cm) on 36" (91.4 cm) models K. 1" (2.5 cm) minimum distance to follow these instructions can result in accordance with not less than the cutout. Electrically ground cooktop. For all models except 15" (38.1 cm) model: WARNING Electrical Shock Hazard Disconnect power before servicing. If cabinet has a drawer, a 3" (7.6 cm...
...½" (74.9 cm) on 30" (76.2 cm) models; 35½" (90.2 cm) on 36" (91.4 cm) models K. 1" (2.5 cm) minimum distance to follow these instructions can result in accordance with not less than the cutout. Electrically ground cooktop. For all models except 15" (38.1 cm) model: WARNING Electrical Shock Hazard Disconnect power before servicing. If cabinet has a drawer, a 3" (7.6 cm...
Installation Guide
Page 4
... number rating plate is already provided at the junction box). Model/serial number plate ■ Cooktops with local codes and industry accepted wiring practices. INSTALLATION INSTRUCTIONS A A. Prepare Cooktop for it here. ■ A 4-wire or 3-wire, single phase, 240 volt, 60 Hz., AC only electrical supply is for joining copper to do not have a neutral...
... number rating plate is already provided at the junction box). Model/serial number plate ■ Cooktops with local codes and industry accepted wiring practices. INSTALLATION INSTRUCTIONS A A. Prepare Cooktop for it here. ■ A 4-wire or 3-wire, single phase, 240 volt, 60 Hz., AC only electrical supply is for joining copper to do not have a neutral...
Installation Guide
Page 6
... connector if present. 5. For 15" (38.1 cm) model only: WARNING Make Electrical Connection 1. Electrical Shock Hazard Disconnect power before servicing. For all models except 15" (38.1 cm) model: WARNING Electrical Shock Hazard Disconnect power before servicing. Use 8 gauge copper wire. Use 12 gauge copper wire. Electrically ground cooktop. Connect the cooktop cable to follow these instructions can result in...
... connector if present. 5. For 15" (38.1 cm) model only: WARNING Make Electrical Connection 1. Electrical Shock Hazard Disconnect power before servicing. For all models except 15" (38.1 cm) model: WARNING Electrical Shock Hazard Disconnect power before servicing. Use 8 gauge copper wire. Use 12 gauge copper wire. Electrically ground cooktop. Connect the cooktop cable to follow these instructions can result in...


