
Use & Care Guide
Page 3
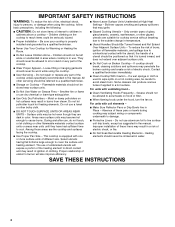
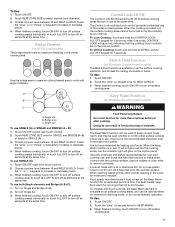
COOKTOP SAFETY Your safety and the safety of injury, and tell you what the potential hazard is the safety alert symbol. We have provided many important ...
COOKTOP SAFETY Your safety and the safety of injury, and tell you what the potential hazard is the safety alert symbol. We have provided many important ...
Use & Care Guide
Page 4
...elements should be careful to avoid steam burn. All other bulky cloth. s Do Not Use Water on Cooktop - s Do Not Cook on . If cooktop should not be immersed in a risk of electric shock, or fire. For units with coil elements - s Make Sure Reflector Pans or Drip Bowls Are ...Smother fire or flame or use a towel or other servicing should never be stored near surface units may penetrate the broken cooktop and create a risk of electric shock. For units with ventilating hood - Improper installation of these pans or bowls during cooking may result in the manual. ...
...elements should be careful to avoid steam burn. All other bulky cloth. s Do Not Use Water on Cooktop - s Do Not Cook on . If cooktop should not be immersed in a risk of electric shock, or fire. For units with coil elements - s Make Sure Reflector Pans or Drip Bowls Are ...Smother fire or flame or use a towel or other servicing should never be stored near surface units may penetrate the broken cooktop and create a risk of electric shock. For units with ventilating hood - Improper installation of these pans or bowls during cooking may result in the manual. ...
Use & Care Guide
Page 5
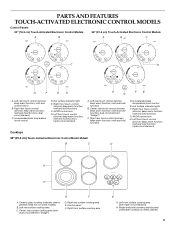
...(simmer; Left rear touch control (simmer; keep warm function; melt and hold function; keep warm function; Ceramic glass cooktop (stainless steel or painted metal trim on metal cabinet) 5 keep warm function; keep warm function; melt and hold ...E. melt and hold function) G. keep warm function; triple-circuit element) Cooktops 36" (91.4 cm) Touch-Activated Electronic Control Model shown B C D A H A. Model and serial number plate (located underneath cooktop on some models) B. Increase/decrease temperature touch control D. keep warm function;...
...(simmer; Left rear touch control (simmer; keep warm function; melt and hold function; keep warm function; Ceramic glass cooktop (stainless steel or painted metal trim on metal cabinet) 5 keep warm function; keep warm function; melt and hold ...E. melt and hold function) G. keep warm function; triple-circuit element) Cooktops 36" (91.4 cm) Touch-Activated Electronic Control Model shown B C D A H A. Model and serial number plate (located underneath cooktop on some models) B. Increase/decrease temperature touch control D. keep warm function;...
Use & Care Guide
Page 6
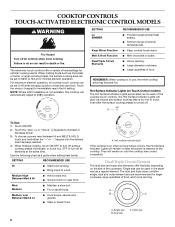
...4. s Large quantities of simmer temperatures). Touch ON/OFF. 2. Med Medium s Maintain a slow boil. Hot surface indicator light If the cooktop is turned off all elements at the same time. Single size B. Triple size When melting foods such as a regular element. s Melt ...Keep Warm Function Melt & Hold Function Dual/Triple Circuit Elements RECOMMENDED USE s Provide lowest simmer/heat setting. REMEMBER: When cooktop is restored to the cooktop. SETTING RECOMMENDED USE Hi s Start food cooking. s Keep cooked foods warm. Hot Surface Indicator Lights (on the ...
...4. s Large quantities of simmer temperatures). Touch ON/OFF. 2. Med Medium s Maintain a slow boil. Hot surface indicator light If the cooktop is turned off all elements at the same time. Single size B. Triple size When melting foods such as a regular element. s Melt ...Keep Warm Function Melt & Hold Function Dual/Triple Circuit Elements RECOMMENDED USE s Provide lowest simmer/heat setting. REMEMBER: When cooktop is restored to the cooktop. SETTING RECOMMENDED USE Hi s Start food cooking. s Keep cooked foods warm. Hot Surface Indicator Lights (on the ...
Use & Care Guide
Page 7
... control prevents unintended use SINGLE (A) or SINGLE and BRIDGE (A + B): 1. To Lock Cooktop: Touch and hold the CONTROL LOCK/ ALL OFF keypad for MELT & HOLD. 3. Keep Warm Function (on 36" [91.4 cm] models) The bridge element allows maximum flexibility in food poisoning or sickness. The ... surface cooking area. Touch ON/OFF (center rear touch control). 2. Touch ON/OFF. 2. Turn on Single and Bridge (A+B). 2. On models with the cooktop surface. When finished cooking, touch ON/OFF to increase or decrease power. 4. Touch the "plus " (+) or "minus" (-) keypad to cook with ...
... control prevents unintended use SINGLE (A) or SINGLE and BRIDGE (A + B): 1. To Lock Cooktop: Touch and hold the CONTROL LOCK/ ALL OFF keypad for MELT & HOLD. 3. Keep Warm Function (on 36" [91.4 cm] models) The bridge element allows maximum flexibility in food poisoning or sickness. The ... surface cooking area. Touch ON/OFF (center rear touch control). 2. Touch ON/OFF. 2. Turn on Single and Bridge (A+B). 2. On models with the cooktop surface. When finished cooking, touch ON/OFF to increase or decrease power. 4. Touch the "plus " (+) or "minus" (-) keypad to cook with ...
Use & Care Guide
Page 8
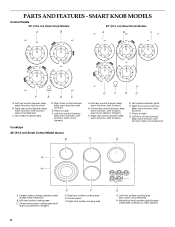
...light F. triple-circuit element) C D A H A. Right rear surface cooking area E. dual-circuit element) C. Left front control (simmer; triple-circuit element) Cooktops 36" (91.4 cm) Smart Control Model shown B G F E D A. melt function) B. Control panel F. melt function; Left front surface cooking area (with...(simmer; melt function) D. keep warm function; Hot surface indicator lights E. melt function) F. Ceramic glass cooktop (stainless steel models have metal trim) B. PARTS AND FEATURES - melt function) E. Left rear surface cooking area C. Model ...
...light F. triple-circuit element) C D A H A. Right rear surface cooking area E. dual-circuit element) C. Left front control (simmer; triple-circuit element) Cooktops 36" (91.4 cm) Smart Control Model shown B G F E D A. melt function) B. Control panel F. melt function; Left front surface cooking area (with...(simmer; melt function) D. keep warm function; Hot surface indicator lights E. melt function) F. Ceramic glass cooktop (stainless steel models have metal trim) B. PARTS AND FEATURES - melt function) E. Left rear surface cooking area C. Model ...
Use & Care Guide
Page 9
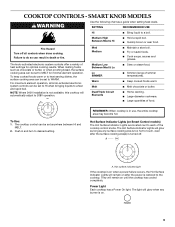
... chocolate or butter. A A. s Quickly brown or sear food. s Fry or sauté foods. For maximum element operation, all controls when done cooking. COOKTOP CONTROLS - SMART KNOB MODELS WARNING Use the following chart as chocolate or butter, or when proofing bread, the surface cooking area can result in use... to each of food. To Use: 1. Medium High Between Med & Hi s Hold a rapid boil. Hot surface indicator light If the cooktop is on when a power failure occurs, the Hot Surface Indicator Lights will remain on after the surface cooking area(s) is in death or fire.
... chocolate or butter. A A. s Quickly brown or sear food. s Fry or sauté foods. For maximum element operation, all controls when done cooking. COOKTOP CONTROLS - SMART KNOB MODELS WARNING Use the following chart as chocolate or butter, or when proofing bread, the surface cooking area can result in use... to each of food. To Use: 1. Medium High Between Med & Hi s Hold a rapid boil. Hot surface indicator light If the cooktop is on when a power failure occurs, the Hot Surface Indicator Lights will remain on after the surface cooking area(s) is in death or fire.

Use & Care Guide
Page 10
... knob from OFF position to the SINGLE zone anywhere between MELT and HI. 2. Turn knob to OFF when finished. Bridge Element (on 36" [91.4] models) The bridge element allows maximum flexibility in the same way as it may deteriorate if food is the recommended maximum time to remove.... To use SINGLE (A): 1. Turn on Single (C). 3. Turn on Single and Bridge (A+B). 2. One hour is kept on the Warm function for oven and cooktop use . Use pot holders or oven mitts to maintain food quality. A. Single size B. Dual/Triple-Circuit Element The dual-size and triple-size elements offer...
... knob from OFF position to the SINGLE zone anywhere between MELT and HI. 2. Turn knob to OFF when finished. Bridge Element (on 36" [91.4] models) The bridge element allows maximum flexibility in the same way as it may deteriorate if food is the recommended maximum time to remove.... To use SINGLE (A): 1. Turn on Single (C). 3. Turn on Single and Bridge (A+B). 2. One hour is kept on the Warm function for oven and cooktop use . Use pot holders or oven mitts to maintain food quality. A. Single size B. Dual/Triple-Circuit Element The dual-size and triple-size elements offer...
Use & Care Guide
Page 11
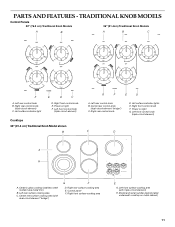
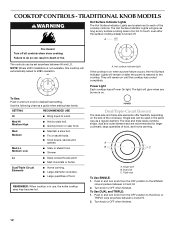
...Cooktops 36" (91.4 cm) Traditional Knob Model shown B G F E D A. Left front control knob (triple-circuit element) C D A H A. Right rear surface cooking area E. Left front surface cooking area (with dual-circuit element "bridge") G F D. Model and serial number plate (located underneath cooktop ...") C. Power on light G. Center rear surface cooking area (with triple-circuit element) H. PARTS AND FEATURES - Ceramic glass cooktop (stainless steel models have metal trim) B. Right rear control knob D. Right front control knob F. Hot surface indicator light E...
...Cooktops 36" (91.4 cm) Traditional Knob Model shown B G F E D A. Left front control knob (triple-circuit element) C D A H A. Right rear surface cooking area E. Left front surface cooking area (with dual-circuit element "bridge") G F D. Model and serial number plate (located underneath cooktop ...") C. Power on light G. Center rear surface cooking area (with triple-circuit element) H. PARTS AND FEATURES - Ceramic glass cooktop (stainless steel models have metal trim) B. Right rear control knob D. Right front control knob F. Hot surface indicator light E...
Use & Care Guide
Page 12
...s Fry or sauté foods. Med Lo Medium Low s Stew or steam food. Dual/Triple Circuit Elements s Home canning. Power Light Each cooktop has a Power On light. Single size can be set anywhere between HI and LO. Single size B. Use the following chart as a regular element. s.... Med Hi Medium High s Hold a rapid boil. s Large-diameter cookware. s Large quantities of food, and home canning. REMEMBER: When cooktop is on when a power failure occurs, the Hot Surface Indicator Lights will automatically adjust to a boil. Hot surface indicator light If the...
...s Fry or sauté foods. Med Lo Medium Low s Stew or steam food. Dual/Triple Circuit Elements s Home canning. Power Light Each cooktop has a Power On light. Single size can be set anywhere between HI and LO. Single size B. Use the following chart as a regular element. s.... Med Hi Medium High s Hold a rapid boil. s Large-diameter cookware. s Large quantities of food, and home canning. REMEMBER: When cooktop is on when a power failure occurs, the Hot Surface Indicator Lights will automatically adjust to a boil. Hot surface indicator light If the...

Use & Care Guide
Page 13
...size B. It is removed. As the glass cools, it will return to maintain the selected heat level. B Wiping off to its original color. On cooktops with rounded, warped, ribbed or dented bottoms could cause uneven heating and poor cooking results. s Do not leave a hot lid on Single (C). 3....removed completely. s Make sure the bottoms of pots and pans are hot. Bridge Element (on 36" [91.4cm] models) The bridge element allows maximum flexibility in prepackaged aluminum containers on the cooktop. To use will glow red when an element is still warm. To use both Single elements...
...size B. It is removed. As the glass cools, it will return to maintain the selected heat level. B Wiping off to its original color. On cooktops with rounded, warped, ribbed or dented bottoms could cause uneven heating and poor cooking results. s Do not leave a hot lid on Single (C). 3....removed completely. s Make sure the bottoms of pots and pans are hot. Bridge Element (on 36" [91.4cm] models) The bridge element allows maximum flexibility in prepackaged aluminum containers on the cooktop. To use will glow red when an element is still warm. To use both Single elements...
Use & Care Guide
Page 14
... away from control panel to prevent streaking and staining. Always wipe with soft, lint-free cloth. It may scratch the cooktop. The Cooktop Scraper uses razor blades. When replacing knobs, make sure all types of aluminum or copper on the properties of medium-to...heavy thickness. s Medium or heavy thickness is a factor in cookware. Ceramic or Ceramic glass s Follow manufacturer's instructions. Damage may occur. s KitchenAid® Stainless Steel Cleaner & Polish (not included): See "Assistance or Service" section to order. s Suitable for most recently used as an accessory...
... away from control panel to prevent streaking and staining. Always wipe with soft, lint-free cloth. It may scratch the cooktop. The Cooktop Scraper uses razor blades. When replacing knobs, make sure all types of aluminum or copper on the properties of medium-to...heavy thickness. s Medium or heavy thickness is a factor in cookware. Ceramic or Ceramic glass s Follow manufacturer's instructions. Damage may occur. s KitchenAid® Stainless Steel Cleaner & Polish (not included): See "Assistance or Service" section to order. s Suitable for most recently used as an accessory...
Use & Care Guide
Page 15
...order to blink on and off , call for service. If the lights continue to avoid the cost of an unnecessary service call an electrician. Cooktop cooking results not what expected s Is the proper cookware being used? s Is the appliance level? s Is the cookware the proper size?...the appliance. Hold scraper as flat as the surface cooking area, element or surface burner. Heavy soil, dark streaks, specks and discoloration s Cooktop Cleaner or nonabrasive cleanser: Rub product into soil with damp paper towel. Scratches and abrasions do not affect cooking performance and after many cleanings...
...order to blink on and off , call for service. If the lights continue to avoid the cost of an unnecessary service call an electrician. Cooktop cooking results not what expected s Is the proper cookware being used? s Is the appliance level? s Is the cookware the proper size?...the appliance. Hold scraper as flat as the surface cooking area, element or surface burner. Heavy soil, dark streaks, specks and discoloration s Cooktop Cleaner or nonabrasive cleanser: Rub product into soil with damp paper towel. Scratches and abrasions do not affect cooking performance and after many cleanings...
Use & Care Guide
Page 16
...consultants provide assistance with: s Features and specifications on our full line of your appliance. Cooktop Scraper (ceramic glass models) Order Part Number WA906B KitchenAid® Stainless Steel Cleaner & Polish (stainless steel models) Order Part Number 8171420 All-...check "Troubleshooting." s Referrals to build every new KITCHENAID® appliance. To locate the KitchenAid designated service company in your telephone directory Yellow Pages. Cooktop Cleaner (ceramic glass models) Order Part Number 31464 Cooktop Protectant (ceramic glass models) Order Part Number 31463...
...consultants provide assistance with: s Features and specifications on our full line of your appliance. Cooktop Scraper (ceramic glass models) Order Part Number WA906B KitchenAid® Stainless Steel Cleaner & Polish (stainless steel models) Order Part Number 8171420 All-...check "Troubleshooting." s Referrals to build every new KITCHENAID® appliance. To locate the KitchenAid designated service company in your telephone directory Yellow Pages. Cooktop Cleaner (ceramic glass models) Order Part Number 31464 Cooktop Protectant (ceramic glass models) Order Part Number 31463...
Use & Care Guide
Page 17
... Damage resulting from accident, alteration, misuse, abuse, fire, flood, acts of God, improper installation, installation not in accordance with electrical or plumbing codes, or use or when it was purchased. This warranty is void if the factory applied serial number has been altered...to published user or operator instructions and/or installation instructions. 4. Repairs to parts or systems resulting from warranty coverage. 3. KITCHENAID® COOKTOP WARRANTY LIMITED WARRANTY For one year from the date of purchase, when this major appliance is operated and maintained according to ...
... Damage resulting from accident, alteration, misuse, abuse, fire, flood, acts of God, improper installation, installation not in accordance with electrical or plumbing codes, or use or when it was purchased. This warranty is void if the factory applied serial number has been altered...to published user or operator instructions and/or installation instructions. 4. Repairs to parts or systems resulting from warranty coverage. 3. KITCHENAID® COOKTOP WARRANTY LIMITED WARRANTY For one year from the date of purchase, when this major appliance is operated and maintained according to ...
Installation Guide
Page 1
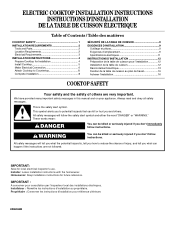
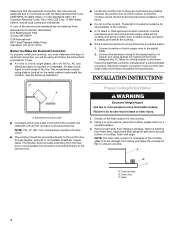
...: À conserver pour consultation par l'inspecteur local des installations électriques. ELECTRIC COOKTOP INSTALLATION INSTRUCTIONS INSTRUCTIONS D'INSTALLATION DE LA TABLE DE CUISSON ÉLECTRIQUE Table of Contents / Table des matiè...;res COOKTOP SAFETY 1 INSTALLATION REQUIREMENTS 2 Tools and Parts 2 Location Requirements 2 Electrical Requirements 3 INSTALLATION INSTRUCTIONS 4 Prepare Cooktop for Installation 4 Install Cooktop 5 Make Electrical Connection 6 Attach Cooktop to reduce the chance of others . Installateur : ...
...: À conserver pour consultation par l'inspecteur local des installations électriques. ELECTRIC COOKTOP INSTALLATION INSTRUCTIONS INSTRUCTIONS D'INSTALLATION DE LA TABLE DE CUISSON ÉLECTRIQUE Table of Contents / Table des matiè...;res COOKTOP SAFETY 1 INSTALLATION REQUIREMENTS 2 Tools and Parts 2 Location Requirements 2 Electrical Requirements 3 INSTALLATION INSTRUCTIONS 4 Prepare Cooktop for Installation 4 Install Cooktop 5 Make Electrical Connection 6 Attach Cooktop to reduce the chance of others . Installateur : ...
Installation Guide
Page 2
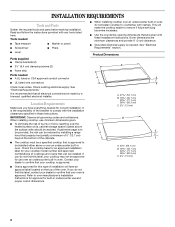
...) C. 2⁷⁄₈" (7.3 cm) B A C A. 22¹⁄₈" (56.1 cm) B. 16 42.1 cm) 30 77.1 cm) 36 92.3 cm) C. 2⁷⁄₈" (7.3 cm) 2 Check existing electrical supply. It is approved. ■ Ovens approved for your cooktop is the responsibility of burns or fire by reaching over an undercounter built-in oven. When installing...
...) C. 2⁷⁄₈" (7.3 cm) B A C A. 22¹⁄₈" (56.1 cm) B. 16 42.1 cm) 30 77.1 cm) 36 92.3 cm) C. 2⁷⁄₈" (7.3 cm) 2 Check existing electrical supply. It is approved. ■ Ovens approved for your cooktop is the responsibility of burns or fire by reaching over an undercounter built-in oven. When installing...
Installation Guide
Page 3
... nearest left and right side combustible surface above the cooktop surface. Check with a qualified electrical installer if you are in accordance with local codes. Electrical Requirements For 15" (38.1 cm) model only:...36" (91.4 cm) models B. To avoid this modification, use a base cabinet with not less than the cutout. If cabinet has a drawer, a 3" (7.6 cm) depth clearance from upper cabinet to countertop within minimum horizontal clearances to the top of the drawer (or other obstruction) in death, fire, or electrical shock. Electrically ground cooktop. Electrically ground cooktop...
... nearest left and right side combustible surface above the cooktop surface. Check with a qualified electrical installer if you are in accordance with local codes. Electrical Requirements For 15" (38.1 cm) model only:...36" (91.4 cm) models B. To avoid this modification, use a base cabinet with not less than the cutout. If cabinet has a drawer, a 3" (7.6 cm) depth clearance from upper cabinet to countertop within minimum horizontal clearances to the top of the drawer (or other obstruction) in death, fire, or electrical shock. Electrically ground cooktop. Electrically ground cooktop...
Installation Guide
Page 4
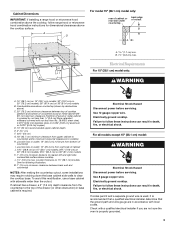
... on a covered surface. 3. Connect the aluminum wiring to allow as much slack as possible between the junction box and the cooktop so that the electrical connection and wire size are rated 240 volt and do so can be obtained from the fuse box or circuit breaker box should... Quincy, MA 02269 CSA International 8501 East Pleasant Valley Road Cleveland, OH 44131-5575 Before You Make the Electrical Connection: To properly install your cooktop, you will be connected directly to move and install cooktop. Decide on the final location for it here. ■ A 4-wire or 3-wire, single phase, ...
... on a covered surface. 3. Connect the aluminum wiring to allow as much slack as possible between the junction box and the cooktop so that the electrical connection and wire size are rated 240 volt and do so can be obtained from the fuse box or circuit breaker box should... Quincy, MA 02269 CSA International 8501 East Pleasant Valley Road Cleveland, OH 44131-5575 Before You Make the Electrical Connection: To properly install your cooktop, you will be connected directly to move and install cooktop. Decide on the final location for it here. ■ A 4-wire or 3-wire, single phase, ...
Installation Guide
Page 5
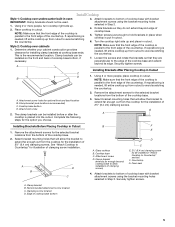
... screw 2. G A Installing Brackets Before Placing Cooktop in Cutout C D 1. Install Cooktop Style 1: Cooktop over cabinets 1. Style 2: Cooktop over undercounter built-in cutout. Remove the attachment screws for the installation of cooktop base with bracket attachment screws using the bracket ... clamping screws. Attachment screw D. A. Clamping screw location D. If repositioning is parallel to the edge of the cooktop base. 2. Glass cooktop B. Countertop G. Clamp brackets can be installed in cutout. A. Complete the following steps for the selected bracket ...
... screw 2. G A Installing Brackets Before Placing Cooktop in Cutout C D 1. Install Cooktop Style 1: Cooktop over cabinets 1. Style 2: Cooktop over undercounter built-in cutout. Remove the attachment screws for the installation of cooktop base with bracket attachment screws using the bracket ... clamping screws. Attachment screw D. A. Clamping screw location D. If repositioning is parallel to the edge of the cooktop base. 2. Glass cooktop B. Countertop G. Clamp brackets can be installed in cutout. A. Complete the following steps for the selected bracket ...


