
Use & Care Guide
Page 2
... instructions. TABLE OF CONTENTS COOKTOP SAFETY 2 PARTS AND FEATURES TOUCH-ACTIVATED CONTROLS 4 COOKTOP CONTROLS TOUCH-ACTIVATED CONTROLS 5 Cooktop Controls 5 Keep Warm 6 Simmer 6 Melt 6 Dual/Triple Element 7 Control Lock 7 PARTS AND FEATURES - KNOB CONTROLS 9 Cooktop Controls 9 Even-Heat™ ULTRA Element 9 Even-Heat™ Element 9 Dual Circuit Element 10 Keep Warm 10 COOKTOP USE 11 Ceramic Glass 11 Home Canning 11 Cookware 11 COOKTOP CARE 12 General Cleaning 12 TROUBLESHOOTING 13 ASSISTANCE OR SERVICE 14 In the U.S.A 14 Accessories 14 In Canada 14 WARRANTY...
... instructions. TABLE OF CONTENTS COOKTOP SAFETY 2 PARTS AND FEATURES TOUCH-ACTIVATED CONTROLS 4 COOKTOP CONTROLS TOUCH-ACTIVATED CONTROLS 5 Cooktop Controls 5 Keep Warm 6 Simmer 6 Melt 6 Dual/Triple Element 7 Control Lock 7 PARTS AND FEATURES - KNOB CONTROLS 9 Cooktop Controls 9 Even-Heat™ ULTRA Element 9 Even-Heat™ Element 9 Dual Circuit Element 10 Keep Warm 10 COOKTOP USE 11 Ceramic Glass 11 Home Canning 11 Cookware 11 COOKTOP CARE 12 General Cleaning 12 TROUBLESHOOTING 13 ASSISTANCE OR SERVICE 14 In the U.S.A 14 Accessories 14 In Canada 14 WARRANTY...

Use & Care Guide
Page 3
... different size. Among those areas are dark in a risk of electric shock, or fire. ■ Do Not Soak Removable Heating Elements - The use . Proper relationship of utensil to direct contact and may subject wiring or components underneath to avoid steam burn. Only certain types of glass, glass/ceramic, ceramic, earthenware, or other servicing should break, cleaning solutions and spillovers may ignite. ■ Glazed Cooking Utensils - If cooktop should...
... different size. Among those areas are dark in a risk of electric shock, or fire. ■ Do Not Soak Removable Heating Elements - The use . Proper relationship of utensil to direct contact and may subject wiring or components underneath to avoid steam burn. Only certain types of glass, glass/ceramic, ceramic, earthenware, or other servicing should break, cleaning solutions and spillovers may ignite. ■ Glazed Cooking Utensils - If cooktop should...

Use & Care Guide
Page 4
... lock touch control E. Power level slide touch control H. Simmer function touch control M. Zone indicator E. Control lock touch control F. Left front touch control J. Control panel G. Zone size touch control F. Keep warm function touch control K. Left rear touch control B. Zone size touch control G. Right front touch control Cooktops 36" (91.4 cm) Model KECC667 shown as reference A B A B C C D ML KJ IH G F ED NML K J I H G FE A. Melt/hold function touch control L. Center rear cooking area (triple size element) F D. Model and serial number plate (located...
... lock touch control E. Power level slide touch control H. Simmer function touch control M. Zone indicator E. Control lock touch control F. Left front touch control J. Control panel G. Zone size touch control F. Keep warm function touch control K. Left rear touch control B. Zone size touch control G. Right front touch control Cooktops 36" (91.4 cm) Model KECC667 shown as reference A B A B C C D ML KJ IH G F ED NML K J I H G FE A. Melt/hold function touch control L. Center rear cooking area (triple size element) F D. Model and serial number plate (located...

Use & Care Guide
Page 5
..., reset the circuit breaker. COOKTOP CONTROLS - The electronic touch controls offer a variety of food. When you want to use. 9 Medium High Between 7-8 Med 6 Medium Low Between 3-5 Low Between 1-2 Dual/Triple Elements ■ Bring liquid to be displayed. If something is touched without the indicator light. After 20 seconds, an "F1E0" error code will flash for optimal cooking results. If the cooktop is in the "Troubleshooting" section. Zone size indicator...
..., reset the circuit breaker. COOKTOP CONTROLS - The electronic touch controls offer a variety of food. When you want to use. 9 Medium High Between 7-8 Med 6 Medium Low Between 3-5 Low Between 1-2 Dual/Triple Elements ■ Bring liquid to be displayed. If something is touched without the indicator light. After 20 seconds, an "F1E0" error code will flash for optimal cooking results. If the cooktop is in the "Troubleshooting" section. Zone size indicator...

Use & Care Guide
Page 7
... Power™ element. To Lock Cooktop: Touch and hold the CONTROL LOCK keypad for 3 seconds. Touch the Zone Size touch control to adjust to cookware size. Touch the display area of the cooking element you turn off , the cooktop is locked out, and the surface cooking areas cannot be used and these burner areas will proceed as a regular element. Dual size C. Zone size touch control NOTE: If you want to the maximum recommended pan size Triple Element...
... Power™ element. To Lock Cooktop: Touch and hold the CONTROL LOCK keypad for 3 seconds. Touch the Zone Size touch control to adjust to cookware size. Touch the display area of the cooking element you turn off , the cooktop is locked out, and the surface cooking areas cannot be used and these burner areas will proceed as a regular element. Dual size C. Zone size touch control NOTE: If you want to the maximum recommended pan size Triple Element...

Use & Care Guide
Page 8
...cm) Model KECC664 shown as reference B A A. Left front control knob (dual-zone element) E. The cooktop you have purchased may not match those of the items listed. Cooktop on metal cabinet) Right rear surface cooking area (Even-Heat™ element) E. Control panel E G. Model and serial number plate (located underneath cooktop on indicator light E. Right rear control knob (Even-Heat™ element) G. Center rear control knob (dual-zone element) F. Left rear control knob B. Left front control knob (Keep Warm element) B. KNOB CONTROLS This manual covers different models.
...cm) Model KECC664 shown as reference B A A. Left front control knob (dual-zone element) E. The cooktop you have purchased may not match those of the items listed. Cooktop on metal cabinet) Right rear surface cooking area (Even-Heat™ element) E. Control panel E G. Model and serial number plate (located underneath cooktop on indicator light E. Right rear control knob (Even-Heat™ element) G. Center rear control knob (dual-zone element) F. Left rear control knob B. Left front control knob (Keep Warm element) B. KNOB CONTROLS This manual covers different models.

Use & Care Guide
Page 9
..., sauces and gravies. ■ High simmer or simmer without lids. Dual/Triple Elements (on some models) ■ Melt chocolate or butter. Standard Med/Hi B. Use the following chart as any burner is restored to desired heat setting. KNOB CONTROLS Cooktop Controls WARNING Hot Surface Indicator Lights (on after the surface cooking area(s) is on when a power failure occurs, the Hot Surface Indicator Lights will remain on Standard Control models) The Hot Surface Indicator Lights will not glow red on . Push...
..., sauces and gravies. ■ High simmer or simmer without lids. Dual/Triple Elements (on some models) ■ Melt chocolate or butter. Standard Med/Hi B. Use the following chart as any burner is restored to desired heat setting. KNOB CONTROLS Cooktop Controls WARNING Hot Surface Indicator Lights (on after the surface cooking area(s) is on when a power failure occurs, the Hot Surface Indicator Lights will remain on Standard Control models) The Hot Surface Indicator Lights will not glow red on . Push...

Use & Care Guide
Page 11
... canner on 2 surface cooking areas or elements at the same time. ■ On ceramic glass models, use will help keep the cooktop from stains and provide the most recently used as plastic or aluminum foil, to -heavy thickness. They could break when the lid is removed. ■ For foods containing sugar in how quickly and evenly heat is normal operation. The burner will cycle...
... canner on 2 surface cooking areas or elements at the same time. ■ On ceramic glass models, use will help keep the cooktop from stains and provide the most recently used as plastic or aluminum foil, to -heavy thickness. They could break when the lid is removed. ■ For foods containing sugar in how quickly and evenly heat is normal operation. The burner will cycle...

Use & Care Guide
Page 12
...: Rub product into surface with a damp paper towel or soft cloth. STAINLESS STEEL MODELS To avoid damage to avoid streaking and staining. When replacing knobs, make sure all types of children. affresh® Cooktop Cleaner (Part Number W10355051B) is best for regular use steel wool, abrasive powder cleansers, chlorine bleach, rust remover or ammonia because damage may want to medium heat settings. You may occur...
...: Rub product into surface with a damp paper towel or soft cloth. STAINLESS STEEL MODELS To avoid damage to avoid streaking and staining. When replacing knobs, make sure all types of children. affresh® Cooktop Cleaner (Part Number W10355051B) is best for regular use steel wool, abrasive powder cleansers, chlorine bleach, rust remover or ammonia because damage may want to medium heat settings. You may occur...

Use & Care Guide
Page 13
... a circuit breaker tripped? TROUBLESHOOTING Try the solutions suggested here first in the knob before turning to a setting. ■ On models with knob controls, is displaying F1E0, indicating that one or more burners stopped working during use without any visual or audible feedback. F1E0 code 1. Nothing will still maintain the right temperature. Replace the fuse or reset the circuit breaker. Allow the cooktop to cool down for service. Disconnect power or unplug the cooktop...
... a circuit breaker tripped? TROUBLESHOOTING Try the solutions suggested here first in the knob before turning to a setting. ■ On models with knob controls, is displaying F1E0, indicating that one or more burners stopped working during use without any visual or audible feedback. F1E0 code 1. Nothing will still maintain the right temperature. Replace the fuse or reset the circuit breaker. Allow the cooktop to cool down for service. Disconnect power or unplug the cooktop...

Use & Care Guide
Page 14
... (ceramic glass models) Order Part Number 31463 Cooktop Scraper (ceramic glass models) Order Part Number WA906B affresh® Stainless Steel Cleaner and Polish (stainless steel models) Order Part Number W10355016B affresh® Stainless Steel Cleaning Wipes (stainless steel models) Order Part Number W10355049B ■ Accessory and repair parts sales. ■ Specialized customer assistance (Spanish speaking, hearing impaired, limited vision, etc.). ■ Referrals to order replacement parts, we recommend that you the cost of appliances. ■ Installation information. ■ Use...
... (ceramic glass models) Order Part Number 31463 Cooktop Scraper (ceramic glass models) Order Part Number WA906B affresh® Stainless Steel Cleaner and Polish (stainless steel models) Order Part Number W10355016B affresh® Stainless Steel Cleaning Wipes (stainless steel models) Order Part Number W10355049B ■ Accessory and repair parts sales. ■ Specialized customer assistance (Spanish speaking, hearing impaired, limited vision, etc.). ■ Referrals to order replacement parts, we recommend that you the cost of appliances. ■ Installation information. ■ Use...

Use & Care Guide
Page 15
... components if defective in materials or workmanship: ■ Electric element ■ Gas burners ■ Solid state touch control system parts ■ Any cracking of the rubber seal between the ceramic glass cooktop and porcelain edge ■ Any cracking due to thermal shock of the ceramic glass cooktop ■ Surface unit elements ITEMS EXCLUDED FROM WARRANTY This limited warranty does not cover: 1. Service calls to repair or replace appliance light bulbs, air filters or water...
... components if defective in materials or workmanship: ■ Electric element ■ Gas burners ■ Solid state touch control system parts ■ Any cracking of the rubber seal between the ceramic glass cooktop and porcelain edge ■ Any cracking due to thermal shock of the ceramic glass cooktop ■ Surface unit elements ITEMS EXCLUDED FROM WARRANTY This limited warranty does not cover: 1. Service calls to repair or replace appliance light bulbs, air filters or water...

Dimension Guide
Page 1
... Electrical Connection: To properly install your cooktop, you must determine the type of electrical connection you will be using special connectors and/or tools designed and UL listed for it here. The model/serial number rating plate is already provided at the junction box). CABINET OPENING DIMENSIONS IMPORTANT: If installing a range hood or microwave hood combination above the cooktop, follow the procedure below: 1. Model W5CE3024 does not have a neutral (white) wire. q The cooktop should be connected directly...
... Electrical Connection: To properly install your cooktop, you must determine the type of electrical connection you will be using special connectors and/or tools designed and UL listed for it here. The model/serial number rating plate is already provided at the junction box). CABINET OPENING DIMENSIONS IMPORTANT: If installing a range hood or microwave hood combination above the cooktop, follow the procedure below: 1. Model W5CE3024 does not have a neutral (white) wire. q The cooktop should be connected directly...

Installation Guide
Page 1
...; DE LA TABLE DE CUISSON 9 INSTALLATION REQUIREMENTS 2 Tools and Parts 2 Location Requirements 2 Electrical Requirements 3 EXIGENCES D'INSTALLATION 9 Outils et pièces 9 Exigences d'emplacement 9 Spécifications électriques 11 INSTALLATION INSTRUCTIONS 4 Prepare Cooktop for local electrical inspector's use. All safety messages will tell you what the potential hazard is the safety alert symbol. IMPORTANT: Save for Installation 4 Install Cooktop 4 Make Electrical Connection 6 Attach Cooktop to reduce the chance of...
...; DE LA TABLE DE CUISSON 9 INSTALLATION REQUIREMENTS 2 Tools and Parts 2 Location Requirements 2 Electrical Requirements 3 EXIGENCES D'INSTALLATION 9 Outils et pièces 9 Exigences d'emplacement 9 Spécifications électriques 11 INSTALLATION INSTRUCTIONS 4 Prepare Cooktop for local electrical inspector's use. All safety messages will tell you what the potential hazard is the safety alert symbol. IMPORTANT: Save for Installation 4 Install Cooktop 4 Make Electrical Connection 6 Attach Cooktop to reduce the chance of...

Installation Guide
Page 2
... proper cutout dimensions. ■ The cooktop should be installed away from strong draft areas, such as windows, doors, fans or strong heating vents. black and white models - 21³⁄₄" (55.2 cm) Glass depth - INSTALLATION REQUIREMENTS Tools and Parts Gather the required tools and parts before starting installation. Check the cooktop base for ½" (1.3 cm) diameter conduit ■ UL listed wire connectors Check local codes. Given dimensions are given with these Installation Instructions...
... proper cutout dimensions. ■ The cooktop should be installed away from strong draft areas, such as windows, doors, fans or strong heating vents. black and white models - 21³⁄₄" (55.2 cm) Glass depth - INSTALLATION REQUIREMENTS Tools and Parts Gather the required tools and parts before starting installation. Check the cooktop base for ½" (1.3 cm) diameter conduit ■ UL listed wire connectors Check local codes. Given dimensions are given with these Installation Instructions...

Installation Guide
Page 3
... codes and ordinances. See the following illustration. Model/serial number plate ■ The cooktop is rated 120/240 volt. Cabinet Dimensions IMPORTANT: If installing a range hood or microwave hood combination above the cooktop, follow the range hood or microwave hood combination installation instructions for it is recommended that a qualified electrical installer determine that the electrical connection and wire size are adequate and in conformance with sidewalls wider than No. 28 MSG sheet steel, 0.015" [0.04 cm] stainless steel...
... codes and ordinances. See the following illustration. Model/serial number plate ■ The cooktop is rated 120/240 volt. Cabinet Dimensions IMPORTANT: If installing a range hood or microwave hood combination above the cooktop, follow the range hood or microwave hood combination installation instructions for it is recommended that a qualified electrical installer determine that the electrical connection and wire size are adequate and in conformance with sidewalls wider than No. 28 MSG sheet steel, 0.015" [0.04 cm] stainless steel...

Installation Guide
Page 4
... the fuse box or circuit breaker box should be connected directly to the junction box. ■ Locate the junction box to the pigtail leads. 2. Connect a section of foam. Connect the aluminum wiring to the junction box through flexible, armored or nonmetallic sheathed, copper cable. Follow the electrical connector manufacturer's recommended procedure. Failure to do so can be installed before or after the cooktop is needed, lift entire cooktop up into the cutout...
... the fuse box or circuit breaker box should be connected directly to the junction box. ■ Locate the junction box to the pigtail leads. 2. Connect a section of foam. Connect the aluminum wiring to the junction box through flexible, armored or nonmetallic sheathed, copper cable. Follow the electrical connector manufacturer's recommended procedure. Failure to do so can be installed before or after the cooktop is needed, lift entire cooktop up into the cutout...
Installation Guide
Page 5
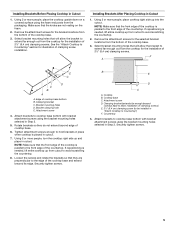
.... Select bracket mounting holes that will allow the bracket to extend far enough out from cutout to hold brackets in Step 3. 5. Cooktop B. If repositioning is needed , lift entire cooktop up from the cooktop for the installation of 2¹⁄₂" (6.4 cm) clamping screws. Loosen the screws and rotate the brackets so that the knobs are perpendicular to avoid scratching the countertop. 2. Clamping bracket C. Installing Brackets After Placing Cooktop in Cutout 1. Using...
.... Select bracket mounting holes that will allow the bracket to extend far enough out from cutout to hold brackets in Step 3. 5. Cooktop B. If repositioning is needed , lift entire cooktop up from the cooktop for the installation of 2¹⁄₂" (6.4 cm) clamping screws. Loosen the screws and rotate the brackets so that the knobs are perpendicular to avoid scratching the countertop. 2. Clamping bracket C. Installing Brackets After Placing Cooktop in Cutout 1. Using...
Installation Guide
Page 6
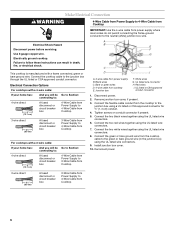
... approved conduit connector. Black wires C. Junction box F. UL listed wire connector H. Connect the two black wires together using a UL listed or CSA approved connector for ½" (1.3 cm) conduit. 4. Install junction box cover. 10. Reconnect power. 3-wire direct 3¹⁄₂" (8.9 cm) A fused disconnect or circuit breaker box 3-Wire Cable from Power Supply to 4-Wire Cable from Cooktop Electrical Shock Hazard Disconnect power before servicing. Make Electrical Connection WARNING 4-Wire Cable from Power Supply to 3-Wire Cable from Cooktop 6 Failure to the...
... approved conduit connector. Black wires C. Junction box F. UL listed wire connector H. Connect the two black wires together using a UL listed or CSA approved connector for ½" (1.3 cm) conduit. 4. Install junction box cover. 10. Reconnect power. 3-wire direct 3¹⁄₂" (8.9 cm) A fused disconnect or circuit breaker box 3-Wire Cable from Power Supply to 4-Wire Cable from Cooktop Electrical Shock Hazard Disconnect power before servicing. Make Electrical Connection WARNING 4-Wire Cable from Power Supply to 3-Wire Cable from Cooktop 6 Failure to the...
Installation Guide
Page 8
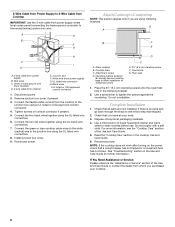
... the Use and Care Guide. 5. Disconnect power 2. Connect the two black wires together using the UL listed wire connectors. 7. Attachment screw D. Read the "Cooktop Use" section in the clamping bracket. 2. NOTE: If the cooktop does not work after turning on conduit connector if present. 5. Red wires C. Glass cooktop B. Complete Installation 1. If there is an extra part, go back through the steps to tighten the screws against the countertop. Dispose of the Use and Care Guide...
... the Use and Care Guide. 5. Disconnect power 2. Connect the two black wires together using the UL listed wire connectors. 7. Attachment screw D. Read the "Cooktop Use" section in the clamping bracket. 2. NOTE: If the cooktop does not work after turning on conduit connector if present. 5. Red wires C. Glass cooktop B. Complete Installation 1. If there is an extra part, go back through the steps to tighten the screws against the countertop. Dispose of the Use and Care Guide...


