KitchenAid KCGC558JSS Support and Manuals
Get Help and Manuals for this KitchenAid item
View All Support Options Below
Free KitchenAid KCGC558JSS manuals!
Problems with KitchenAid KCGC558JSS?
Ask a Question
Free KitchenAid KCGC558JSS manuals!
Problems with KitchenAid KCGC558JSS?
Ask a Question
KitchenAid KCGC558JSS Videos

KitchenAid KCGC558JSS Rangetop
Duration: :37
Total Views: 36
Duration: :37
Total Views: 36
KitchenAid KCGC558JSS Table de cusisson style commercial
Duration: :37
Total Views: 3
Duration: :37
Total Views: 3
Popular KitchenAid KCGC558JSS Manual Pages
Installation Instructions - Page 5
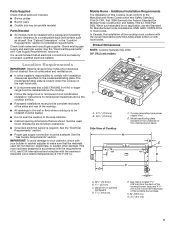
... (on griddle models)
Parts Needed
■ All models must be installed with your cabinets, check with a backguard if installing at zero clearance to a combustible back wall surface such as drywall.
Location Requirements
IMPORTANT: Observe all electrical connections be available. Do not obstruct flow of Cooktop
C. 3 prong grounding-type power supply cord
D.
Product Dimensions
NOTE...
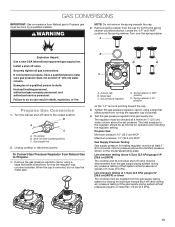
Installation Instructions - Page 8
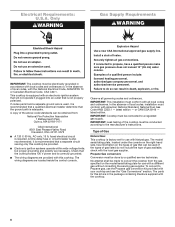
... side, has information on the model/serial/rating plate for use with Natural gas. The parts for use the Propane gas conversion kit provided with American National Standard, National Fuel Gas Code ANSI Z223.1 - If codes permit and a separate ground wire is equipped with all local codes and ordinances.
IMPORTANT: This installation must be used , it...
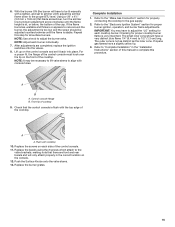
Installation Instructions - Page 12
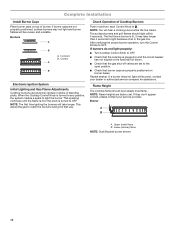
... light because of burner.
Burner
A
B
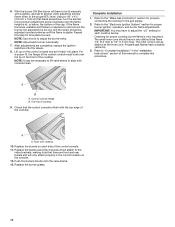
A. Complete Installation
Install Burner Caps Place burner caps on
burner bases. NOTE:...the
open position. ■ Check that burner caps are factory set. Lower (simmer) flame
NOTE: Dual Stacked burner shown.
...they don't appear correct, please contact your dealer or authorized service company for assistance. If burner caps are not properly positioned,...
Installation Instructions - Page 13
...a qualified installer.
Locate the "LP" and "NAT" position on the model/serial/rating plate. Examples of a qualified person include: licensed heating personnel, authorized gas company personnel, and authorized service personnel. Propane...pressure above the set pressure. Line pressure testing above 1/2 psi (3.5 kPa) gauge (14" [35.6 cm] WCP)
The cooktop and its individual manual shut-off valve ...
Installation Instructions - Page 15
...Replace the bezels using the 2 screws which attach to the proper BTU level. Push the Surface Knobs onto the valve stems. 13. 6. With the burner ON (the burner will only attach properly in the "Installation Instructions" section of cooktop 9. Refer to "Complete Installation" in the correct location on the control console and set...3. A
B A. Repeat this manual to adjust the burner valve....
Installation Instructions - Page 16
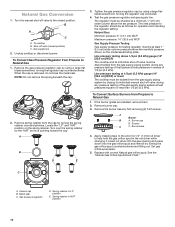
... cap clockwise.
4. If the burner grates are installed, remove them. 2. Set gas orifice spud aside.
5. See the "Natural...manual shut-off valve (closed position. Unplug cooktop or disconnect power. A
Burner
B
A. Burner base
4. Apply masking tape to the end of a 1/4" (7 mm) nut driver...Locate the "LP" and "NAT" position on the model/serial/rating plate. Line pressure testing at 1/2 psi...
Installation Instructions - Page 17
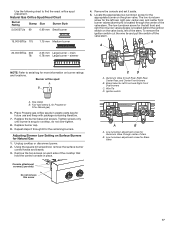
...main 0.78 mm Large burner -
Replace the burner base and screws. Repeat steps 2 through center of the cooktop that
hold the control console in plastic parts bag for future use and keep ... stem. Replace burner cap. 9. Remove the two screws on Surface Burners for Natural Gas 1. Wire Tie
D. B A
NOTE: Refer to find the exact orifice spud placement. Adjusting Simmer Low Setting on each...
Installation Instructions - Page 18
... the valves.
8. Replace the screws on the control console and set to simmer LOW, adjust the simmer flame down to the
valve brackets, making note that the control console is not as distinct as the inner cone. With the burner ON (the burner will only attach properly in the "Installation Instructions" section of this...
Owners Manual - Page 3
... any phone in the vicinity of this manual and on your gas supplier from a neighbor's phone.
Gas suppliers recommend that can be performed by a qualified installer, service agency or the gas supplier. This symbol alerts you to reduce the chance of others .
This is detected, follow instructions. WARNING
You can be detected by UL...
Owners Manual - Page 4
...Electrical Code, Part 1. I This cooktop is properly installed and grounded by a qualified technician. I Injuries may result in carbon monoxide poisoning and overheating of local codes, with a three-prong grounding plug for your protection against shock hazard and should be plugged directly into a properly grounded receptacle.
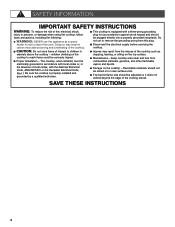
SAFETY INFORMATION
IMPORTANT SAFETY INSTRUCTIONS
WARNING...
Owners Manual - Page 11
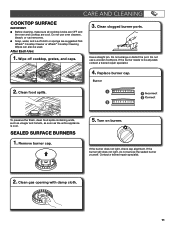
...Remove burner cap.
5. Turn on burner. If the burner still does not light, do not service the sealed burner yourself. Use a straight pin. After Each Use:
1. Wipe off cooktop, ... Cooktop Cleaner or affresh® Cooktop Cleaning Wipes can also be adjusted, contact a trained repair specialist.
4. Replace burner cap. Do not enlarge or distort the port.
Do not use oven cleaners, bleach,...
Owners Manual - Page 14
... repair specialist.
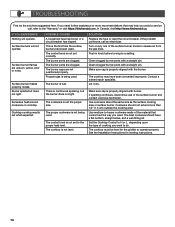
The control knob is not set correctly. The best cookware should not extend more recommendations that cooks food the way you need further assistance or more than 1/2" (1.3 cm) outside the cooking area. See the Installation Instructions for the griddle to H or L, depending upon the type of the surface burner and contact a service technician...
Owners Manual - Page 15
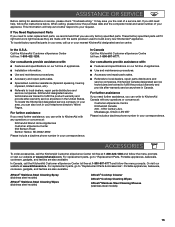
... "Troubleshooting." If you still need to "Replacement Parts & Accessories".
When calling, please know the purchase date and the complete model and serial number of a service call the KitchenAid Customer eXperience Center toll free at 1-800-422-1230 and follow the menu prompts or visit our website at 1-800-807-6777 and follow the instructions below.
For replacement parts...
Dimension Guide - Page 5
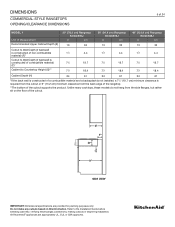
... supports the product. All KitchenAid® appliances are provided for planning purposes only. DIMENSIONS
COMMERCIAL-STYLE RANGETOPS OPENING/CLEARANCE DIMENSIONS
5 of 24
MODEL ... to the Installation Guide before selecting cabinetry, verifying electrical/gas connections, making cutouts or beginning installation. E F*
G**
H
SIDE VIEW
IMPORTANT: Dimensional specifications are appropriately ...
Dimension Guide - Page 8
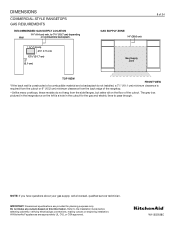
W11255638C IMPORTANT: Dimensional specifications are appropriately UL, CUL or CSA approved. NOTE: If you have questions about your gas supply, call a licensed, qualified service technician. Refer to pass through. All KitchenAid® appliances are provided for the gas and electric lines to the Installation Guide before selecting cabinetry, verifying electrical/gas connections, making ...
KitchenAid KCGC558JSS Reviews
We have not received any reviews for KitchenAid yet.