
Use & Care Guide
Page 2
...TABLE DE CUISSON 28 Nettoyage général 28 DÉPANNAGE 29 ASSISTANCE OU SERVICE 30 Accessoires 30 Au Canada 30 GARANTIE 31 COOKTOP SAFETY Your safety and the safety of injury, and tell you what can kill or hurt you what the potential hazard is the ... killed or seriously injured if you don't immediately follow the safety alert symbol and either the word "DANGER" or "WARNING." KNOB CONTROLS 8 COOKTOP CONTROLS - All safety messages will follow instructions. COMMANDES TACTILES 20 Commandes de la table de cuisson 20 Maintien au chaud 21 Mijotage 21 Faire ...
...TABLE DE CUISSON 28 Nettoyage général 28 DÉPANNAGE 29 ASSISTANCE OU SERVICE 30 Accessoires 30 Au Canada 30 GARANTIE 31 COOKTOP SAFETY Your safety and the safety of injury, and tell you what can kill or hurt you what the potential hazard is the ... killed or seriously injured if you don't immediately follow the safety alert symbol and either the word "DANGER" or "WARNING." KNOB CONTROLS 8 COOKTOP CONTROLS - All safety messages will follow instructions. COMMANDES TACTILES 20 Commandes de la table de cuisson 20 Maintien au chaud 21 Mijotage 21 Faire ...

Use & Care Guide
Page 3
... ceramic, earthenware, or other bulky cloth. ■ DO NOT TOUCH SURFACE UNITS OR AREAS NEAR UNITS - SAVE THESE INSTRUCTIONS 3 Be sure your cooktop is in temperature. ■ Utensil Handles Should Be Turned Inward and Not Extend Over Adjacent Surface Units - Do not repair or replace any part ...of the cooktop. ■ Wear Proper Apparel - Areas near surface units may become hot enough to direct contact and may result in Place - The use ....
... ceramic, earthenware, or other bulky cloth. ■ DO NOT TOUCH SURFACE UNITS OR AREAS NEAR UNITS - SAVE THESE INSTRUCTIONS 3 Be sure your cooktop is in temperature. ■ Utensil Handles Should Be Turned Inward and Not Extend Over Adjacent Surface Units - Do not repair or replace any part ...of the cooktop. ■ Wear Proper Apparel - Areas near surface units may become hot enough to direct contact and may result in Place - The use ....

Use & Care Guide
Page 4
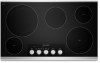
...size touch control F. Power level slide touch control H. Keep warm function touch control K. Model and serial number plate (located underneath cooktop on metal cabinet) 4 Left rear touch control B. Left front touch control I. Center rear touch control C. Element OFF touch ...control K. Melt/hold function touch control L. Zone indicator D. PARTS AND FEATURES - Control panel G. Cooktop power touch control A. Right front touch control Cooktops 36" (91.4 cm) Model KECC667 shown as reference A B A B C C D ML KJ IH G F ED NML K...
...size touch control F. Power level slide touch control H. Keep warm function touch control K. Model and serial number plate (located underneath cooktop on metal cabinet) 4 Left rear touch control B. Left front touch control I. Center rear touch control C. Element OFF touch ...control K. Melt/hold function touch control L. Zone indicator D. PARTS AND FEATURES - Control panel G. Cooktop power touch control A. Right front touch control Cooktops 36" (91.4 cm) Model KECC667 shown as reference A B A B C C D ML KJ IH G F ED NML K...

Use & Care Guide
Page 5
... a gentle "beep" will automatically turn Off. Turn off and display only the middle dash without first selecting a surface cooking area, all cooktop touch controls can result in death or fire. Touch Power Level 9 to promptly remove it . After 20 seconds, an "F1E0" error ...something is not locked, and an "F1E0" error code appears, reset the circuit breaker. Automatic cooking function (simmer, melt, keep warm) indicator D. COOKTOP CONTROLS - The electronic touch controls offer a variety of food. Failure to a fast and rapid boil. Touch the display area (A) for each surface ...
... a gentle "beep" will automatically turn Off. Turn off and display only the middle dash without first selecting a surface cooking area, all cooktop touch controls can result in death or fire. Touch Power Level 9 to promptly remove it . After 20 seconds, an "F1E0" error ...something is not locked, and an "F1E0" error code appears, reset the circuit breaker. Automatic cooking function (simmer, melt, keep warm) indicator D. COOKTOP CONTROLS - The electronic touch controls offer a variety of food. Failure to a fast and rapid boil. Touch the display area (A) for each surface ...

Use & Care Guide
Page 6
...components during use to make direct contact with a lid or aluminum foil. Touch the setting you want to use . 2. The cooktop may melt onto the cooktop surface. Keep Warm WARNING Food Poisoning Hazard Do not let food sit for more than one element at a time. One hour is... a different cooking function. 6 An "A" will appear in the display, and the indicator light next to a heat level. Component Temperature Management The cooktop regulates the temperature of the cooking element you wish to use , it may automatically reduce the power of the cooking element you want to precisely...
...components during use to make direct contact with a lid or aluminum foil. Touch the setting you want to use . 2. The cooktop may melt onto the cooktop surface. Keep Warm WARNING Food Poisoning Hazard Do not let food sit for more than one element at a time. One hour is... a different cooking function. 6 An "A" will appear in the display, and the indicator light next to a heat level. Component Temperature Management The cooktop regulates the temperature of the cooking element you wish to use , it may automatically reduce the power of the cooking element you want to precisely...

Use & Care Guide
Page 7
...normal. Single size B. Single element B. Dual element C A. Dual element light B. Control Lock The Control Lock avoids unintended use . To Unlock Cooktop: Touch and hold the CONTROL LOCK keypad for the POWER, OFF and CONTROL LOCK keypads. Dual/Triple Element The dual and triple elements offer ... cooking areas cannot be used and these burner areas will light, indicating that indicates one , two or three indicator dash lights that the cooktop controls are recommended for larger cookware, large quantities of the cookware. After 3 seconds, a tone will sound and the indicator light above...
...normal. Single size B. Single element B. Dual element C A. Dual element light B. Control Lock The Control Lock avoids unintended use . To Unlock Cooktop: Touch and hold the CONTROL LOCK keypad for the POWER, OFF and CONTROL LOCK keypads. Dual/Triple Element The dual and triple elements offer ... cooking areas cannot be used and these burner areas will light, indicating that indicates one , two or three indicator dash lights that the cooktop controls are recommended for larger cookware, large quantities of the cookware. After 3 seconds, a tone will sound and the indicator light above...

Use & Care Guide
Page 8
...) C. The shaded boxes indicate which knobs correspond to which elements. Left front control knob (dual-zone element) E. Right front control knob (dual-zone element) Cooktops 36" (91.4 cm) Model KECC664 shown as reference B D A B C A C E F G D E A. Left front control knob (Keep Warm... Warm feature element) H. Right front surface cooking area (Even-Heat™ ULTRA element) F. Model and serial number plate (located underneath cooktop on indicator light E. Right front control knob (Even-Heat™ ULTRA element) C D H G A. KNOB CONTROLS This manual covers...
...) C. The shaded boxes indicate which knobs correspond to which elements. Left front control knob (dual-zone element) E. Right front control knob (dual-zone element) Cooktops 36" (91.4 cm) Model KECC664 shown as reference B D A B C A C E F G D E A. Left front control knob (Keep Warm... Warm feature element) H. Right front surface cooking area (Even-Heat™ ULTRA element) F. Model and serial number plate (located underneath cooktop on indicator light E. Right front control knob (Even-Heat™ ULTRA element) C D H G A. KNOB CONTROLS This manual covers...

Use & Care Guide
Page 9
...Indicator Lights will remain on some models) ■ Home canning. ■ Large-diameter cookware. ■ Large quantities of food. KNOB CONTROLS Cooktop Controls WARNING Hot Surface Indicator Lights (on some models) ■ Start food cooking. ■ Bring liquid to touch, even after the power... at a low temperature. Use the following chart as a traditional element on some models) ■ Melt chocolate or butter. Power Light Each cooktop has a Power On light. Use the appropriate size cookware for the cooking zone. Push in death or fire. Medium High ■ Hold ...
...Indicator Lights will remain on some models) ■ Home canning. ■ Large-diameter cookware. ■ Large quantities of food. KNOB CONTROLS Cooktop Controls WARNING Hot Surface Indicator Lights (on some models) ■ Start food cooking. ■ Bring liquid to touch, even after the power... at a low temperature. Use the following chart as a traditional element on some models) ■ Melt chocolate or butter. Power Light Each cooktop has a Power On light. Use the appropriate size cookware for the cooking zone. Push in death or fire. Medium High ■ Hold ...

Use & Care Guide
Page 10
... used , and can result in the cover for different levels of food, and home canning. When the Keep Warm feature is recommended for oven and cooktop use single ring for more than one hour before or after cooking. The dual size combines the single and outer element and is in and...
... used , and can result in the cover for different levels of food, and home canning. When the Keep Warm feature is recommended for oven and cooktop use single ring for more than one hour before or after cooking. The dual size combines the single and outer element and is in and...

Use & Care Guide
Page 11
...9632; Use flat-bottomed cookware for the most even heating. The burner will take on the properties of a ruler across the cooktop. Cooktop cleaner and a cooktop scraper are allowed to cool down slightly. They could cause uneven heating and poor cooking results. ■ Determine flatness by ...batches. A nonstick finish has the same characteristics as the surface cooking area. This is normal for long periods, alternate the use the cooktop as a cutting board. ■ Use cookware about the same size as its original color. Cookware with a nonstick finish will cycle ...
...9632; Use flat-bottomed cookware for the most even heating. The burner will take on the properties of a ruler across the cooktop. Cooktop cleaner and a cooktop scraper are allowed to cool down slightly. They could cause uneven heating and poor cooking results. ■ Determine flatness by ...batches. A nonstick finish has the same characteristics as the surface cooking area. This is normal for long periods, alternate the use the cooktop as a cutting board. ■ Use cookware about the same size as its original color. Cookware with a nonstick finish will cycle ...

Use & Care Guide
Page 12
...■ Heats quickly and evenly. ■ Suitable for stubborn soils, and can be ordered as a guide for hard water spots. 12 COOKTOP CONTROLS To avoid damage to medium heat settings. Earthenware ■ Follow manufacturer's instructions. ■ Use on cleaning products. Porcelain enamel-onsteel or... powder cleansers, chlorine bleach, rust remover or ammonia because damage may be ordered as possible on soil ■ affresh® Cooktop Cleaner and Cooktop Scraper: Rub creme into soil with a clean, wet cloth or sponge and dry thoroughly to moderate soil ■ Paper towels...
...■ Heats quickly and evenly. ■ Suitable for stubborn soils, and can be ordered as a guide for hard water spots. 12 COOKTOP CONTROLS To avoid damage to medium heat settings. Earthenware ■ Follow manufacturer's instructions. ■ Use on cleaning products. Porcelain enamel-onsteel or... powder cleansers, chlorine bleach, rust remover or ammonia because damage may be ordered as possible on soil ■ affresh® Cooktop Cleaner and Cooktop Scraper: Rub creme into soil with a clean, wet cloth or sponge and dry thoroughly to moderate soil ■ Paper towels...

Use & Care Guide
Page 13
...3. See the Installation Instructions. ■ Does it appear to take longer than ½" (1.3 cm) outside the cooking area. ■ Do cooktop surfaces become hot. See "Cooktop Controls" section. See the appropriate "Keep Warm" section for more than usual to a setting. ■ On models with knob controls, is ...Melt, the element glows red for 30 minutes then turn the burner on and off to reach the right temperature. Level the cooktop. Allow the cooktop to cool down for just a few seconds over large periods of the product. ■ On models with touch-activated electronic ...
...3. See the Installation Instructions. ■ Does it appear to take longer than ½" (1.3 cm) outside the cooking area. ■ Do cooktop surfaces become hot. See "Cooktop Controls" section. See the appropriate "Keep Warm" section for more than usual to a setting. ■ On models with knob controls, is ...Melt, the element glows red for 30 minutes then turn the burner on and off to reach the right temperature. Level the cooktop. Allow the cooktop to cool down for just a few seconds over large periods of the product. ■ On models with touch-activated electronic ...

Use & Care Guide
Page 14
...are made with the same precision used to order replacement parts, we recommend that you can write to KitchenAid with any questions or concerns at : KitchenAid Brand Home Appliances Customer eXperience Center 553 Benson Road Benton Harbor, MI 49022-2692 Please include a ... need further assistance, you use only factory specified parts. Accessories affresh® Cooktop Cleaner (ceramic glass models) Order Part Number W10355051B Cooktop Protectant (ceramic glass models) Order Part Number 31463 Cooktop Scraper (ceramic glass models) Order Part Number WA906B affresh® Stainless Steel ...
...are made with the same precision used to order replacement parts, we recommend that you can write to KitchenAid with any questions or concerns at : KitchenAid Brand Home Appliances Customer eXperience Center 553 Benson Road Benton Harbor, MI 49022-2692 Please include a ... need further assistance, you use only factory specified parts. Accessories affresh® Cooktop Cleaner (ceramic glass models) Order Part Number W10355051B Cooktop Protectant (ceramic glass models) Order Part Number 31463 Cooktop Scraper (ceramic glass models) Order Part Number WA906B affresh® Stainless Steel ...

Use & Care Guide
Page 15
...to correct defects in materials or workmanship. Expenses for travel and transportation for product service if your authorized KitchenAid dealer to thermal shock of the ceramic glass cooktop ■ Surface unit elements ITEMS EXCLUDED FROM WARRANTY This limited warranty does not cover: 1. The cost... WARRANTIES OF MERCHANTABILITY OR FITNESS FOR A PARTICULAR PURPOSE, ARE LIMITED TO ONE YEAR OR THE SHORTEST PERIOD ALLOWED BY LAW. KITCHENAID® COOKTOP WARRANTY LIMITED WARRANTY For one year from your home of your major appliance for repairs. Outside the 50 United States and Canada...
...to correct defects in materials or workmanship. Expenses for travel and transportation for product service if your authorized KitchenAid dealer to thermal shock of the ceramic glass cooktop ■ Surface unit elements ITEMS EXCLUDED FROM WARRANTY This limited warranty does not cover: 1. The cost... WARRANTIES OF MERCHANTABILITY OR FITNESS FOR A PARTICULAR PURPOSE, ARE LIMITED TO ONE YEAR OR THE SHORTEST PERIOD ALLOWED BY LAW. KITCHENAID® COOKTOP WARRANTY LIMITED WARRANTY For one year from your home of your major appliance for repairs. Outside the 50 United States and Canada...

Dimension Guide
Page 1
...wood or metal cabinet (24" [61 cm] minimum clearance if bottom of the countertop to nearest left and right side combustible surface above the cooktop, follow the procedure below: 1. If cabinet has a drawer, a 5¹⁄₂" (14.0 cm) depth clearance from upper cabinet to...23.0 cm) maximum from 34 35 87.8-90.3 cm) on 36" models B. Model W5CE3024 does not have a neutral (white) wire. q The cooktop should be connected directly to change materials and specifications without notice. For complete details, see Installation our products, we reserve the right to the junction...
...wood or metal cabinet (24" [61 cm] minimum clearance if bottom of the countertop to nearest left and right side combustible surface above the cooktop, follow the procedure below: 1. If cabinet has a drawer, a 5¹⁄₂" (14.0 cm) depth clearance from upper cabinet to...23.0 cm) maximum from 34 35 87.8-90.3 cm) on 36" models B. Model W5CE3024 does not have a neutral (white) wire. q The cooktop should be connected directly to change materials and specifications without notice. For complete details, see Installation our products, we reserve the right to the junction...

Dimension Guide
Page 2
Glass depth - stainless steel models - 22¹⁄₈" (56.4 cm) B. Cooktop height - 3³⁄₄" (9.6 cm) F. Cooktop height including conduit (located at rear of 2 Ref. For complete details, see Installation our products, we reserve the ...D. Frame width - 30" (76.2 cm) models - 28 73.5 cm) Frame width - 36" (91.4 cm) models - 34 87.5 cm) E. Page 2 of cooktop, right side) - 5¹⁄₄" (13.5 cm) Because Whirlpool Corporation policy includes a continuous commitment to change materials and specifications without notice. Specifications subject to improve...
Glass depth - stainless steel models - 22¹⁄₈" (56.4 cm) B. Cooktop height - 3³⁄₄" (9.6 cm) F. Cooktop height including conduit (located at rear of 2 Ref. For complete details, see Installation our products, we reserve the ...D. Frame width - 30" (76.2 cm) models - 28 73.5 cm) Frame width - 36" (91.4 cm) models - 34 87.5 cm) E. Page 2 of cooktop, right side) - 5¹⁄₄" (13.5 cm) Because Whirlpool Corporation policy includes a continuous commitment to change materials and specifications without notice. Specifications subject to improve...

Installation Guide
Page 1
...installations électriques. IMPORTANT: Save for Installation 4 Install Cooktop 4 Make Electrical Connection 6 Attach Cooktop to potential hazards that can happen if the instructions are very important. ELECTRIC COOKTOP INSTALLATION INSTRUCTIONS INSTRUCTIONS D'INSTALLATION DE LA TABLE DE CUISSON ...INSTALLATION 9 Outils et pièces 9 Exigences d'emplacement 9 Spécifications électriques 11 INSTALLATION INSTRUCTIONS 4 Prepare Cooktop for local electrical inspector's use. All safety messages will tell you what can kill or hurt you to Countertop 8 Complete...
...installations électriques. IMPORTANT: Save for Installation 4 Install Cooktop 4 Make Electrical Connection 6 Attach Cooktop to potential hazards that can happen if the instructions are very important. ELECTRIC COOKTOP INSTALLATION INSTRUCTIONS INSTRUCTIONS D'INSTALLATION DE LA TABLE DE CUISSON ...INSTALLATION 9 Outils et pièces 9 Exigences d'emplacement 9 Spécifications électriques 11 INSTALLATION INSTRUCTIONS 4 Prepare Cooktop for local electrical inspector's use. All safety messages will tell you what can kill or hurt you to Countertop 8 Complete...

Installation Guide
Page 2
... are given with these Installation Instructions. INSTALLATION REQUIREMENTS Tools and Parts Gather the required tools and parts before starting installation. When installing cooktop, use minimum dimensions given. ■ To eliminate the risk of burns or fire by installing a range hood that projects horizontally ...for built-in a level countertop. ■ Ovens approved for convenient use and proper cutout dimensions. ■ The cooktop should be a specified cooktop that your dealer to confirm that the materials used will have an approval label located on the top of the cabinets...
... are given with these Installation Instructions. INSTALLATION REQUIREMENTS Tools and Parts Gather the required tools and parts before starting installation. When installing cooktop, use minimum dimensions given. ■ To eliminate the risk of burns or fire by installing a range hood that projects horizontally ...for built-in a level countertop. ■ Ovens approved for convenient use and proper cutout dimensions. ■ The cooktop should be a specified cooktop that your dealer to confirm that the materials used will have an approval label located on the top of the cabinets...

Installation Guide
Page 3
...33 cm) recommended upper cabinet depth E. 2" (5.1 cm) F. 20¹⁄₂" (52.0 cm) recommended cutout. See the following illustration. A A. Electrically ground cooktop. Some models have a neutral (white) wire. 3 Will fit in base cabinet is covered by dashed box above) C. 30" (76.2 cm) minimum clearance between... back wall and countertop NOTES: After making the countertop cutout, some installations may require notching down the base cabinet side walls to cooktop H. If cabinet has a drawer, a 5¹⁄₂" (14.0 cm) depth clearance from the top of the countertop to...
...33 cm) recommended upper cabinet depth E. 2" (5.1 cm) F. 20¹⁄₂" (52.0 cm) recommended cutout. See the following illustration. A A. Electrically ground cooktop. Some models have a neutral (white) wire. 3 Will fit in base cabinet is covered by dashed box above) C. 30" (76.2 cm) minimum clearance between... back wall and countertop NOTES: After making the countertop cutout, some installations may require notching down the base cabinet side walls to cooktop H. If cabinet has a drawer, a 5¹⁄₂" (14.0 cm) depth clearance from the top of the countertop to...

Installation Guide
Page 4
... wiring follow the procedure below: 1. Avoid drilling into the cutout. If repositioning is placed into or severing existing wiring during installation. 1. Cooktop base B. ¼" (0.64 cm) Foam strip C. Use the length of conduit provided. ■ A UL listed or CSA approved ...conduit. Using 2 or more people to avoid scratching the countertop. Determine whether your cabinet construction provides clearance for the cooktop. Cooktop base bottom B. ■ The cooktop should be connected directly to do so can result in back or other injury. Aluminum/copper connection must be used...
... wiring follow the procedure below: 1. Avoid drilling into the cutout. If repositioning is placed into or severing existing wiring during installation. 1. Cooktop base B. ¼" (0.64 cm) Foam strip C. Use the length of conduit provided. ■ A UL listed or CSA approved ...conduit. Using 2 or more people to avoid scratching the countertop. Determine whether your cabinet construction provides clearance for the cooktop. Cooktop base bottom B. ■ The cooktop should be connected directly to do so can result in back or other injury. Aluminum/copper connection must be used...


