
Use & Care Guide
Page 3
...be stored near surface units. ■ Do Not Use Water on any part of these liners may penetrate the broken cooktop and create a risk of electric shock, or fire. ■ Do Not Soak Removable Heating Elements - Flammable materials should be careful to avoid steam ... - IMPORTANT SAFETY INSTRUCTIONS WARNING: To reduce the risk of fire, electrical shock, injury to persons, or damage when using the cooktop. ■ User Servicing - SAVE THESE INSTRUCTIONS 3 Contact a qualified technician immediately. ■ Clean Cooktop With Caution - The use , do not touch, or let clothing...
...be stored near surface units. ■ Do Not Use Water on any part of these liners may penetrate the broken cooktop and create a risk of electric shock, or fire. ■ Do Not Soak Removable Heating Elements - Flammable materials should be careful to avoid steam ... - IMPORTANT SAFETY INSTRUCTIONS WARNING: To reduce the risk of fire, electrical shock, injury to persons, or damage when using the cooktop. ■ User Servicing - SAVE THESE INSTRUCTIONS 3 Contact a qualified technician immediately. ■ Clean Cooktop With Caution - The use , do not touch, or let clothing...

Use & Care Guide
Page 15
... or furnished with the product, KitchenAid or KitchenAid Canada will pay for Factory Specified Parts for the following components if defective in materials or workmanship: ■ Electric element ■ Gas burners ■ Solid state touch control system parts ■ Any cracking of the rubber seal between the ceramic glass cooktop and porcelain edge ■...
... or furnished with the product, KitchenAid or KitchenAid Canada will pay for Factory Specified Parts for the following components if defective in materials or workmanship: ■ Electric element ■ Gas burners ■ Solid state touch control system parts ■ Any cracking of the rubber seal between the ceramic glass cooktop and porcelain edge ■...

Dimension Guide
Page 1
... a neutral (white) wire. q Locate the junction box to allow as much slack as possible between the junction box and the cooktop so that the cooktop can be connected directly to cooktop H. Follow the electrical connector manufacturer's recommended procedure. If cabinet has a drawer, a 5¹⁄₂" (14.0 cm) depth clearance from upper cabinet to countertop...
... a neutral (white) wire. q Locate the junction box to allow as much slack as possible between the junction box and the cooktop so that the cooktop can be connected directly to cooktop H. Follow the electrical connector manufacturer's recommended procedure. If cabinet has a drawer, a 5¹⁄₂" (14.0 cm) depth clearance from upper cabinet to countertop...

Installation Guide
Page 1
... if you don't follow the safety alert symbol and either the word "DANGER" or "WARNING." W10353374A ELECTRIC COOKTOP INSTALLATION INSTRUCTIONS INSTRUCTIONS D'INSTALLATION DE LA TABLE DE CUISSON ÉLECTRIQUE Table of Contents / Table des matières COOKTOP SAFETY 1 SÉCURITÉ DE LA TABLE DE CUISSON 9 INSTALLATION REQUIREMENTS 2 Tools and Parts 2 Location...
... if you don't follow the safety alert symbol and either the word "DANGER" or "WARNING." W10353374A ELECTRIC COOKTOP INSTALLATION INSTRUCTIONS INSTRUCTIONS D'INSTALLATION DE LA TABLE DE CUISSON ÉLECTRIQUE Table of Contents / Table des matières COOKTOP SAFETY 1 SÉCURITÉ DE LA TABLE DE CUISSON 9 INSTALLATION REQUIREMENTS 2 Tools and Parts 2 Location...

Installation Guide
Page 2
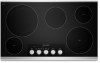
...) models - 30 78.4 cm) Glass width - 36" (91.4 cm) models - 36 92.3 cm) C. Check existing electrical supply. The cooktop should be reduced by a licensed, qualified electrical installer. black and white models - 21³⁄₄" (55.2 cm) Glass depth - Frame width - 30" (76...9632; A UL listed or CSA approved connector for an approved installation label. See the "Electrical Requirements" section. When installing cooktop, use and proper cutout dimensions. ■ The cooktop should be installed either alone or over an undercounter built-in a level countertop. ■...
...) models - 30 78.4 cm) Glass width - 36" (91.4 cm) models - 36 92.3 cm) C. Check existing electrical supply. The cooktop should be reduced by a licensed, qualified electrical installer. black and white models - 21³⁄₄" (55.2 cm) Glass depth - Frame width - 30" (76...9632; A UL listed or CSA approved connector for an approved installation label. See the "Electrical Requirements" section. When installing cooktop, use and proper cutout dimensions. ■ The cooktop should be installed either alone or over an undercounter built-in a level countertop. ■...

Installation Guide
Page 3
... 1 Batterymarch Park Quincy, MA 02169-7471 CSA International 8501 East Pleasant Valley Road Cleveland, OH 44131-5575 Before You Make the Electrical Connection: To properly install your cooktop, you must determine the type of countertop I K J A. 30" (76.2 cm) on 30" models; 36" (91.4 ...on 30" (76.2 cm) models. 35¹⁄₂" (90.2 cm) recommended cutout on 36" (91.4 cm) models. Electrically ground cooktop. Model/serial number plate ■ The cooktop is rated 120/240 volt. Cabinet Dimensions IMPORTANT: If installing a range hood or microwave hood combination above the...
... 1 Batterymarch Park Quincy, MA 02169-7471 CSA International 8501 East Pleasant Valley Road Cleveland, OH 44131-5575 Before You Make the Electrical Connection: To properly install your cooktop, you must determine the type of countertop I K J A. 30" (76.2 cm) on 30" models; 36" (91.4 ...on 30" (76.2 cm) models. 35¹⁄₂" (90.2 cm) recommended cutout on 36" (91.4 cm) models. Electrically ground cooktop. Model/serial number plate ■ The cooktop is rated 120/240 volt. Cabinet Dimensions IMPORTANT: If installing a range hood or microwave hood combination above the...

Installation Guide
Page 4
... wire using the foam end posts from debris and helps the cooktop sit flat on the foam. 2. Connect a section of the countertop. Remove one strip at the cooktop. ■ If the house has aluminum wiring follow the procedure below: 1. Follow the electrical connector manufacturer's recommended procedure. Determine whether your cabinet construction provides clearance...
... wire using the foam end posts from debris and helps the cooktop sit flat on the foam. 2. Connect a section of the countertop. Remove one strip at the cooktop. ■ If the house has aluminum wiring follow the procedure below: 1. Follow the electrical connector manufacturer's recommended procedure. Determine whether your cabinet construction provides clearance...
Installation Guide
Page 6
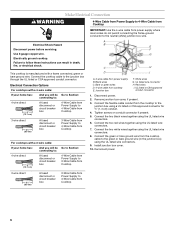
...wires together using the UL listed wire connectors. 8. Connect the two white wires together using the UL listed wire connectors. 6. Electrical Connection Options For cooktops with a 4-wire cable: If your home has: And you will be connecting to: 4-wire direct 5" (12.7 cm)...red wires together using a UL listed or CSA approved connector for ½" (1.3 cm) conduit. 4. Red wires I A. 4-wire cable from Cooktop Electrical Shock Hazard Disconnect power before servicing. Reconnect power. 3-wire direct 3¹⁄₂" (8.9 cm) A fused disconnect or circuit breaker box 3-...
...wires together using the UL listed wire connectors. 8. Connect the two white wires together using the UL listed wire connectors. 6. Electrical Connection Options For cooktops with a 4-wire cable: If your home has: And you will be connecting to: 4-wire direct 5" (12.7 cm)...red wires together using a UL listed or CSA approved connector for ½" (1.3 cm) conduit. 4. Red wires I A. 4-wire cable from Cooktop Electrical Shock Hazard Disconnect power before servicing. Reconnect power. 3-wire direct 3¹⁄₂" (8.9 cm) A fused disconnect or circuit breaker box 3-...


