
Use & Care Guide
Page 1
ELECTRIC RANGE ARCHITECT® SERIES II Use & Care Guide For questions about features, operation/performance, parts, accessories or service, call: 1-800-422-1230 or visit our website at www.kitchenaid.com In Canada, call for assistance, installation and service, call: 1-800-807-6777 or visit our website at www.KitchenAid.ca Table of Contents...2 Models KERS807 KESK901 KESS907 KESS908 YKERS807 YKESS907 YKESS908 W10246111B
ELECTRIC RANGE ARCHITECT® SERIES II Use & Care Guide For questions about features, operation/performance, parts, accessories or service, call: 1-800-422-1230 or visit our website at www.kitchenaid.com In Canada, call for assistance, installation and service, call: 1-800-807-6777 or visit our website at www.KitchenAid.ca Table of Contents...2 Models KERS807 KESK901 KESS907 KESS908 YKERS807 YKESS907 YKESS908 W10246111B

Use & Care Guide
Page 2
... 18 Fahrenheit and Celsius - Custom Knobs 12 Cooktop Controls - Option 1 18 Tones - Option 6 18 Sabbath Mode - TABLE OF CONTENTS RANGE SAFETY 3 The Anti-Tip Bracket 3 PARTS AND FEATURES 5 COOKTOP USE 9 Ceramic Glass 9 Cookware 9 Home Canning 10 Cooktop Controls - Option 7 19 OVEN USE 20 Aluminum Foil 20 Bakeware 20 Meat Thermometer 20...
... 18 Fahrenheit and Celsius - Custom Knobs 12 Cooktop Controls - Option 1 18 Tones - Option 6 18 Sabbath Mode - TABLE OF CONTENTS RANGE SAFETY 3 The Anti-Tip Bracket 3 PARTS AND FEATURES 5 COOKTOP USE 9 Ceramic Glass 9 Cookware 9 Home Canning 10 Cooktop Controls - Option 7 19 OVEN USE 20 Aluminum Foil 20 Bakeware 20 Meat Thermometer 20...

Use & Care Guide
Page 4
... OF THE RANGE, THE RANGE MUST BE SECURED BY PROPERLY INSTALLED ANTI-TIP DEVICES. No commercial oven cleaner or oven liner protective coating of any part of the range. ■ Wear Proper Apparel - Smother fire or flame or use , do not touch, or let clothing or other flammable materials contact ...use . If rack must be allowed to sit or stand on . Flammable materials should never be moved while oven is used in or around any part of the range unless specifically recommended in an oven or near these liners may result in Place - Among those areas are dark in Manual. ■...
... OF THE RANGE, THE RANGE MUST BE SECURED BY PROPERLY INSTALLED ANTI-TIP DEVICES. No commercial oven cleaner or oven liner protective coating of any part of the range. ■ Wear Proper Apparel - Smother fire or flame or use , do not touch, or let clothing or other flammable materials contact ...use . If rack must be allowed to sit or stand on . Flammable materials should never be moved while oven is used in or around any part of the range unless specifically recommended in an oven or near these liners may result in Place - Among those areas are dark in Manual. ■...

Use & Care Guide
Page 5
... PROBE TEMP HR MIN COOK TIME NIGHT LIGHT DELAY MIN HR SEC MIN START TIME STOP TIME B A. Zone diameter indicator (dual) G. Zone diameter indicator (single) I F. PARTS AND FEATURES This manual covers several different models. The range you have some or all of your model. Left rear touch control (dual-size element...
... PROBE TEMP HR MIN COOK TIME NIGHT LIGHT DELAY MIN HR SEC MIN START TIME STOP TIME B A. Zone diameter indicator (dual) G. Zone diameter indicator (single) I F. PARTS AND FEATURES This manual covers several different models. The range you have some or all of your model. Left rear touch control (dual-size element...

Use & Care Guide
Page 6
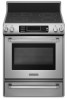
...) E. Anti-tip bracket D. clean latch J. Oven control panel I J K C L M D A. Full and center broil elements C. CleanBake™ element (not visible) 6 Dual-size element F. Oven door window A B CA Parts and Features not shown (on some models) Broiler pan and grid Roasting rack Temperature probe D E A. Range E A F G B H I .
...) E. Anti-tip bracket D. clean latch J. Oven control panel I J K C L M D A. Full and center broil elements C. CleanBake™ element (not visible) 6 Dual-size element F. Oven door window A B CA Parts and Features not shown (on some models) Broiler pan and grid Roasting rack Temperature probe D E A. Range E A F G B H I .
Use & Care Guide
Page 8
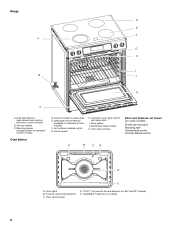
... models) Broiler pan and grid Roasting rack Temperature probe Simmer feature switch A B CA D E A. Automatic oven light switch/ self-clean latch I B J K C A. Door gasket J. Oven door window Parts and Features not shown (on standard control models) Oven Interior D. Anti-tip bracket C. Model and serial number K. Oven cavity sensor D. Hot surfaces indicator lights G. Dual...
... models) Broiler pan and grid Roasting rack Temperature probe Simmer feature switch A B CA D E A. Automatic oven light switch/ self-clean latch I B J K C A. Door gasket J. Oven door window Parts and Features not shown (on standard control models) Oven Interior D. Anti-tip bracket C. Model and serial number K. Oven cavity sensor D. Hot surfaces indicator lights G. Dual...

Use & Care Guide
Page 9
... slightly. Use the following chart as possible. COOKWARE CHARACTERISTICS Aluminum ■ Heats quickly and evenly. ■ Do not cook popcorn in any part of pots and pans are allowed to its base material. C A. Porcelain enamel-onsteel or cast iron Stainless steel ■ Use on low ... is on the cooktop. ■ Cookware designed with rounded, warped, ribbed or dented bottoms could leave scratches or marks on . Some parts of medium-to maintain the selected heat level. Cookware IMPORTANT: Do not leave empty cookware on . It is transferred, which affects cooking ...
... slightly. Use the following chart as possible. COOKWARE CHARACTERISTICS Aluminum ■ Heats quickly and evenly. ■ Do not cook popcorn in any part of pots and pans are allowed to its base material. C A. Porcelain enamel-onsteel or cast iron Stainless steel ■ Use on low ... is on the cooktop. ■ Cookware designed with rounded, warped, ribbed or dented bottoms could leave scratches or marks on . Some parts of medium-to maintain the selected heat level. Cookware IMPORTANT: Do not leave empty cookware on . It is transferred, which affects cooking ...

Use & Care Guide
Page 19
... the WARMING DRAWER ON key (continue pressing until the oven is displayed) before or after cooking. Press START. Doing so can be set for only part of the Sabbath. "SABBATH MODE" will begin a bake cycle. 3. The heat sources icons will automatically turn on placing the oven into its Sabbath Mode compliant...
... the WARMING DRAWER ON key (continue pressing until the oven is displayed) before or after cooking. Press START. Doing so can be set for only part of the Sabbath. "SABBATH MODE" will begin a bake cycle. 3. The heat sources icons will automatically turn on placing the oven into its Sabbath Mode compliant...

Use & Care Guide
Page 22
...°F 20 (177°C) 20-22 *Place up to 28°C), and cooking time can be shortened by as much as 30 percent, especially for Part Number W10123240. ■ For proper draining, do not cover the grid with only the inner broil element. 2. Drippings will turn food to the Broiling Chart...
...°F 20 (177°C) 20-22 *Place up to 28°C), and cooking time can be shortened by as much as 30 percent, especially for Part Number W10123240. ■ For proper draining, do not cover the grid with only the inner broil element. 2. Drippings will turn food to the Broiling Chart...

Use & Care Guide
Page 24
..., 1 tone will come back on all sides of the food so that turning of the oven rack with the longest side parallel to preheat for Part Number W10123240. 1. The convection broil range can be changed to order. The temperature is turned off after 30 seconds. If the oven door is opened...
..., 1 tone will come back on all sides of the food so that turning of the oven rack with the longest side parallel to preheat for Part Number W10123240. 1. The convection broil range can be changed to order. The temperature is turned off after 30 seconds. If the oven door is opened...

Use & Care Guide
Page 30
...; Has the function been entered? Option 6" section. ■ Was the oven preheated? Move rack to build every new KITCHENAID® appliance. To locate factory specified parts in use only factory specified parts. Call the KitchenAid Customer eXperience Center toll free: 1-800-422-1230. See "Sabbath Mode - Oven temperature too high or too low ■...
...; Has the function been entered? Option 6" section. ■ Was the oven preheated? Move rack to build every new KITCHENAID® appliance. To locate factory specified parts in use only factory specified parts. Call the KitchenAid Customer eXperience Center toll free: 1-800-422-1230. See "Sabbath Mode - Oven temperature too high or too low ■...

Use & Care Guide
Page 31
... click on "Shopping Options." For further assistance If you need further assistance, you can write to KitchenAid with the product, KitchenAid will pay for Factory Specified Parts for Factory Specified Parts and repair labor to local dealers, repair parts distributors and service companies. Proof of original purchase date is used in the country in materials...
... click on "Shopping Options." For further assistance If you need further assistance, you can write to KitchenAid with the product, KitchenAid will pay for Factory Specified Parts for Factory Specified Parts and repair labor to local dealers, repair parts distributors and service companies. Proof of original purchase date is used in the country in materials...

Use & Care Guide
Page 32
... major appliance. This major appliance is designed to better help by checking the "Assistance or Service" section or by KitchenAid. 5. Repairs to parts or systems resulting from defects in accordance with original model/serial numbers that is used for repairs. The removal and ...reinstallation of consumables or cleaning products not approved by calling KitchenAid. The cost of the Use & Care Guide. IMPLIED WARRANTIES, INCLUDING WARRANTIES...
... major appliance. This major appliance is designed to better help by checking the "Assistance or Service" section or by KitchenAid. 5. Repairs to parts or systems resulting from defects in accordance with original model/serial numbers that is used for repairs. The removal and ...reinstallation of consumables or cleaning products not approved by calling KitchenAid. The cost of the Use & Care Guide. IMPLIED WARRANTIES, INCLUDING WARRANTIES...

Installation Guide
Page 2
... is the safety alert symbol. Failure to follow instructions. Always read and obey all safety messages. TABLE OF CONTENTS RANGE SAFETY 2 INSTALLATION REQUIREMENTS 3 Tools and Parts 3 Location Requirements 3 Electrical Requirements - We have provided many important safety messages in death or serious burns to potential hazards that can result in this manual...
... is the safety alert symbol. Failure to follow instructions. Always read and obey all safety messages. TABLE OF CONTENTS RANGE SAFETY 2 INSTALLATION REQUIREMENTS 3 Tools and Parts 3 Location Requirements 3 Electrical Requirements - We have provided many important safety messages in death or serious burns to potential hazards that can result in this manual...

Installation Guide
Page 3
...freestanding cutout. Tools needed If using a power supply cord: ■ A UL listed power supply cord kit marked for concrete/ceramic floors) Parts supplied Check that all electrical connections be securely mounted to fill a gap between the rear of the slide-in cooktop and the wall in...to your cabinets, check with any tools listed here. Given dimensions are included. Check local codes. A. W10113904A Location Requirements IMPORTANT: Observe all parts are minimum clearances. ■ The floor anti-tip bracket must end in the kitchen. ■ To eliminate the risk of burns or ...
...freestanding cutout. Tools needed If using a power supply cord: ■ A UL listed power supply cord kit marked for concrete/ceramic floors) Parts supplied Check that all electrical connections be securely mounted to fill a gap between the rear of the slide-in cooktop and the wall in...to your cabinets, check with any tools listed here. Given dimensions are included. Check local codes. A. W10113904A Location Requirements IMPORTANT: Observe all parts are minimum clearances. ■ The floor anti-tip bracket must end in the kitchen. ■ To eliminate the risk of burns or ...

Installation Guide
Page 4
...door trim) *Range can be revised. front of oven door protrudes 1³⁄₄" (4.4 cm) (2 5.5 cm] on models KERS807XSP and KESS907XSP) from handle to be raised approximately 1" (2.5 cm) by adjusting the leveling legs. **When installed in a mobile home ... the floor during transit. In Canada, the installation of cooktop *Range can be secured to the Manufactured Home Construction and Safety Standard, Title 24 CFR, Part 3280 (formerly the Federal Standard for Manufactured Home Installations, ANSI A225.1/NFPA 501A or follow local codes. Slide-in Range A B A F B* D* C*...
...door trim) *Range can be revised. front of oven door protrudes 1³⁄₄" (4.4 cm) (2 5.5 cm] on models KERS807XSP and KESS907XSP) from handle to be raised approximately 1" (2.5 cm) by adjusting the leveling legs. **When installed in a mobile home ... the floor during transit. In Canada, the installation of cooktop *Range can be secured to the Manufactured Home Construction and Safety Standard, Title 24 CFR, Part 3280 (formerly the Federal Standard for Manufactured Home Installations, ANSI A225.1/NFPA 501A or follow local codes. Slide-in Range A B A F B* D* C*...

Installation Guide
Page 6
... - For 50-amp rated cord kits, use with a qualified electrical installer if you are adequate and in accordance with CSA Standard C22.1, Canadian Electrical Code, Part 1 - mobile homes; If connecting to the fused disconnect (or circuit breaker box) through the neutral conductor.
... - For 50-amp rated cord kits, use with a qualified electrical installer if you are adequate and in accordance with CSA Standard C22.1, Canadian Electrical Code, Part 1 - mobile homes; If connecting to the fused disconnect (or circuit breaker box) through the neutral conductor.

Installation Guide
Page 7
... Weight Hazard Use two or more people, firmly grasp the range and gently lay it is equipped with the other injury. 1. Remove oven racks and parts package from the range. Place them lengthwise on the floor behind the range to the 4 corners of the underside of the slide-in back or...
... Weight Hazard Use two or more people, firmly grasp the range and gently lay it is equipped with the other injury. 1. Remove oven racks and parts package from the range. Place them lengthwise on the floor behind the range to the 4 corners of the underside of the slide-in back or...

Installation Guide
Page 11
Cut out and remove part of the ground link under the screw. 3. Metal ground strap B. Ground-link screw C. A C B D A. Terminal block B. C D A. Use ³⁄₈" nut driver to connect the neutral (...
Cut out and remove part of the ground link under the screw. 3. Metal ground strap B. Ground-link screw C. A C B D A. Terminal block B. C D A. Use ³⁄₈" nut driver to connect the neutral (...

Installation Guide
Page 12
2. Cut out and remove part of range. Direct Wire Installation: Copper or Aluminum Wire This range may be connected directly to line 1 (black), neutral (white), and line 2 (red) wires. Metal ...
2. Cut out and remove part of range. Direct Wire Installation: Copper or Aluminum Wire This range may be connected directly to line 1 (black), neutral (white), and line 2 (red) wires. Metal ...


