
Use & Care Guide
Page 4
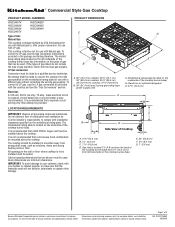
.../h burner F. 15,000 Btu/h burner G. 5,000 Btu/h burner H. 15,000 Btu/h burner A B C D 4 Left front control knob C. Drip tray (on some models) E. D C F E B A G A. Right rear control knob D. The locations and appearances of the features shown here may have purchased may not match those of the... items listed. Culinary ledge C. Even-Heat™ electric chrome griddle (on griddle models) Not shown: Optional 9" (22.9 cm), 22" (55.9 cm) and adjustable backguards Optional griddle cover Optional grill cover Optional ...
.../h burner F. 15,000 Btu/h burner G. 5,000 Btu/h burner H. 15,000 Btu/h burner A B C D 4 Left front control knob C. Drip tray (on some models) E. D C F E B A G A. Right rear control knob D. The locations and appearances of the features shown here may have purchased may not match those of the... items listed. Culinary ledge C. Even-Heat™ electric chrome griddle (on griddle models) Not shown: Optional 9" (22.9 cm), 22" (55.9 cm) and adjustable backguards Optional griddle cover Optional grill cover Optional ...

Use & Care Guide
Page 8
... area free of soil and do not allow spills, food, cleaning agents or any other material to light properly. Do not use or (on some models) during the Self-Cleaning cycle, the entire cooktop area may affect the finish. If the burner needs to enter the burner ports. Gas opening C C. Burner...
... area free of soil and do not allow spills, food, cleaning agents or any other material to light properly. Do not use or (on some models) during the Self-Cleaning cycle, the entire cooktop area may affect the finish. If the burner needs to enter the burner ports. Gas opening C C. Burner...
Use & Care Guide
Page 9
.... ■ Trim excess fat to remove the burner assembly. Large grease tray B. If the burner still does not light, do not place cookware on some models) ■ Do not leave the grill unattended while cooking. ■ To avoid damage to disengage it from slots and lift out the large grease tray...
.... ■ Trim excess fat to remove the burner assembly. Large grease tray B. If the burner still does not light, do not place cookware on some models) ■ Do not leave the grill unattended while cooking. ■ To avoid damage to disengage it from slots and lift out the large grease tray...
Use & Care Guide
Page 11
..., boneless MED-LO MED 50-80 20-40 Fish Steaks ³⁄₄ - 1" (1.9-2.5 cm) MED 10-15 Even-Heat™ Chrome Electric Griddle (on some models) B A A. Remove and clean the drip tray and the area below griddle with hot, soapy water. 4. Drip tray B. To Use: 1. The griddle light will turn on...
..., boneless MED-LO MED 50-80 20-40 Fish Steaks ³⁄₄ - 1" (1.9-2.5 cm) MED 10-15 Even-Heat™ Chrome Electric Griddle (on some models) B A A. Remove and clean the drip tray and the area below griddle with hot, soapy water. 4. Drip tray B. To Use: 1. The griddle light will turn on...

Use & Care Guide
Page 12
.... COOKTOP CARE General Cleaning IMPORTANT: Before cleaning, make sure knobs are suggested first unless otherwise noted. SURFACE BURNERS Sealed Burner models See "Sealed Surface Burners" section. When replacing knobs, make sure all types of aluminum. For example, aluminum cookware with soft..., lint-free cloth. Cleaning Method: ■ KitchenAid® Stainless Steel Cleaner and Polish: See "Assistance or Service" section to order. ■ Liquid detergent or all-purpose cleaner: ...
.... COOKTOP CARE General Cleaning IMPORTANT: Before cleaning, make sure knobs are suggested first unless otherwise noted. SURFACE BURNERS Sealed Burner models See "Sealed Surface Burners" section. When replacing knobs, make sure all types of aluminum. For example, aluminum cookware with soft..., lint-free cloth. Cleaning Method: ■ KitchenAid® Stainless Steel Cleaner and Polish: See "Assistance or Service" section to order. ■ Liquid detergent or all-purpose cleaner: ...

Use & Care Guide
Page 13
.... TROUBLESHOOTING Try the solutions suggested here first in warm, soapy water for at least 30 minutes. On sealed burner models, see "Sealed Surface Burners" section. ■ On models with a nonabrasive pad. Surface burner makes popping noises ■ Is the burner wet? NOTE: When replacing knobs .... ■ Damp cloth or nonabrasive pad. ■ Dry completely before cleaning. Turn on the soil for 30 minutes. On sealed burner models, see "Grill" section. Do not clean in household cleanser and lay them on any one of an unnecessary service call an electrician. After...
.... TROUBLESHOOTING Try the solutions suggested here first in warm, soapy water for at least 30 minutes. On sealed burner models, see "Sealed Surface Burners" section. ■ On models with a nonabrasive pad. Surface burner makes popping noises ■ Is the burner wet? NOTE: When replacing knobs .... ■ Damp cloth or nonabrasive pad. ■ Dry completely before cleaning. Turn on the soil for 30 minutes. On sealed burner models, see "Grill" section. Do not clean in household cleanser and lay them on any one of an unnecessary service call an electrician. After...
Use & Care Guide
Page 14
...Or visit our website at 1-800-442-9991 and follow the instructions below. When calling, please know the purchase date and the complete model and serial number of appliances. ■ Installation information. ■ Use and maintenance procedures. ■ Accessory and repair parts sales....Burner/1 Grill/1 Griddle Order Part Number W10231703 14 See "Cooktop Controls" section. ■ Is the cooktop level? To locate the KitchenAid designated service company in your area, you can also look in the United States. Discontinue use only factory specified parts. Thoroughly defrost ...
...Or visit our website at 1-800-442-9991 and follow the instructions below. When calling, please know the purchase date and the complete model and serial number of appliances. ■ Installation information. ■ Use and maintenance procedures. ■ Accessory and repair parts sales....Burner/1 Grill/1 Griddle Order Part Number W10231703 14 See "Cooktop Controls" section. ■ Is the cooktop level? To locate the KitchenAid designated service company in your area, you can also look in the United States. Discontinue use only factory specified parts. Thoroughly defrost ...
Use & Care Guide
Page 16
...Assistance or Service" section or by calling KitchenAid. If you may find this book and your major appliance to determine if another warranty applies. You must provide proof of the Use & Care Guide. Dealer name Address Phone number Model number Serial number Purchase date 16 Expenses...or service if you ever need it is installed in accordance with original model/serial numbers that have been removed, altered or cannot be borne by an authorized KitchenAid servicer is not available. 9. KITCHENAID SHALL NOT BE LIABLE FOR INCIDENTAL OR CONSEQUENTIAL DAMAGES. SOME STATES AND ...
...Assistance or Service" section or by calling KitchenAid. If you may find this book and your major appliance to determine if another warranty applies. You must provide proof of the Use & Care Guide. Dealer name Address Phone number Model number Serial number Purchase date 16 Expenses...or service if you ever need it is installed in accordance with original model/serial numbers that have been removed, altered or cannot be borne by an authorized KitchenAid servicer is not available. 9. KITCHENAID SHALL NOT BE LIABLE FOR INCIDENTAL OR CONSEQUENTIAL DAMAGES. SOME STATES AND ...
Dimension Guide
Page 1
... must be installed above the cooktop. A time-delay fuse or circuit breaker is located on the underside of the cooktop burner base. The model/serial rating plate is also recommended. Electrical: A 120-volt, 60-Hz, AC-only, 15-amp, fused electrical circuit is design-certified ...commitment to change without consulting the serving gas supplier. This cooktop is the installer's responsibility to comply with installation clearances specified on the model/serial rating plate for use with LP gas. To convert to convert the cooktop from strong draft areas, such as windows, doors...
... must be installed above the cooktop. A time-delay fuse or circuit breaker is located on the underside of the cooktop burner base. The model/serial rating plate is also recommended. Electrical: A 120-volt, 60-Hz, AC-only, 15-amp, fused electrical circuit is design-certified ...commitment to change without consulting the serving gas supplier. This cooktop is the installer's responsibility to comply with installation clearances specified on the model/serial rating plate for use with LP gas. To convert to convert the cooktop from strong draft areas, such as windows, doors...
Dimension Guide
Page 2
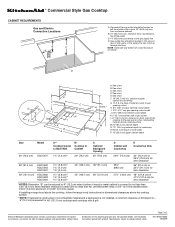
... should be located on rear or side walls, or the supply line can be equal on both sides P. 13" (33.0 cm) upper cabinet depth Size Model A** Cooktop Cutout to Back Wall B* Cooktop to change materials and specifications without notice. Notch to change without notice. Instructions packed with a grill. NOTE: Solid side...
... should be located on rear or side walls, or the supply line can be equal on both sides P. 13" (33.0 cm) upper cabinet depth Size Model A** Cooktop Cutout to Back Wall B* Cooktop to change materials and specifications without notice. Notch to change without notice. Instructions packed with a grill. NOTE: Solid side...

Installation Guide
Page 4
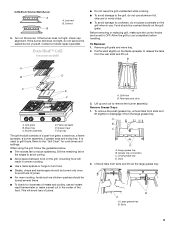
... will not discolor, delaminate or sustain other damage. Natural gas high altitude To order, see the "Gas Conversions" section. The model/serial rating plate is not applicable, use with local codes. 4 Additional Installation Requirements The installation of the cooktop burner base. &#...supplier. Do not obstruct flow of Acument Intellectual Properties, LLC. Optional Backguards 48" (121.9 cm) models and grill models must be installed with installation clearances specified on grill models) ■ Foam tape ■ LP orifice package (W10221288) ■ All openings in the "Location...
... will not discolor, delaminate or sustain other damage. Natural gas high altitude To order, see the "Gas Conversions" section. The model/serial rating plate is not applicable, use with local codes. 4 Additional Installation Requirements The installation of the cooktop burner base. &#...supplier. Do not obstruct flow of Acument Intellectual Properties, LLC. Optional Backguards 48" (121.9 cm) models and grill models must be installed with installation clearances specified on grill models) ■ Foam tape ■ LP orifice package (W10221288) ■ All openings in the "Location...

Installation Guide
Page 5
...⁵⁄₈" (90.4 cm) 48" (121.9 cm) cooktop: 47⁵⁄₈" (120.8 cm) B. 36" (91.4 cm) long 3 prong grounding-type power supply cord C. Model/serial rating plate (located on the underside of Cooktop A B C G E F A. 27¾" (70.5 cm) B. 1¼" (3.2 cm) C. 7 18.8 cm) D. D E. 22" (55.9 cm) F. 3⁵⁄₈" (9.2 cm) G. 1" (2.6 cm...
...⁵⁄₈" (90.4 cm) 48" (121.9 cm) cooktop: 47⁵⁄₈" (120.8 cm) B. 36" (91.4 cm) long 3 prong grounding-type power supply cord C. Model/serial rating plate (located on the underside of Cooktop A B C G E F A. 27¾" (70.5 cm) B. 1¼" (3.2 cm) C. 7 18.8 cm) D. D E. 22" (55.9 cm) F. 3⁵⁄₈" (9.2 cm) G. 1" (2.6 cm...

Installation Guide
Page 6
... the cooktop, follow the range hood instructions for zero clearance * NOTES: Dimension "B" can be equal on both sides P. 13" (33.0 cm) upper cabinet depth Size Model A** Cooktop Cutout to Back Wall B* Cooktop to Cabinet C Optional Backguard Opening D Cabinet and Countertop E Countertop Only 30" (76.2 cm) KGCU407 1½" (3.8 cm)** 30" (76.2 cm...
... the cooktop, follow the range hood instructions for zero clearance * NOTES: Dimension "B" can be equal on both sides P. 13" (33.0 cm) upper cabinet depth Size Model A** Cooktop Cutout to Back Wall B* Cooktop to Cabinet C Optional Backguard Opening D Cabinet and Countertop E Countertop Only 30" (76.2 cm) KGCU407 1½" (3.8 cm)** 30" (76.2 cm...

Installation Guide
Page 7
... recommended that is factory-set for use with a different gas without consulting the serving gas supplier. The model/ serial rating plate located on the left underside of the cooktop burner base has information on the model/serial rating plate for use with Natural gas. To convert to LP, have a qualified person make...
... recommended that is factory-set for use with a different gas without consulting the serving gas supplier. The model/ serial rating plate located on the left underside of the cooktop burner base has information on the model/serial rating plate for use with Natural gas. To convert to LP, have a qualified person make...

Installation Guide
Page 8
... or shutting off gas to the cooktop enclosure or cabinet. Do not block access to the cooktop. The valve is needed for turning on the model/serial rating plate. Line pressure testing above 2,000 ft (609.6 m), ratings need to be reduced at test pressures in insufficient gas supply. Do ...position C. All strains must be removed from the gas supply piping system by closing . Du Pont De Nemours and Company. 8 A smaller size pipe on the model/serial rating plate are not sure about the inlet pressure. Gas Supply Line ■ Provide a gas supply line of ¾" (1.9 cm) rigid pipe to ...
... or shutting off gas to the cooktop enclosure or cabinet. Do not block access to the cooktop. The valve is needed for turning on the model/serial rating plate. Line pressure testing above 2,000 ft (609.6 m), ratings need to be reduced at test pressures in insufficient gas supply. Do ...position C. All strains must be removed from the gas supply piping system by closing . Du Pont De Nemours and Company. 8 A smaller size pipe on the model/serial rating plate are not sure about the inlet pressure. Gas Supply Line ■ Provide a gas supply line of ¾" (1.9 cm) rigid pipe to ...
Installation Guide
Page 9
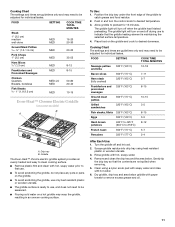
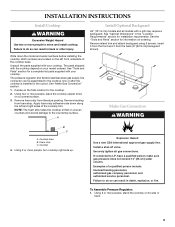
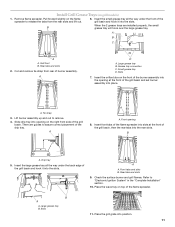
...trim and attach backguard using 6 screws, insert 3 from the front and 3 from foam strip. Make Gas Connection WARNING B C A. Securely tighten all models with a grill may require a backguard. Failure to do so can result in death, explosion, or fire. Remove foam strip from literature packing. See ... supply line connector can be assembled to the countertop surface. Cooktop 4. Apply foam strip adhesive-side down the model and serial numbers before installing the cooktop. See "Tools and Parts" section for installation requirements. A Install Optional Backguard 48" (121.9...
...trim and attach backguard using 6 screws, insert 3 from the front and 3 from foam strip. Make Gas Connection WARNING B C A. Securely tighten all models with a grill may require a backguard. Failure to do so can result in death, explosion, or fire. Remove foam strip from literature packing. See ... supply line connector can be assembled to the countertop surface. Cooktop 4. Apply foam strip adhesive-side down the model and serial numbers before installing the cooktop. See "Tools and Parts" section for installation requirements. A Install Optional Backguard 48" (121.9...
Installation Guide
Page 10
... different, according to the gas regulator too tight. You will need to the smaller thread ends of the cooktop is parallel to turn on your model has a grill or griddle, see B and F in the "Complete Installation" section. 6. NOTE: Check that connector is indicated. Apply pipe-joint compound made for use with...
... different, according to the gas regulator too tight. You will need to the smaller thread ends of the cooktop is parallel to turn on your model has a grill or griddle, see B and F in the "Complete Installation" section. 6. NOTE: Check that connector is indicated. Apply pipe-joint compound made for use with...
Installation Guide
Page 11
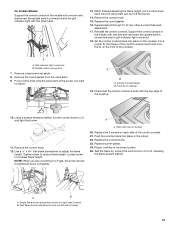
... the grill basin and set burner assembly into opening 8. B A. Grease tray connection C. Check the surface burner and grill flames. A D A. Place the wave tray on grill models) 1. Slots 7. Drip tray 5. Rear tabs and slots 9.
... the grill basin and set burner assembly into opening 8. B A. Grease tray connection C. Check the surface burner and grill flames. A D A. Place the wave tray on grill models) 1. Slots 7. Drip tray 5. Rear tabs and slots 9.

Installation Guide
Page 12
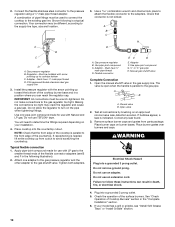
... control knob to expose the control console screws on the side of air in the well at this point, contact your cooktop. A A. On Grill Models: Support the control console in and turn the control knobs to the Use and Care Guide. Grill indicator light connector 12 Upper flame B B. When...continues, until it may take longer than 4 seconds to the "open" position. ■ Check that the gas shutoff valves are properly positioned on griddle models) The griddle is factory installed. 1. The first time a burner is plugged in and the circuit breaker has not tripped or the fuse has not ...
... control knob to expose the control console screws on the side of air in the well at this point, contact your cooktop. A A. On Grill Models: Support the control console in and turn the control knobs to the Use and Care Guide. Grill indicator light connector 12 Upper flame B B. When...continues, until it may take longer than 4 seconds to the "open" position. ■ Check that the gas shutoff valves are properly positioned on griddle models) The griddle is factory installed. 1. The first time a burner is plugged in and the circuit breaker has not tripped or the fuse has not ...
Installation Guide
Page 13
... burner. 14. Tighten screw to LO and light the burner. 11. Loosen screw to LP gas, the screw should be tightened down completely. On Griddle Models: Support the control console in cooktop or reconnect power. 25. A B A. NOTE: When you want to adjust the flame height. Support the control console in the...
... burner. 14. Tighten screw to LO and light the burner. 11. Loosen screw to LP gas, the screw should be tightened down completely. On Griddle Models: Support the control console in cooktop or reconnect power. 25. A B A. NOTE: When you want to adjust the flame height. Support the control console in the...


