
Specification Sheet
Page 1
... KHBC300 SERIES IMMERSION BLENDER MOTOR NSF COMMERCIAL CERTIFIED MAX BLEND VOLUME 350 Watts DC Motor Yes KHBC308OB - 3 gallons / 11.4 liters KHBC310OB - 6 gallons / 22.7 liters KHBC312OB - 9 gallons / 38.0 liters BLEND SPEEDS BLENDING ARM BLADE DESIGN HANDLING SAFETY WALL MOUNT WARRANTY Speed 1: 11,000 RPM Speed 2: 18,000 RPM Stainless steel Removable Dishwasher-safe Multi-purpose "S"-blade, fixed bell Soft-grip handle for one-handed operation Primary power switch Included 2-Year Hassle Free KHBC312OB
... KHBC300 SERIES IMMERSION BLENDER MOTOR NSF COMMERCIAL CERTIFIED MAX BLEND VOLUME 350 Watts DC Motor Yes KHBC308OB - 3 gallons / 11.4 liters KHBC310OB - 6 gallons / 22.7 liters KHBC312OB - 9 gallons / 38.0 liters BLEND SPEEDS BLENDING ARM BLADE DESIGN HANDLING SAFETY WALL MOUNT WARRANTY Speed 1: 11,000 RPM Speed 2: 18,000 RPM Stainless steel Removable Dishwasher-safe Multi-purpose "S"-blade, fixed bell Soft-grip handle for one-handed operation Primary power switch Included 2-Year Hassle Free KHBC312OB

Specification Sheet
Page 2
....com for complete warranty details. ®/™ ©2017 KitchenAidCommercial.com. Commercial KHBC300 Series IMMERSION BLENDER Wall Mount, Hand Blender, & Blending Arm Included Sold Separately INDIVIDUAL UNIT MODELS MODEL # KHBC308OB KHBC310OB KHBC312OB MODEL # KHBC10WER KHBC08MER KHBC10MER KHBC12MER KHBC312OB KHBC10WER KHBC12MER, KHBC10MER, KHBCO8MER IMMERSION BLENDERS 8" Immersion Blender 10" Immersion Blender 12" Immersion Blender ACCESSORIES 10" Whisk Attachment 8" Blending Arm Only 10" Blending Arm Only 12" Blending Arm Only UPC 883049 43480 3 883049...
....com for complete warranty details. ®/™ ©2017 KitchenAidCommercial.com. Commercial KHBC300 Series IMMERSION BLENDER Wall Mount, Hand Blender, & Blending Arm Included Sold Separately INDIVIDUAL UNIT MODELS MODEL # KHBC308OB KHBC310OB KHBC312OB MODEL # KHBC10WER KHBC08MER KHBC10MER KHBC12MER KHBC312OB KHBC10WER KHBC12MER, KHBC10MER, KHBCO8MER IMMERSION BLENDERS 8" Immersion Blender 10" Immersion Blender 12" Immersion Blender ACCESSORIES 10" Whisk Attachment 8" Blending Arm Only 10" Blending Arm Only 12" Blending Arm Only UPC 883049 43480 3 883049...
Use and Care Guide
Page 2
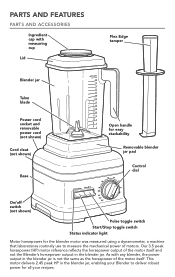
... cup Lid Blender jar Talon blade Power cord socket and removable power cord (not shown) Cord cleat (not shown) Base Flex Edge tamper Open handle for easy stackability Removable blender jar pad Control dial On/off switch (not shown) Pulse toggle switch Start/Stop toggle switch Status indicator light Motor horsepower for the blender motor was measured using a dynamometer, a machine that laboratories routinely use to deliver robust power for all your recipes. PARTS AND FEATURES PARTS AND ACCESSORIES Ingredient cap...
... cup Lid Blender jar Talon blade Power cord socket and removable power cord (not shown) Cord cleat (not shown) Base Flex Edge tamper Open handle for easy stackability Removable blender jar pad Control dial On/off switch (not shown) Pulse toggle switch Start/Stop toggle switch Status indicator light Motor horsepower for the blender motor was measured using a dynamometer, a machine that laboratories routinely use to deliver robust power for all your recipes. PARTS AND FEATURES PARTS AND ACCESSORIES Ingredient cap...

Use and Care Guide
Page 3
ENGLISH COMMERCIAL BLENDER SAFETY IMPORTANT SAFEGUARDS When using electrical appliances, basic safety precautions should always be replaced by or near children. 4. Read all instructions. 2. If the supply cord or plug is damaged, it must be followed, including the following: 1. Do not use , before putting on or taking off parts, and before cleaning. 5. Return appliance to the nearest Authorized Service Center for...
ENGLISH COMMERCIAL BLENDER SAFETY IMPORTANT SAFEGUARDS When using electrical appliances, basic safety precautions should always be replaced by or near children. 4. Read all instructions. 2. If the supply cord or plug is damaged, it must be followed, including the following: 1. Do not use , before putting on or taking off parts, and before cleaning. 5. Return appliance to the nearest Authorized Service Center for...

Use and Care Guide
Page 4
... speed and slowly ramp to the Blender. Blades are sharp. Do not use appliance for commercial use. ELECTRICAL REQUIREMENTS Voltage: 120 V Frequency: 60 HZ Amps: 15.0 A NOTE: If the plug does not fit in place over the lid opening. If the power supply cord is designed for other than intended use of attachments, including canning blender jars, not recommended by KitchenAid may be used, but must be used...
... speed and slowly ramp to the Blender. Blades are sharp. Do not use appliance for commercial use. ELECTRICAL REQUIREMENTS Voltage: 120 V Frequency: 60 HZ Amps: 15.0 A NOTE: If the plug does not fit in place over the lid opening. If the power supply cord is designed for other than intended use of attachments, including canning blender jars, not recommended by KitchenAid may be used, but must be used...

Use and Care Guide
Page 5
... to full power to clean the blender jar with just 2 cups of water and a drop of power momentarily. When High speed is selected the Blender will run continuously on medium until the Start/stop switch is pressed, N/A or after 6 minutes elapse. Alternatively, use Pulse during manual operation to customize your blending for such drinks as ice, whole fruits or vegetables, or frozen fruits. USING THE COMMERCIAL BLENDER | 5 It also...
... to full power to clean the blender jar with just 2 cups of water and a drop of power momentarily. When High speed is selected the Blender will run continuously on medium until the Start/stop switch is pressed, N/A or after 6 minutes elapse. Alternatively, use Pulse during manual operation to customize your blending for such drinks as ice, whole fruits or vegetables, or frozen fruits. USING THE COMMERCIAL BLENDER | 5 It also...
Use and Care Guide
Page 6
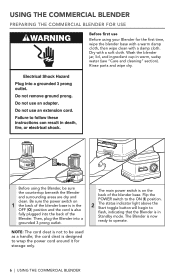
... of the blender base. Be sure the power switch on the back of the blender base is in warm, sudsy water (see "Care and cleaning" section). The Blender is designed to operate. 6 | USING THE COMMERCIAL BLENDER Before using your Blender for storage only. USING THE COMMERCIAL BLENDER PREPARING THE COMMERCIAL BLENDER FOR USE Before first use Before using the Blender, be used as a handle; the cord cleat is now ready to wrap the power cord around it...
... of the blender base. Be sure the power switch on the back of the blender base is in warm, sudsy water (see "Care and cleaning" section). The Blender is designed to operate. 6 | USING THE COMMERCIAL BLENDER Before using your Blender for storage only. USING THE COMMERCIAL BLENDER PREPARING THE COMMERCIAL BLENDER FOR USE Before first use Before using the Blender, be used as a handle; the cord cleat is now ready to wrap the power cord around it...

Use and Care Guide
Page 7
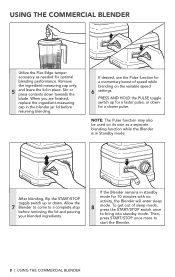
... be solid. ENGLISH USING THE COMMERCIAL BLENDER ASSEMBLING AND RUNNING THE COMMERCIAL BLENDER Put the items to begin operation. NOTE: Do not fill blender jar past the top-most measurement mark, especially when blending liquids. Flip the START/STOP toggle switch 3 up or down to blend into the 1 blender jar. USING THE COMMERCIAL BLENDER | 7 The status indicator light will need to flip the START/ STOP toggle to your desired 4 speed, time, or...
... be solid. ENGLISH USING THE COMMERCIAL BLENDER ASSEMBLING AND RUNNING THE COMMERCIAL BLENDER Put the items to begin operation. NOTE: Do not fill blender jar past the top-most measurement mark, especially when blending liquids. Flip the START/STOP toggle switch 3 up or down to blend into the 1 blender jar. USING THE COMMERCIAL BLENDER | 7 The status indicator light will need to flip the START/ STOP toggle to your desired 4 speed, time, or...
Use and Care Guide
Page 8
... the blade. Remove the ingredient-measuring cap only, 5 and leave the lid in standby mode for a slower pulse. If desired, use the Pulse function for optimal blending performance. To get out of speed while blending on its own as needed for a momentary boost of sleep mode, press the START/STOP switch once to start the Blender. 8 | USING THE COMMERCIAL BLENDER If the Blender remains in place. USING THE COMMERCIAL BLENDER...
... the blade. Remove the ingredient-measuring cap only, 5 and leave the lid in standby mode for a slower pulse. If desired, use the Pulse function for optimal blending performance. To get out of speed while blending on its own as needed for a momentary boost of sleep mode, press the START/STOP switch once to start the Blender. 8 | USING THE COMMERCIAL BLENDER If the Blender remains in place. USING THE COMMERCIAL BLENDER...

Use and Care Guide
Page 9
... a soft cloth. CARE AND CLEANING | 9 Fill the blender 2 jar with 2 cups of warm water and 1 drop of liquid detergent. Place the lid on the blender base. To avoid scratching the Blender, do not immerse the blender base or cord in place on the blender jar, and make sure the blender jar is fully in water. Remove any remaining contents from the blender jar. ENGLISH CARE AND CLEANING CLEANING THE BLENDER AND ACCESSORIES Clean the Blender thoroughly after...
... a soft cloth. CARE AND CLEANING | 9 Fill the blender 2 jar with 2 cups of warm water and 1 drop of liquid detergent. Place the lid on the blender base. To avoid scratching the Blender, do not immerse the blender base or cord in place on the blender jar, and make sure the blender jar is fully in water. Remove any remaining contents from the blender jar. ENGLISH CARE AND CLEANING CLEANING THE BLENDER AND ACCESSORIES Clean the Blender thoroughly after...

Use and Care Guide
Page 10
... blender base. 3. Prepare a 200 ppm sodium hypochlorite solution* using 1.75 L of hot water. 10 | CARE AND CLEANING Turn off the Blender and let the sanitizing mix sit in the blender jar for 35 seconds. CARE AND CLEANING Rotate the control dial to start the Blender. 4. Flip the START/STOP toggle switch 3 up or down . Wash the blender jar, jar pad, lid, Flex Edge tamper, and ingredient cap by 4 hand...
... blender base. 3. Prepare a 200 ppm sodium hypochlorite solution* using 1.75 L of hot water. 10 | CARE AND CLEANING Turn off the Blender and let the sanitizing mix sit in the blender jar for 35 seconds. CARE AND CLEANING Rotate the control dial to start the Blender. 4. Flip the START/STOP toggle switch 3 up or down . Wash the blender jar, jar pad, lid, Flex Edge tamper, and ingredient cap by 4 hand...

Use and Care Guide
Page 11
... service" section. If the ingredients of a recipe aren't blending: • There may be caused by: using a spatula or any other utensil that locks up the blade. • Correct the problem by pulling it is possible there is created around the blade causing the ingredients to rearrange ingredients in error mode. Stop the Blender, remove the blender jar from the base, and clear the items. Place the Blender...
... service" section. If the ingredients of a recipe aren't blending: • There may be caused by: using a spatula or any other utensil that locks up the blade. • Correct the problem by pulling it is possible there is created around the blade causing the ingredients to rearrange ingredients in error mode. Stop the Blender, remove the blender jar from the base, and clear the items. Place the Blender...

Use and Care Guide
Page 12
OR The replacement parts and repair labor costs to cosmetic issues. KitchenAid Will Not Pay for service. See the KitchenAid Commercial Blender Warranty for Puerto Rico for details on how to arrange for Commercial Blenders operated in materials and workmanship. Replacement parts or repair labor costs for Your Choice of: Hassle-Free Replacement of Columbia. LIMITATION OF REMEDIES IMPLIED WARRANTIES, INCLUDING TO THE EXTENT APPLICABLE WARRANTIES OF MERCHANTABILITY OR FITNESS FOR A PARTICULAR PURPOSE, ARE...
OR The replacement parts and repair labor costs to cosmetic issues. KitchenAid Will Not Pay for service. See the KitchenAid Commercial Blender Warranty for Puerto Rico for details on how to arrange for Commercial Blenders operated in materials and workmanship. Replacement parts or repair labor costs for Your Choice of: Hassle-Free Replacement of Columbia. LIMITATION OF REMEDIES IMPLIED WARRANTIES, INCLUDING TO THE EXTENT APPLICABLE WARRANTIES OF MERCHANTABILITY OR FITNESS FOR A PARTICULAR PURPOSE, ARE...

Use and Care Guide
Page 13
... covered by our three year limited warranty. to the purchaser and any succeeding owner for Commercial Blender Bases operated in this quality service. During the warranty period, all service must be returned to you are unable to the nearest Authorized Service Center. If your name and complete shipping address along with an identical or comparable replacement. Or write to an Authorized KitchenAid Service Centre. Box numbers...
... covered by our three year limited warranty. to the purchaser and any succeeding owner for Commercial Blender Bases operated in this quality service. During the warranty period, all service must be returned to you are unable to the nearest Authorized Service Center. If your name and complete shipping address along with an identical or comparable replacement. Or write to an Authorized KitchenAid Service Centre. Box numbers...

Use and Care Guide
Page 14
Your replacement unit will also be covered by our one year warranty extends to receive this manner call our toll-free Customer eXperience Center at 1-855-845-9684 Monday through Friday, 8 a.m. Please follow these instructions to the purchaser and any succeeding owner for Commercial Blender Jars operated in this quality service. MEXICO AND LATIN AMERICA For Mexico and Latin America: For more information...
Your replacement unit will also be covered by our one year warranty extends to receive this manner call our toll-free Customer eXperience Center at 1-855-845-9684 Monday through Friday, 8 a.m. Please follow these instructions to the purchaser and any succeeding owner for Commercial Blender Jars operated in this quality service. MEXICO AND LATIN AMERICA For Mexico and Latin America: For more information...
Use and Care Guide
Page 15
ENGLISH WARRANTY AND SERVICE ARRANGING FOR SERVICE AFTER THE WARRANTY EXPIRES, OR ORDERING ACCESSORIES AND REPLACEMENT PARTS In the United States and Puerto Rico: For service information, or to order accessories or replacement parts, call toll-free at 1-855-845-9684 or write to obtain service. Box 218, St. KitchenAid and the design of the Stand Mixer are trademarks in Canada: Call toll-free 1-800-807-6777. Joseph...
ENGLISH WARRANTY AND SERVICE ARRANGING FOR SERVICE AFTER THE WARRANTY EXPIRES, OR ORDERING ACCESSORIES AND REPLACEMENT PARTS In the United States and Puerto Rico: For service information, or to order accessories or replacement parts, call toll-free at 1-855-845-9684 or write to obtain service. Box 218, St. KitchenAid and the design of the Stand Mixer are trademarks in Canada: Call toll-free 1-800-807-6777. Joseph...


