
Owners Manual
Page 2
Also available as an optional accessory. **The Bowl design and material depend on the Stand Mixer model. ***Can also be used to scrape your Bowl. 2 PARTS AND FEATURES 5 6 4 7 3 8 9 2 1 10 11 12 13 14 15 16 1 Bowl Clamping Plate 2 Beater Height Adjustment Screw (not shown) 3 Speed Control Lever 4 Motor Head 5 Attachment Hub 6 Attachment Knob 7 Motor Head (locking lever not shown) 8 Beater Shaft 9 Bowl** 10 Pouring Shield* 11 2.8 L Stainless Steel Bowl* 12 Flat Beater* 13 Flex Edge Beater* 14 Wire Whip 15 Dough Hook 16 Pastry Beater* and Scraper*** * *Included with select ...
Also available as an optional accessory. **The Bowl design and material depend on the Stand Mixer model. ***Can also be used to scrape your Bowl. 2 PARTS AND FEATURES 5 6 4 7 3 8 9 2 1 10 11 12 13 14 15 16 1 Bowl Clamping Plate 2 Beater Height Adjustment Screw (not shown) 3 Speed Control Lever 4 Motor Head 5 Attachment Hub 6 Attachment Knob 7 Motor Head (locking lever not shown) 8 Beater Shaft 9 Bowl** 10 Pouring Shield* 11 2.8 L Stainless Steel Bowl* 12 Flat Beater* 13 Flex Edge Beater* 14 Wire Whip 15 Dough Hook 16 Pastry Beater* and Scraper*** * *Included with select ...

Owners Manual
Page 3
... not put Stand Mixer in use, before assembling or disassembling parts, and before cleaning. Do not operate any manner. Read all instructions. 2. Never pull from the outlet. The use by persons (including children) with a damaged cord or plug, or after the appliance malfunctions, or is used by or near children. Turn the appliance OFF/0, then unplug from beater during operation to the Stand Mixer. 6. Avoid contacting...
... not put Stand Mixer in use, before assembling or disassembling parts, and before cleaning. Do not operate any manner. Read all instructions. 2. Never pull from the outlet. The use by persons (including children) with a damaged cord or plug, or after the appliance malfunctions, or is used by or near children. Turn the appliance OFF/0, then unplug from beater during operation to the Stand Mixer. 6. Avoid contacting...

Owners Manual
Page 4
... select models only. If the power supply cord is designed for your Stand Mixer is based on the serial plate. GETTING STARTED ACCESSORY GUIDE ACCESSORY USE TO MIX SUGGESTED ITEMS Flat Beater* Flex Edge Beater* Pastry Beater* Wire Whip Dough Hook Normal to heavy mixtures Cut butter into flour Mixtures that draws the greatest load (power). Do not use only. Eggs, egg whites, heavy cream, boiled frostings, sponge cakes, mayonnaise, some candies. Remove the Beaters, Pastry Beater, Wire Whip, or Dough Hook from the Stand Mixer...
... select models only. If the power supply cord is designed for your Stand Mixer is based on the serial plate. GETTING STARTED ACCESSORY GUIDE ACCESSORY USE TO MIX SUGGESTED ITEMS Flat Beater* Flex Edge Beater* Pastry Beater* Wire Whip Dough Hook Normal to heavy mixtures Cut butter into flour Mixtures that draws the greatest load (power). Do not use only. Eggs, egg whites, heavy cream, boiled frostings, sponge cakes, mayonnaise, some candies. Remove the Beaters, Pastry Beater, Wire Whip, or Dough Hook from the Stand Mixer...
Owners Manual
Page 5
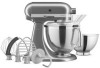
..., cake mixes. Then, lock** the head to keep it across the settings in either direction. Mash fruits and vegetables. For medium-fast beating (creaming), Flat Beater* or whipping. PRODUCT ASSEMBLY 1 2 Turn the Stand Mixer "OFF/0" and then Unplug. ENGLISH SPEED CONTROL GUIDE Note: The Speed Control Lever can be set to egg whites for meringues. High speed for cake mixes. Wire Whip For adding sugar to obtain speeds 1, 3, 5, 7, and 9 if a finer adjustment is available on select models. 5 Use to combine sugar and shortening. CREAMING...
..., cake mixes. Then, lock** the head to keep it across the settings in either direction. Mash fruits and vegetables. For medium-fast beating (creaming), Flat Beater* or whipping. PRODUCT ASSEMBLY 1 2 Turn the Stand Mixer "OFF/0" and then Unplug. ENGLISH SPEED CONTROL GUIDE Note: The Speed Control Lever can be set to egg whites for meringues. High speed for cake mixes. Wire Whip For adding sugar to obtain speeds 1, 3, 5, 7, and 9 if a finer adjustment is available on select models. 5 Use to combine sugar and shortening. CREAMING...

Owners Manual
Page 6
... Motor Head. (OPTIONAL) To adjust Beater to Bowl Clearance: Tilt and lock** the Motor Head back. Press lightly so that the Motor Head covers the u-shaped gap in place. 5 Slide and rotate the accessory, aligning over the pin on the shaft. Then, lock** the head to keep it . Also available as you over-adjust the screw, the Bowl Lock Lever may not lock into place. (OPTIONAL) Place the Pouring Shield***: From the front of the Stand Mixer...
... Motor Head. (OPTIONAL) To adjust Beater to Bowl Clearance: Tilt and lock** the Motor Head back. Press lightly so that the Motor Head covers the u-shaped gap in place. 5 Slide and rotate the accessory, aligning over the pin on the shaft. Then, lock** the head to keep it . Also available as you over-adjust the screw, the Bowl Lock Lever may not lock into place. (OPTIONAL) Place the Pouring Shield***: From the front of the Stand Mixer...
Owners Manual
Page 7
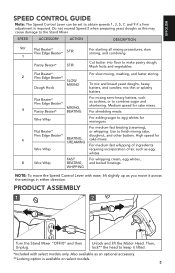
ENGLISH PRODUCT USAGE 1 Plug it into the Bowl* through the Pouring Chute. *The Bowl design and material depend on the Stand Mixer model. 7 Scraping the Bowl* once or twice during mixing is usually sufficient. (OPTIONAL): Pour ingredients into a grounded 3 prong outlet. Start with lower speed to the "Speed Control Guide". 2 Do not scrape the Bowl* while operating. Refer to avoid splashing, and increase speed gradually.
ENGLISH PRODUCT USAGE 1 Plug it into the Bowl* through the Pouring Chute. *The Bowl design and material depend on the Stand Mixer model. 7 Scraping the Bowl* once or twice during mixing is usually sufficient. (OPTIONAL): Pour ingredients into a grounded 3 prong outlet. Start with lower speed to the "Speed Control Guide". 2 Do not scrape the Bowl* while operating. Refer to avoid splashing, and increase speed gradually.

Owners Manual
Page 8
..., Pasta Cutters, or Food Grinder that may be attached to the Stand Mixer attachment power hub as an optional accessory. ***The Bowl design and material depend on select models. **Included with select models only. Then, lock* the head to unlock the Bowl*** from the Beater Shaft. Unlock and lift the Motor Head. OPTIONAL ATTACHMENTS KitchenAid offers a wide range of the Bowl***. Also available as shown here. 1 2 Turn the Stand Mixer "OFF/0" and then Unplug. PRODUCT DISASSEMBLY 1 Turn the Stand Mixer "OFF...
..., Pasta Cutters, or Food Grinder that may be attached to the Stand Mixer attachment power hub as an optional accessory. ***The Bowl design and material depend on select models. **Included with select models only. Then, lock* the head to unlock the Bowl*** from the Beater Shaft. Unlock and lift the Motor Head. OPTIONAL ATTACHMENTS KitchenAid offers a wide range of the Bowl***. Also available as shown here. 1 2 Turn the Stand Mixer "OFF/0" and then Unplug. PRODUCT DISASSEMBLY 1 Turn the Stand Mixer "OFF...
Owners Manual
Page 9
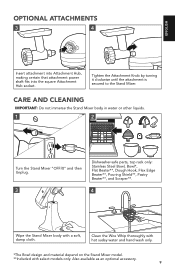
... attachment power shaft fits into the square Attachment Hub socket. Clean the Wire Whip thoroughly with hot sudsy water and hand wash only. *The Bowl design and material depend on the Stand Mixer model. **Included with a soft, damp cloth. CARE AND CLEANING IMPORTANT: Do not immerse the Stand Mixer body in water or other liquids. 1 2 Turn the Stand Mixer "OFF/0" and then Unplug. 3 Dishwasher-safe parts, top rack only: Stainless Steel Bowl, Bowl*, Flat Beater**, Dough Hook, Flex Edge Beater**, Pouring Shield...
... attachment power shaft fits into the square Attachment Hub socket. Clean the Wire Whip thoroughly with hot sudsy water and hand wash only. *The Bowl design and material depend on the Stand Mixer model. **Included with a soft, damp cloth. CARE AND CLEANING IMPORTANT: Do not immerse the Stand Mixer body in water or other liquids. 1 2 Turn the Stand Mixer "OFF/0" and then Unplug. 3 Dishwasher-safe parts, top rack only: Stainless Steel Bowl, Bowl*, Flat Beater**, Dough Hook, Flex Edge Beater**, Pouring Shield...
Owners Manual
Page 10
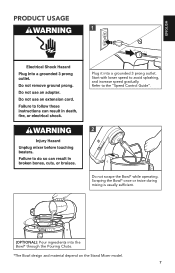
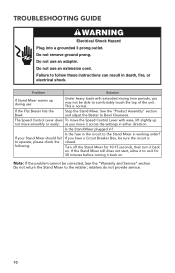
... service. 10 TROUBLESHOOTING GUIDE WARNING Electrical Shock Hazard Plug into a grounded 3 prong outlet. Do not use an extension cord. Failure to comfortably touch the top of the unit. Turn off the Stand Mixer for 30 minutes before turning it back on . Problem Solution If Stand Mixer warms up not move smoothly or easily: as you move the Speed Control Lever with ease, lift slightly up during use: Under heavy...
... service. 10 TROUBLESHOOTING GUIDE WARNING Electrical Shock Hazard Plug into a grounded 3 prong outlet. Do not use an extension cord. Failure to comfortably touch the top of the unit. Turn off the Stand Mixer for 30 minutes before turning it back on . Problem Solution If Stand Mixer warms up not move smoothly or easily: as you move the Speed Control Lever with ease, lift slightly up during use: Under heavy...
Owners Manual
Page 11
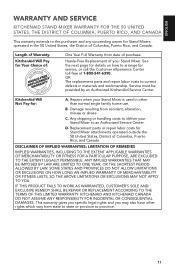
... TO WORK AS WARRANTED, CUSTOMER'S SOLE AND EXCLUSIVE REMEDY SHALL BE REPAIR OR REPLACEMENT ACCORDING TO THE TERMS OF THIS LIMITED WARRANTY. Hassle-Free Replacement of : One Year Full Warranty from accident, alteration, misuse or abuse. Any shipping or handling costs to deliver your Stand Mixer. Replacement parts or repair labor costs for Stand Mixer attachments operated outside the 50 United States, District of Columbia, Puerto Rico, and Canada. KITCHENAID AND KITCHENAID...
... TO WORK AS WARRANTED, CUSTOMER'S SOLE AND EXCLUSIVE REMEDY SHALL BE REPAIR OR REPLACEMENT ACCORDING TO THE TERMS OF THIS LIMITED WARRANTY. Hassle-Free Replacement of : One Year Full Warranty from accident, alteration, misuse or abuse. Any shipping or handling costs to deliver your Stand Mixer. Replacement parts or repair labor costs for Stand Mixer attachments operated outside the 50 United States, District of Columbia, Puerto Rico, and Canada. KITCHENAID AND KITCHENAID...

Owners Manual
Page 12
... will replace your Stand Mixer with an identical or comparable replacement. If your Stand Mixer should fail within the first year of ownership, simply call our toll-free Customer eXperience Center at 1-800-541-6390 Monday through Friday. For service information in the U.S. and elsewhere. Proof of purchase will be required to KitchenAid. ARRANGING FOR SERVICE AFTER THE WARRANTY EXPIRES, OR ORDERING ACCESSORIES AND REPLACEMENT PARTS...
... will replace your Stand Mixer with an identical or comparable replacement. If your Stand Mixer should fail within the first year of ownership, simply call our toll-free Customer eXperience Center at 1-800-541-6390 Monday through Friday. For service information in the U.S. and elsewhere. Proof of purchase will be required to KitchenAid. ARRANGING FOR SERVICE AFTER THE WARRANTY EXPIRES, OR ORDERING ACCESSORIES AND REPLACEMENT PARTS...


